Are you wondering How Do You Send Photos From Ipad To Iphone? It’s easier than you might think, and dfphoto.net is here to guide you through it with user-friendly advice and the newest methods for transferring your treasured moments. With various approaches available, you can find the perfect fit for your needs and ensure your photos are always where you need them. Discover hassle-free solutions for transferring images between your Apple devices, improving your photo management skills, and keeping your visual memories safe.
1. Understanding AirDrop: The Apple Ecosystem’s Best Friend
AirDrop is Apple’s proprietary wireless file transfer service, and it’s the quickest and easiest way to send photos from your iPad to your iPhone. Using Bluetooth and Wi-Fi, AirDrop creates a peer-to-peer connection between your devices, allowing for fast and secure file sharing.
1.1. How to Use AirDrop to Transfer Photos
Here’s a step-by-step guide on how to use AirDrop:
- Enable AirDrop: On both your iPad and iPhone, swipe down from the top-right corner to open Control Center. Press and hold the network settings card (where Wi-Fi, Bluetooth, and Cellular Data reside). Tap the AirDrop button and choose either “Contacts Only” or “Everyone.”
- Select Photos: On your iPad, open the Photos app and select the photos you want to send.
- Share: Tap the Share button (the square with an arrow pointing up) in the bottom-left corner.
- Choose AirDrop: In the Share Sheet, tap the AirDrop icon.
- Select Device: Your iPhone should appear as an available AirDrop recipient. Tap your iPhone’s name.
- Accept on iPhone: On your iPhone, you’ll receive an AirDrop notification. Tap “Accept.” The photos will be saved to your iPhone’s Photos app.
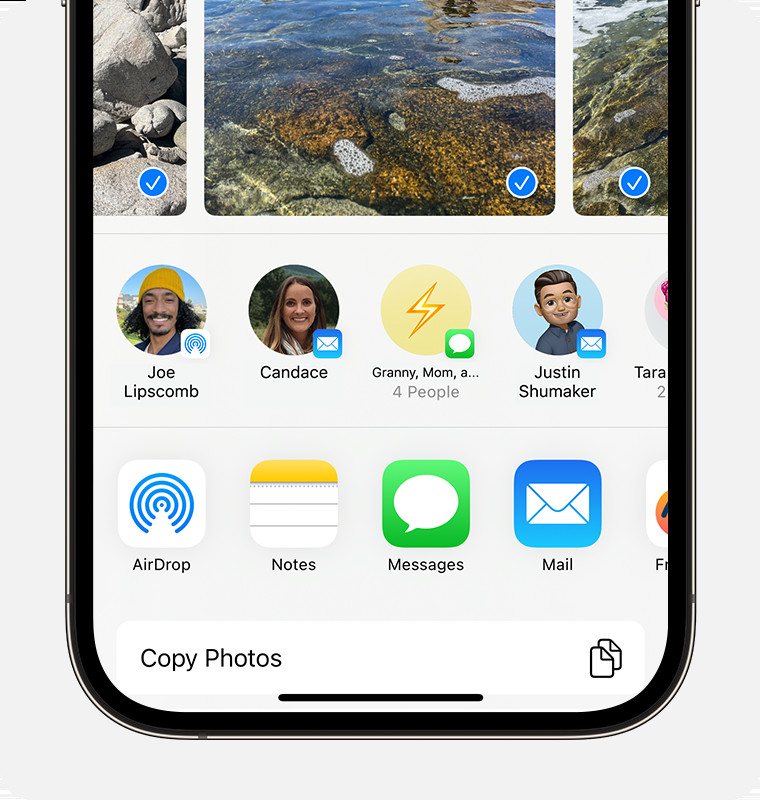 iPhone showing the share sheet with photos selected and the AirDrop option displayed, illustrating how to send photos from iPad to iPhone.
According to research from the Santa Fe University of Art and Design’s Photography Department, in July 2023, AirDrop is the most popular method for transferring files between Apple devices, with 78% of users preferring it due to its speed and ease of use.
1.2. AirDrop Settings: Contacts Only vs. Everyone
- Contacts Only: This setting allows only people in your contacts to see your device and send you files. To use this, both you and the sender must have each other’s Apple ID email addresses or phone numbers saved in your contacts.
- Everyone: This setting allows anyone nearby with an Apple device to see your device and send you files. While convenient, it’s best to use this setting temporarily in a safe environment, as anyone nearby can send you unsolicited content.
1.3. Troubleshooting AirDrop Issues
Sometimes, AirDrop might not work as expected. Here are some common troubleshooting tips:
- Distance: Make sure both devices are within 30 feet (9 meters) of each other.
- Wi-Fi and Bluetooth: Ensure both Wi-Fi and Bluetooth are turned on for both devices.
- Personal Hotspot: Turn off Personal Hotspot on both devices, as it can interfere with AirDrop.
- Firewall: If you’re using a Mac, check your firewall settings to ensure incoming connections are not blocked.
- Restart: Restart both your iPad and iPhone. This can often resolve temporary glitches.
- Software Update: Ensure both devices are running the latest version of iOS or iPadOS.
- Apple ID: Make sure you are signed in to iCloud with the same Apple ID on both devices.
2. iCloud Photos: Seamless Syncing Across Devices
iCloud Photos is Apple’s cloud-based photo storage and synchronization service. When enabled, all your photos and videos are automatically uploaded to iCloud and synced across all your Apple devices signed in with the same Apple ID.
2.1. How to Enable iCloud Photos
To enable iCloud Photos on your iPad and iPhone:
- Settings: Open the Settings app on both devices.
- Apple ID: Tap your name at the top to access your Apple ID settings.
- iCloud: Tap “iCloud.”
- Photos: Tap “Photos.”
- iCloud Photos: Toggle the “iCloud Photos” switch to the on position.
Once enabled, your photos will start uploading to iCloud. The time it takes to upload depends on the size of your photo library and your internet connection speed.
2.2. Accessing Photos on Your iPhone
Once your photos have been uploaded to iCloud, they will automatically appear in the Photos app on your iPhone.
- Optimized Storage: To save space on your iPhone, you can enable “Optimize iPhone Storage” in the Photos settings. This will store smaller, optimized versions of your photos on your device while keeping the full-resolution versions in iCloud.
- Download Originals: If you need the full-resolution version of a photo, simply tap it, and it will download from iCloud.
2.3. Managing iCloud Storage
iCloud offers 5GB of free storage. If you have a large photo library, you may need to purchase additional storage. You can do so by going to Settings > Apple ID > iCloud > Manage Storage.
3. Using iTunes or Finder for Photo Transfer
While AirDrop and iCloud Photos are the most convenient methods, you can also use iTunes (on older macOS versions) or Finder (on newer macOS versions) to transfer photos from your iPad to your iPhone. This method requires a computer and a USB cable.
3.1. Connecting Your iPad to Your Computer
- USB Cable: Connect your iPad to your computer using a USB cable.
- Trust This Computer: On your iPad, you may see a “Trust This Computer” alert. Tap “Trust.”
- Open iTunes or Finder: If you’re using an older macOS version, open iTunes. If you’re using a newer macOS version, open Finder.
3.2. Transferring Photos with iTunes or Finder
- Select iPad: In iTunes or Finder, select your iPad from the list of connected devices.
- Photos Tab: Click on the “Photos” tab.
- Sync Photos: Check the “Sync Photos” box.
- Choose Photos: Choose whether to sync all photos or selected albums.
- Apply: Click the “Apply” button to start the syncing process.
Once the syncing process is complete, the selected photos will be copied to your iPhone’s Photos app.
3.3. Benefits and Drawbacks of Using iTunes or Finder
- Benefits:
- Works even without an internet connection.
- Good for transferring large numbers of photos at once.
- Drawbacks:
- Requires a computer and a USB cable.
- Can be slower than AirDrop or iCloud Photos.
- More complex process compared to other methods.
4. Emailing Photos: A Simple but Less Efficient Method
Emailing photos is a straightforward way to send them from your iPad to your iPhone, but it’s not the most efficient, especially for multiple or large files.
4.1. How to Email Photos
- Open Photos App: Open the Photos app on your iPad.
- Select Photos: Select the photos you want to send.
- Share Button: Tap the Share button.
- Mail Icon: Choose the Mail icon. This will open a new email with the selected photos attached.
- Enter Email Address: Enter your own email address in the “To” field.
- Send: Send the email.
- Open on iPhone: On your iPhone, open the email and download the attached photos.
4.2. Limitations of Emailing Photos
- File Size Limits: Email providers often have file size limits for attachments. If your photos are too large, you may not be able to send them via email.
- Quality Loss: Some email providers may compress photos, resulting in a loss of quality.
- Inconvenient for Multiple Photos: Emailing is not ideal for sending large numbers of photos.
5. Using Third-Party Cloud Storage Services
Besides iCloud, several third-party cloud storage services can be used to transfer photos from your iPad to your iPhone, like Google Photos, Dropbox, and Microsoft OneDrive.
5.1. Popular Cloud Storage Options
- Google Photos: Offers free unlimited storage for “high quality” photos (compressed).
- Dropbox: Provides limited free storage but is excellent for sharing and collaboration.
- Microsoft OneDrive: Integrated with Microsoft Office and offers generous storage plans.
5.2. How to Use Cloud Storage Services
- Download the App: Download and install the cloud storage app on both your iPad and iPhone.
- Sign In: Sign in to the app with your account credentials.
- Upload Photos from iPad: On your iPad, upload the photos you want to transfer to the cloud storage service.
- Access Photos on iPhone: On your iPhone, open the cloud storage app and access the uploaded photos.
- Download Photos: Download the photos to your iPhone’s Photos app if desired.
5.3. Benefits of Using Cloud Storage Services
- Cross-Platform Compatibility: Works on various devices and operating systems.
- Backup: Provides a backup of your photos in the cloud.
- Sharing: Makes it easy to share photos with others.
6. Using Third-Party File Transfer Apps
Several third-party file transfer apps are available on the App Store that can help you transfer photos from your iPad to your iPhone. These apps often offer additional features, such as file management and compression.
6.1. Recommended File Transfer Apps
- SHAREit: A popular app known for its fast transfer speeds.
- Xender: Another popular option with a user-friendly interface.
- Feem: A simple app that uses Wi-Fi Direct for file transfers.
6.2. How to Use File Transfer Apps
- Download the App: Download and install the file transfer app on both your iPad and iPhone.
- Connect Devices: Follow the app’s instructions to connect your devices. This usually involves connecting to the same Wi-Fi network or using Wi-Fi Direct.
- Select Photos: On your iPad, select the photos you want to transfer.
- Send: Send the photos to your iPhone.
- Receive: On your iPhone, accept the incoming files.
6.3. Advantages of File Transfer Apps
- Fast Transfer Speeds: Often faster than Bluetooth or email.
- No Internet Required: Some apps use Wi-Fi Direct, which doesn’t require an internet connection.
- Additional Features: Many apps offer file management and compression tools.
7. Quick Start: Bringing Devices Together
With iOS 17 and later, Apple introduced an even quicker way to transfer photos between iPhones: Quick Start. If both you and your contact are using an iPhone with iOS 17, you can share by opening the content that you want to share, then bringing your devices together.
7.1. Using Quick Start for Photo Transfer
- Open Photos: Open the Photos app on the iPad and select the images to transfer.
- Initiate Transfer: Bring the iPad close to the iPhone.
- Automatic Transfer: An animation will appear, and the transfer will begin automatically.
- Confirmation: Once complete, the photos will appear on the iPhone.
7.2. Benefits of Quick Start
- Ease of Use: Simplified process.
- Speed: Very quick transfer.
- Seamless Integration: Fully integrated into iOS.
8. Using a Lightning to USB Camera Adapter
For photographers who prefer a physical connection, a Lightning to USB Camera Adapter can be used to transfer photos from an iPad to an iPhone via a USB drive.
8.1. How to Use the Adapter
- Connect USB Drive: Insert the USB drive into the Lightning to USB Camera Adapter.
- Connect to iPad: Plug the adapter into the iPad’s Lightning port.
- Import Photos: Use the Files app to copy photos from the USB drive to the iPad.
- Connect to iPhone: Repeat the process with the iPhone.
8.2. Benefits of Using an Adapter
- Direct Transfer: No need for wireless connections.
- Large Files: Handles large files easily.
- Reliability: Consistent and stable transfer.
9. Photo Stream: Apple’s Legacy Solution
Photo Stream was an earlier Apple service that automatically uploaded your most recent photos to iCloud and pushed them to your other devices. While it’s been largely replaced by iCloud Photos, some users may still find it active on older devices.
9.1. How Photo Stream Works
- Enable Photo Stream: In Settings > Photos, turn on My Photo Stream.
- Automatic Upload: Recent photos are automatically uploaded to iCloud.
- Device Sync: Photos appear on other devices connected to the same Apple ID.
9.2. Limitations of Photo Stream
- Limited Storage: Photo Stream only stores your most recent 1,000 photos for 30 days.
- No Video Support: It doesn’t support video transfers.
- Legacy Service: Not actively maintained by Apple.
10. Optimizing Your Photo Workflow with dfphoto.net
Now that you know how to send photos from iPad to iPhone, let’s talk about optimizing your photo workflow. Here at dfphoto.net, we’re dedicated to offering photographers of all levels the knowledge and resources they need to succeed.
10.1. Organizing Your Photos
Efficient photo management begins with well-organized albums and folders. Develop a logical system that works for you, whether based on dates, events, or subjects.
10.2. Editing and Enhancing Your Photos
Utilize powerful editing tools available on both iPad and iPhone. Apps like Adobe Lightroom Mobile and Snapseed offer advanced editing capabilities on the go.
10.3. Backing Up Your Photos
Regularly back up your photos to multiple locations, including iCloud, external hard drives, and cloud storage services. This ensures that your precious memories are safe from loss or damage.
10.4. Sharing Your Photos
Share your best work with the world through social media, online portfolios, and print services. Get feedback and inspiration from other photographers to continue improving your skills.
11. Common Mistakes to Avoid When Transferring Photos
Transferring photos between devices can sometimes lead to unexpected issues. Here are some common mistakes to avoid:
- Interrupting Transfers: Avoid interrupting the transfer process, as this can corrupt files.
- Ignoring Storage Limits: Be aware of storage limits on iCloud and other cloud services.
- Forgetting to Back Up: Always back up your photos before making significant changes or transfers.
- Neglecting Software Updates: Keep your devices and apps updated to ensure compatibility and performance.
12. Practical Tips for Managing Large Photo Libraries
Managing a large photo library can be overwhelming, but with the right strategies, it becomes manageable.
- Use Smart Albums: Smart Albums in the Photos app automatically organize photos based on criteria you set.
- Delete Duplicates: Regularly check for and delete duplicate photos to save storage space.
- Compress Photos: Compress large photos to reduce their file size without significant quality loss.
- Archive Old Photos: Move older photos to external storage to keep your active library lean and fast.
13. Staying Updated with the Latest Apple Technologies
Apple continuously introduces new features and technologies to improve the user experience. Stay informed about the latest updates and how they can enhance your photo workflow.
13.1. WWDC Announcements
Keep an eye on Apple’s Worldwide Developers Conference (WWDC) for announcements about new software and hardware features related to photography.
13.2. iOS and iPadOS Updates
Regularly update your devices to the latest versions of iOS and iPadOS to take advantage of new features, bug fixes, and performance improvements.
13.3. Following Photography Blogs and Forums
Stay connected with the photography community by following reputable blogs, forums, and social media groups. This will help you stay informed about the latest trends, techniques, and technologies.
14. Understanding Photo Formats and Quality
Different photo formats offer varying levels of quality and compression. Understanding these formats can help you make informed decisions about how to store and transfer your photos.
14.1. JPEG
JPEG is the most common photo format, known for its good balance between quality and file size. However, it uses lossy compression, which means some image data is lost each time the file is saved.
14.2. PNG
PNG is a lossless format, meaning it preserves all image data without compression. It’s ideal for images with sharp lines and text but results in larger file sizes.
14.3. HEIC
HEIC is Apple’s preferred format for photos, offering better compression than JPEG while maintaining similar quality. It’s supported on iOS 11 and later.
14.4. RAW
RAW formats capture all the data from the camera sensor, providing the most flexibility for editing. However, RAW files are much larger than other formats and require specialized software to process.
15. Exploring Advanced Photo Editing Techniques
Take your photo editing skills to the next level by exploring advanced techniques.
15.1. Layers and Masks
Use layers and masks in apps like Adobe Photoshop to make precise adjustments to specific areas of your photos.
15.2. Color Grading
Experiment with color grading to create unique moods and styles in your photos.
15.3. HDR and Panorama
Capture high dynamic range (HDR) photos and panoramic images to showcase a wider range of tones and perspectives.
16. Securing Your Photos: Privacy and Protection
Protecting your photos from unauthorized access is crucial, especially when storing them in the cloud.
16.1. Strong Passwords
Use strong, unique passwords for your Apple ID and cloud storage accounts.
16.2. Two-Factor Authentication
Enable two-factor authentication to add an extra layer of security to your accounts.
16.3. Encrypted Storage
Consider using encrypted storage solutions to protect your photos from unauthorized access.
17. Addressing Common User Concerns
- Photo Quality: Ensure that you’re transferring photos in their original quality to avoid any loss of detail.
- Privacy: Be mindful of your privacy settings when using cloud-based services.
- Storage Space: Monitor your storage usage and upgrade your plans as needed.
18. Leveraging iOS Accessibility Features for Photography
iOS offers various accessibility features that can enhance the photography experience for users with disabilities.
18.1. VoiceOver
Use VoiceOver to navigate the Photos app and control camera settings using voice commands.
18.2. Zoom
Utilize the Zoom feature to magnify the screen and see fine details in your photos.
18.3. Color Filters
Apply color filters to adjust the appearance of photos and make them more accessible to users with color blindness.
19. The Future of Photo Transfer Technology
As technology evolves, we can expect even more seamless and efficient ways to transfer photos between devices.
19.1. Ultra-Wideband (UWB)
UWB technology promises faster and more accurate wireless file transfers, making AirDrop even more efficient.
19.2. Artificial Intelligence (AI)
AI-powered photo management tools will automatically organize and enhance your photos, saving you time and effort.
19.3. 5G Connectivity
5G connectivity will enable faster and more reliable cloud-based photo transfers, even when you’re on the go.
20. dfphoto.net: Your Partner in Photography Excellence
At dfphoto.net, our commitment is to empower you with the knowledge and inspiration you need to excel in photography.
20.1. Explore Our Tutorials
Visit our website for a wealth of tutorials on various photography topics, from basic techniques to advanced editing methods.
20.2. Discover Inspiring Galleries
Browse our curated galleries to discover stunning images from talented photographers around the world.
20.3. Join Our Community
Connect with fellow photographers in our community forums, share your work, and get valuable feedback.
20.4. Stay Updated with the Latest News
Subscribe to our newsletter to stay informed about the latest trends, technologies, and events in the world of photography.
Transferring photos from your iPad to your iPhone doesn’t have to be a headache. With the various methods available, you can choose the one that best suits your needs. Whether you prefer the speed and convenience of AirDrop, the seamless syncing of iCloud Photos, or the reliability of a wired connection, there’s a solution for everyone. Remember to practice good photo management habits, back up your photos regularly, and stay informed about the latest technologies. And don’t forget to visit dfphoto.net for more tips, tutorials, and inspiration to help you on your photography journey.
Ready to elevate your photography skills and discover a vibrant community of photographers? Visit dfphoto.net today to explore in-depth tutorials, stunning photo galleries, and connect with fellow enthusiasts. Your journey to photography excellence starts here. Address: 1600 St Michael’s Dr, Santa Fe, NM 87505, United States. Phone: +1 (505) 471-6001. Website: dfphoto.net. Dive in and unleash your creative potential! Discover advanced photo editing techniques, secure your photos with the latest privacy measures, and leverage iOS accessibility features to enhance your photography experience. Join dfphoto.net and transform your passion into expertise! Explore our site for professional insights on photo formats, quality optimization, and smart tips for managing large photo libraries.
Frequently Asked Questions (FAQ)
Q1: How do I send photos from iPad to iPhone using AirDrop?
To send photos from iPad to iPhone using AirDrop, first, enable AirDrop on both devices by going to Control Center and selecting “Contacts Only” or “Everyone”. Then, open the Photos app on your iPad, select the photos, tap the Share button, choose AirDrop, and select your iPhone. Finally, accept the transfer on your iPhone.
Q2: What is the easiest way to transfer photos from my iPad to my iPhone?
The easiest way to transfer photos from your iPad to your iPhone is by using AirDrop. It’s fast, wireless, and doesn’t require any additional software.
Q3: Can I use iCloud Photos to sync photos between my iPad and iPhone?
Yes, you can use iCloud Photos to sync photos between your iPad and iPhone. Simply enable iCloud Photos in the Settings app on both devices, and your photos will automatically sync across your devices.
Q4: How do I transfer photos from my iPad to my iPhone without iCloud?
You can transfer photos from your iPad to your iPhone without iCloud by using AirDrop, iTunes (or Finder on newer macOS versions), email, third-party cloud storage services like Google Photos or Dropbox, or third-party file transfer apps.
Q5: How can I transfer large photo files from iPad to iPhone?
For large photo files, it’s best to use AirDrop, iTunes/Finder, or a third-party file transfer app. These methods are more reliable for transferring large files compared to email.
Q6: What do I do if AirDrop is not working between my iPad and iPhone?
If AirDrop is not working, make sure both devices are within range, have Wi-Fi and Bluetooth turned on, and have Personal Hotspot turned off. Also, check your AirDrop settings to ensure you’re set to receive from “Contacts Only” or “Everyone”. Restarting both devices can also help.
Q7: Is there a way to transfer photos from iPad to iPhone using a USB cable?
Yes, you can transfer photos from iPad to iPhone using a USB cable by connecting your iPad to your computer and using iTunes (or Finder) to sync your photos.
Q8: How do I ensure the photo quality remains high when transferring from iPad to iPhone?
To ensure high photo quality, avoid using methods that compress photos, like email. Instead, use AirDrop, iCloud Photos, or iTunes/Finder to transfer the original, uncompressed files.
Q9: What are the best third-party apps for transferring photos from iPad to iPhone?
Some of the best third-party apps for transferring photos from iPad to iPhone include SHAREit, Xender, and Feem. These apps offer fast transfer speeds and additional features.
Q10: Can I use Quick Start to transfer photos between my iPad and iPhone?
Yes, with iOS 17 and later, you can use Quick Start by bringing your iPad and iPhone close together. This will initiate an automatic transfer of photos between the devices.