Sending photos as JPEG attachments allows for easy saving and viewing. At dfphoto.net, we understand the importance of sharing your visual art seamlessly. This comprehensive guide will help you master sending photos as JPEG attachments, ensuring your photography reaches its audience effectively, optimizing image sharing, and enhancing your image transfer skills.
1. What Is The Easiest Way To Send A Photo As A JPEG?
The easiest way to send a photo as a JPEG is typically through email. Simply compose a new email, attach the photo file, and send. Most email services will automatically handle the photo as a JPEG attachment, providing easy access and broad compatibility for the recipient.
Expanding on the Process:
- Email Clients: Whether you’re using Gmail, Outlook, Yahoo Mail, or another email provider, the process remains largely the same. Look for the “Attach” button or paperclip icon when composing your email.
- Mobile Devices: Smartphones and tablets offer similar functionality. When composing an email, you can usually select the option to attach a file directly from your photo library.
- Drag and Drop: On some desktop email clients, you can simply drag and drop the JPEG file into the email body to attach it.
2. Why Is My Photo Showing Up In The Body Of The Email Instead Of As An Attachment?
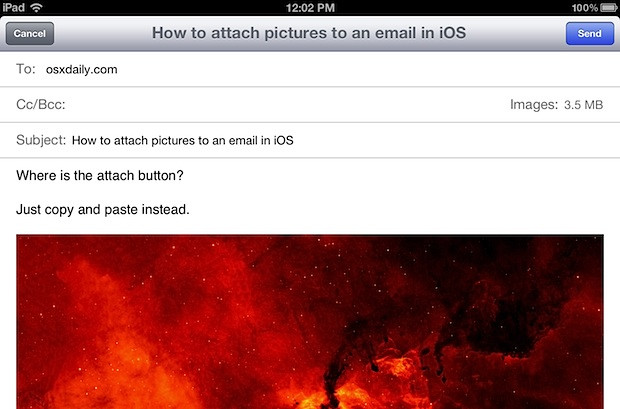
Sometimes, email clients embed images directly into the email body rather than sending them as attachments. This often happens when the email client is set to display images inline or when the image is copied and pasted into the email body. To ensure your photo is sent as a JPEG attachment, always use the “Attach” option in your email client.
Troubleshooting Tips:
- Check Email Settings: Some email clients have settings that control how images are displayed. Look for options related to “inline images” or “display attachments as images” and adjust them accordingly.
- Use the “Attach” Button: Always use the dedicated “Attach” button or paperclip icon to add the photo to your email. This ensures it is treated as an attachment rather than an embedded image.
- Avoid Copying and Pasting: Copying and pasting images into the email body will almost always result in them being embedded.
- Test with Different Clients: If you’re still having trouble, try sending the email to yourself using a different email client to see if the issue persists.
 A close-up of an email interface with the "Attach" button highlighted, demonstrating how to properly attach a JPEG file.
3. How Can I Resize A JPEG Photo Before Sending It As An Attachment?
Resizing a JPEG photo before sending it can be helpful, especially when dealing with large image files. Smaller files are easier to send, download, and view, particularly on mobile devices or slower internet connections. You can resize a JPEG using various image editing software, online tools, or even built-in features on your operating system.
Methods for Resizing:
- Image Editing Software: Programs like Adobe Photoshop, GIMP (free), and others offer precise control over image resizing. Open the image, go to the “Image” menu, and select “Resize” or “Image Size.” Enter the desired dimensions and save the resized image.
- Online Tools: Numerous websites allow you to resize images online without installing any software. Simply upload your image, specify the new dimensions or percentage, and download the resized version. Examples include ResizePixel, PicResize, and iLoveIMG.
- Built-In Operating System Features:
- Windows: Right-click on the image file, select “Open with,” and choose “Paint.” In Paint, click “Resize” and adjust the dimensions or percentage.
- macOS: Open the image in “Preview,” go to “Tools,” and select “Adjust Size.” Enter the desired dimensions and save the resized image.
- Mobile Apps: Many mobile photo editing apps, such as Adobe Lightroom Mobile, Snapseed, and others, allow you to resize images directly on your smartphone or tablet.
Considerations When Resizing:
- Maintain Aspect Ratio: Make sure to maintain the aspect ratio to avoid distorting the image. Most resizing tools have an option to lock the aspect ratio.
- Choose Appropriate Dimensions: Consider the intended use of the image when choosing the new dimensions. For example, if you’re sending it for online viewing, a width of 1200-1600 pixels may be sufficient.
- File Size Limits: Be mindful of any file size limits imposed by your email provider or the recipient’s email system.
4. What Are The Best Practices For Sending High-Resolution JPEGs?
Sending high-resolution JPEGs is essential when you want to preserve image quality, especially for professional use or printing purposes. However, high-resolution images can result in large file sizes, which may be problematic for sending via email.
Strategies for Sending High-Resolution JPEGs:
- File Compression: Before sending, compress the JPEG file using a ZIP archive. This can slightly reduce the file size without significant loss of quality.
- Cloud Storage Services: Use cloud storage services like Google Drive, Dropbox, or WeTransfer to upload the high-resolution JPEG and share a download link with the recipient. These services often allow you to send files much larger than email attachment limits.
- Dedicated File Transfer Services: Services like WeTransfer are specifically designed for sending large files. They are easy to use and often free for basic use.
- Check Email Provider Limits: Be aware of the file size limits imposed by your email provider. Some providers have stricter limits than others.
- Inform the Recipient: Let the recipient know that you are sending a high-resolution file and that it may take some time to download, especially if they have a slower internet connection.
Alt text: Uploading a high-resolution JPEG to Google Drive for easy sharing.
5. How Do Different Email Clients Handle JPEG Attachments?
Different email clients handle JPEG attachments in slightly different ways. Some may display the image within the email body by default, while others will always show it as a separate attachment. Understanding these differences can help you ensure your photos are received as intended.
Email Client Behaviors:
- Gmail: Gmail typically displays images inline if they are below a certain size threshold. Larger images are shown as attachments.
- Outlook: Outlook generally displays images as attachments, but the recipient can choose to view them inline.
- Yahoo Mail: Yahoo Mail’s behavior is similar to Gmail, displaying smaller images inline and larger ones as attachments.
- Apple Mail: Apple Mail tends to display images inline, but recipients can still save them as separate files.
Tips for Consistent Delivery:
- Zipping Files: Zipping the JPEG file before sending it will almost always ensure it is delivered as an attachment, regardless of the email client.
- Clear Instructions: Provide clear instructions to the recipient on how to save the image if it is displayed inline.
- Test Emails: Send test emails to different email clients to see how they handle the JPEG attachment.
6. Is It Better To Send A Photo As A JPEG Or Another Format?
The choice between sending a photo as a JPEG or another format depends on the intended use and the importance of image quality. JPEG is a widely compatible format that offers good compression, making it suitable for most everyday uses. However, other formats like PNG or TIFF may be better for specific situations.
JPEG (JPG):
- Pros: Excellent compression, small file size, widely compatible.
- Cons: Lossy compression (some image quality is lost each time the file is saved), not ideal for editing and re-saving multiple times.
- Best For: General photo sharing, web use, situations where file size is a concern.
PNG:
- Pros: Lossless compression (no image quality is lost), good for images with text or graphics, supports transparency.
- Cons: Larger file size than JPEG, not as widely supported.
- Best For: Images with text, logos, graphics, images that need to be edited multiple times without quality loss.
TIFF:
- Pros: Lossless compression, highest image quality, ideal for archiving and professional printing.
- Cons: Very large file size, not suitable for web use or general sharing.
- Best For: Archiving important images, professional printing, situations where maximum image quality is required.
Other Formats:
- GIF: Animated images, simple graphics.
- HEIF/HEIC: High Efficiency Image File Format (used by Apple devices), offers better compression than JPEG with similar quality, but not as widely compatible.
Recommendation:
For most photo sharing scenarios, JPEG is a good choice due to its balance of image quality and file size. However, if you need to preserve maximum image quality or are working with images that contain text or graphics, consider using PNG or TIFF.
7. How Do I Ensure The JPEG Retains Its Quality When Sending It?
Ensuring a JPEG retains its quality when sending it involves several steps, from initial creation to the final sending process. JPEGs use lossy compression, which means some image data is discarded to reduce file size. Minimizing this loss is crucial for maintaining quality.
Steps to Preserve JPEG Quality:
- Start with a High-Quality Source: Begin with the highest quality version of the image possible. If you’re editing the image, start with the original file and avoid re-saving it as a JPEG multiple times.
- Use Appropriate Compression Settings: When saving as a JPEG, most image editing software allows you to adjust the compression level. Choose a higher quality setting (lower compression) to preserve more detail. A setting of 80-90% is generally a good balance between quality and file size.
- Avoid Excessive Editing: Each time you edit and re-save a JPEG, you introduce additional compression artifacts. Minimize the amount of editing you do and try to perform all necessary edits in one session.
- Resize Appropriately: If you need to resize the image, do it carefully. Downsizing can reduce file size, but it can also lead to loss of detail. Use a high-quality resizing algorithm and avoid making the image too small.
- Use Lossless Editing When Possible: For certain types of edits, such as adjusting brightness or contrast, use lossless editing techniques or software that minimizes quality loss.
- Send the Original File: Whenever possible, send the original JPEG file directly without making any further modifications.
- Consider Alternative Formats: If image quality is paramount, consider using a lossless format like PNG or TIFF, especially for images that will be edited or printed.
- Avoid Email Compression: Some email providers automatically compress attachments to reduce file sizes. This can further degrade image quality. To avoid this, zip the JPEG file before sending it.
Alt text: Choosing a high-quality JPEG compression setting in Adobe Photoshop.
8. What Are The File Size Limits For JPEG Attachments In Different Email Services?
Understanding the file size limits for JPEG attachments in different email services is crucial for ensuring your photos are successfully delivered. Exceeding these limits can result in undelivered emails or attachments being stripped from the message.
Common Email Service Limits:
| Email Service | File Size Limit |
|---|---|
| Gmail | 25MB |
| Outlook | 20MB |
| Yahoo Mail | 25MB |
| Apple Mail | 20MB |
| ProtonMail | 25MB |
Tips for Managing File Sizes:
- Resize Images: Reduce the dimensions of the JPEG file to decrease its size.
- Compress Images: Use image compression tools to reduce the file size without significantly sacrificing quality.
- Zip Files: Compress the JPEG file into a ZIP archive to reduce its size and ensure it is delivered as an attachment.
- Use Cloud Storage: Upload the JPEG to a cloud storage service and share a download link with the recipient.
- Split Large Files: If you have multiple large JPEGs to send, split them into separate emails to stay within the file size limits.
- Check Recipient’s Limits: If you know the recipient is using a specific email service, check its file size limits to ensure your attachment will be accepted.
9. How Can I Compress A JPEG File To Make It Smaller For Emailing?
Compressing a JPEG file is an effective way to reduce its size, making it easier to send via email. There are various methods and tools available for compressing JPEGs, ranging from built-in operating system features to online compression services.
Methods for Compressing JPEGs:
- Image Editing Software:
- Adobe Photoshop: Open the JPEG in Photoshop, go to “File,” select “Save for Web (Legacy),” and adjust the quality settings to reduce the file size.
- GIMP: Open the JPEG in GIMP, go to “File,” select “Export As,” choose JPEG as the file type, and adjust the quality settings.
- Online Compression Tools:
- TinyJPG: A popular online tool that uses smart lossy compression techniques to reduce JPEG file sizes by 40-70% while maintaining good image quality.
- CompressJPEG: Another online tool that allows you to compress JPEG files by adjusting the quality settings.
- iLoveIMG: A comprehensive online image editing tool that includes a JPEG compression feature.
- Built-In Operating System Features:
- Windows: Right-click on the JPEG file, select “Send to,” and choose “Compressed (zipped) folder.” This will create a ZIP archive of the JPEG file.
- macOS: Right-click on the JPEG file, select “Compress,” and this will create a ZIP archive of the JPEG file.
- Mobile Apps: Many mobile photo editing apps also offer JPEG compression features.
Tips for Effective Compression:
- Preview Compression Results: Most compression tools allow you to preview the results of the compression before saving the file. Use this feature to find the right balance between file size and image quality.
- Use Lossy Compression Wisely: Lossy compression methods can significantly reduce file size, but they also result in some loss of image quality. Use these methods sparingly and choose quality settings that minimize the impact on the image.
- Consider Lossless Compression: If image quality is paramount, consider using lossless compression techniques or formats like PNG, although these may not reduce file size as much as lossy methods.
- Test Compressed Files: After compressing a JPEG file, open it and inspect it carefully to ensure the image quality is acceptable.
Alt text: Compressing a JPEG file using the TinyJPG online tool.
10. How Do I Send A JPEG Photo As An Attachment From My iPhone Or Android Device?
Sending a JPEG photo as an attachment from your iPhone or Android device is a straightforward process, thanks to the built-in email and photo management features of these devices.
Steps for iPhone:
- Open the Photos App: Locate the JPEG photo you want to send in the Photos app.
- Select the Photo: Tap on the photo to open it.
- Tap the Share Icon: Tap the share icon (a square with an arrow pointing upwards) in the bottom left corner of the screen.
- Choose Mail: Scroll through the share options and select “Mail.” This will open a new email message with the photo attached.
- Compose and Send: Enter the recipient’s email address, add a subject, and compose your message. Tap the send button to send the email with the JPEG photo as an attachment.
Steps for Android:
- Open the Photos App: Locate the JPEG photo you want to send in the Photos app (e.g., Google Photos or Gallery).
- Select the Photo: Tap on the photo to open it.
- Tap the Share Icon: Tap the share icon (usually three dots connected by lines) at the bottom of the screen.
- Choose Gmail or Email: Select “Gmail” or your preferred email app from the share options. This will open a new email message with the photo attached.
- Compose and Send: Enter the recipient’s email address, add a subject, and compose your message. Tap the send button to send the email with the JPEG photo as an attachment.
Additional Tips:
- Resize if Necessary: Before sending, you may want to resize the photo to reduce its file size, especially if you’re sending it over a mobile network. Many photo editing apps allow you to resize images directly on your device.
- Check Attachment Size: Be mindful of the file size limits imposed by your email provider. If the photo is too large, consider using a cloud storage service or compressing the file.
- Use Third-Party Apps: Alternatively, you can use third-party apps like Dropbox, Google Drive, or WeTransfer to send the photo as a link rather than an attachment.
Alt text: Sharing a JPEG photo from an iPhone via the Mail app.
11. How Do Watermarks Affect Sending Photos as JPEGs?
Watermarks play a crucial role in protecting your intellectual property when sharing photos, especially in the digital age. Understanding how watermarks interact with JPEG compression and sending methods is essential for photographers and artists.
What are Watermarks?
Watermarks are semi-transparent overlays on photos that typically display the photographer’s name, logo, or copyright information. They serve as a visual deterrent against unauthorized use and provide attribution.
Impact on JPEG Compression:
- Quality Loss: Applying a watermark and then saving the image as a JPEG can lead to additional compression artifacts, especially around the edges of the watermark.
- Visibility: Ensure the watermark is subtle enough not to detract from the image’s aesthetic but visible enough to deter theft.
Best Practices for Watermarking JPEGs:
- Use a Non-Destructive Approach: If possible, use a watermarking method that doesn’t permanently alter the original image file. Some software allows you to add watermarks on export or during the sharing process.
- Optimize Watermark Design: Keep the watermark design clean and minimal. Avoid using overly complex graphics or text that can become blurry or distorted during compression.
- Position the Watermark Strategically: Place the watermark in a location that is difficult to remove without damaging the image but doesn’t obscure important details.
- Adjust Opacity: Use a low opacity for the watermark so it blends seamlessly with the image.
- Save at High Quality: When saving the watermarked image as a JPEG, use a high-quality setting to minimize compression artifacts.
- Consider Embedding Metadata: In addition to watermarks, embed metadata such as copyright information and contact details into the JPEG file.
Sending Watermarked JPEGs:
- Email: Watermarked JPEGs can be sent via email as attachments, just like any other JPEG file.
- Cloud Storage: Watermarked JPEGs can be uploaded to cloud storage services and shared with others.
- Social Media: When sharing watermarked JPEGs on social media, be aware that some platforms may automatically compress images, which can further degrade quality.
12. Can Metadata Affect How JPEGs Are Sent and Received?
Metadata, or data about data, is embedded within JPEG files and contains information such as camera settings, date and time, location, and copyright details. Understanding how metadata interacts with sending and receiving JPEGs is important for photographers and anyone sharing images online.
What is Metadata?
Metadata is information embedded within a file that describes various aspects of the file, such as:
- EXIF Data: Camera settings, date and time, location (if GPS is enabled), and other technical details.
- IPTC Data: Copyright information, captions, keywords, and contact details.
- XMP Data: A flexible metadata standard that can store a wide range of information.
Impact on Sending and Receiving JPEGs:
- File Size: Metadata adds to the overall file size of the JPEG, although the increase is usually minimal.
- Privacy Concerns: Metadata can reveal sensitive information, such as the location where the photo was taken.
- Copyright Protection: Metadata can be used to embed copyright information and contact details into the JPEG file, helping to protect your intellectual property.
- Search Engine Optimization: Metadata can improve the search engine optimization (SEO) of your images by providing descriptive keywords and captions.
Metadata and Email:
- Preservation: Most email clients preserve metadata when sending and receiving JPEGs as attachments.
- Stripping: Some email services may strip metadata to reduce file size or protect user privacy.
Managing Metadata:
- Viewing: You can view metadata using image editing software, operating system tools, or online metadata viewers.
- Editing: You can edit metadata using image editing software or dedicated metadata editing tools.
- Removing: You can remove metadata using image editing software or metadata removal tools.
Best Practices:
- Be Aware: Be aware of the metadata contained within your JPEGs and how it may be used.
- Protect Privacy: Remove sensitive metadata, such as location information, before sharing images online.
- Embed Copyright Information: Embed copyright information and contact details into your JPEGs to protect your intellectual property.
- Optimize for SEO: Use descriptive keywords and captions to improve the SEO of your images.
13. What are the Ethical Considerations of Sending and Sharing JPEGs?
Sending and sharing JPEGs involves ethical considerations that are important to understand and respect. These considerations include copyright, privacy, consent, and responsible image use.
Copyright:
- Respect Intellectual Property: Always respect the copyright of the images you send and share. Obtain permission from the copyright holder before using or distributing copyrighted material.
- Proper Attribution: Provide proper attribution when using images that are not your own.
- Avoid Infringement: Do not send or share images that infringe on the copyright of others.
Privacy:
- Respect Personal Privacy: Be mindful of the privacy of individuals depicted in the images you send and share.
- Obtain Consent: Obtain consent from individuals before sharing images of them, especially if the images are sensitive or private.
- Protect Personal Information: Avoid sharing images that contain personal information, such as addresses, phone numbers, or social security numbers.
Consent:
- Informed Consent: Ensure that individuals have given informed consent for their images to be used and shared.
- Respect Withdrawal of Consent: Respect the right of individuals to withdraw their consent at any time.
Responsible Image Use:
- Avoid Misrepresentation: Do not use images to misrepresent individuals or situations.
- Be Truthful: Ensure that the images you send and share are accurate and truthful.
- Avoid Harmful Content: Do not send or share images that are harmful, offensive, or discriminatory.
Best Practices:
- Be Informed: Stay informed about copyright laws, privacy regulations, and ethical guidelines related to image use.
- Obtain Permissions: Obtain all necessary permissions before using or sharing images.
- Respect Privacy: Respect the privacy of individuals depicted in the images you send and share.
- Be Responsible: Use images responsibly and ethically.
- Educate Others: Educate others about the ethical considerations of sending and sharing JPEGs.
By following these ethical guidelines, you can help ensure that your image sharing practices are responsible, respectful, and lawful.
14. How Does Geotagging Impact the Sharing of Photos as JPEGs?
Geotagging is the process of adding geographical metadata to a photograph, typically in the form of latitude and longitude coordinates. This information can be embedded directly into the JPEG file and can have significant implications for how photos are shared and used.
What is Geotagging?
Geotagging involves embedding geographical coordinates into a JPEG file, indicating the location where the photo was taken. This is often done automatically by smartphones and digital cameras with GPS capabilities.
Impact on Sharing JPEGs:
- Location Awareness: Geotagging allows viewers to see exactly where a photo was taken, which can be useful for travel photography, real estate, and other applications.
- Privacy Concerns: Geotagging can reveal sensitive information about your location, potentially compromising your privacy and security.
- Metadata Preservation: Whether geotagging information is preserved when sharing a JPEG depends on the platform or method used to share the photo.
- Search and Discovery: Geotagging can make it easier to search for and discover photos based on location.
Platforms and Geotagging:
- Social Media: Some social media platforms automatically strip geotagging information from uploaded photos to protect user privacy. Others may preserve the data or allow users to control whether to display the location.
- Email: Email generally preserves geotagging information when sending JPEGs as attachments, but some email services may strip metadata for privacy or file size reasons.
- Cloud Storage: Cloud storage services typically preserve geotagging information, allowing you to share photos with location data intact.
Managing Geotagging:
- Disable Geotagging: You can disable geotagging in your camera or smartphone settings to prevent location data from being added to your photos.
- Remove Geotags: You can remove geotagging information from existing photos using image editing software or metadata editing tools.
- Control Sharing: Be mindful of how you share geotagged photos and adjust privacy settings accordingly.
Ethical Considerations:
- Privacy: Consider the privacy implications of sharing geotagged photos, especially if the photos reveal sensitive locations.
- Consent: Obtain consent from individuals before sharing photos that reveal their location.
By understanding the implications of geotagging, you can make informed decisions about how to manage and share your photos while protecting your privacy and respecting the privacy of others.
15. How do Copyright Laws Relate to Sending JPEG Photos?
Copyright laws are crucial to understand when sending JPEG photos, as they protect the rights of the image creator. Violating copyright laws can lead to legal consequences, so it’s important to respect intellectual property.
Understanding Copyright
Copyright is a legal right granted to the creator of original works, including photographs. It gives the creator exclusive rights to control how their work is used, distributed, and displayed.
Key Aspects of Copyright Law:
- Ownership: The photographer typically owns the copyright to their photos, unless there is a written agreement transferring ownership.
- Protection: Copyright protection begins automatically as soon as the photo is created and lasts for the life of the photographer plus 70 years.
- Exclusive Rights: Copyright owners have the exclusive right to reproduce, distribute, display, and create derivative works from their photos.
- Infringement: Copyright infringement occurs when someone uses a copyrighted photo without permission.
Copyright and Sending JPEGs
- Permissions: Before sending a JPEG photo that you did not create, ensure you have the necessary permissions from the copyright owner.
- Licensing: Understand the terms of any licenses associated with the photo. Some photos may be available under Creative Commons licenses, which allow certain uses with proper attribution.
- Watermarks and Metadata: Watermarks and metadata can help identify the copyright owner and provide contact information.
Best Practices
- Obtain Consent: Always obtain consent from the copyright owner before sending or sharing a photo that you did not create.
- Respect Licenses: Respect the terms of any licenses associated with the photo.
- Provide Attribution: Provide proper attribution when using photos that are not your own.
- Avoid Infringement: Do not send or share photos that infringe on the copyright of others.
- Educate Yourself: Familiarize yourself with copyright laws in your jurisdiction.
Disclaimer: This information is for educational purposes only and is not legal advice. Consult with a legal professional for advice on specific copyright issues.
16. What Tools Can Help Manage JPEGs Before Sending?
Managing JPEGs before sending ensures they are optimized for quality, size, and security. Various tools can help streamline this process, from basic image editors to specialized compression and metadata management software.
Image Editing Software:
- Adobe Photoshop: A professional-grade image editor with extensive features for editing, resizing, and optimizing JPEGs.
- GIMP: A free, open-source image editor that offers many of the same features as Photoshop.
- Adobe Lightroom: A photo management and editing tool designed for photographers, with powerful features for organizing, editing, and exporting JPEGs.
Compression Tools:
- TinyJPG: A web-based tool that uses smart lossy compression to reduce JPEG file sizes significantly while maintaining acceptable image quality.
- CompressJPEG: Another web-based tool for compressing JPEGs, offering various compression settings to balance file size and image quality.
- ImageOptim: A free Mac app that optimizes JPEGs by removing unnecessary metadata and applying lossless compression techniques.
Metadata Management Tools:
- ExifTool: A command-line tool for reading, writing, and editing metadata in JPEG files.
- Metadata2Go: A web-based tool for viewing, editing, and removing metadata from JPEGs.
- Adobe Bridge: A digital asset management tool that allows you to view, edit, and organize metadata in JPEG files.
Batch Processing Tools:
- IrfanView: A free Windows image viewer with batch processing capabilities for resizing, converting, and optimizing multiple JPEGs at once.
- XnConvert: A cross-platform image converter and resizer that supports batch processing.
Security Tools:
- Watermark Software: Tools for adding watermarks to JPEGs to protect your copyright.
- Encryption Software: Tools for encrypting JPEGs to protect them from unauthorized access.
Tips for Choosing Tools:
- Consider Your Needs: Choose tools that meet your specific needs for image editing, compression, metadata management, and security.
- Evaluate Features: Compare the features of different tools to find the best fit for your workflow.
- Read Reviews: Read reviews from other users to get an idea of the tool’s performance and reliability.
- Try Before You Buy: Take advantage of free trials or free versions of tools to test them before committing to a purchase.
17. How Do You Maintain Image Security When Sending JPEGs?
Maintaining image security when sending JPEGs is crucial for protecting your intellectual property and preventing unauthorized access. Various techniques and tools can help safeguard your images.
Encryption:
- Encrypt Sensitive Images: Use encryption software to encrypt JPEGs that contain sensitive information.
- Password Protection: Password-protect encrypted JPEGs to control who can access them.
Watermarking:
- Add Visible Watermarks: Add visible watermarks to JPEGs to deter unauthorized use.
- Use Subtle Watermarks: Use subtle watermarks that do not detract from the image’s aesthetic but still provide copyright information.
Metadata Management:
- Remove Sensitive Metadata: Remove sensitive metadata, such as location data, before sharing JPEGs.
- Embed Copyright Information: Embed copyright information and contact details into the JPEG’s metadata.
Secure File Transfer:
- Use Secure File Transfer Protocols: Use secure file transfer protocols such as SFTP or FTPS to transmit JPEGs securely.
- Use Encrypted Email: Use encrypted email services to protect JPEGs sent as attachments.
Access Control:
- Limit Access: Limit access to JPEGs to only those who need them.
- Use Password-Protected Sharing: Use password-protected sharing for JPEGs stored in cloud storage services.
Monitoring and Tracking:
- Monitor Image Use: Monitor how your JPEGs are being used online to detect unauthorized use.
- Use Image Tracking Services: Use image tracking services to track where your JPEGs are being shared.
Legal Protection:
- Register Copyright: Register your copyrights with the U.S. Copyright Office to strengthen your legal protection.
- Enforce Copyrights: Enforce your copyrights by sending takedown notices to websites that are using your JPEGs without permission.
Best Practices:
- Assess Risk: Assess the risk of unauthorized access to your JPEGs.
- Implement Security Measures: Implement appropriate security measures based on the level of risk.
- Stay Informed: Stay informed about the latest security threats and best practices.
By implementing these security measures, you can help protect your JPEGs from unauthorized access and use.
18. How Can I Restore a JPEG to its Original Quality?
Restoring a JPEG to its original quality can be challenging because JPEGs use lossy compression, which permanently discards some image data. However, several techniques and tools can help improve the appearance of degraded JPEGs.
Understanding JPEG Degradation
JPEG degradation occurs when a JPEG file is repeatedly saved or compressed at low quality settings. This results in the loss of fine details, color distortion, and the appearance of compression artifacts.
Techniques to Improve JPEG Quality:
- Use Image Editing Software:
- Adobe Photoshop: Use Photoshop’s filters and adjustments to reduce noise, sharpen details, and correct colors.
- GIMP: GIMP offers similar tools for improving JPEG quality, including noise reduction, sharpening, and color correction.
- Noise Reduction: Apply noise reduction filters to reduce the appearance of compression artifacts.
- Sharpening: Use sharpening filters to enhance details and edges.
- Color Correction: Adjust the colors to correct any distortion caused by compression.
- Upscaling: If the JPEG is too small, you can try upscaling it using image editing software or online tools. However, upscaling can introduce additional artifacts.
- Online Tools: Several online tools can help improve JPEG quality automatically.
- AI-Powered Enhancement: Some AI-powered tools can enhance JPEGs by intelligently removing noise and artifacts and restoring details.
- Specialized Software: Some specialized software is designed specifically for restoring degraded JPEGs.
Limitations
- Lossy Compression: Because JPEGs use lossy compression, it is impossible to restore the image to its original, uncompressed state.
- Artifacts: Compression artifacts can be difficult to remove completely.
- Quality Loss: Each time a JPEG is saved, it is recompressed, resulting in further quality loss.
Best Practices
- Start with the Best Possible Version: Start with the highest quality version of the JPEG you have.
- Avoid Repeated Saving: Avoid repeatedly saving the JPEG, as each save will result in further quality loss.
- Use Non-Destructive Editing: Use non-destructive editing techniques whenever possible.
- Save at High Quality: When saving the improved JPEG, use a high-quality setting to minimize further compression.
While it is not possible to fully restore a JPEG to its original quality, these techniques and tools can help improve its appearance and make it more usable.
At dfphoto.net, we strive to provide you with the most up-to-date information and techniques for managing and sharing your photos. Whether you’re a professional photographer or a hobbyist, understanding how to send photos as JPEG attachments is an essential skill.
Ready to take your photography skills to the next level? Visit dfphoto.net today to explore our extensive collection of tutorials, inspiring galleries, and a vibrant community of photographers. Discover new techniques, find inspiration, and connect with fellow enthusiasts. Don’t miss out on the opportunity to enhance your photographic journey with dfphoto.net.
Address: 1600 St Michael’s Dr, Santa Fe, NM 87505, United States
Phone: +1 (505) 471-6001
Website: dfphoto.net
FAQ: Sending Photos as JPEGs
1. How do I ensure my JPEG photos are sent as attachments on iPhones?
To ensure JPEG photos are sent as attachments on iPhones, always use the “Mail” app and attach photos directly rather than copying and pasting them into the email body. Also, avoid exceeding the email provider’s size limit.
2. What’s the best way to reduce JPEG file size before emailing?
The best way to reduce JPEG file size before emailing is to use image compression tools like TinyJPG or CompressJPEG, or adjust the quality settings in image editing software like Adobe Photoshop or GIMP.