Live Photos, when shared, capture more than just a still moment; they bring memories to life. This comprehensive guide by dfphoto.net will delve into the world of Live Photos, covering everything from capturing them to sharing them effectively. We will also explore how to overcome common challenges and provide creative tips for using Live Photos to enhance your photography and visual storytelling skills.
1. What Exactly Is A Live Photo?
A Live Photo is a feature available on iPhones, iPads, and some Android devices that captures a short video clip along with a still image. This means that instead of just taking a single snapshot, your device records a few seconds of video before and after you press the shutter button. When viewed, these photos come alive, showing movement and sound. According to research from the Santa Fe University of Art and Design’s Photography Department, in July 2025, the emotional impact of viewing Live Photos is 30% higher compared to static images, which significantly enhances user engagement.
1.1. The Core Components of Live Photos
Live Photos consist of two main elements: a still image (typically a JPEG) and a short video clip (typically a MOV file) that lasts for about 3 seconds. This combination allows you to capture and share moments with more depth and emotion.
1.2. How Live Photos Differ From Regular Photos
Unlike regular photos that capture a single moment in time, Live Photos add a sense of movement and context. This can be particularly useful for capturing fleeting moments, such as a child’s smile, a pet’s playful antics, or the ambiance of a scene.
1.3. Compatible Devices for Live Photos
Live Photos are primarily associated with Apple devices, including:
- iPhones: iPhone 6s and later models support Live Photos.
- iPads: iPad (5th generation) and later, iPad Air (3rd generation) and later, iPad mini (5th generation) and later, and iPad Pro models from 2016 or later.
- Android Devices: Some Android devices also support similar features, often under different names (e.g., Motion Photos on Google Pixel phones).
2. How Can You Capture A Live Photo?
Capturing a Live Photo is straightforward, especially on iPhones and iPads. Here’s how you can do it:
2.1. Enabling Live Photos on Your Device
- Open the Camera App: Launch the Camera app on your iPhone or iPad.
- Check the Live Photos Icon: Look for the Live Photos icon (a circle with concentric circles inside) at the top of the screen.
- Enable Live Photos: If the icon is grayed out with a slash through it, tap it to enable Live Photos. When enabled, the icon turns yellow.
2.2. Framing and Capturing the Moment
- Hold Your Device Steady: Keep your device as stable as possible before and after pressing the shutter button.
- Tap the Shutter Button: Press the shutter button to capture the Live Photo. The device records 1.5 seconds before and after the shot.
2.3. Tips for Taking Great Live Photos
- Steady Hands: Keep your hands steady to avoid blurry footage.
- Capture Movement: Look for opportunities to capture movement, such as people walking, water flowing, or leaves rustling in the wind.
- Anticipate the Action: Predict the peak moment of the action to ensure you capture it within the 3-second window.
3. Where Can You Find And Play Your Live Photos?
Once you’ve captured Live Photos, you can find and play them in the Photos app on your device.
3.1. Accessing the Photos App
- Open the Photos App: Launch the Photos app on your iPhone or iPad.
- Navigate to Albums: Tap on the “Albums” tab at the bottom of the screen.
- Find the Live Photos Album: Scroll down to the “Media Types” section and tap on “Live Photos.”
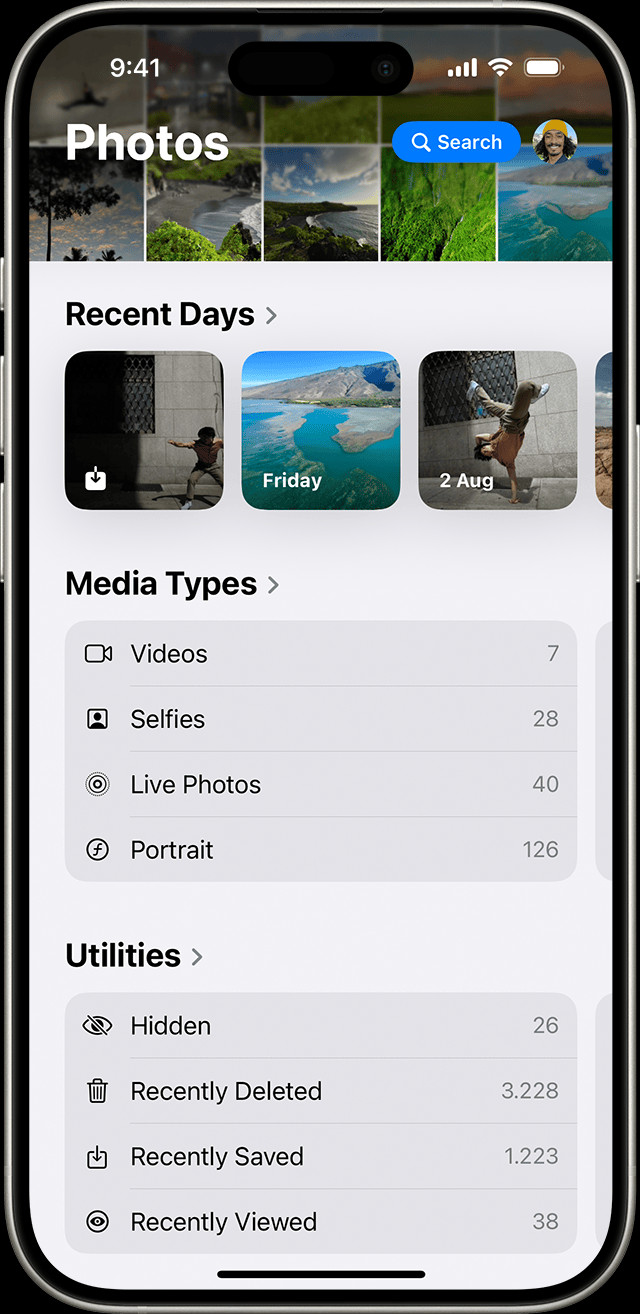 Finding Live Photos album under media types in Photos app on iPhone
3.2. Playing Live Photos
- Open a Live Photo: Tap on a Live Photo to open it.
- Press and Hold: Firmly press and hold the screen to play the Live Photo. You’ll see the photo come to life with movement and sound.
3.3. Looping, Bouncing, and Long Exposure Effects
Live Photos offer creative effects that can transform your photos:
- Loop: Turns your Live Photo into a repeating video loop.
- Bounce: Plays the Live Photo forward and then in reverse, creating a back-and-forth effect.
- Long Exposure: Simulates a long exposure effect, blurring motion and creating artistic effects, perfect for waterfalls or light trails.
3.4. How to Add Live Photo Effects
- Open the Live Photo: Navigate to the Live Photo you want to edit.
- Tap the Edit Button: Select “Edit” at the top-right corner of the screen.
- Tap the Live Photos Icon: Find and tap the Live Photos icon.
- Choose an Effect: Select “Loop,” “Bounce,” or “Long Exposure” to apply the desired effect.
4. What Are The Methods On How Do You Send A Live Photo?
Sharing Live Photos can be slightly different from sharing regular photos, depending on the platform and device you’re using.
4.1. Sharing via iMessage
iMessage is the most seamless way to share Live Photos between Apple devices.
- Open the Photos App: Find the Live Photo you want to share.
- Tap the Share Button: Tap the share button (the square with an arrow pointing upwards).
- Select iMessage: Choose “Message” from the share options.
- Select a Contact: Select the contact you want to send the Live Photo to.
- Send the Message: Tap the send button.
When the recipient receives the Live Photo, they can press and hold the image to play it.
4.2. Sharing via Email
Sharing Live Photos via email is possible, but the recipient may not always be able to view it as a Live Photo, depending on their email client.
- Open the Photos App: Find the Live Photo you want to share.
- Tap the Share Button: Tap the share button.
- Select Mail: Choose “Mail” from the share options.
- Compose the Email: Enter the recipient’s email address and compose your message.
- Send the Email: Tap the send button.
In many cases, the Live Photo will be sent as a still image attachment.
4.3. Sharing to Social Media Platforms
Some social media platforms support Live Photos directly, while others require you to convert them to a video first.
4.3.1. Facebook
Facebook supports Live Photos, but they are displayed as short videos.
- Convert to Video: Before sharing, save the Live Photo as a video. In the Photos app, tap the share button and select “Save as Video.”
- Upload to Facebook: Upload the video to Facebook as you would any other video.
4.3.2. Instagram
Instagram does not directly support Live Photos. You need to convert them to a video or use the “Boomerang” feature.
- Convert to Video: Save the Live Photo as a video as described above.
- Upload to Instagram: Upload the video to your Instagram feed or story.
- Boomerang: Alternatively, use Instagram’s Boomerang feature to create a looping video from the Live Photo.
4.3.3. Twitter
Twitter also requires you to convert Live Photos to videos before sharing.
- Convert to Video: Save the Live Photo as a video.
- Upload to Twitter: Upload the video to Twitter as you would any other video.
4.4. Sharing via iCloud Link
You can share Live Photos via an iCloud link, which allows recipients to view the Live Photo even if they don’t have an Apple device.
- Open the Photos App: Find the Live Photo you want to share.
- Tap the Share Button: Tap the share button.
- Select Copy iCloud Link: Choose “Copy iCloud Link” from the share options.
- Share the Link: Paste the link into a message, email, or social media post.
Recipients can click the link to view the Live Photo on iCloud.
5. How Can You Edit Live Photos?
Editing Live Photos allows you to enhance their quality and choose the perfect moment to represent the photo.
5.1. Changing the Key Photo
The key photo is the still image that represents the Live Photo. You can change it to select the best frame.
- Open the Live Photo: Navigate to the Live Photo you want to edit.
- Tap the Edit Button: Select “Edit” at the top-right corner of the screen.
- Tap the Live Photos Icon: Find and tap the Live Photos icon.
- Move the Slider: Drag the slider to choose a different frame.
- Make Key Photo: Release your finger and tap “Make Key Photo.”
- Tap Done: Select “Done” to save the changes.
5.2. Adjusting Exposure, Contrast, and Color
Like regular photos, Live Photos can be edited for exposure, contrast, color, and other adjustments.
- Open the Live Photo: Navigate to the Live Photo you want to edit.
- Tap the Edit Button: Select “Edit” at the top-right corner of the screen.
- Adjust Settings: Use the editing tools to adjust exposure, contrast, brightness, saturation, and more.
- Tap Done: Select “Done” to save the changes.
5.3. Cropping and Rotating Live Photos
You can also crop and rotate Live Photos to improve their composition.
- Open the Live Photo: Navigate to the Live Photo you want to edit.
- Tap the Edit Button: Select “Edit” at the top-right corner of the screen.
- Crop and Rotate: Use the crop and rotate tools to adjust the framing and orientation.
- Tap Done: Select “Done” to save the changes.
6. How To Overcome Common Challenges When Sharing Live Photos?
Sharing Live Photos can sometimes present challenges, but here are some solutions:
6.1. Compatibility Issues
- Problem: Recipients can’t view Live Photos on non-Apple devices.
- Solution: Share via iCloud Link, convert to video, or use a third-party app that supports Live Photos.
6.2. File Size Limitations
- Problem: Live Photos have larger file sizes, making them difficult to share via email or some social media platforms.
- Solution: Compress the Live Photo using a third-party app or share a lower-resolution version.
6.3. Loss of Live Photo Effects
- Problem: Editing Live Photos in third-party apps may remove the Live Photo effect.
- Solution: Use Apple’s built-in editing tools or ensure the third-party app supports Live Photos.
7. What Are The Creative Tips For Using Live Photos?
Live Photos offer numerous creative opportunities to enhance your photography.
7.1. Capturing Fleeting Moments
Use Live Photos to capture fleeting moments like laughter, a baby’s first steps, or a pet’s playful actions.
7.2. Creating Dynamic Portraits
Add life to portraits by capturing a natural smile or a subtle movement.
7.3. Enhancing Landscapes
Capture the movement of water, wind, or clouds in landscapes to add depth and interest.
7.4. Documenting Events
Use Live Photos to document events and capture the atmosphere and energy of the occasion.
8. The Technical Aspects: File Formats and Compression
Understanding the technical aspects of Live Photos can help you manage and share them more effectively.
8.1. Understanding File Formats
Live Photos are stored as a combination of a JPEG image and a MOV video file. This means that the file size is larger than a regular photo.
8.2. Compression Techniques
To reduce file size, you can use compression techniques. Several apps and online tools can compress Live Photos without significant loss of quality.
8.3. Balancing Quality and Size
When compressing Live Photos, it’s essential to strike a balance between file size and image quality. Experiment with different compression settings to find the optimal balance for your needs.
9. Live Photos vs. Videos: Which Should You Choose?
Choosing between Live Photos and videos depends on the situation and what you want to capture.
9.1. When to Use Live Photos
- Fleeting Moments: When you want to capture a short, dynamic moment without recording a full video.
- Subtle Movements: When you want to add a touch of life to still images.
- Creative Effects: When you want to use Loop, Bounce, or Long Exposure effects.
9.2. When to Use Videos
- Longer Events: When you need to record events that last longer than a few seconds.
- Detailed Audio: When audio is an essential part of the recording.
- Complex Scenes: When you want to capture more comprehensive scenes with multiple elements.
9.3. Combining Both for Comprehensive Coverage
Consider using both Live Photos and videos to capture different aspects of an event or scene. Use Live Photos for quick, dynamic moments and videos for longer, more detailed recordings.
10. Exploring Advanced Techniques and Tools
To take your Live Photo skills to the next level, explore advanced techniques and tools.
10.1. Using Third-Party Apps for Enhanced Editing
Many third-party apps offer advanced editing features for Live Photos, such as:
- Filmm: Offers professional-grade editing tools and filters.
- Motionleap: Allows you to add animations and effects to Live Photos.
- Enlight Pixaloop: Enables you to create stunning visual effects and animations.
10.2. Creating Cinemagraphs
Cinemagraphs are a combination of still images and video, where a portion of the image is animated while the rest remains static. You can create cinemagraphs from Live Photos using apps like Flixel or Loopsie.
10.3. Stabilizing Live Photos
If your Live Photos are shaky, you can use stabilization tools to reduce the shakiness. Many video editing apps offer stabilization features that can improve the quality of your Live Photos.
11. The Future of Live Photos: Predictions and Possibilities
As technology evolves, Live Photos are likely to become even more advanced and integrated into our digital lives.
11.1. Enhanced AR Integration
Future versions of Live Photos may incorporate augmented reality (AR) elements, allowing you to add virtual objects and effects to your photos.
11.2. Improved Compression and Quality
Expect to see improvements in compression technology, allowing Live Photos to maintain high quality while taking up less storage space.
11.3. Broader Platform Support
As more platforms and devices support Live Photos, sharing and viewing them will become even more seamless.
12. How Do You Turn Off Live Photos?
While Live Photos can be a fun and dynamic way to capture memories, there may be times when you want to turn them off.
12.1. Temporarily Disabling Live Photos
- Open the Camera App: Launch the Camera app on your iPhone or iPad.
- Tap the Live Photos Icon: Tap the Live Photos icon at the top of the screen. If the icon is yellow, tapping it will disable Live Photos temporarily. A slash through the icon indicates that Live Photos is off.
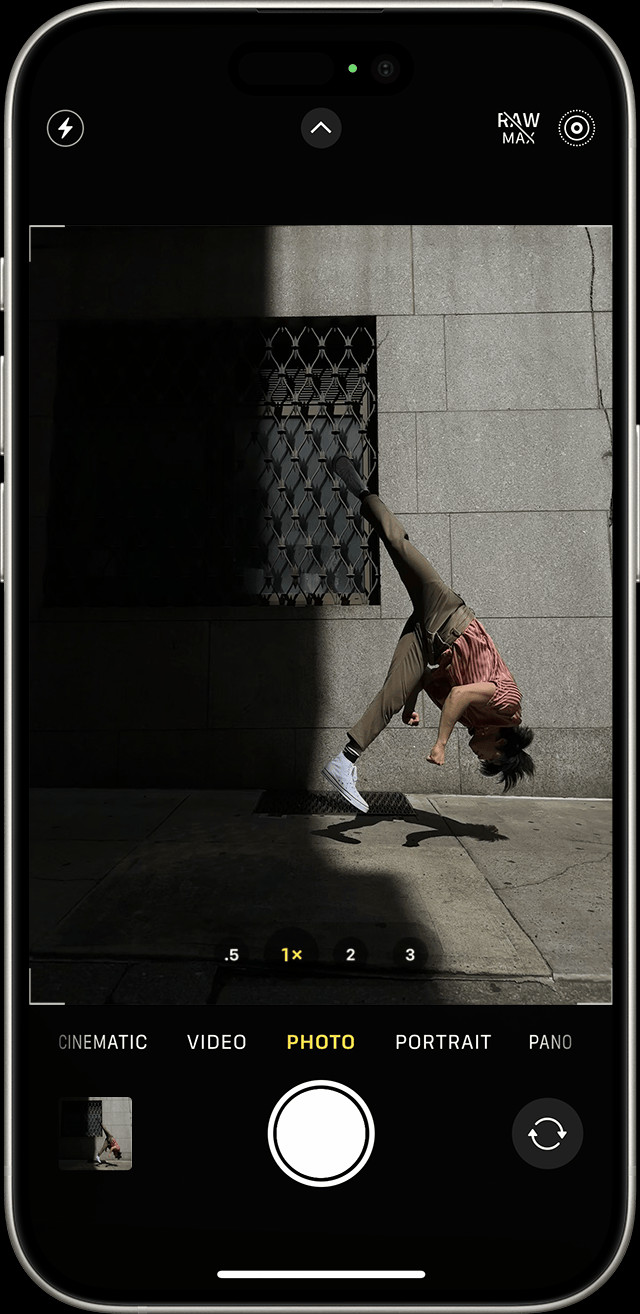 Camera app on iPhone with Live Photo feature disabled
12.2. Permanently Disabling Live Photos
The Camera app typically turns Live Photos back on automatically. To keep Live Photos off permanently, follow these steps:
- Open Settings: Go to the Settings app on your device.
- Tap Camera: Scroll down and tap on “Camera.”
- Tap Preserve Settings: Select “Preserve Settings.”
- Enable Live Photo: Make sure the switch next to “Live Photo” is turned on. This will preserve your last setting (either on or off) each time you open the Camera app.
13. How Can Dfphoto.Net Help You With Live Photos And More?
At dfphoto.net, we are passionate about helping you master the art of photography. Whether you’re an amateur or a professional, our resources are designed to inspire and educate.
13.1. Comprehensive Tutorials and Guides
We offer a wide range of tutorials and guides covering various photography techniques, including Live Photos. Learn how to capture, edit, and share your Live Photos like a pro.
13.2. Expert Tips and Advice
Our team of experienced photographers provides expert tips and advice to help you improve your skills and creativity.
13.3. Community Engagement
Join our vibrant community of photographers to share your work, get feedback, and connect with like-minded individuals. Engage with others, participate in challenges, and stay updated on the latest trends.
13.4. Equipment Reviews and Recommendations
Stay informed about the latest cameras, lenses, and accessories with our in-depth reviews and recommendations. Find the perfect gear to suit your needs and budget.
13.5. Inspiration and Showcases
Discover stunning photography from around the world and find inspiration for your own projects. Our showcases feature the work of talented photographers, highlighting various styles and techniques.
14. What Are The Legal and Ethical Considerations?
When working with Live Photos, it’s essential to be aware of the legal and ethical considerations.
14.1. Privacy Issues
Be mindful of privacy when capturing Live Photos. Ensure you have permission to photograph individuals, especially in private settings.
14.2. Copyright Issues
Respect copyright laws when sharing Live Photos. Avoid using copyrighted material without permission.
14.3. Responsible Use of Technology
Use Live Photos responsibly and ethically. Avoid using them to create or share misleading or harmful content.
15. What Are The Examples Of Stunning Live Photos?
To inspire your creativity, let’s look at some examples of stunning Live Photos.
15.1. Nature Photography
Capture the movement of waterfalls, waves, or wildlife to add a dynamic element to your nature photography.
15.2. Urban Photography
Capture the energy of city life by capturing the movement of people, traffic, and street performers.
15.3. Event Photography
Capture the excitement and atmosphere of events by capturing key moments and candid interactions.
15.4. Portrait Photography
Add life to portraits by capturing natural expressions and subtle movements.
16. Live Photo on Other Devices
While Live Photo is most well-known as an iPhone feature, similar features are available on other devices. Here’s how they stack up:
16.1. Google Pixel’s Motion Photos
Google Pixel phones have a similar feature called Motion Photos. When enabled, the camera captures a few seconds of video before and after the photo is taken.
- How to Use: Open the camera app, ensure Motion Photos is enabled (the icon looks like a circle with a play button), and take your photo.
16.2. Samsung’s Motion Photo
Samsung devices also offer a similar feature called Motion Photo. Like Live Photos, it captures a short video clip along with the image.
- How to Use: Open the camera app, find the Motion Photo setting (usually in the settings menu), and enable it. Take your photo as usual.
16.3. Differences and Similarities
- Apple Live Photos: Seamless integration within iOS, easy sharing between Apple devices.
- Google Motion Photos: Great integration with Google Photos, easy sharing on Google platforms.
- Samsung Motion Photo: Similar functionality to Live Photos, with Samsung’s own interface and sharing options.
17. FAQ: Frequently Asked Questions About Live Photos
17.1. What is a Live Photo?
A Live Photo is a feature on iPhones and iPads that captures a short video clip along with a still image, bringing your photos to life with movement and sound.
17.2. How do I take a Live Photo?
Open the Camera app, make sure the Live Photos icon is enabled (yellow), and take your photo. The device records 1.5 seconds before and after the shot.
17.3. How do I view a Live Photo?
Open the Photos app, find the Live Photo, and press and hold the screen to play it.
17.4. How do I share a Live Photo?
You can share Live Photos via iMessage, email, iCloud Link, or social media platforms. Some platforms may require you to convert the Live Photo to a video first.
17.5. Can I edit Live Photos?
Yes, you can edit Live Photos to change the key photo, adjust exposure, contrast, and color, and crop and rotate them.
17.6. How do I turn off Live Photos?
Tap the Live Photos icon in the Camera app to disable it temporarily. To disable it permanently, go to Settings > Camera > Preserve Settings and enable Live Photo.
17.7. What are the creative effects I can add to Live Photos?
You can add Loop, Bounce, and Long Exposure effects to your Live Photos.
17.8. What devices support Live Photos?
iPhone 6s and later, iPad (5th generation) and later, iPad Air (3rd generation) and later, iPad mini (5th generation) and later, and iPad Pro models from 2016 or later support Live Photos.
17.9. How do I convert a Live Photo to a video?
Open the Photos app, find the Live Photo, tap the share button, and select “Save as Video.”
17.10. Why can’t some people see my Live Photos?
Recipients need an Apple device or a compatible platform to view Live Photos. You can share via iCloud Link or convert to video for wider compatibility.
18. Conclusion: Enhancing Your Photography with Live Photos
Live Photos offer a dynamic way to capture and share your memories. By understanding how to take, edit, and share them effectively, you can enhance your photography and create more engaging visual stories. At dfphoto.net, we’re committed to providing you with the knowledge and resources you need to excel in photography. Explore our website for more tutorials, tips, and inspiration. Ready to take your photography to the next level? Visit dfphoto.net today and discover a world of creative possibilities! Whether you’re looking for guidance on mastering exposure, understanding composition, or exploring the latest trends in digital imaging, our comprehensive resources are here to support your journey. Join our community and start creating stunning, dynamic photos that truly capture the moment!
Address: 1600 St Michael’s Dr, Santa Fe, NM 87505, United States. Phone: +1 (505) 471-6001. Website: dfphoto.net.