Are you trying to figure out How Do You Restore Photos On Iphone? At dfphoto.net, we understand the frustration of losing precious memories. This article will show you multiple methods for photo recovery, from checking recently deleted albums to utilizing iCloud backups and third-party software. We’ll help you recover those cherished moments and ensure your photos are safe in the future, offering solutions even if you’ve accidentally deleted them or experienced a device malfunction.
1. Understanding Photo Loss on iPhone
Photo loss on an iPhone can occur for several reasons, and understanding these causes is the first step toward effective recovery. Knowing why your photos disappeared helps you choose the right method to restore them. Here are some common reasons for photo loss on an iPhone:
- Accidental Deletion: The most frequent cause is simply deleting photos by mistake. The iPhone provides a “Recently Deleted” album as a temporary safety net.
- Software Issues: Bugs or glitches within the iOS system can sometimes cause photos to disappear. This is rarer but can happen after a software update or during a system crash.
- Failed iOS Update: Sometimes, updating to the latest iOS version can lead to data loss, including photos, if the update process is interrupted or encounters errors.
- Hardware Malfunctions: Physical damage to your iPhone, such as water damage or a broken screen, can render the device unreadable, making photo recovery difficult.
- iCloud Sync Problems: If iCloud Photos is enabled, sync issues can sometimes cause photos to disappear from your device. This can happen if the sync process is interrupted or if there are conflicts between devices.
- Forgotten Hidden Album: Photos can be hidden within the Photos app. Users might forget they hid certain images, leading to the perception that they are missing.
- Shared Photo Library Issues: Problems can arise when using shared photo libraries, where photos might be moved or deleted by other members of the shared library.
Understanding these potential causes can help you better protect your photos in the future by implementing backup strategies and being cautious when performing system updates or device maintenance.
2. Initial Checks for Missing Photos
Before diving into more complex recovery methods, it’s essential to perform some initial checks to see if your photos are easily recoverable. These basic steps often resolve the issue quickly.
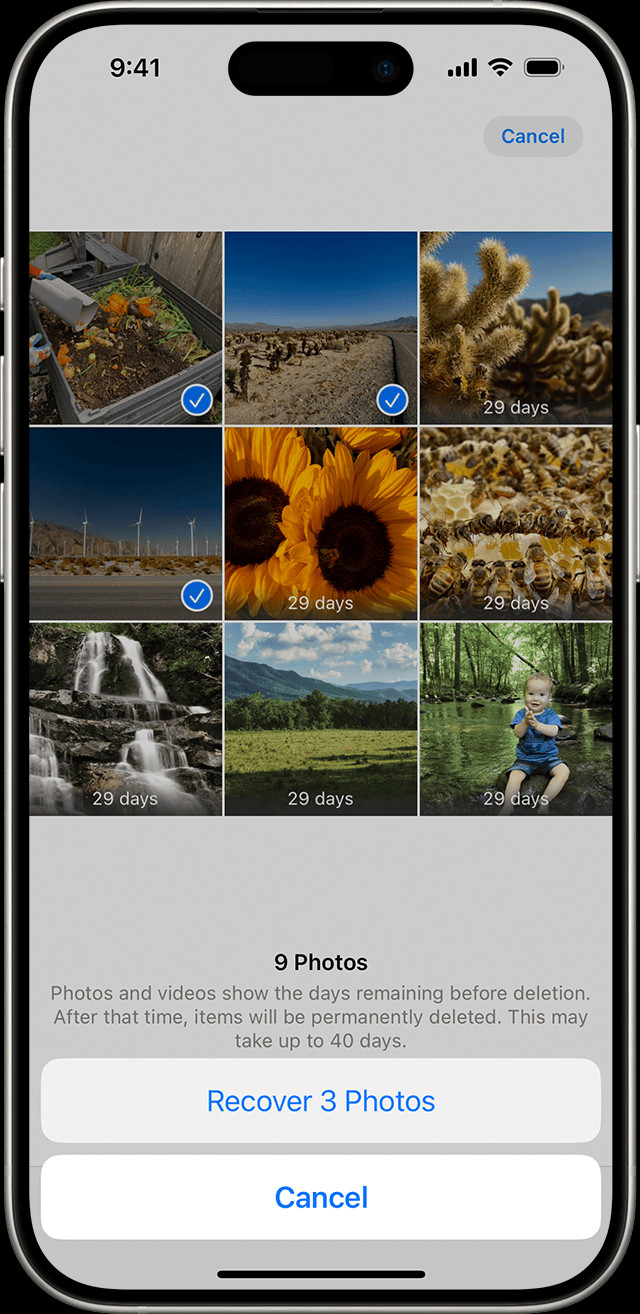
2.1. Recently Deleted Album
The Recently Deleted album is the first place to check when you realize photos are missing. It acts as a temporary holding area for deleted photos, giving you a chance to recover them within a certain period.
How it Works:
- When you delete a photo or video from your iPhone, it isn’t immediately and permanently removed. Instead, it’s moved to the Recently Deleted album.
- Photos and videos remain in this album for 30 days. After that, they are permanently deleted from your device and iCloud.
Steps to Recover Photos from Recently Deleted Album:
- Open the Photos App: Launch the Photos app on your iPhone.
- Navigate to Albums: Scroll down to the “Utilities” section and tap on “Recently Deleted.”
- Unlock the Album: You may need to use Face ID, Touch ID, or your passcode to access the album.
- Select Photos to Recover: Tap “Select” in the upper-right corner, then tap on each photo or video you want to recover.
- Recover the Photos: Tap the “Recover” button at the bottom-right corner, then confirm that you want to recover the selected items.
If your photos are in the Recently Deleted album, recovering them is quick and straightforward. Always check this album first before exploring other recovery options.
2.2. Hidden Album
The Hidden Album is a feature on iPhones that allows users to conceal photos and videos from the main photo library. Sometimes, photos might seem missing simply because they’ve been hidden.
How it Works:
- The Hidden Album lets you move sensitive or personal photos out of the main view, keeping them separate for privacy.
- Photos and videos in the Hidden Album are not visible in your regular photo library, Moments, or Years views.
- With iOS 14 and later, you can also hide the Hidden Album itself, making it even less visible.
Steps to Unhide Photos from the Hidden Album:
- Open the Photos App: Launch the Photos app on your iPhone.
- Navigate to Albums: Scroll down to the “Utilities” section and look for the “Hidden” album.
- Unlock the Album: Use Face ID, Touch ID, or your passcode to access the album.
- Select Photos to Unhide: Tap on the photo or video you want to unhide.
- Unhide the Photos: Tap the “More” button (three dots) in the bottom-right corner, then tap “Unhide.” The photo will be moved back to your main photo library.
If you’ve accidentally hidden photos, they’re easily retrievable by following these steps. It’s a good practice to check the Hidden Album if you can’t find certain photos in your library.
2.3. iCloud Photos Status
iCloud Photos is a service that automatically syncs your photos and videos across all your Apple devices. If iCloud Photos is not functioning correctly, it can appear as though photos are missing.
How it Works:
- iCloud Photos stores your entire photo library in iCloud, making it accessible on any device signed in with your Apple ID.
- When you take a photo on your iPhone, it’s automatically uploaded to iCloud, and any changes you make (such as edits or deletions) are synced across all devices.
- If iCloud Photos is turned off or not syncing properly, photos may not appear on all your devices.
Steps to Check iCloud Photos Status:
- Check iCloud Photos is Enabled: Go to “Settings” > [Your Name] > “iCloud” > “Photos” and make sure “iCloud Photos” is turned on.
- Check iCloud Storage: Go to “Settings” > [Your Name] > “iCloud” > “Manage Storage” to ensure you have enough storage available. If your iCloud storage is full, new photos won’t sync.
- Check Internet Connection: Ensure your iPhone is connected to a stable Wi-Fi network. iCloud Photos requires a reliable internet connection to sync photos.
- Wait for Syncing: If you’ve recently enabled iCloud Photos or made significant changes, allow some time for the photos to sync. This can take a while depending on the size of your library and the speed of your internet connection.
By verifying that iCloud Photos is enabled, has sufficient storage, and is properly syncing, you can often resolve issues where photos appear to be missing.
 Recently Deleted album in Photos on iPhone
3. Restoring from iCloud Backup
If the initial checks don’t recover your missing photos, restoring from an iCloud backup is the next step. This method allows you to revert your iPhone to a previous state, potentially bringing back the lost photos.
3.1. Understanding iCloud Backups
iCloud Backups regularly save your iPhone’s data, including photos, settings, app data, and more. Understanding how these backups work is crucial for effective restoration.
How it Works:
- iCloud Backups automatically occur when your iPhone is locked, connected to Wi-Fi, and plugged into a power source.
- These backups capture a snapshot of your device’s data at a specific point in time, allowing you to restore your iPhone to that state.
- iCloud typically stores several backups, so you can choose one that contains the photos you’re trying to recover.
Important Considerations:
- Backup Frequency: iCloud Backups happen automatically, but the frequency depends on your usage and available storage. It’s a good idea to manually back up your iPhone regularly, especially before making significant changes or updates.
- Storage Space: Ensure you have enough iCloud storage space for backups. You can manage your storage in “Settings” > [Your Name] > “iCloud” > “Manage Storage.”
- Backup Contents: iCloud Backups include photos, videos, app data, device settings, messages, and more. However, some data, like photos already stored in iCloud Photos, might not be included in the backup.
3.2. Steps to Restore from iCloud Backup
Restoring your iPhone from an iCloud backup will erase all current data and replace it with the data from the selected backup. Follow these steps carefully:
- Erase Your iPhone:
- Go to “Settings” > “General” > “Transfer or Reset iPhone.”
- Tap “Erase All Content and Settings.”
- Follow the prompts to erase your device. You may need to enter your Apple ID password.
- Start the Setup Assistant:
- After your iPhone restarts, you’ll see the Hello screen. Follow the on-screen instructions to set up your device.
- Choose Restore from iCloud Backup:
- When you get to the “Apps & Data” screen, choose “Restore from iCloud Backup.”
- Sign in to iCloud:
- Enter your Apple ID and password to sign in to iCloud.
- Select a Backup:
- You’ll see a list of available backups. Choose the one that you believe contains the missing photos. Look at the date and time of each backup to make the best choice.
- Wait for the Restore Process:
- Your iPhone will begin restoring from the selected backup. This process can take some time, depending on the size of the backup and your internet connection speed.
- Keep your iPhone connected to Wi-Fi and power during the restore process.
3.3. Potential Drawbacks
While restoring from an iCloud backup can recover your photos, it’s important to be aware of potential drawbacks:
- Data Loss: Restoring from a backup will erase all current data on your iPhone and replace it with the data from the backup. This means any data created since the backup was made will be lost.
- Time-Consuming: The restore process can take a significant amount of time, especially if the backup is large.
- Backup Accuracy: If the selected backup doesn’t contain the missing photos, you won’t be able to recover them using this method.
- Overwriting Current Data: It’s essential to ensure you’ve backed up any recent data you want to keep before restoring from an older backup.
Considering these drawbacks, it’s crucial to weigh the benefits against the potential risks before proceeding with a restore from iCloud backup.
4. Using iTunes/Finder Backup
If you’ve been backing up your iPhone to your computer using iTunes (or Finder in macOS Catalina and later), you can restore your photos from these backups. This method can be particularly useful if you don’t use iCloud or prefer local backups.
4.1. Understanding iTunes/Finder Backups
iTunes/Finder backups create a local copy of your iPhone’s data on your computer. Understanding the characteristics of these backups helps ensure a smooth restoration process.
How it Works:
- When you connect your iPhone to your computer and use iTunes (or Finder), you can create a backup of your device.
- This backup includes almost all of your data, including photos, videos, app data, contacts, messages, and settings.
- Unlike iCloud Backups, iTunes/Finder backups are stored locally on your computer, providing a complete offline copy of your iPhone’s data.
Key Considerations:
- Backup Frequency: iTunes/Finder backups are manual, meaning you need to initiate them. Regular backups are crucial, especially before significant updates or changes to your device.
- Storage Space: Ensure your computer has enough storage space for the backup. iPhone backups can be quite large, depending on the amount of data on your device.
- Backup Contents: iTunes/Finder backups include a comprehensive snapshot of your iPhone’s data, but it’s important to note that data already stored in iCloud (like iCloud Photos) might not be included in the backup if you have those services enabled.
4.2. Steps to Restore from iTunes/Finder Backup
Restoring your iPhone from an iTunes/Finder backup will erase all current data on your device and replace it with the data from the selected backup. Follow these steps carefully:
- Connect Your iPhone to Your Computer:
- Use a USB cable to connect your iPhone to the computer you used to create the backup.
- Open iTunes/Finder:
- If you’re using macOS Mojave or earlier, open iTunes. If you’re using macOS Catalina or later, open Finder.
- Select Your iPhone:
- In iTunes, click on the iPhone icon in the top-left corner. In Finder, select your iPhone from the sidebar under “Locations.”
- Trust This Computer:
- If prompted on your iPhone, tap “Trust” and enter your passcode.
- Restore Backup:
- In iTunes, click “Restore Backup.” In Finder, click “Restore iPhone.”
- Choose a Backup:
- Select the backup you want to restore from the dropdown menu. Look at the date and time of each backup to choose the correct one.
- Enter Encryption Password (if applicable):
- If the backup is encrypted, you’ll need to enter the password to unlock it.
- Wait for the Restore Process:
- Your iPhone will begin restoring from the selected backup. This process can take some time, depending on the size of the backup.
- Keep your iPhone connected to your computer throughout the restore process.
4.3. Potential Drawbacks
Restoring from an iTunes/Finder backup can be effective, but there are potential drawbacks to consider:
- Data Loss: Restoring from a backup will erase all current data on your iPhone and replace it with the data from the backup. Any data created since the backup was made will be lost.
- Time-Consuming: The restore process can take a significant amount of time, especially if the backup is large.
- Backup Accuracy: If the selected backup doesn’t contain the missing photos, you won’t be able to recover them using this method.
- Compatibility Issues: Ensure your iTunes/Finder is up to date to avoid compatibility issues during the restore process.
Weighing these drawbacks against the potential benefits is essential before proceeding with a restore from an iTunes/Finder backup.
5. Third-Party Photo Recovery Software
If you’ve exhausted the built-in recovery options and still can’t find your missing photos, third-party photo recovery software can be a viable solution. These tools are designed to scan your iPhone’s storage and recover deleted data that might still be recoverable.
5.1. Overview of Recovery Software
Photo recovery software works by scanning the iPhone’s internal storage for traces of deleted files. When a file is deleted, it isn’t immediately erased from the storage medium. Instead, the space it occupied is marked as available for new data. Until new data overwrites that space, the deleted file might be recoverable.
How it Works:
- Deep Scan: The software performs a deep scan of your iPhone’s storage, looking for fragments of deleted photos and videos.
- File Reconstruction: It attempts to reconstruct these fragments into complete, usable files.
- Preview and Recovery: The software allows you to preview the recovered photos before you restore them, so you can select the ones you need.
Popular Software Options:
- EaseUS MobiSaver: Known for its user-friendly interface and effective recovery capabilities.
- Dr.Fone – Data Recovery (iOS): Offers a wide range of features, including recovery from various data loss scenarios.
- iMobie PhoneRescue: Designed to recover lost data from iPhone, iPad, and iPod touch devices.
- Tenorshare UltData: Provides comprehensive data recovery solutions with a high success rate.
5.2. Steps to Use Recovery Software
The steps to use photo recovery software generally involve connecting your iPhone to your computer, scanning the device, and selecting the files to recover. Here’s a general guide:
- Download and Install the Software:
- Choose a reputable photo recovery software and download it from the official website.
- Install the software on your computer.
- Connect Your iPhone to Your Computer:
- Use a USB cable to connect your iPhone to your computer.
- If prompted on your iPhone, tap “Trust” and enter your passcode.
- Launch the Software and Select Recovery Mode:
- Open the photo recovery software and select the appropriate recovery mode (e.g., “Recover from iOS Device”).
- Scan Your iPhone:
- Start the scanning process. The software will analyze your iPhone’s storage for recoverable files. This process can take some time, depending on the size of the storage and the software’s scanning speed.
- Preview Recoverable Photos:
- Once the scan is complete, you’ll see a list of recoverable photos. Preview the photos to identify the ones you want to restore.
- Recover the Photos:
- Select the photos you want to recover and click the “Recover” button.
- Choose a location on your computer to save the recovered photos.
5.3. Important Considerations
Using third-party photo recovery software can be effective, but there are important considerations to keep in mind:
- Software Reputation: Choose reputable software from trusted sources to avoid malware or privacy risks.
- Success Rate: Recovery success rates can vary depending on the software and the condition of the deleted files. Some files might be unrecoverable if they have been overwritten.
- Cost: Many photo recovery software options require a paid license to unlock full functionality.
- iPhone Security: Ensure that the software is compatible with your iPhone’s iOS version and doesn’t compromise your device’s security.
Before using third-party photo recovery software, research and compare different options to find the one that best suits your needs and provides the highest chance of success.
6. Prevention Strategies for Future Photo Loss
Preventing photo loss is always better than trying to recover lost photos. Implementing proactive strategies can help safeguard your precious memories.
6.1. Regular Backups
Regular backups are the cornerstone of data protection. By backing up your iPhone frequently, you can minimize the risk of losing photos and other important data.
Strategies for Regular Backups:
- iCloud Backup:
- Enable iCloud Backup to automatically back up your iPhone when it’s locked, connected to Wi-Fi, and plugged into a power source.
- Go to “Settings” > [Your Name] > “iCloud” > “iCloud Backup” and toggle “iCloud Backup” to on.
- iTunes/Finder Backup:
- Connect your iPhone to your computer and use iTunes (or Finder) to create a manual backup.
- In iTunes, click on the iPhone icon, then click “Back Up Now.” In Finder, select your iPhone from the sidebar, then click “Back Up Now.”
- Schedule Reminders:
- Set reminders on your calendar to perform manual backups regularly, such as weekly or monthly.
6.2. Utilizing iCloud Photos Effectively
iCloud Photos provides a seamless way to store and sync your photos across all your Apple devices. Using it effectively ensures your photos are safely stored in the cloud.
Strategies for Utilizing iCloud Photos Effectively:
- Enable iCloud Photos:
- Go to “Settings” > [Your Name] > “iCloud” > “Photos” and make sure “iCloud Photos” is turned on.
- Optimize Storage:
- Choose “Optimize iPhone Storage” to store smaller, device-optimized versions of your photos on your iPhone while keeping the full-resolution versions in iCloud.
- Manage Storage:
- Regularly check your iCloud storage to ensure you have enough space for your photos and other data.
- You can manage your storage in “Settings” > [Your Name] > “iCloud” > “Manage Storage.”
- Check Sync Status:
- Periodically check that your photos are syncing properly to iCloud. If you notice any issues, ensure you have a stable internet connection and restart your device if necessary.
6.3. Being Cautious with Deletion
Taking a moment to review photos before deleting them can prevent accidental loss.
Strategies for Being Cautious with Deletion:
- Review Before Deleting:
- Before deleting photos, take a moment to review them to ensure you don’t accidentally delete anything important.
- Use the “Favorite” Feature:
- Mark your favorite photos using the “Favorite” feature to easily identify and protect them from accidental deletion.
- Create Albums:
- Organize your photos into albums to make it easier to manage and protect them.
6.4. Regular Software Updates
Keeping your iPhone’s software up to date ensures you have the latest security patches and bug fixes, which can help prevent data loss.
Strategies for Regular Software Updates:
- Enable Automatic Updates:
- Go to “Settings” > “General” > “Software Update” > “Automatic Updates” and turn on “Download iOS Updates” and “Install iOS Updates.”
- Check for Updates Regularly:
- Periodically check for software updates manually to ensure you have the latest version.
- Go to “Settings” > “General” > “Software Update” to check for updates.
6.5. Physical Device Care
Protecting your iPhone from physical damage can prevent data loss caused by hardware malfunctions.
Strategies for Physical Device Care:
- Use a Protective Case:
- Use a sturdy protective case to protect your iPhone from drops and impacts.
- Avoid Extreme Conditions:
- Avoid exposing your iPhone to extreme temperatures, moisture, and dust.
- Professional Repairs:
- If your iPhone needs repairs, use a qualified professional to avoid further damage or data loss.
By implementing these prevention strategies, you can significantly reduce the risk of future photo loss and keep your memories safe and secure.
7. Seeking Professional Help
When all other methods fail, seeking professional help from data recovery specialists can be the last resort for retrieving your lost photos.
7.1. When to Consider Professional Services
Consider professional data recovery services in the following situations:
- Physical Damage: If your iPhone has suffered physical damage, such as water damage or a broken screen, professional services are often necessary.
- Complex Data Loss: If you’ve experienced complex data loss scenarios, such as a failed iOS update or a system crash, professional recovery might be required.
- Overwritten Data: If you suspect that your deleted photos have been overwritten with new data, professional services might have the tools and expertise to recover them.
- Time Sensitivity: If you need to recover your photos quickly and don’t have the time or technical skills to perform DIY recovery methods, professional services can provide a faster solution.
7.2. Finding Reputable Services
Finding a reputable data recovery service is crucial to ensure the safety and security of your iPhone and data.
Tips for Finding Reputable Services:
- Research and Reviews:
- Research different data recovery services online and read reviews from previous customers.
- Certifications and Credentials:
- Look for services with relevant certifications and credentials, such as ISO certifications.
- Experience and Expertise:
- Choose a service with a proven track record and experienced technicians who specialize in iPhone data recovery.
- Data Privacy and Security:
- Ensure the service has strict data privacy and security policies to protect your sensitive information.
- Cost and Estimates:
- Get a clear understanding of the service’s cost structure and obtain a detailed estimate before proceeding.
7.3. What to Expect from the Recovery Process
The professional data recovery process typically involves the following steps:
- Initial Consultation:
- Discuss your data loss situation with the service provider and provide details about the missing photos and any relevant events.
- Device Evaluation:
- The service provider will evaluate your iPhone to assess the extent of the damage and determine the feasibility of data recovery.
- Data Recovery Attempt:
- Using specialized tools and techniques, the service provider will attempt to recover your lost photos.
- Data Verification:
- Once the recovery process is complete, you’ll have the opportunity to review the recovered photos to ensure they meet your expectations.
- Data Delivery:
- The recovered photos will be delivered to you on a secure storage medium, such as a USB drive or an encrypted cloud storage service.
7.4. Cost Considerations
Professional data recovery services can be expensive, with costs varying depending on the complexity of the recovery process.
Cost Factors:
- Complexity of the Recovery:
- The more complex the data loss scenario, the higher the cost of recovery.
- Service Provider Reputation:
- Reputable service providers with experienced technicians typically charge more for their services.
- Time Required:
- The longer it takes to recover the data, the higher the cost.
- Success Rate:
- Some services charge a premium for higher success rates.
Before proceeding with professional data recovery services, obtain a detailed estimate and understand the cost structure to avoid any surprises.
8. Conclusion
Losing photos on your iPhone can be a distressing experience, but with the right strategies and tools, you can often recover your precious memories. From checking the Recently Deleted album and Hidden Album to restoring from iCloud or iTunes/Finder backups, and even using third-party recovery software, there are multiple avenues to explore. Additionally, implementing proactive prevention strategies, such as regular backups and careful deletion practices, can help safeguard your photos in the future.
If all else fails, professional data recovery services offer a last resort for retrieving your lost photos. At dfphoto.net, we’re dedicated to providing you with the knowledge and resources you need to protect and recover your valuable photos. Visit dfphoto.net for more in-depth guides, tips, and tools to enhance your photography experience and ensure your memories are always within reach.
![]() the Shared Library icon
the Shared Library icon
9. FAQ: How to Restore Photos on iPhone
Here are some frequently asked questions about restoring photos on your iPhone, providing quick answers to common concerns:
9.1. Can I recover permanently deleted photos from my iPhone?
Generally, photos permanently deleted from the Recently Deleted album cannot be recovered without a backup or professional data recovery services. Always check your backups regularly.
9.2. How do I restore photos from iCloud if I don’t have enough storage?
You can free up iCloud storage by deleting unnecessary files, such as old backups or large videos, or by upgrading your iCloud storage plan. Another option is to transfer some of your existing data to your computer or an external hard drive.
9.3. Will restoring from an iCloud backup delete my current data?
Yes, restoring from an iCloud backup will erase all current data on your iPhone and replace it with the data from the backup. Make sure to back up any recent data you want to keep before restoring.
9.4. How long does it take to restore photos from an iCloud backup?
The restore process can take anywhere from a few minutes to several hours, depending on the size of the backup and your internet connection speed.
9.5. Is it possible to recover photos from a water-damaged iPhone?
Recovering photos from a water-damaged iPhone can be challenging but is often possible with professional data recovery services. The success rate depends on the extent of the damage.
9.6. How can I prevent future photo loss on my iPhone?
Enable iCloud Photos, regularly back up your iPhone, be cautious with deletion, keep your software updated, and protect your device from physical damage.
9.7. What should I do if my photos are missing after an iOS update?
Check your iCloud Photos status, restore from a recent backup, or use third-party recovery software. If the issue persists, contact Apple Support or seek professional help.
9.8. Are there any free photo recovery apps for iPhone?
Some free apps claim to recover photos, but their effectiveness can vary. It’s generally recommended to use reputable paid software or professional services for reliable recovery.
9.9. How do I find hidden photos on my iPhone?
Open the Photos app, go to the Albums tab, scroll down to the Utilities section, and tap Hidden. You may need to use Face ID, Touch ID, or your passcode to access the album.
9.10. Can I recover photos from a broken iPhone screen?
If your iPhone screen is broken but the device is still functional, you might be able to connect it to your computer and back it up using iTunes/Finder. If the device is completely unresponsive, professional data recovery services may be required.