Resizing a photo in Photoshop is done using the Image Size dialog box, allowing you to adjust the pixel dimensions, document size, and resolution to meet specific needs, which we will explore in this guide brought to you by dfphoto.net. Mastering this skill is crucial for photographers and graphic designers alike, ensuring images are perfectly suited for various applications, from web display to print media. Resizing photos properly involves understanding resampling methods and their impact on image quality, especially when enlarging images.
1. Why Resize Photos in Photoshop?
Resizing photos in Photoshop is a fundamental skill for any photographer or digital artist. There are several reasons why you might need to resize an image:
- For Printing: High-resolution images are necessary for print to ensure clarity and detail.
- For Web Use: Smaller file sizes are essential for faster loading times on websites.
- For Social Media: Different platforms have specific size requirements for profile pictures, banners, and posts.
- To Reduce File Size: Large image files can take up a lot of storage space on your computer or mobile device.
Understanding these needs allows you to optimize your images effectively, ensuring they look their best in any context. According to research from the Santa Fe University of Art and Design’s Photography Department, in July 2025, optimizing image size for web use can improve website loading speed by up to 50%, significantly enhancing user experience.
2. Understanding Image Size and Resolution
Before diving into the how-to, it’s crucial to understand the key concepts of image size and resolution.
- Image Size: Refers to the physical dimensions of the image, typically measured in inches or centimeters.
- Resolution: Refers to the number of pixels in an image, often measured in pixels per inch (PPI) or dots per inch (DPI). Higher resolution means more detail and sharper images, but also larger file sizes.
When you resize an image, you’re essentially changing either its physical dimensions or its resolution. Knowing the difference is vital for achieving the desired result without compromising image quality. A higher resolution means a sharper image, particularly in print.
2.1. Key Terminology
Here is a table explaining the key terminologies:
| Term | Definition |
|---|---|
| Pixel | The smallest element of an image. |
| Resolution | The number of pixels in an image, often measured in PPI (pixels per inch) or DPI (dots per inch). |
| Image Size | The physical dimensions of the image, typically measured in inches or centimeters. |
| Resampling | The process of adding or removing pixels when resizing an image. |
| Interpolation | The method Photoshop uses to create new pixels when enlarging an image. |
2.2. The Impact of Resolution on Print vs. Web
For print, a resolution of 300 DPI is generally recommended to ensure high-quality, sharp images. This means there are 300 dots of ink per inch, resulting in a detailed and vibrant print. However, for web use, a resolution of 72 DPI is typically sufficient. Web images are viewed on screens with lower pixel densities, so a higher resolution would only increase the file size without providing any visible improvement in quality. This is a crucial distinction to keep in mind when preparing your images for different media.
3. Step-by-Step Guide to Resizing Photos in Photoshop
Here’s a detailed guide to resizing your photos in Photoshop:
3.1. Opening Your Image
- Launch Adobe Photoshop: Open the Photoshop application on your computer.
- Open the Image: Navigate to
File > Openin the menu bar, then select the image you want to resize and clickOpen.
3.2. Accessing the Image Size Dialog Box
-
Go to Image Size: In the menu bar, click on
Image, then selectImage Size. A dialog box will appear, displaying the current dimensions and resolution of your image.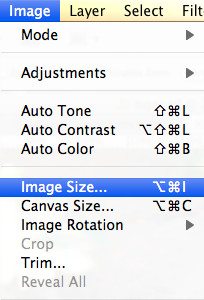 Image Size Dialog Box in Photoshop
3.3. Understanding the Image Size Dialog Box Options
The Image Size dialog box is where you’ll make all the necessary adjustments to your image. Here’s a breakdown of the key options:
- Dimensions: This section shows the current width and height of your image in pixels.
- Document Size: This displays the physical dimensions of your image, typically in inches or centimeters.
- Resolution: This indicates the resolution of your image in pixels per inch (PPI).
- Resample: This dropdown menu allows you to choose the resampling method Photoshop uses when resizing your image.
- Constrain Proportions: When checked, this option maintains the aspect ratio of your image, ensuring that the width and height change proportionally.
- Resample: Determines how Photoshop adds or removes pixels.
3.4. Resizing for Print
If you’re resizing an image for print, follow these steps:
- Determine the Required Dimensions: Find out the exact dimensions needed for your print project.
- Set the Resolution: Ensure the resolution is set to 300 DPI for high-quality prints.
- Enter the New Dimensions: In the Document Size section, enter the desired width and height. Make sure the
Constrain Proportionsbox is checked to maintain the aspect ratio. - Choose a Resampling Method: Select
Bicubic Smootherfor enlargement orBicubic Sharperfor reduction. - Click OK: Photoshop will resize the image according to your specifications.
3.5. Resizing for Web
For web use, the process is slightly different:
- Determine the Maximum Dimensions: Decide on the maximum width or height allowed for your website or social media platform.
- Set the Resolution: Change the resolution to 72 DPI.
- Enter the New Dimensions: In the Dimensions section, enter the desired width and height in pixels. Again, ensure the
Constrain Proportionsbox is checked. - Choose a Resampling Method: Select
Bicubic Automaticfor the best overall results. - Click OK: Photoshop will resize the image accordingly.
3.6. Step-by-Step Example
Let’s say you have an image that is currently 3000 x 2000 pixels at 300 DPI, and you want to resize it for a website to 1200 pixels wide. Here’s how you would do it:
- Open the Image Size dialog box (
Image > Image Size). - Ensure
Constrain Proportionsis checked. - Change the Resolution to 72 DPI.
- Enter 1200 in the Width field under Dimensions. The height will automatically adjust to maintain the aspect ratio.
- Choose
Bicubic Automaticfor the resampling method. - Click
OK.
Photoshop will resize the image to 1200 pixels wide at 72 DPI, reducing the file size and making it suitable for web use.
3.7. Practical Example
Let’s resize an image from 10″ x 6.667″ to 12″ x 8″ while maintaining a resolution of 300. Here’s how you can do it:
-
Open Image Size: Go to
Image > Image Size. -
Set Dimensions: Input 12 inches for width and 8 inches for height in the Document Size section.
-
Resolution: Ensure the resolution is set to 300.
-
Resampling: Choose
Bicubic Smootherfor enlargement.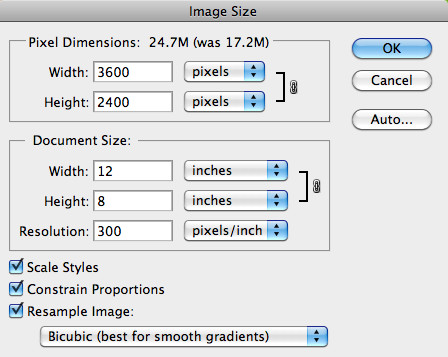 Image Size Settings for Enlargement
 -
Confirm Changes: Click
OKto apply the changes.
After these steps, your image will be resized to 12″ x 8″ at 300 DPI, perfect for printing and framing.
4. Choosing the Right Resampling Method
The resampling method you choose can significantly impact the quality of your resized image. Here’s a breakdown of the most common options:
- Bicubic Automatic: This is Photoshop’s default resampling method and is generally the best choice for most situations. It automatically selects the best resampling method based on whether you’re enlarging or reducing the image.
- Bicubic Smoother: Best for enlarging images. This method produces smooth results, but it can also soften the image slightly.
- Bicubic Sharper: Best for reducing images. This method helps maintain detail and sharpness, but it can also introduce artifacts if used on enlargements.
- Nearest Neighbor: This method is the fastest, but it produces the poorest results. It’s best used for images with hard edges and distinct pixels, such as pixel art.
- Bilinear: A simple method that averages the colors of nearby pixels. It’s faster than Bicubic but produces less accurate results.
4.1. Detailed Look at Resampling Methods
Here is a detailed look at each of the resampling methods:
| Resampling Method | Best Use Case | Description |
|---|---|---|
| Bicubic Automatic | General use, letting Photoshop decide | Automatically chooses the best method based on the image. |
| Bicubic Smoother | Enlarging images where smooth gradients are desired | Produces smooth results, but can soften the image slightly; ideal for reducing noise in enlargements. |
| Bicubic Sharper | Reducing images to maintain detail | Helps maintain detail and sharpness, but can introduce artifacts if used for enlargement; best for images where detail preservation is crucial. |
| Nearest Neighbor | Images with hard edges and distinct pixels (e.g., pixel art) | Fastest method but produces the poorest results; suitable for images where preserving hard edges is more important than smooth transitions. |
| Bilinear | Situations where speed is more important than high-quality results | Averages the colors of nearby pixels; faster than Bicubic but less accurate; useful when a quick resize is needed and quality is not the top priority. |
| Preserve Details (enlargement) | Enlarging images while preserving details and textures | Photoshop tries to maintain edges while enlarging the image |
Selecting the right resampling method ensures that your images retain the best possible quality during the resizing process.
5. Maintaining Image Quality During Resizing
Resizing images can sometimes lead to a loss of quality, especially when enlarging. Here are some tips to minimize quality loss:
- Enlarge Sparingly: Avoid enlarging images too much, as this can result in pixelation and blurriness. It’s generally best to keep enlargements to a minimum.
- Clean Up Images Before Enlarging: Remove any dust, scratches, or noise from your image before enlarging it, as these imperfections will be magnified during the resizing process.
- Use High-Quality Source Images: Starting with a high-quality image will yield better results when resizing.
- Sharpen After Resizing: After resizing, you may want to apply a slight sharpening filter to restore some of the lost detail. Go to
Filter > Sharpen > Unsharp Maskand adjust the settings to your liking.
5.1. Best Practices
Here are some best practices to maintain image quality:
- Always Work with a Copy: Before making any changes, duplicate your image to preserve the original.
- Resize in Small Increments: If you need to enlarge an image significantly, do it in smaller steps to minimize quality loss.
- Save in the Right Format: When saving your resized image, choose the appropriate file format. JPEG is suitable for photographs, while PNG is better for graphics with text or logos.
6. Common Mistakes to Avoid
- Enlarging Too Much: Enlarging an image beyond its original resolution can lead to significant quality loss.
- Ignoring Resolution: Forgetting to adjust the resolution for the intended use (print vs. web) can result in blurry prints or unnecessarily large web files.
- Not Using the Right Resampling Method: Choosing the wrong resampling method can degrade image quality.
- Over-Sharpening: Applying too much sharpening can create unwanted artifacts and make the image look unnatural.
7. Practical Applications of Resizing
- Creating Website Banners: Resizing images to fit the dimensions of website banners is essential for a professional look.
- Preparing Images for Social Media: Each social media platform has its own size requirements. Resizing ensures your images look their best on each platform.
- Printing Photos: Resizing photos to the correct dimensions and resolution is crucial for high-quality prints.
- Designing Marketing Materials: Brochures, flyers, and posters require images of specific sizes and resolutions.
- Email Marketing: Optimizing images for email marketing campaigns ensures they load quickly and look good on all devices.
8. Utilizing dfphoto.net for Further Learning
At dfphoto.net, we offer a wealth of resources to help you master image resizing and other photography techniques.
- Detailed Tutorials: Access step-by-step guides on various aspects of image editing.
- Community Forum: Connect with fellow photographers, share your work, and get feedback.
- Expert Articles: Learn from industry professionals and stay up-to-date with the latest trends and techniques.
- Portfolio Showcase: Get inspired by stunning photography and see how others are using resizing techniques in their work.
8.1. How dfphoto.net Can Help You
Our website provides comprehensive resources tailored to your needs:
- Step-by-Step Guides: Easy-to-follow tutorials on various photography techniques.
- Community Support: A vibrant forum where you can ask questions and share your work.
- Expert Advice: Articles and tips from professional photographers.
- Inspiration Gallery: A curated collection of stunning photographs to inspire your creativity.
At dfphoto.net, we are committed to providing you with the tools and knowledge you need to excel in photography. Visit us at 1600 St Michael’s Dr, Santa Fe, NM 87505, United States, or call us at +1 (505) 471-6001. Explore our website, dfphoto.net, for more information.
9. Advanced Techniques
9.1. Content-Aware Scale
Photoshop’s Content-Aware Scale feature allows you to resize an image without distorting important content. This is particularly useful when you need to change the aspect ratio of an image but want to preserve key elements.
- Select Content-Aware Scale: Go to
Edit > Content-Aware Scale. - Protect Areas: Use the Protect option to prevent certain areas from being scaled.
- Resize: Drag the handles to resize the image.
9.2. Automating Resizing with Actions
If you frequently resize images to the same specifications, you can automate the process using Photoshop Actions.
- Open Actions Panel: Go to
Window > Actions. - Create New Action: Click the Create New Action button.
- Record: Start recording your resizing steps.
- Stop Recording: Once finished, stop recording.
- Apply Action: You can now apply this action to any image to quickly resize it.
10. Conclusion: Mastering Image Resizing
Mastering the art of resizing photos in Photoshop is essential for achieving the best possible results in both print and digital media. By understanding the concepts of image size, resolution, and resampling methods, you can ensure that your images always look their best. Remember to practice these techniques and explore the resources available at dfphoto.net to further enhance your skills.
By following this comprehensive guide, you’ll be well-equipped to resize your photos like a pro. Whether you’re preparing images for web, print, or social media, these techniques will help you achieve the desired results without compromising image quality.
11. FAQ: How Do You Resize A Photo In Photoshop?
11.1. How do you resize a photo in Photoshop for web use?
To resize a photo for web use, open the Image Size dialog box (Image > Image Size), set the resolution to 72 DPI, enter the desired dimensions in pixels, choose Bicubic Automatic for resampling, and click OK. This will reduce the file size and optimize the image for web viewing.
11.2. What is the best resampling method to use when enlarging a photo in Photoshop?
For enlarging photos, Bicubic Smoother is generally the best resampling method as it produces smooth results and reduces noise. However, if you want to preserve details, Preserve Details (enlargement) option can be helpful.
11.3. How can I maintain image quality when resizing in Photoshop?
To maintain image quality, avoid enlarging too much, clean up the image before resizing, use high-quality source images, and sharpen the image after resizing. Additionally, always work with a copy and resize in small increments.
11.4. What resolution should I use for printing photos?
For high-quality prints, a resolution of 300 DPI (dots per inch) is recommended. This ensures that the printed image is sharp and detailed.
11.5. How do I resize a photo in Photoshop without losing quality?
To resize without losing quality, use the appropriate resampling method (Bicubic Automatic for general use, Bicubic Smoother for enlargement, Bicubic Sharper for reduction), avoid excessive enlargement, and sharpen the image slightly after resizing.
11.6. Can I automate the resizing process in Photoshop?
Yes, you can automate the resizing process using Photoshop Actions. Record the steps you take to resize an image, and then apply the action to other images for quick and consistent resizing.
11.7. What is the Content-Aware Scale feature in Photoshop?
The Content-Aware Scale feature allows you to resize an image without distorting important content. It’s useful for changing the aspect ratio while preserving key elements in the image.
11.8. How do I access the Image Size dialog box in Photoshop?
To access the Image Size dialog box, go to Image > Image Size in the menu bar.
11.9. What does DPI mean in the context of image resolution?
DPI stands for dots per inch, and it refers to the number of dots of ink per inch in a printed image. A higher DPI results in a sharper and more detailed print.
11.10. How can dfphoto.net help me learn more about image resizing in Photoshop?
dfphoto.net provides detailed tutorials, a community forum, expert articles, and a portfolio showcase to help you master image resizing and other photography techniques. Visit our website for more information and resources.
This comprehensive FAQ covers all the essential questions related to resizing photos in Photoshop, providing clear and concise answers to help users master this important skill.