Removing all photos from your iPhone can free up storage, protect your privacy, or prepare your device for a sale. This guide from dfphoto.net provides various methods to help you remove all photos from your iPhone, from simple deletions to more permanent solutions, and teaches you how to manage your digital photography collection. Whether you’re a seasoned photographer or a casual user, understanding how to effectively manage your photos is crucial.
1. Understanding Why You Might Want to Remove All Photos
There are several reasons why someone might want to remove all photos from their iPhone:
- Freeing Up Storage: Photos and videos can take up a significant amount of storage space on your iPhone. Removing them can free up space for new apps, music, or other files.
- Privacy Concerns: If you’re selling or giving away your iPhone, you’ll want to ensure that all your personal photos and videos are removed to protect your privacy.
- Organization: Sometimes, it’s easier to start fresh with a clean photo library rather than trying to organize a large collection of images.
- Troubleshooting: In some cases, removing all photos can help resolve issues with the Photos app or iCloud syncing.
2. Backing Up Your Photos Before Deletion
Before you start deleting, it’s crucial to back up any photos and videos you want to keep. Here’s how:
2.1. iCloud Photos
If you use iCloud Photos, your photos and videos are automatically stored in iCloud and synced across all your devices. To back up your photos using iCloud:
- Go to Settings > [Your Name] > iCloud > Photos.
- Make sure iCloud Photos is turned on.
- Select Optimize iPhone Storage or Download and Keep Originals. If you choose “Optimize iPhone Storage,” full-resolution versions of your photos will be stored in iCloud, while smaller, device-optimized versions are kept on your iPhone. Choosing “Download and Keep Originals” downloads the original, full-resolution versions to your device.
 iPhone iCloud Photos settings
2.2. Using a Computer
You can also back up your photos to a computer using a USB cable:
- Connect your iPhone to your computer.
- If prompted, trust the computer on your iPhone.
- On a Mac, open the Photos app. On a PC, open File Explorer.
- Import the photos and videos to your computer. On a Mac, you can drag and drop the photos from the Photos app to a folder on your computer. On a PC, you can copy the photos from the iPhone’s storage to a folder on your computer.
2.3. Third-Party Cloud Services
Services like Google Photos, Dropbox, and OneDrive offer photo backup options:
- Google Photos: Install the Google Photos app, sign in to your Google account, and enable backup and sync. Google Photos offers free unlimited storage for photos up to 16MP and videos up to 1080p.
- Dropbox/OneDrive: Install the Dropbox or OneDrive app, sign in to your account, and upload your photos and videos to the cloud. These services offer limited free storage, but you can purchase additional storage if needed.
3. Deleting Photos Directly on Your iPhone
Once you’ve backed up your photos, you can proceed with deleting them from your iPhone. Here are a few methods:
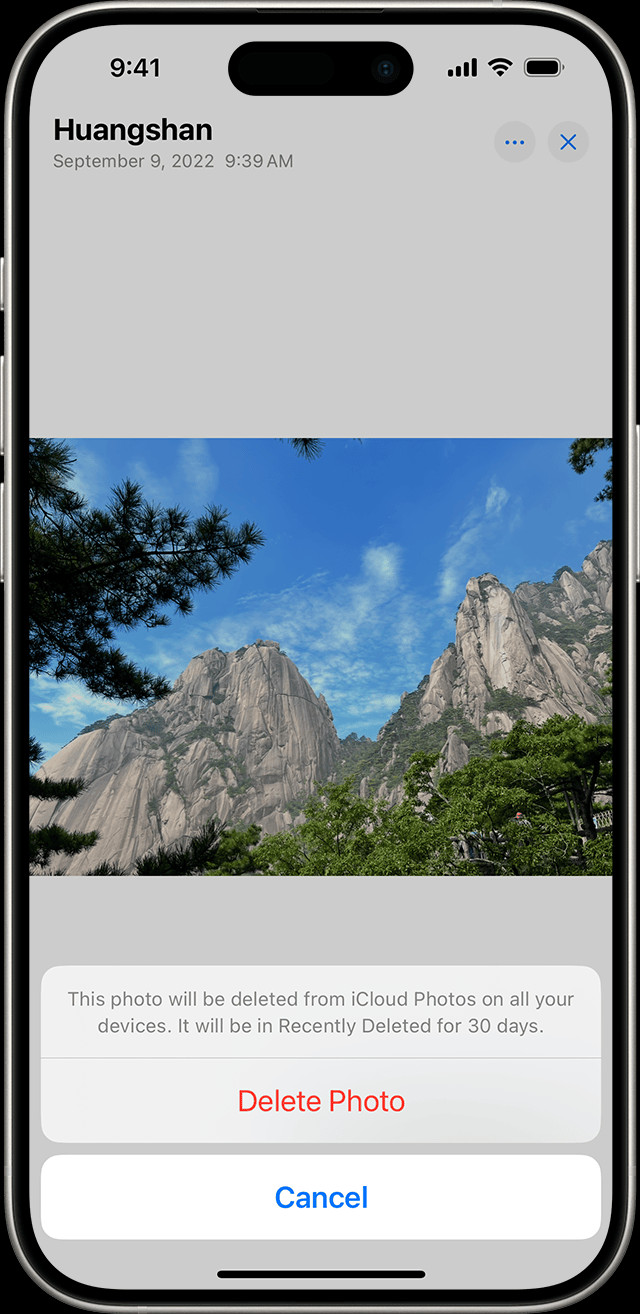
3.1. Deleting Photos Individually
This method is suitable for deleting a small number of photos:
- Open the Photos app.
- Tap the photo or video you want to delete.
- Tap the Trash icon.
- Confirm the deletion by tapping Delete Photo.
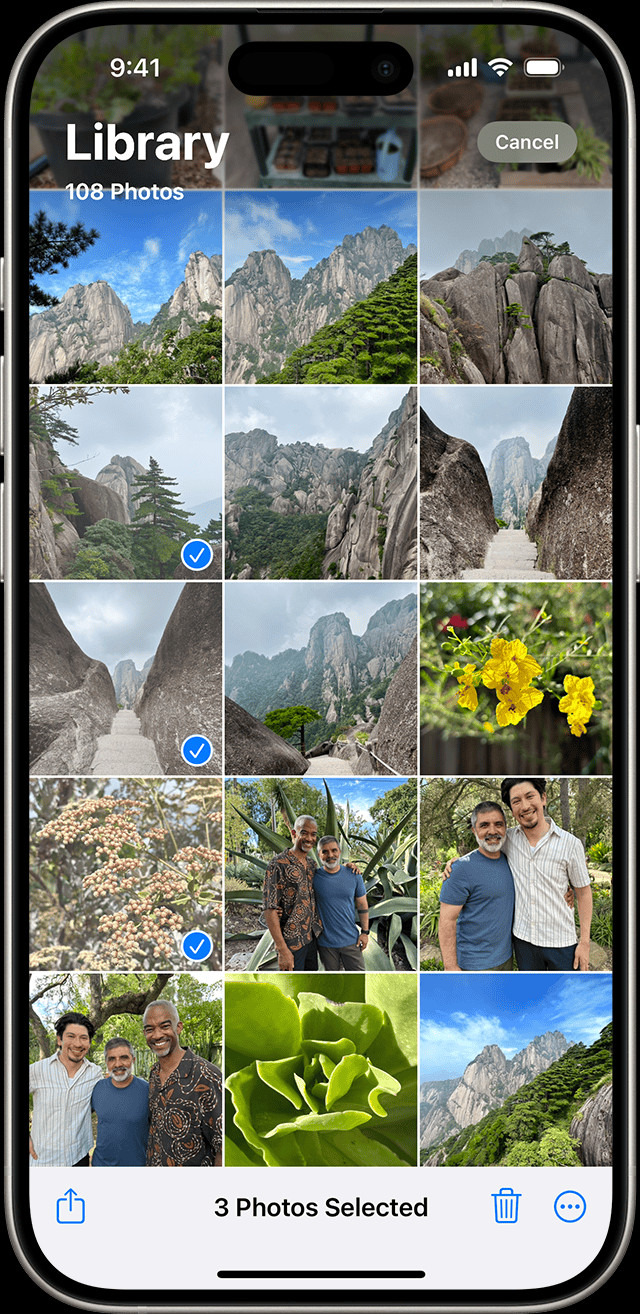
3.2. Deleting Multiple Photos at Once
For deleting a larger number of photos:
- Open the Photos app.
- Tap Select in the upper-right corner.
- Tap the photos and videos you want to delete, or slide your finger across multiple photos to select them.
- Tap the Trash icon.
- Confirm the deletion by tapping Delete [Number] Photos.
 Deleting multiple photos on iPhone
3.3. Using the “All Photos” View
- Open the Photos app.
- Tap Library at the bottom.
- Tap All Photos.
- Follow the steps for deleting multiple photos.
3.4. Deleting Photos from Specific Albums
If you want to delete photos from a specific album:
- Open the Photos app.
- Tap Albums at the bottom.
- Select the album from which you want to delete photos.
- Follow the steps for deleting multiple photos.
4. Understanding the “Recently Deleted” Album
When you delete photos and videos from your iPhone, they are moved to the “Recently Deleted” album. These items remain in this album for 30 days before being permanently deleted. This gives you a chance to recover any photos or videos you accidentally deleted.
4.1. Accessing the “Recently Deleted” Album
- Open the Photos app.
- Tap Albums at the bottom.
- Scroll down to Utilities and tap Recently Deleted.
- If you have iOS 16 or later, you may need to use Face ID or Touch ID to unlock the album.
4.2. Recovering Photos from the “Recently Deleted” Album
- Open the Recently Deleted album.
- Tap Select in the upper-right corner.
- Tap the photos and videos you want to recover.
- Tap Recover in the bottom-right corner.
- Confirm the recovery by tapping Recover [Number] Photos.
4.3. Permanently Deleting Photos from the “Recently Deleted” Album
To permanently delete photos and videos from your iPhone, you need to remove them from the “Recently Deleted” album:
- Open the Recently Deleted album.
- Tap Select in the upper-right corner.
- Tap the photos and videos you want to delete permanently.
- Tap Delete in the bottom-left corner.
- Confirm the deletion by tapping Delete [Number] Photos.
Important Note: Once you delete photos and videos from the “Recently Deleted” album, they cannot be recovered.
5. Dealing with Photos Synced from a Computer
If you added photos to your iPhone by syncing from a computer, you can’t delete them directly from your device. Instead, you need to stop syncing photos from your computer:
- Connect your iPhone to your computer.
- Open iTunes (or Finder on macOS Catalina or later).
- Select your iPhone.
- Go to the Photos tab.
- Uncheck Sync Photos.
- Choose to Remove photos.
- Sync your iPhone.
6. Removing Photos from iCloud Photos
If you use iCloud Photos, deleting photos from your iPhone will also delete them from iCloud and all other devices where you’re signed in with the same Apple ID. To avoid this, you can temporarily disable iCloud Photos on your iPhone before deleting the photos:
- Go to Settings > [Your Name] > iCloud > Photos.
- Turn off iCloud Photos.
- Choose to Remove from iPhone or Download Photos & Videos. If you choose “Remove from iPhone,” the full-resolution versions of your photos will be removed from your iPhone, but they will remain in iCloud. If you choose “Download Photos & Videos,” the full-resolution versions will be downloaded to your iPhone before being removed from iCloud.
- Delete the photos from your iPhone as described above.
- If you want to keep using iCloud Photos, turn it back on in Settings.
7. Using Third-Party Apps to Remove Photos
Several third-party apps can help you manage and remove photos from your iPhone. These apps often offer additional features like duplicate detection, photo organization, and privacy protection. Some popular options include:
- Gemini Photos: This app scans your photo library for duplicate photos and helps you remove them.
- Cleanup Duplicate Contacts: While primarily designed for managing contacts, this app can also find and remove duplicate photos.
- Flic: This app allows you to quickly swipe through your photos and delete the ones you don’t want.
8. Addressing Specific Scenarios
8.1. Removing Photos Before Selling Your iPhone
If you’re selling your iPhone, it’s crucial to remove all personal data, including photos and videos. In addition to deleting the photos, you should also erase all content and settings:
- Back up your iPhone.
- Go to Settings > General > Transfer or Reset iPhone.
- Tap Erase All Content and Settings.
- Follow the on-screen instructions.
This process will completely wipe your iPhone and restore it to its factory settings.
8.2. Removing Photos from a Shared Album
If you’re a participant in a shared album, deleting photos from the album will remove them for all participants. Only the person who added the photo to the shared album can permanently delete or recover it from the “Recently Deleted” folder.
8.3. Removing Photos from iCloud Shared Photo Library
In iOS 16.1, iPadOS 16.1, and later, you can start an iCloud Shared Photo Library and invite up to five contacts. Anyone can delete, add, or edit items in the Shared Library. If someone else deletes a photo or video from the Shared Library, it no longer appears for you, either. Only the person who added the photo or video to the Shared Library can permanently delete or recover it from the Recently Deleted folder.
9. Preventing Future Photo Clutter
To avoid having to deal with a large, disorganized photo library in the future, consider these tips:
- Regularly review and delete unwanted photos and videos. Make it a habit to go through your photo library every few weeks and delete any photos or videos you don’t need.
- Use albums to organize your photos. Create albums for different events, trips, or categories to make it easier to find and manage your photos.
- Enable iCloud Photos to keep your photos backed up and synced across all your devices. This will also free up storage space on your iPhone.
- Use third-party apps to manage your photos. Apps like Gemini Photos can help you find and remove duplicate photos, while apps like Flic can make it easier to quickly delete unwanted photos.
10. Understanding iOS 16 and Later Features
iOS 16 and later versions have introduced several new features related to photo management:
- Duplicates Album: This album automatically detects duplicate photos and videos in your library, making it easier to merge them.
- iCloud Shared Photo Library: This feature allows you to share a photo library with up to five other people, making it easier to collaborate on photo projects.
- Face ID or Touch ID Protection for Hidden and Recently Deleted Albums: This adds an extra layer of security to your hidden and recently deleted photos and videos.
11. The Role of dfphoto.net in Your Photography Journey
At dfphoto.net, we understand the importance of managing your photos effectively. Whether you’re a professional photographer or a hobbyist, we offer a wealth of resources to help you improve your photography skills and manage your photo library. From tutorials on composition and lighting to tips on editing and organizing your photos, dfphoto.net is your go-to source for all things photography.
Address: 1600 St Michael’s Dr, Santa Fe, NM 87505, United States
Phone: +1 (505) 471-6001
Website: dfphoto.net
12. Actionable Steps to Master Your iPhone Photo Management
Ready to take control of your iPhone photo library? Here are some actionable steps you can take right now:
- Back up your photos: Choose a backup method that works for you (iCloud Photos, computer backup, or third-party cloud service) and make sure your photos are safely stored.
- Delete unwanted photos: Go through your photo library and delete any photos or videos you don’t need.
- Empty the “Recently Deleted” album: Permanently delete the photos and videos from the “Recently Deleted” album to free up storage space.
- Organize your photos: Create albums to organize your photos and make it easier to find them later.
- Explore dfphoto.net: Visit dfphoto.net to discover tips, tutorials, and inspiration to help you take your photography to the next level.
13. Frequently Asked Questions (FAQs)
1. How do I permanently delete all photos from my iPhone?
To permanently delete all photos, you must delete them from both your photo library and the “Recently Deleted” album.
2. Can I recover photos after deleting them from the “Recently Deleted” album?
No, once photos are deleted from the “Recently Deleted” album, they cannot be recovered.
3. How do I stop iCloud from deleting my photos on all devices?
Turn off iCloud Photos on the devices where you don’t want the photos to be deleted.
4. What happens to my photos if I sell my iPhone without deleting them?
Your photos will be accessible to the new owner, so it’s crucial to erase all content and settings before selling your iPhone.
5. How do I delete photos synced from my computer?
You need to stop syncing photos from your computer through iTunes (or Finder on macOS Catalina or later) and then sync your iPhone.
6. What is the “Duplicates” album in iOS 16?
The “Duplicates” album automatically detects duplicate photos and videos in your library, making it easier to merge them.
7. How do I protect my “Recently Deleted” album with Face ID or Touch ID?
In iOS 16 and later, Face ID or Touch ID protection is enabled by default for the “Hidden” and “Recently Deleted” albums.
8. Can I delete photos from a shared album?
Yes, but deleting photos from a shared album will remove them for all participants. Only the person who added the photo can permanently delete them.
9. What are the benefits of using third-party apps to manage my photos?
Third-party apps often offer additional features like duplicate detection, photo organization, and privacy protection.
10. How can dfphoto.net help me with my photography?
dfphoto.net offers a wealth of resources, including tutorials, tips, and inspiration, to help you improve your photography skills and manage your photo library.
By following these steps, you can efficiently and safely remove all photos from your iPhone, ensuring your privacy and freeing up valuable storage space. And remember, dfphoto.net is here to support you on your photography journey, offering expert advice and resources to help you capture and manage your memories.