In today’s digital world, images are crucial for websites, social media, and online communication. However, large image files can significantly slow down page loading times, consume excessive bandwidth, and negatively impact user experience. Understanding How Do You Reduce The Size Of Photos is essential for anyone working with images online. This guide will walk you through the most effective methods to reduce photo file size without compromising quality, ensuring your images are web-friendly and visually appealing.
Understanding Image File Formats for Size Reduction
Before diving into compression techniques, it’s important to understand the three primary image file formats you’ll encounter: JPEG, GIF, and PNG. Each format handles compression differently and is suited for different types of images.
JPEG (or JPG): Ideal for photographs and images with complex colors and gradients. JPEG uses lossy compression, meaning some image data is discarded during compression, which reduces file size. The level of compression can be adjusted, allowing you to balance file size and image quality.
GIF: Best suited for simple graphics, logos, and animations with limited colors and solid areas. GIF uses lossless compression for images with 256 or fewer colors. It’s also known for supporting transparency and animation.
PNG: Offers two main subtypes: PNG-8 and PNG-24. PNG-8 is similar to GIF, using lossless compression for images with up to 256 colors and offering transparency. PNG-24 is designed for images with millions of colors, like photos, and uses lossless compression, resulting in higher quality but larger file sizes compared to JPEG.
Choosing the right format is the first step in effectively reducing your photo size. For most photographs, JPEG is the go-to format for achieving a good balance between file size and visual quality.
Compressing JPEGs: Balancing Quality and File Size
JPEG compression revolves around the concept of “quality.” When you save an image as a JPEG in image editing software, you are typically presented with quality options, often represented as:
- Quality Levels: Low, Medium, High, Maximum.
- Numerical Range: 0-12 (0 being lowest, 12 highest quality).
- Percentage: 0% – 100% (0% lowest, 100% highest quality).
The key principle is to select the lowest quality setting that still maintains acceptable visual quality for your intended purpose.
A practical strategy is to start with a relatively high-quality setting and gradually reduce it while visually inspecting the image. If a lower quality setting still looks good, try reducing it further. Once you notice a drop in quality that is unacceptable, revert to the last acceptable setting.
Consider the purpose of your image. For high-stakes applications like botanical encyclopedia websites where minute details are crucial, higher quality is necessary. However, for casual social media posts or less critical uses, lower quality settings are perfectly adequate and will significantly reduce file size.
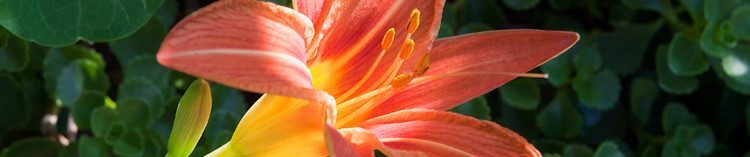
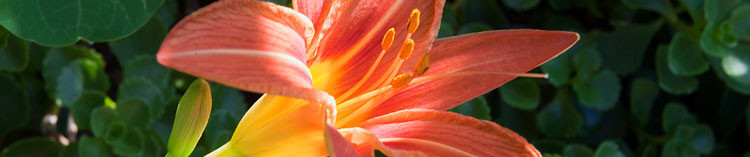
Let’s examine a visual example using a flower photo at various JPEG quality settings:
100% Quality: 103 KB file size. This is usually unnecessary for web use and results in a larger file size than needed.
 Daylily flower and buds at 100% quality
80% Quality: 48 KB file size. Visually almost indistinguishable from 100% quality but nearly half the file size.
 Daylily flower and buds at 80% quality
60% Quality: 28 KB file size. Most viewers would struggle to see any difference from the 100% setting, yet the file is a quarter of the original size, leading to faster loading times.
 Daylily flower and buds at 60% quality
40% Quality: 17 KB file size. Acceptable for many general online uses and loads five times faster than the 100% quality image.
 Daylily flower and buds at 40% quality
20% Quality: 12 KB file size. Noticeable degradation in image quality, becoming less visually appealing.
 Daylily flower and buds at 20% quality
0% Quality: 7 KB file size. Severe blockiness and artifacts from extreme JPEG compression, making the image very low quality.
 Daylily flower and buds at 0% quality
Sample photo showcasing JPEG quality levels. Source: FCIT’s plant photo collection.
Utilizing Blur for Further JPEG Compression
Another technique to reduce JPEG file size is to apply a slight blur to the image before compression. Images with fewer sharp edges and fine details compress more efficiently. This is particularly effective for background images or photos where subtle details are not critical.
Consider this example of a daylily with a detailed background. At 60% JPEG quality, the file size is 77 KB.
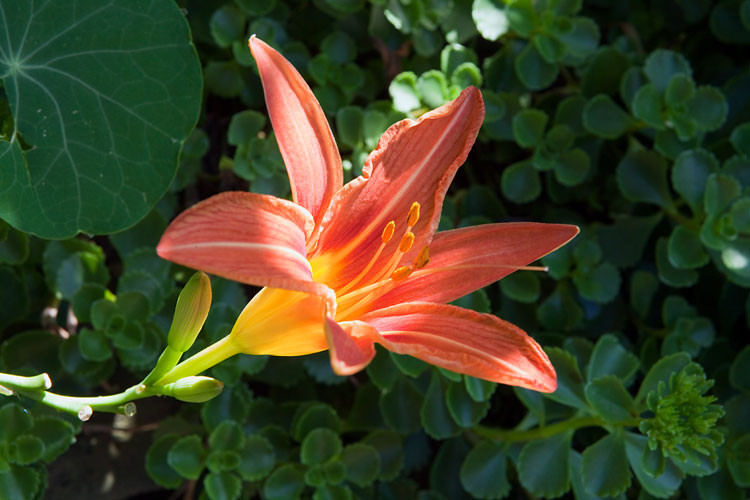 Day lily with sharp background
By selectively blurring the background in an image editor like Photoshop, while keeping the flower sharp, and then saving at the same 60% JPEG quality, the file size reduces to only 54 KB. This represents a significant file size reduction of approximately 30%, leading to faster loading times and a more focused image.
 Day lily with blurred background
This technique not only reduces file size but can also enhance the artistic appeal of the photo by drawing more attention to the subject.
Important Note on Lossy Compression
JPEG is a lossy format. Each time you save an image as a JPEG, you lose some image data and quality. To avoid cumulative quality loss, always maintain your original image in a lossless format like TIFF or PSD. Only export copies as JPEGs for web or sharing purposes. Avoid editing and re-saving a JPEG repeatedly, as this will progressively degrade the image quality, similar to making photocopies of photocopies.
Compressing GIFs: Reducing Color Palette
GIF images are limited to a 256-color palette. However, you can achieve substantial file size reductions by further decreasing the color depth. For optimal results, aim for color palette sizes close to powers of 2: 256, 128, 64, 32, 16, 8, 4, or 2 colors. Reducing the color palette from 33 colors to 32 will yield a noticeable size reduction, whereas reducing from 32 to 31 colors will not offer the same benefit.
When saving as a GIF, you’ll typically have options to:
- Select the number of colors: Choose the smallest palette that maintains acceptable visual quality.
- Apply Dithering: If you notice “banding” in gradients, dithering can help smooth transitions by introducing a pattern of pixels. “Diffusion” dithering usually works best.
- Enable Transparency: If your image requires transparent areas, ensure you select the transparency option.
Settings like “Web snap” and “Matte” are generally less relevant in modern web design and can usually be ignored. While GIF has historically been used for animations, PNG is increasingly becoming a viable alternative, even for animated images.
 Animated dancing robot GIF
Example of a GIF animation. Source: FCIT’s robot illustrations.
Compressing PNGs: Choosing Between PNG-8 and PNG-24
PNG format offers a versatile approach to image compression, incorporating aspects of both JPEG and GIF. Its popularity is rapidly growing due to its flexibility and efficiency. Understanding the difference between PNG-8 and PNG-24 is crucial for effective compression.
PNG-8: Similar to GIF, it is best suited for graphics with limited colors and solid shapes, like logos and illustrations. PNG-8 generally produces smaller file sizes than GIFs for similar images due to more efficient compression techniques.
PNG-24: Designed for continuous-tone images like photographs or complex graphics with more than 256 colors. PNG-24 employs lossless compression, preserving image quality but resulting in larger file sizes compared to JPEGs.
Exporting as PNG-8
When exporting to PNG-8, the settings are similar to GIF: you can select the number of colors (typically powers of 2 up to 256), apply dithering, and enable transparency. The primary advantage of PNG-8 over GIF is often a smaller file size for comparable visual quality.
Consider this cartoon example:
Cartoon saved as GIF (32 colors): 13.6 KB file size.
 Cartoon graphic saved as GIF
Same cartoon saved as PNG-8 (32 colors, identical settings): 10.2 KB file size. A 25% reduction in file size compared to the GIF version.
Cartoon graphic saved as PNG-8
Comparison of GIF and PNG-8 file sizes for a cartoon graphic. Source: FCIT’s tech cartoons.
Exporting as PNG-24
PNG-24 is a lossless format, so there are typically no quality settings to adjust during export. It retains all image data, resulting in the highest possible quality but also larger file sizes.
Photo saved as PNG-24: 400 KB file size. Relatively large due to lossless compression.
 Photo of macaws saved as PNG-24
Same photo saved as JPEG at Maximum (100%) Quality: 259 KB file size. Smaller than PNG-24, but with some loss of quality.
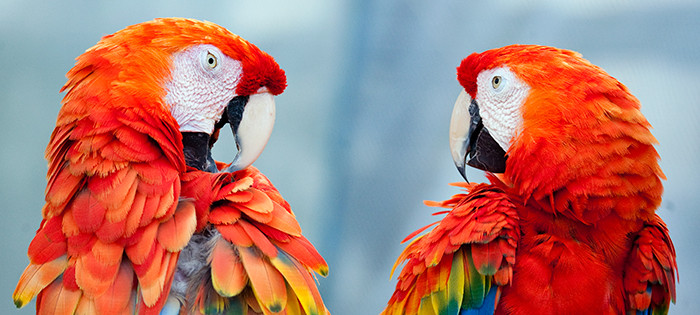 Photo of macaws saved as Maximum quality JPEG
Same photo saved as JPEG at High (60%) Quality: 69 KB file size. Significantly smaller, with a manageable quality reduction for many applications.
 Photo of macaws saved as High quality JPEG
File size comparison between PNG-24 and JPEG at different quality levels for a photograph. Source: FCIT’s animal photos.
When to Choose PNG-24 Over JPEG?
Despite PNG-24’s larger file size, there are compelling reasons to choose it over JPEG:
- Transparency: PNG-24 supports transparency, which JPEG does not. If your image requires transparent areas, PNG-24 is necessary.
- Lossless Quality: For situations where image quality is paramount and any data loss is unacceptable, PNG-24’s lossless compression is essential.
- Sharp Details: PNG-24 excels at preserving sharp details, particularly in screenshots with text or line art. JPEG compression can “smudge” fine details, making text less legible.
Tools and Software for Image Compression
Numerous tools and software options are available to help you reduce photo sizes effectively:
- Image Editing Software: Adobe Photoshop, GIMP (free), Affinity Photo, and others offer robust image optimization features, including JPEG quality adjustments, PNG compression options, and more.
- Online Image Compressors: Websites like TinyPNG, ImageOptim, Compressor.io, and others provide user-friendly interfaces for compressing JPEGs, PNGs, and sometimes GIFs, often using advanced compression algorithms.
- Batch Compression Tools: For processing multiple images at once, consider batch image compression tools that can automate the optimization process.
Best Practices for Image Optimization
To effectively reduce photo sizes and optimize images for the web, follow these best practices:
- Choose the Right Format: Select JPEG for photos, PNG-8 or GIF for simple graphics, and PNG-24 for lossless quality or transparency when needed.
- Optimize JPEG Quality: Experiment to find the lowest acceptable quality setting that balances visual quality and file size.
- Reduce Color Palette for GIFs and PNG-8: Minimize the number of colors to reduce file size without significant quality loss.
- Use Image Editing Tools: Leverage software to control compression settings and apply techniques like blurring for JPEGs.
- Consider Online Compressors: Utilize online tools for quick and easy compression, especially for web images.
- Batch Process Images: Optimize multiple images efficiently using batch compression tools.
- Regularly Review and Optimize: Periodically check your website or digital assets for unoptimized images and compress them further.
Conclusion
Mastering how do you reduce the size of photos is a vital skill for anyone working with images online. By understanding image file formats, compression techniques, and utilizing the right tools, you can significantly reduce photo file sizes, improve website performance, and enhance user experience without sacrificing visual quality. Remember to always balance file size reduction with the intended use and desired quality of your images. For more in-depth guides and resources on photography and image optimization, visit dfphoto.net.
Related Resources:
- What is the difference between bitmap and vector images?
- What is bit depth?