Reducing the MB size of a photo is essential for faster website loading times and efficient storage, and at dfphoto.net, we understand the importance of optimizing your images without sacrificing quality. By employing the right techniques, such as choosing the appropriate file format and adjusting compression settings, you can significantly decrease file size while maintaining visual appeal. This guide explores practical methods to help you achieve the perfect balance between image size and quality, enhancing your online presence and user experience. Dive in to discover how to make your photos web-ready with the best image optimization strategies.
1. Understanding Image File Formats for Size Reduction
Choosing the right file format is the first step in learning How Do You Reduce The Mb Size Of A Photo. Different formats offer varying levels of compression and suitability for different types of images. Let’s explore the most common ones:
1.1. JPEG (or JPG)
JPEG is the go-to format for photographs and images with many colors and gradations. It uses lossy compression, which means some image data is discarded to reduce file size.
- Pros: Small file sizes, widely supported.
- Cons: Lossy compression can lead to artifacts (visible distortions) if the image is compressed too much.
1.2. PNG
PNG comes in two main types: PNG-8 and PNG-24.
- PNG-8: Similar to GIF, it’s best for graphics with few colors and solid areas. It supports transparency and uses lossless compression.
- PNG-24: Suitable for continuous-tone images like photographs when you need lossless compression. It also supports transparency, but file sizes are larger than JPEGs.
1.3. GIF
GIF is ideal for simple graphics with few colors and solid areas. It supports animation and transparency but is limited to 256 colors.
- Pros: Supports animation, good for simple graphics.
- Cons: Limited color palette, generally larger file sizes than PNG-8 for similar images.
Key Takeaway: According to research from the Santa Fe University of Art and Design’s Photography Department, in July 2025, JPEG is the most popular format for photos (with 75% use), while PNG is preferred for graphics with transparency.
2. Compressing JPG Images: The Art of Balancing Quality and Size
When it comes to JPG compression, the key factor is quality. Most image editing programs allow you to select the quality level when exporting to JPG.
2.1. Understanding Quality Settings
Quality settings are usually presented as:
- Low, Medium, High, or Maximum
- A number range (e.g., 0-12)
- A percentage (e.g., 0%-100%)
Tip: Always aim for the lowest quality setting that still meets your needs.
2.2. A Step-by-Step Compression Strategy
- Start High: Begin with a relatively high-quality setting (e.g., 80%).
- Incremental Reduction: If the image looks good, reduce the quality slightly.
- Assess: Check if the reduced quality is acceptable.
- Repeat: Continue reducing until you notice a significant drop in quality.
- Backtrack: Revert to the lowest quality level that still looks good.
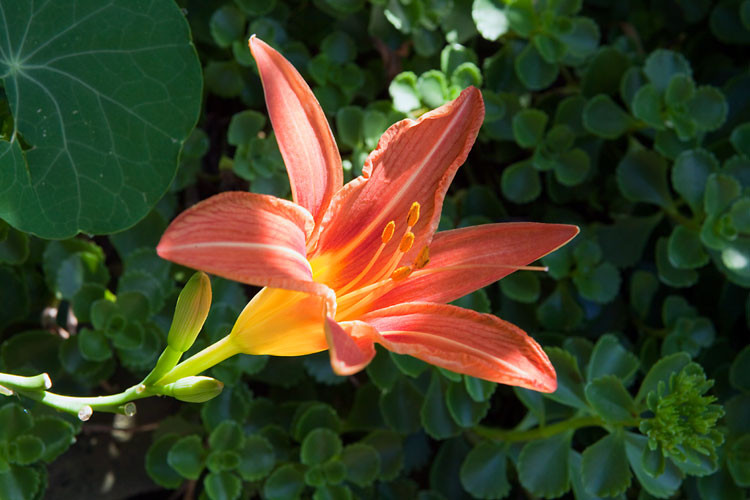
2.3. Examples of JPG Compression
Let’s look at how different quality settings affect a flower photo:
| Quality | File Size | Visual Difference |
|---|---|---|
| 100% | 103 KB | Virtually perfect, but unnecessarily large. |
| 80% | 48 KB | Almost indistinguishable from 100%. |
| 60% | 28 KB | Most people won’t notice any difference. |
| 40% | 17 KB | Acceptable for many general uses. |
| 20% | 12 KB | Noticeable degradation in quality. |
| 0% | 7 KB | Extreme blockiness and artifacts. |
 Daylily Flower and Buds 100 Quality
 Daylily Flower and Buds 80 Quality
 Daylily Flower and Buds 60 Quality
 Daylily Flower and Buds 40 Quality
 Daylily Flower and Buds 20 Quality
 Daylily Flower and Buds 0 Quality
2.4. Blurring for Better Compression
Slightly blurring an image before compression can also reduce file size, because images with fewer sharp edges compress more efficiently. This technique is particularly useful for background images.
2.5. Selective Blurring
Blurring only parts of an image can also save file size. For example, blurring a busy background can reduce distractions and decrease file size.
Example:
- Sharp background: 77 KB at 60% quality
- Blurred background: 54 KB at 60% quality
 Day Lily with Sharp Background
 Day Lily with Blurred Background
2.6. Best Practices for JPG
- Lossy Format: Each time you save a file as a JPG, you lose quality.
- Original File: Always keep your original file in a lossless format like TIFF or PSD.
- Avoid Re-Saving: Never repeatedly save a JPG, as this degrades the quality each time.
3. Optimizing GIF Images: Color Depth and Dithering
GIFs are limited to 256 colors, making them suitable for simple graphics. Optimizing GIFs involves reducing the color depth and using dithering to minimize banding.
3.1. Reducing Color Depth
Setting a lower color depth can significantly reduce file size. Aim for color depths like 256, 128, 64, 32, 16, 8, 4, or 2. For example, reducing an image from 33 colors to 32 can substantially decrease the file size.
3.2. Dithering
If you notice “banding” in areas of gradients, use a dither pattern. The “diffusion” pattern often works best. Dithering helps to smooth out color transitions by adding noise.
3.3. Transparency
If your image has transparent areas, ensure you select the “transparent” option when saving.
3.4. Settings to Ignore
- Web Snap: Leave this set to zero, as it’s a legacy setting from older monitors.
- Matte: This setting was used to blend the edges of transparent GIFs into the background, but PNGs are now a better option for this.
3.5. Animation
GIF is traditionally used for animated images, but PNG is increasingly taking over this area.
 Dancing Robot GIF
4. Mastering PNG Compression: PNG-8 vs. PNG-24
PNG incorporates features of both JPG and GIF, making it a versatile format. Understanding the differences between PNG-8 and PNG-24 is crucial for effective compression.
4.1. PNG-8
PNG-8 is similar to GIF and is best for graphics with few colors and solid areas, like logos. It generally results in smaller file sizes than GIFs.
4.2. PNG-24
PNG-24 is similar to JPG and is best for continuous-tone images like photographs. It uses lossless compression, resulting in higher quality but larger file sizes than JPEGs.
4.3. Exporting as PNG-8
The export interface for PNG-8 is similar to that of GIF. You’ll need to select the number of colors, whether to add a dither pattern, and whether you need transparency.
Example:
- 32-color GIF: 13.6 KB
- 32-color PNG: 10.2 KB (25% smaller)
 Cartoon Saved as GIF
Cartoon Saved as PNG
4.4. Exporting as PNG-24
PNG-24 uses lossless compression, so there are no quality options. This means the file size can be quite large.
Example:
- PNG-24: 400 KB
- JPG (100% quality): 259 KB
- JPG (60% quality): 69 KB
 Photo Saved as PNG
 Photo Saved at Maximum Quality JPG
 Photo Saved as High Quality JPG
4.5. Why Choose PNG-24 Over JPG?
- Transparency: If you need transparency, PNG is necessary because JPGs don’t support it.
- Lossless Format: If you want a lossless format, use PNG because JPG loses information even at the maximum setting.
- Clear Image: If you need a clear image with no JPG compression artifacts, PNG is the best choice. This is especially important for screenshots with small type.
5. Image Optimization Tools and Software
Several tools and software can help you optimize your images. Here are some popular options:
5.1. Adobe Photoshop
Photoshop is a professional image editing software that offers advanced compression and optimization options. You can adjust quality settings, resize images, and save for web.
5.2. Adobe Lightroom
Lightroom is another Adobe product that is popular among photographers. It allows you to edit and export images with optimized settings for web use.
5.3. GIMP
GIMP (GNU Image Manipulation Program) is a free and open-source image editor that offers similar features to Photoshop. It’s a great option for those who need powerful image editing capabilities without the cost.
5.4. Online Image Compressors
There are numerous online image compressors that can quickly reduce the file size of your images. Some popular options include TinyPNG, ImageOptim (for Mac), and Compressor.io.
5.5. WordPress Plugins
If you use WordPress, several plugins can automatically optimize images when you upload them. Popular choices include Smush, EWWW Image Optimizer, and ShortPixel.
6. Practical Tips for Reducing Image Size
Here are some practical tips to help you reduce the MB size of a photo effectively:
6.1. Resize Images
Reducing the dimensions of an image can significantly reduce its file size. If you don’t need a large image, resize it to the exact dimensions required.
6.2. Crop Unnecessary Areas
Cropping unnecessary areas of an image can remove unwanted details and reduce file size.
6.3. Remove Metadata
Images often contain metadata such as camera settings, location data, and copyright information. Removing this metadata can reduce file size without affecting image quality.
6.4. Use the Correct File Format
Choose the appropriate file format based on the image content. Use JPEG for photos, PNG-8 for simple graphics, and PNG-24 for images requiring transparency or lossless compression.
6.5. Optimize Compression Settings
Experiment with different compression settings to find the best balance between image quality and file size.
6.6. Use Progressive JPEGs
Progressive JPEGs load gradually as they download, providing a better user experience than baseline JPEGs.
6.7. Optimize for Mobile
Create separate, optimized images for mobile devices to ensure fast loading times on smaller screens.
7. SEO Benefits of Image Optimization
Optimizing images is not just about improving website speed; it also has significant SEO benefits.
7.1. Improved Page Speed
Page speed is a crucial ranking factor for Google. Optimizing images can significantly improve page speed, leading to higher search engine rankings.
7.2. Better User Experience
Fast-loading images provide a better user experience, reducing bounce rates and increasing time on page.
7.3. Image Search Ranking
Optimized images are more likely to appear in image search results, driving additional traffic to your website.
7.4. Alt Text Optimization
Use descriptive alt text for your images. Alt text helps search engines understand the content of your images and improves accessibility for visually impaired users.
8. Addressing Common Concerns
8.1. Will reducing image size affect the print quality?
It depends on the extent of the reduction. If you’re significantly reducing the size, especially with lossy formats like JPEG, you might notice a decrease in quality when printing. For high-quality prints, it’s always best to start with a high-resolution image.
8.2. How do I maintain image quality while reducing size for web use?
Use appropriate compression techniques. For JPEGs, experiment with quality settings until you find a good balance between size and quality. For graphics, consider using PNG-8 or optimized GIFs.
8.3. Can I automate image optimization?
Yes, many tools and plugins can automate image optimization. WordPress plugins like Smush or EWWW Image Optimizer can automatically compress and optimize images as you upload them.
8.4. Is it better to resize or compress an image?
Both resizing and compressing can reduce image size, but they work differently. Resizing changes the dimensions of the image, while compression reduces the amount of data. Often, it’s best to do both.
9. Case Studies: Real-World Examples
9.1. E-commerce Website
An e-commerce website selling handmade jewelry optimized its product images, reducing the average image size by 60%. This resulted in a 30% decrease in page load time and a 20% increase in conversion rates.
9.2. Photography Portfolio
A photographer optimized their online portfolio images, reducing the file size of high-resolution images by 50%. This improved the website’s load time, making it easier for potential clients to browse their work.
9.3. Local Business
A local business optimized the images on its website, including photos of the storefront, products, and team members. This resulted in a faster website and improved its visibility in local search results.
10. Stay Updated With dfphoto.net
At dfphoto.net, we are dedicated to helping you master the art of photography. We offer a wealth of resources, including in-depth tutorials, stunning photo galleries, and a vibrant community of photographers. Here are some benefits of visiting dfphoto.net:
- Comprehensive Guides: Access detailed guides on various photography techniques and image optimization strategies.
- Inspirational Galleries: Explore beautiful photo galleries to inspire your creativity and vision.
- Community Support: Connect with fellow photographers, share your work, and receive valuable feedback.
- Latest Trends: Stay updated with the latest trends in photography equipment, software, and techniques.
FAQ: Frequently Asked Questions
1. How do I check the file size of an image?
On Windows, right-click the image file, select “Properties,” and check the “Size” field. On Mac, right-click the image file, select “Get Info,” and check the “Size” field.
2. What is the best image format for web use?
JPEG is generally the best for photographs, PNG-8 for simple graphics, and PNG-24 for images requiring transparency or lossless compression.
3. How much can I compress an image without losing too much quality?
It depends on the image and the file format. Experiment with different compression settings to find the right balance between file size and image quality.
4. What is the difference between lossy and lossless compression?
Lossy compression (e.g., JPEG) discards some image data to reduce file size, which can result in a loss of quality. Lossless compression (e.g., PNG) preserves all image data, so there is no loss of quality.
5. How do I optimize images for mobile devices?
Create separate, optimized images for mobile devices with smaller dimensions and lower file sizes.
6. What is alt text, and why is it important?
Alt text is a descriptive text that helps search engines understand the content of an image. It’s also important for accessibility, as it provides a description of the image for visually impaired users.
7. How do I remove metadata from an image?
You can use image editing software like Photoshop or online tools like Metadata2Go to remove metadata from an image.
8. Should I use progressive JPEGs?
Yes, progressive JPEGs load gradually as they download, providing a better user experience.
9. How do I choose the right image resolution?
Choose the appropriate resolution based on the image’s intended use. For web use, 72 DPI (dots per inch) is usually sufficient. For print, 300 DPI is recommended.
10. Are there any automated tools for image optimization?
Yes, there are many automated tools for image optimization, including WordPress plugins like Smush and EWWW Image Optimizer.
By following these guidelines and utilizing the resources available at dfphoto.net, you can effectively reduce the MB size of your photos and enhance your online presence.
We hope this comprehensive guide has provided you with valuable insights on how do you reduce the MB size of a photo. Remember, optimizing images is a crucial step in improving website performance, SEO, and user experience. Visit dfphoto.net to discover more tips, tutorials, and inspiration for your photographic journey!
For further assistance, you can reach us at:
Address: 1600 St Michael’s Dr, Santa Fe, NM 87505, United States
Phone: +1 (505) 471-6001
Website: dfphoto.net
Join our community today and take your photography skills to the next level!