SD cards are invaluable for expanding the storage of our digital devices, particularly cameras and smartphones, allowing us to capture and store countless photos and videos. Their portability and ease of use make them a staple for photographers and casual users alike. However, the convenience of SD cards comes with the risk of accidental data loss. If you’ve ever faced the sinking feeling of realizing you’ve deleted precious photos from your SD card, know that hope is not lost. Recovering deleted photos from an SD card is often possible, and this guide will walk you through the most effective methods to retrieve your cherished memories.
Understanding the Need for SD Card Photo Recovery
Data loss from SD cards can occur for various reasons. Understanding these scenarios is the first step in knowing how to approach recovery:
- Accidental Deletion: It’s a common mishap – a slip of the finger, a momentary lapse in concentration, and suddenly, your photos are gone. Whether it’s deleting individual images or mistakenly hitting “Delete All,” accidental deletion is a primary cause for needing photo recovery.
- Inadvertent Formatting: Formatting an SD card erases all data on it. This can happen accidentally when navigating camera or device menus, or if you mistakenly format the wrong card. A formatted card doesn’t mean your photos are unrecoverable, but it does require specific recovery techniques.
- SD Card Corruption: SD cards, like any digital storage, can become corrupted. This can be due to physical damage, improper removal, power surges, or logical errors in the file system. Corruption can make your photos inaccessible, but data recovery tools can often salvage files from a corrupted card.
Knowing the reason behind your photo loss can sometimes influence the best recovery approach. Regardless of the cause, acting quickly and using the right methods significantly increases your chances of successful photo recovery.
If you find yourself in the unfortunate situation of needing to recover deleted photos, this guide provides several methods tailored to different operating systems and devices:
Recover on Windows PC → Recover on Mac → Recover from Android SD card →
6 Proven Methods to Recover Deleted Photos From an SD Card
The good news is that deleting a photo from an SD card doesn’t immediately erase the data physically. Instead, the space occupied by the photo is marked as available for new data. This means that until new data overwrites the space, the deleted photos are still potentially recoverable. The following methods offer various strategies to leverage this fact and get your photos back.
Method 1: Utilizing Data Recovery Software for SD Card Photo Recovery
The most reliable and often most effective way to recover deleted photos from an SD card is by using dedicated data recovery software. These tools are designed to scan storage devices at a sector level, identifying and reconstructing deleted files even if they’re no longer visible to the operating system. A leading example of such software is Disk Drill.
Disk Drill stands out as a user-friendly yet powerful data recovery application. It supports a wide array of file formats, including various RAW image formats used by professional cameras, ensuring comprehensive recovery. Its intuitive interface and robust scanning algorithms make it a top choice for both beginners and experienced users.
Let’s explore how to use Disk Drill to recover deleted photos on both Windows and Mac operating systems.
Step-by-Step Guide to Recover Deleted Pictures from an SD Card on Windows
-
Download and Install Disk Drill on Your Windows PC: Begin by downloading Disk Drill from the official website. The free version allows you to scan your SD card and preview recoverable files, confirming whether your photos can be retrieved before you commit to purchasing the Pro version for actual recovery beyond 500MB.
Data recovery for free Your Companion for Deleted Files Recovery
-
Connect Your SD Card to Your Windows PC: Insert your SD card into an SD card reader and connect it to your computer. Alternatively, if your computer has a built-in SD card slot, you can use that directly. Ensure the SD card is properly recognized by your system.
-
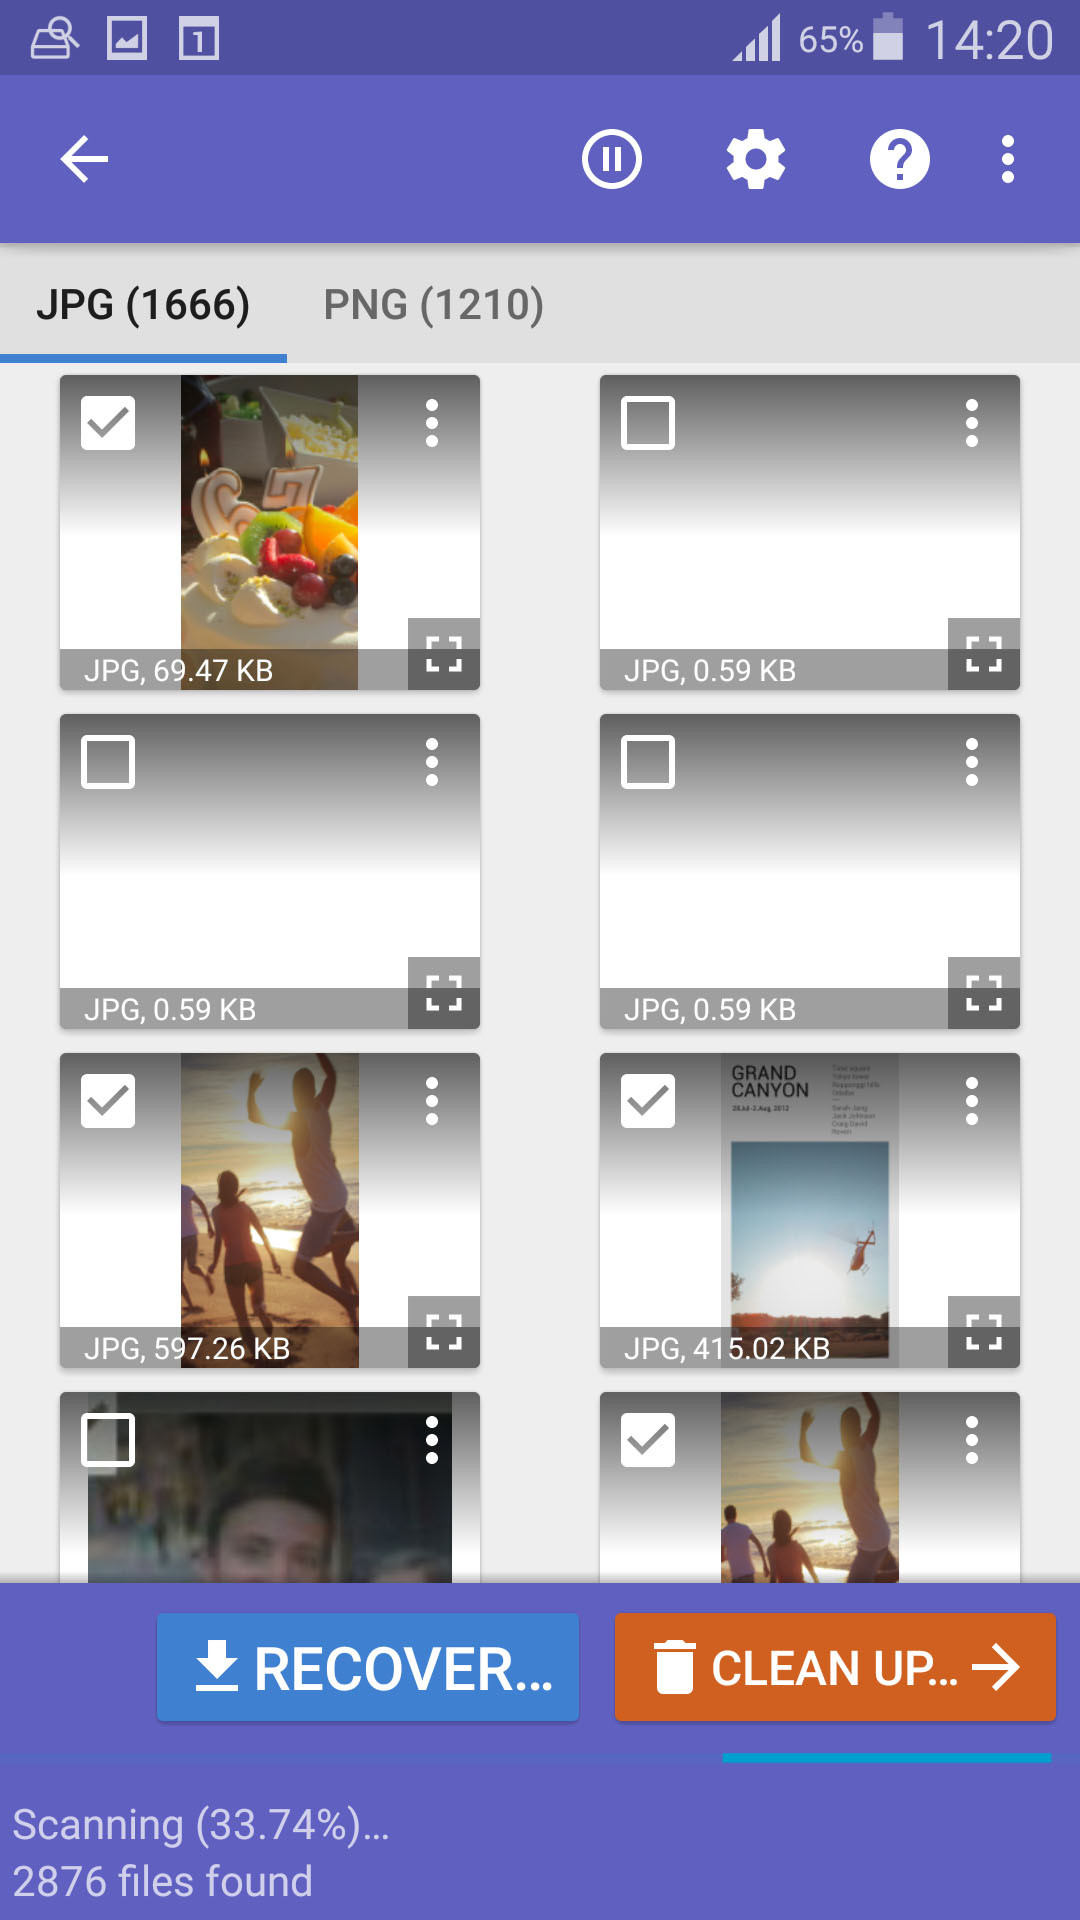
Launch Disk Drill and Select Your SD Card: Open Disk Drill, and you will see a list of available drives. Locate and select your SD card from this list. Once selected, click the “Search for lost data” button to initiate the scanning process.
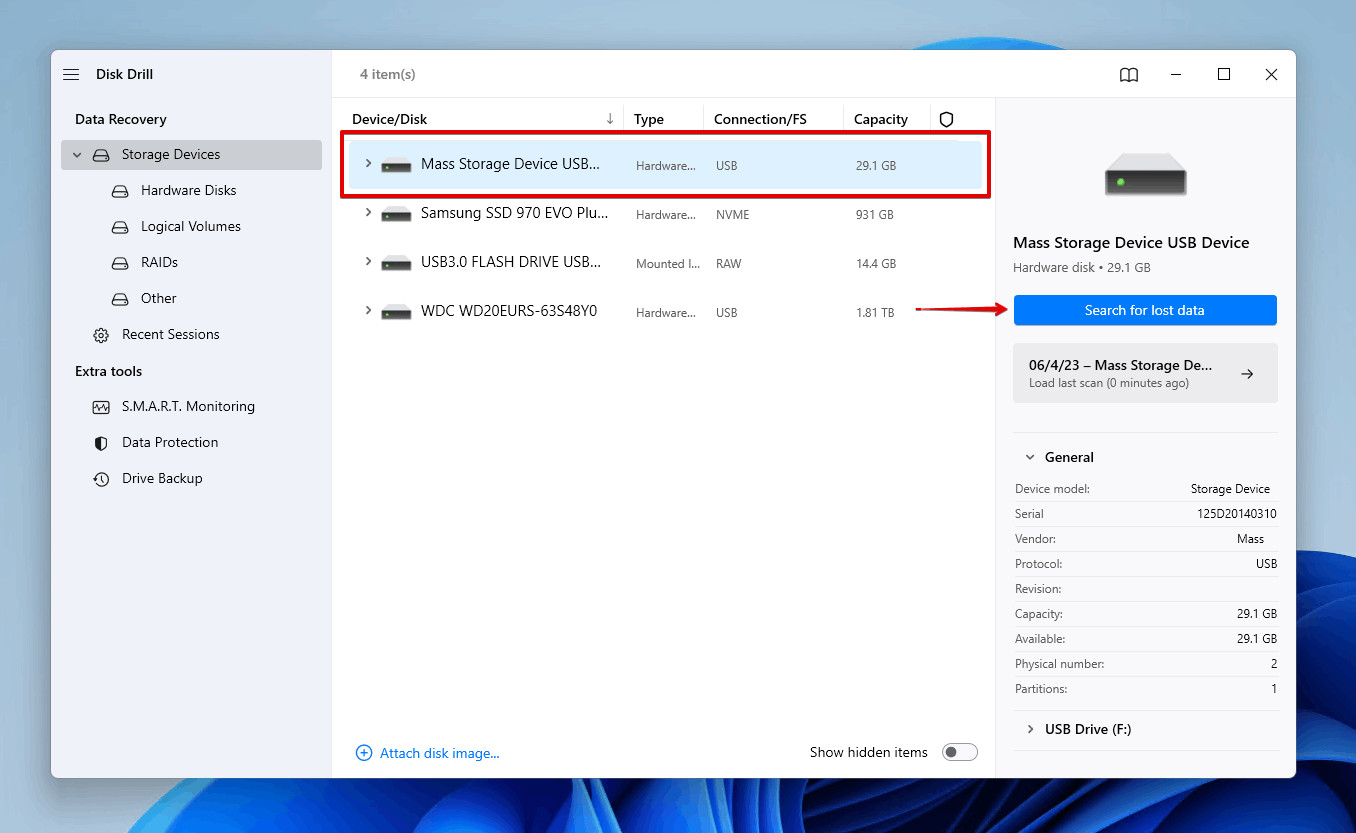 Scanning the SD card for deleted photos on Windows PC
 -
Wait for Disk Drill to Scan Your SD Card: Disk Drill will now thoroughly scan your SD card for recoverable files. The scan duration depends on the size of your SD card and the amount of data to be analyzed. Allow the process to complete without interruption for the best results.
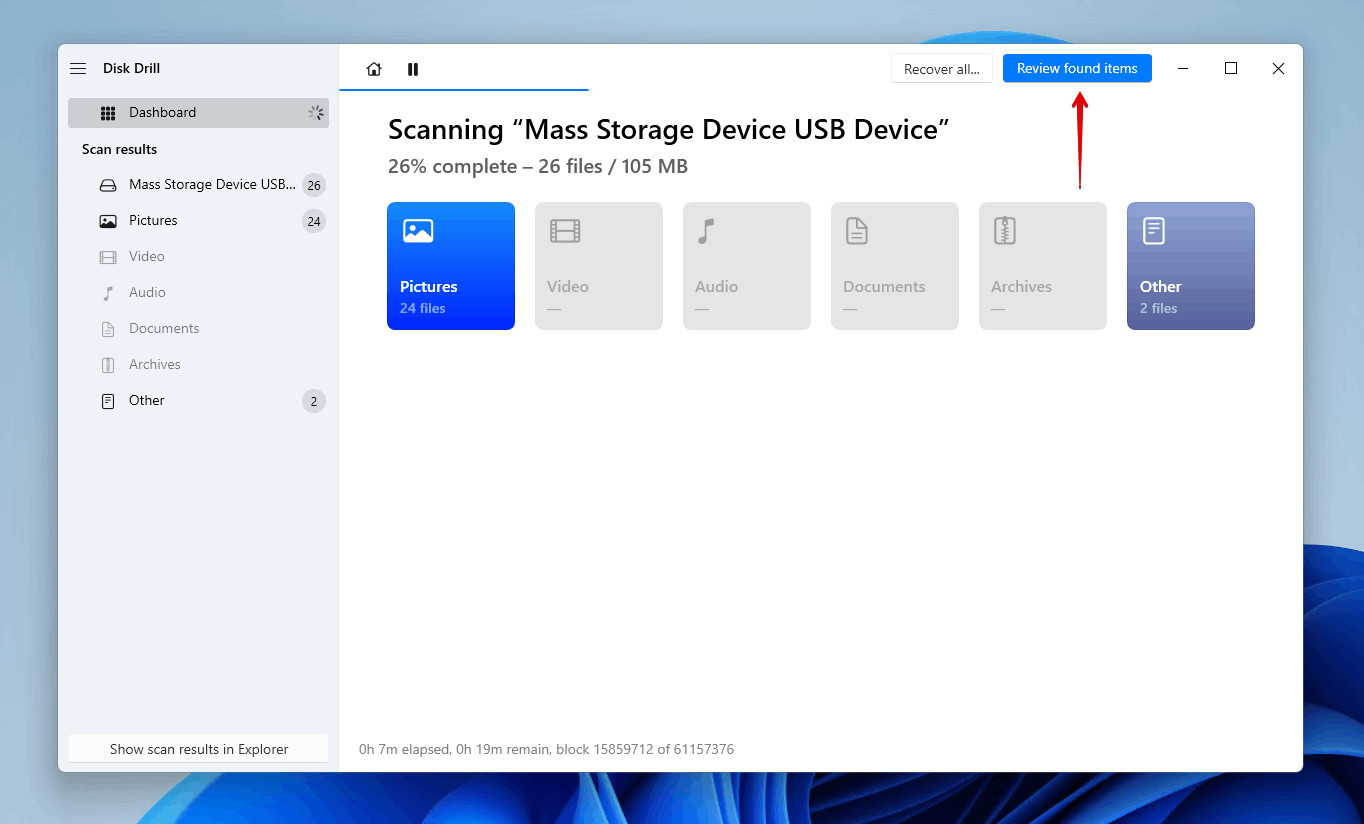 Scanning memory card using data recovery software
 -
Preview Recoverable Photos: After the scan is complete, Disk Drill will display a list of found files. You can filter and preview these files to locate your deleted photos. Use the “Preview” icon to view thumbnails and confirm that the files are indeed the photos you wish to recover.
-
Select Photos for Recovery and Initiate Recovery: Once you’ve identified the photos you want to restore, check the boxes next to them to select them. Then, click the “Recover” button to proceed with the recovery process.
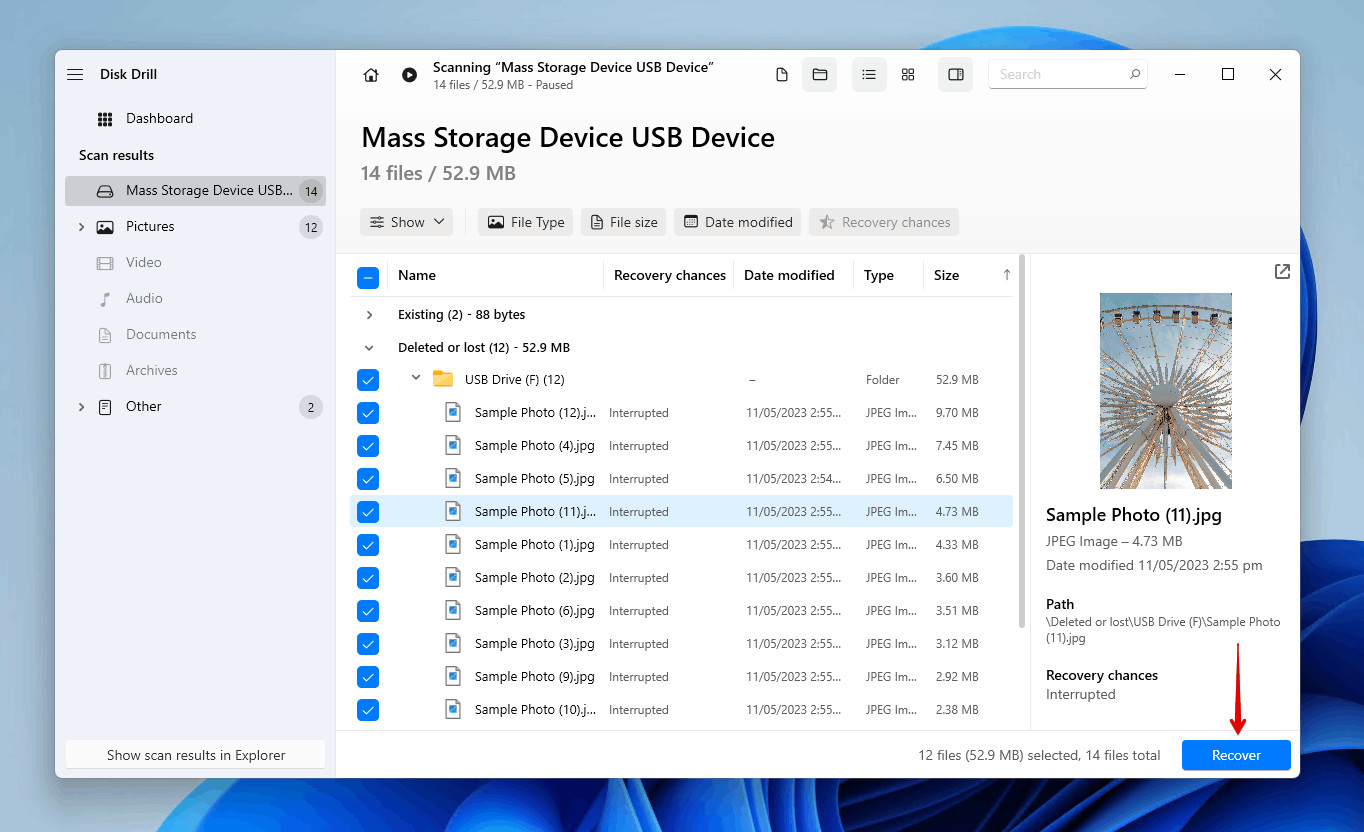 Selecting the SD card photos.
 -
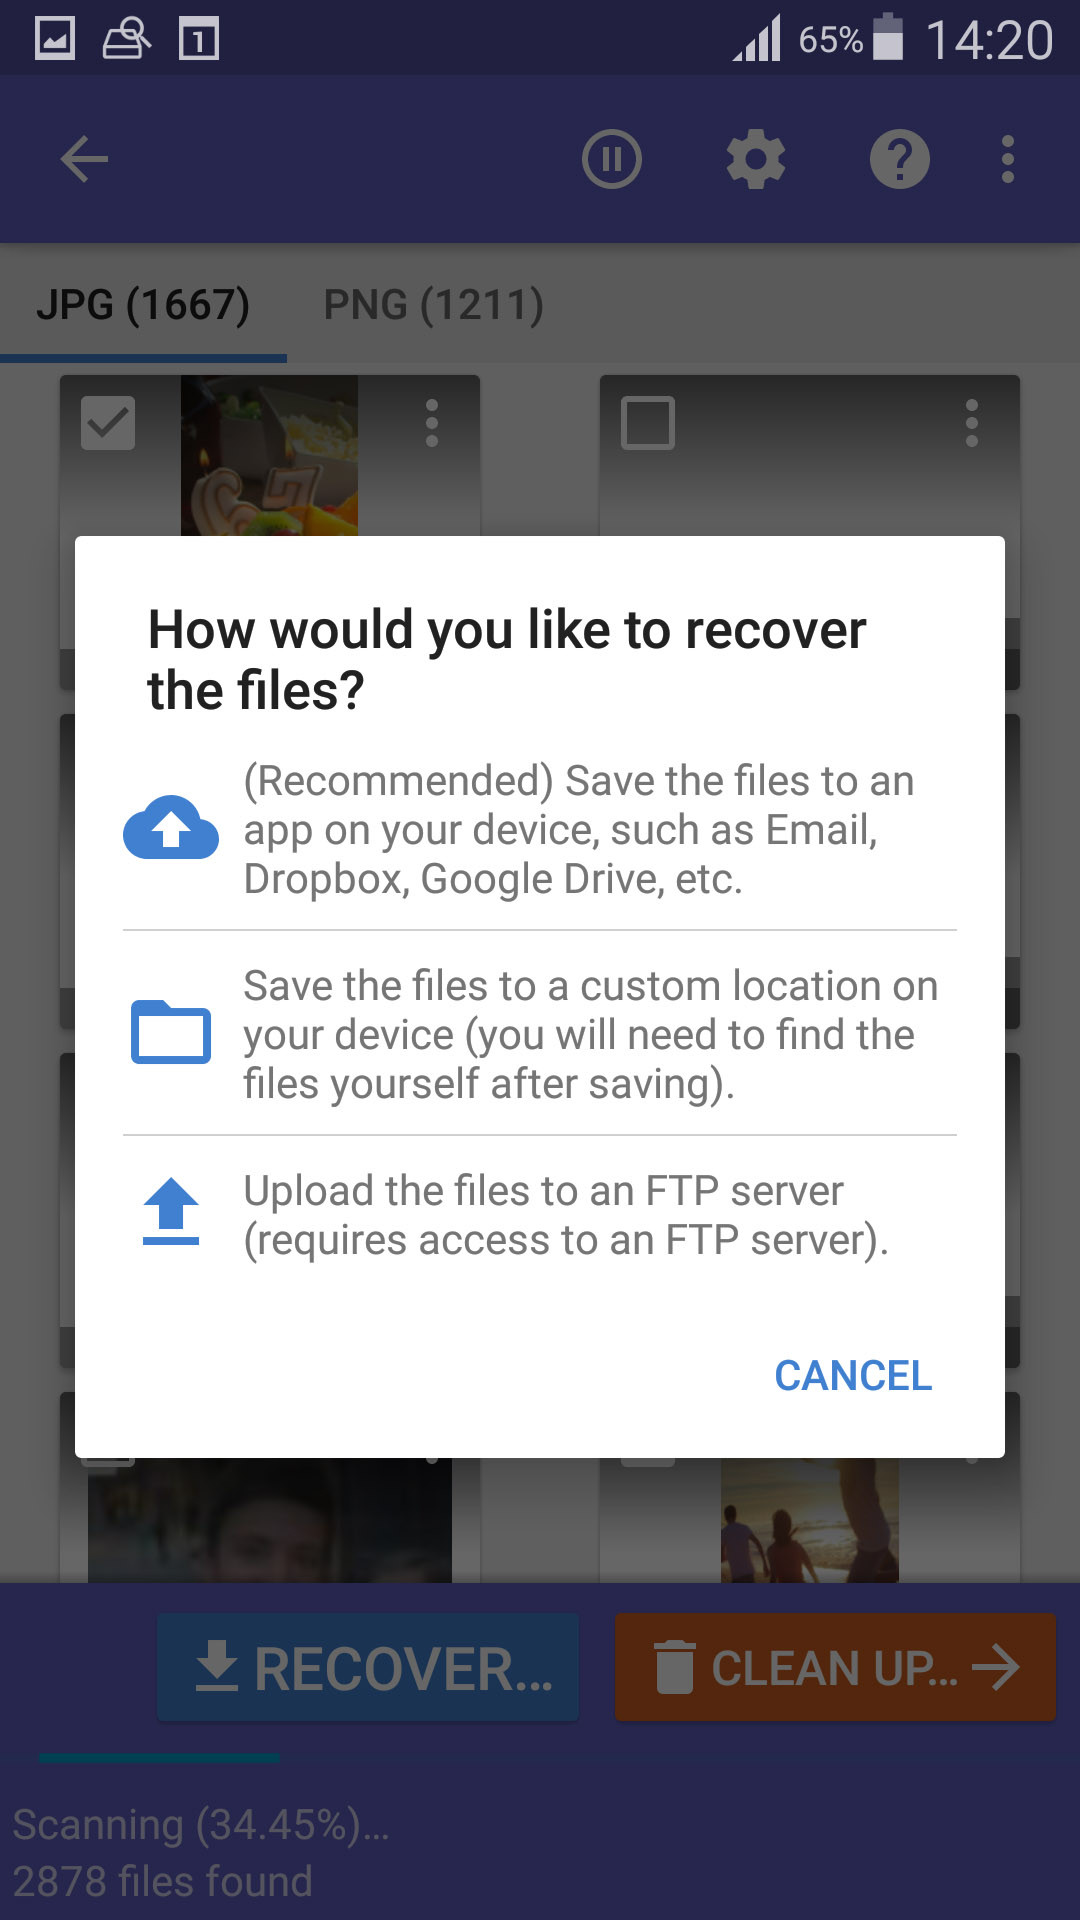
Choose a Recovery Destination: It’s crucial to select a recovery destination that is different from the SD card you are recovering from. Choose a folder on your computer’s internal hard drive or another external drive. Recovering files to the same SD card could potentially overwrite other recoverable data. Click “OK” to start the photo recovery process.
 Choosing a recovery destination.
Step-by-Step Guide to Recover Deleted Photos from an SD Card on Mac
Disk Drill also offers a free version for Mac users, allowing you to preview recoverable files before purchasing the Pro version for full recovery capabilities. The process on Mac is very similar to Windows:
-
Download and Install Disk Drill on Your Mac: Download the Mac version of Disk Drill from the official website and install it on your macOS system.
Data recovery for free Your Companion for Deleted Files Recovery
-
Connect Your SD Card to Your Mac: Connect the SD card containing your deleted photos to your Mac using an SD card reader or the built-in SD card slot if available.
-
Select Your SD Card in Disk Drill: Launch Disk Drill and locate your SD card in the list of disks. Select it to prepare for scanning.
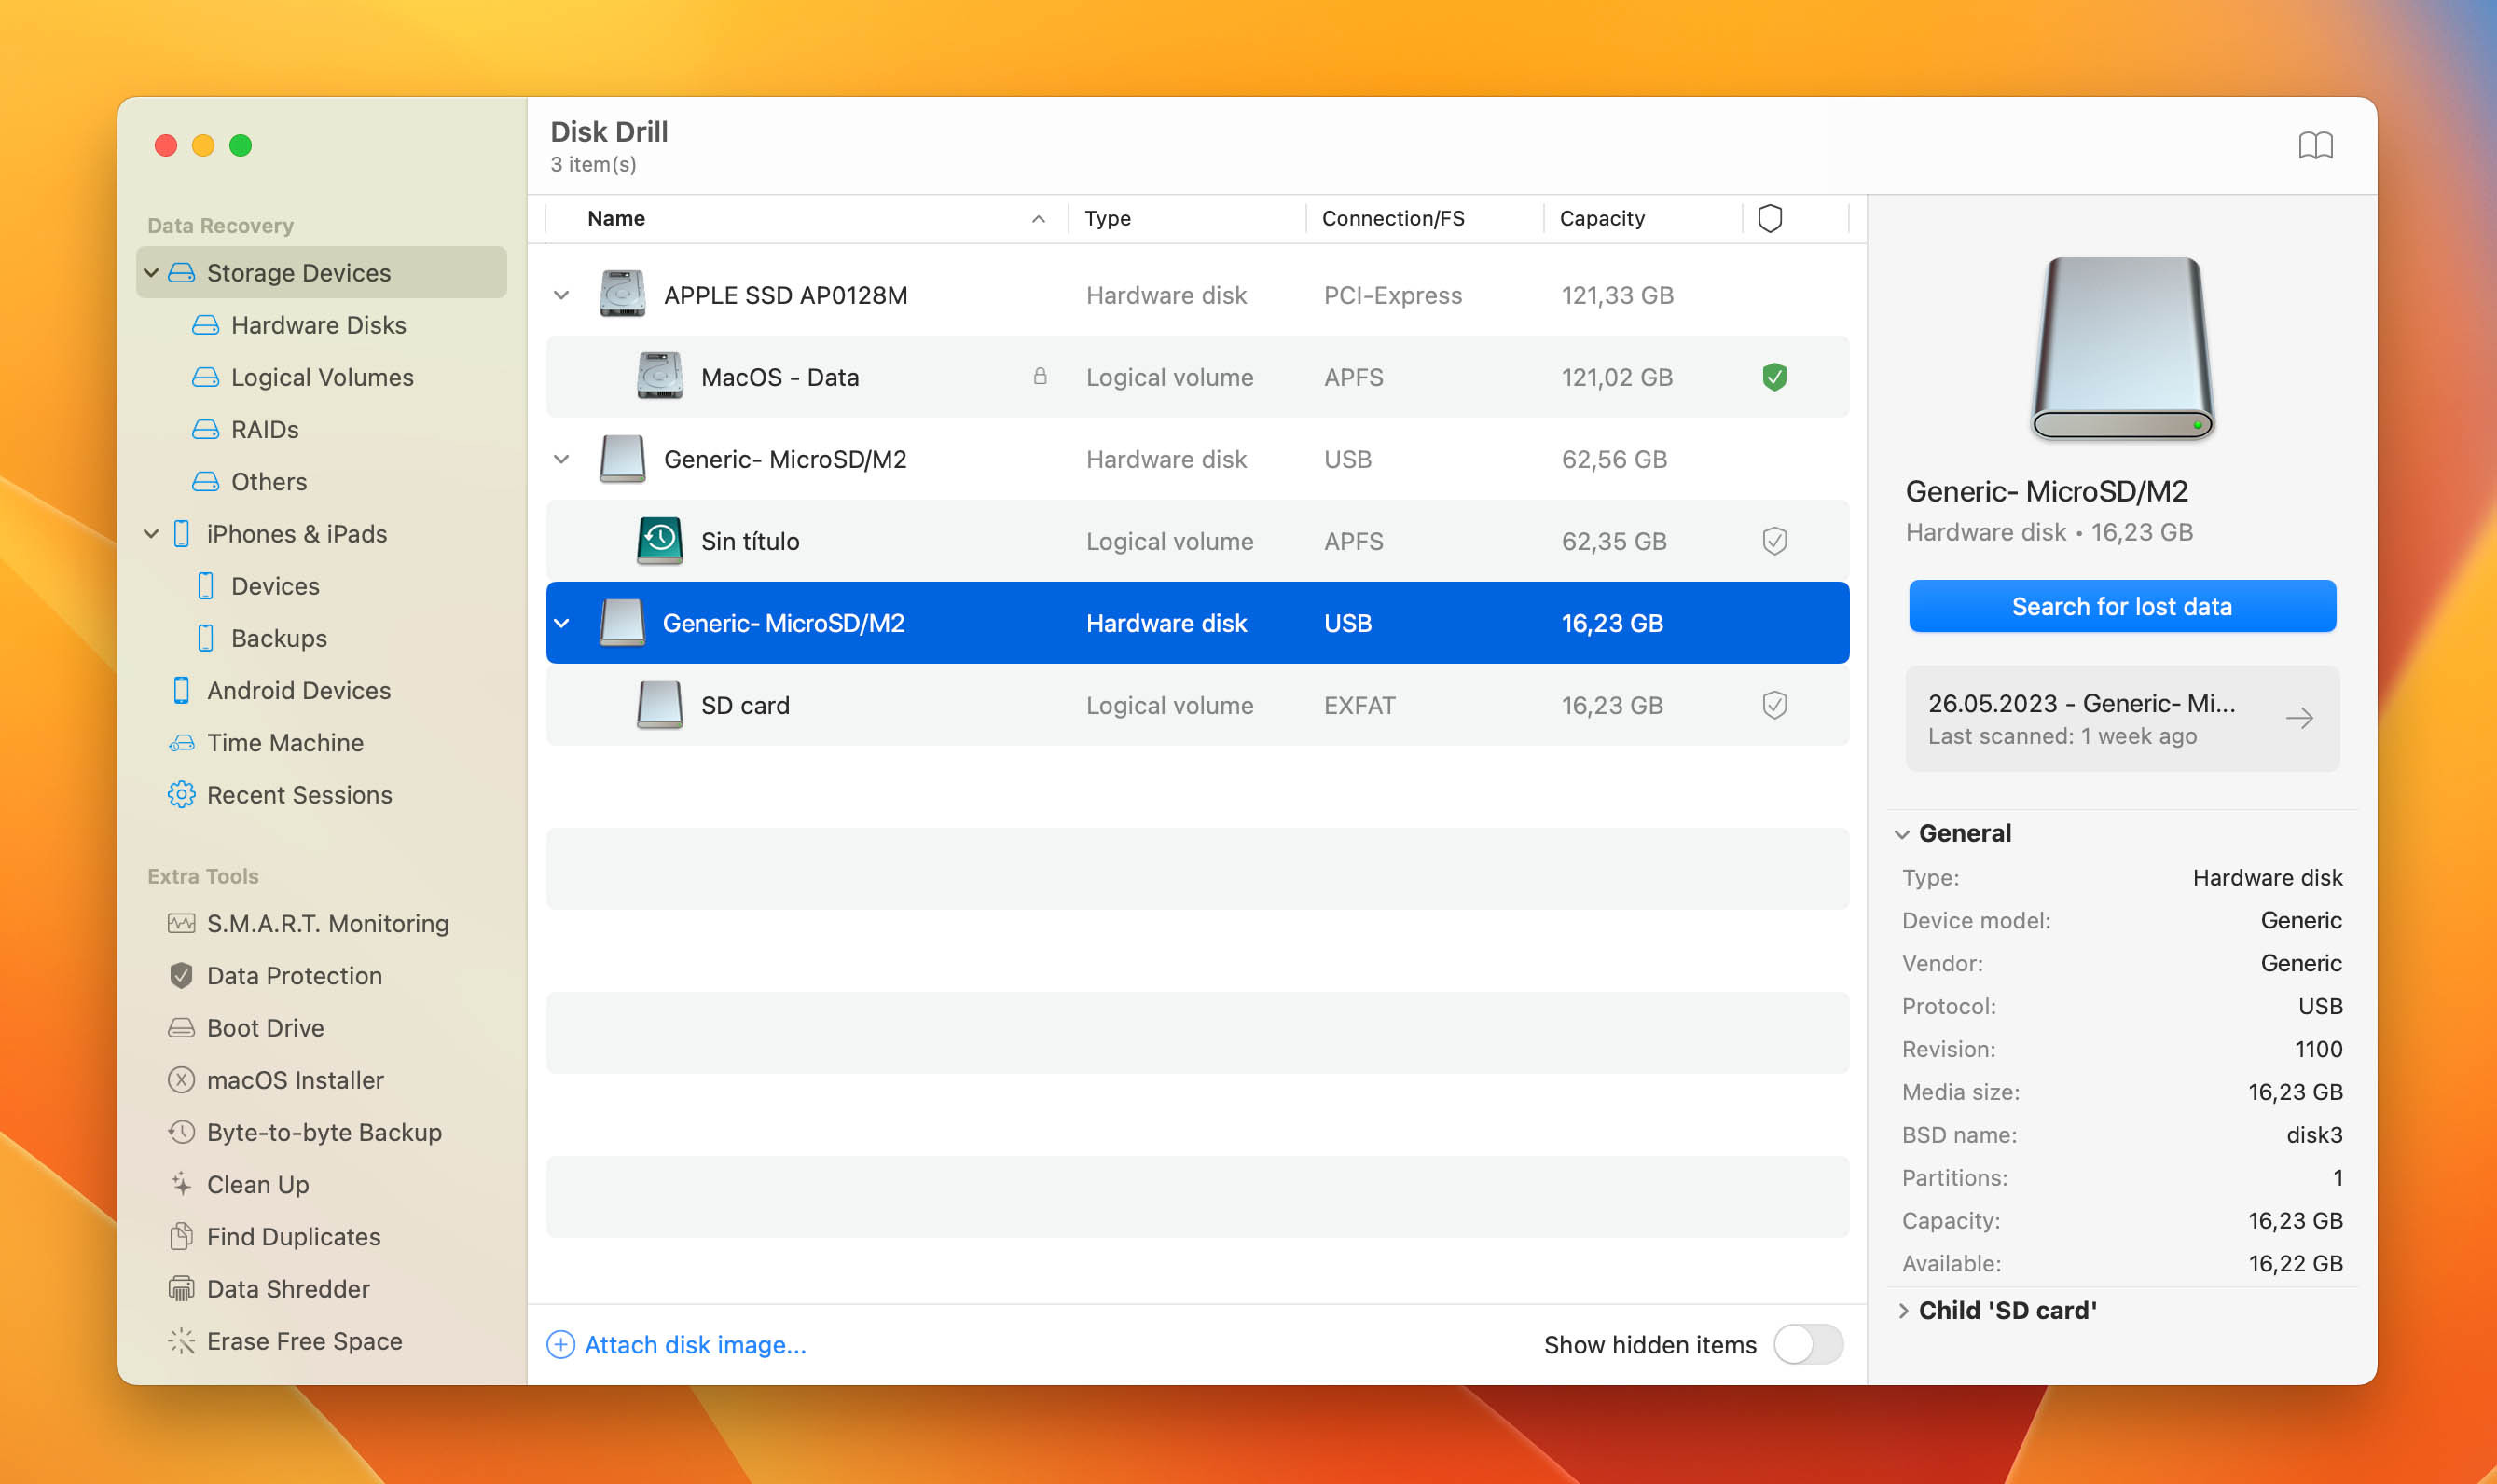 sd card in disk drill
 -
Initiate the Scan: Click the “Search for lost data” button to start Disk Drill’s scanning process on your selected SD card. The scan will search for recoverable photos.
-
Review Recoverable Files: After the scan completes, Disk Drill will present a list of recoverable files. Browse through the files, using the preview option to verify the photos you want to recover. You can use the search bar to find specific file names or types if needed.
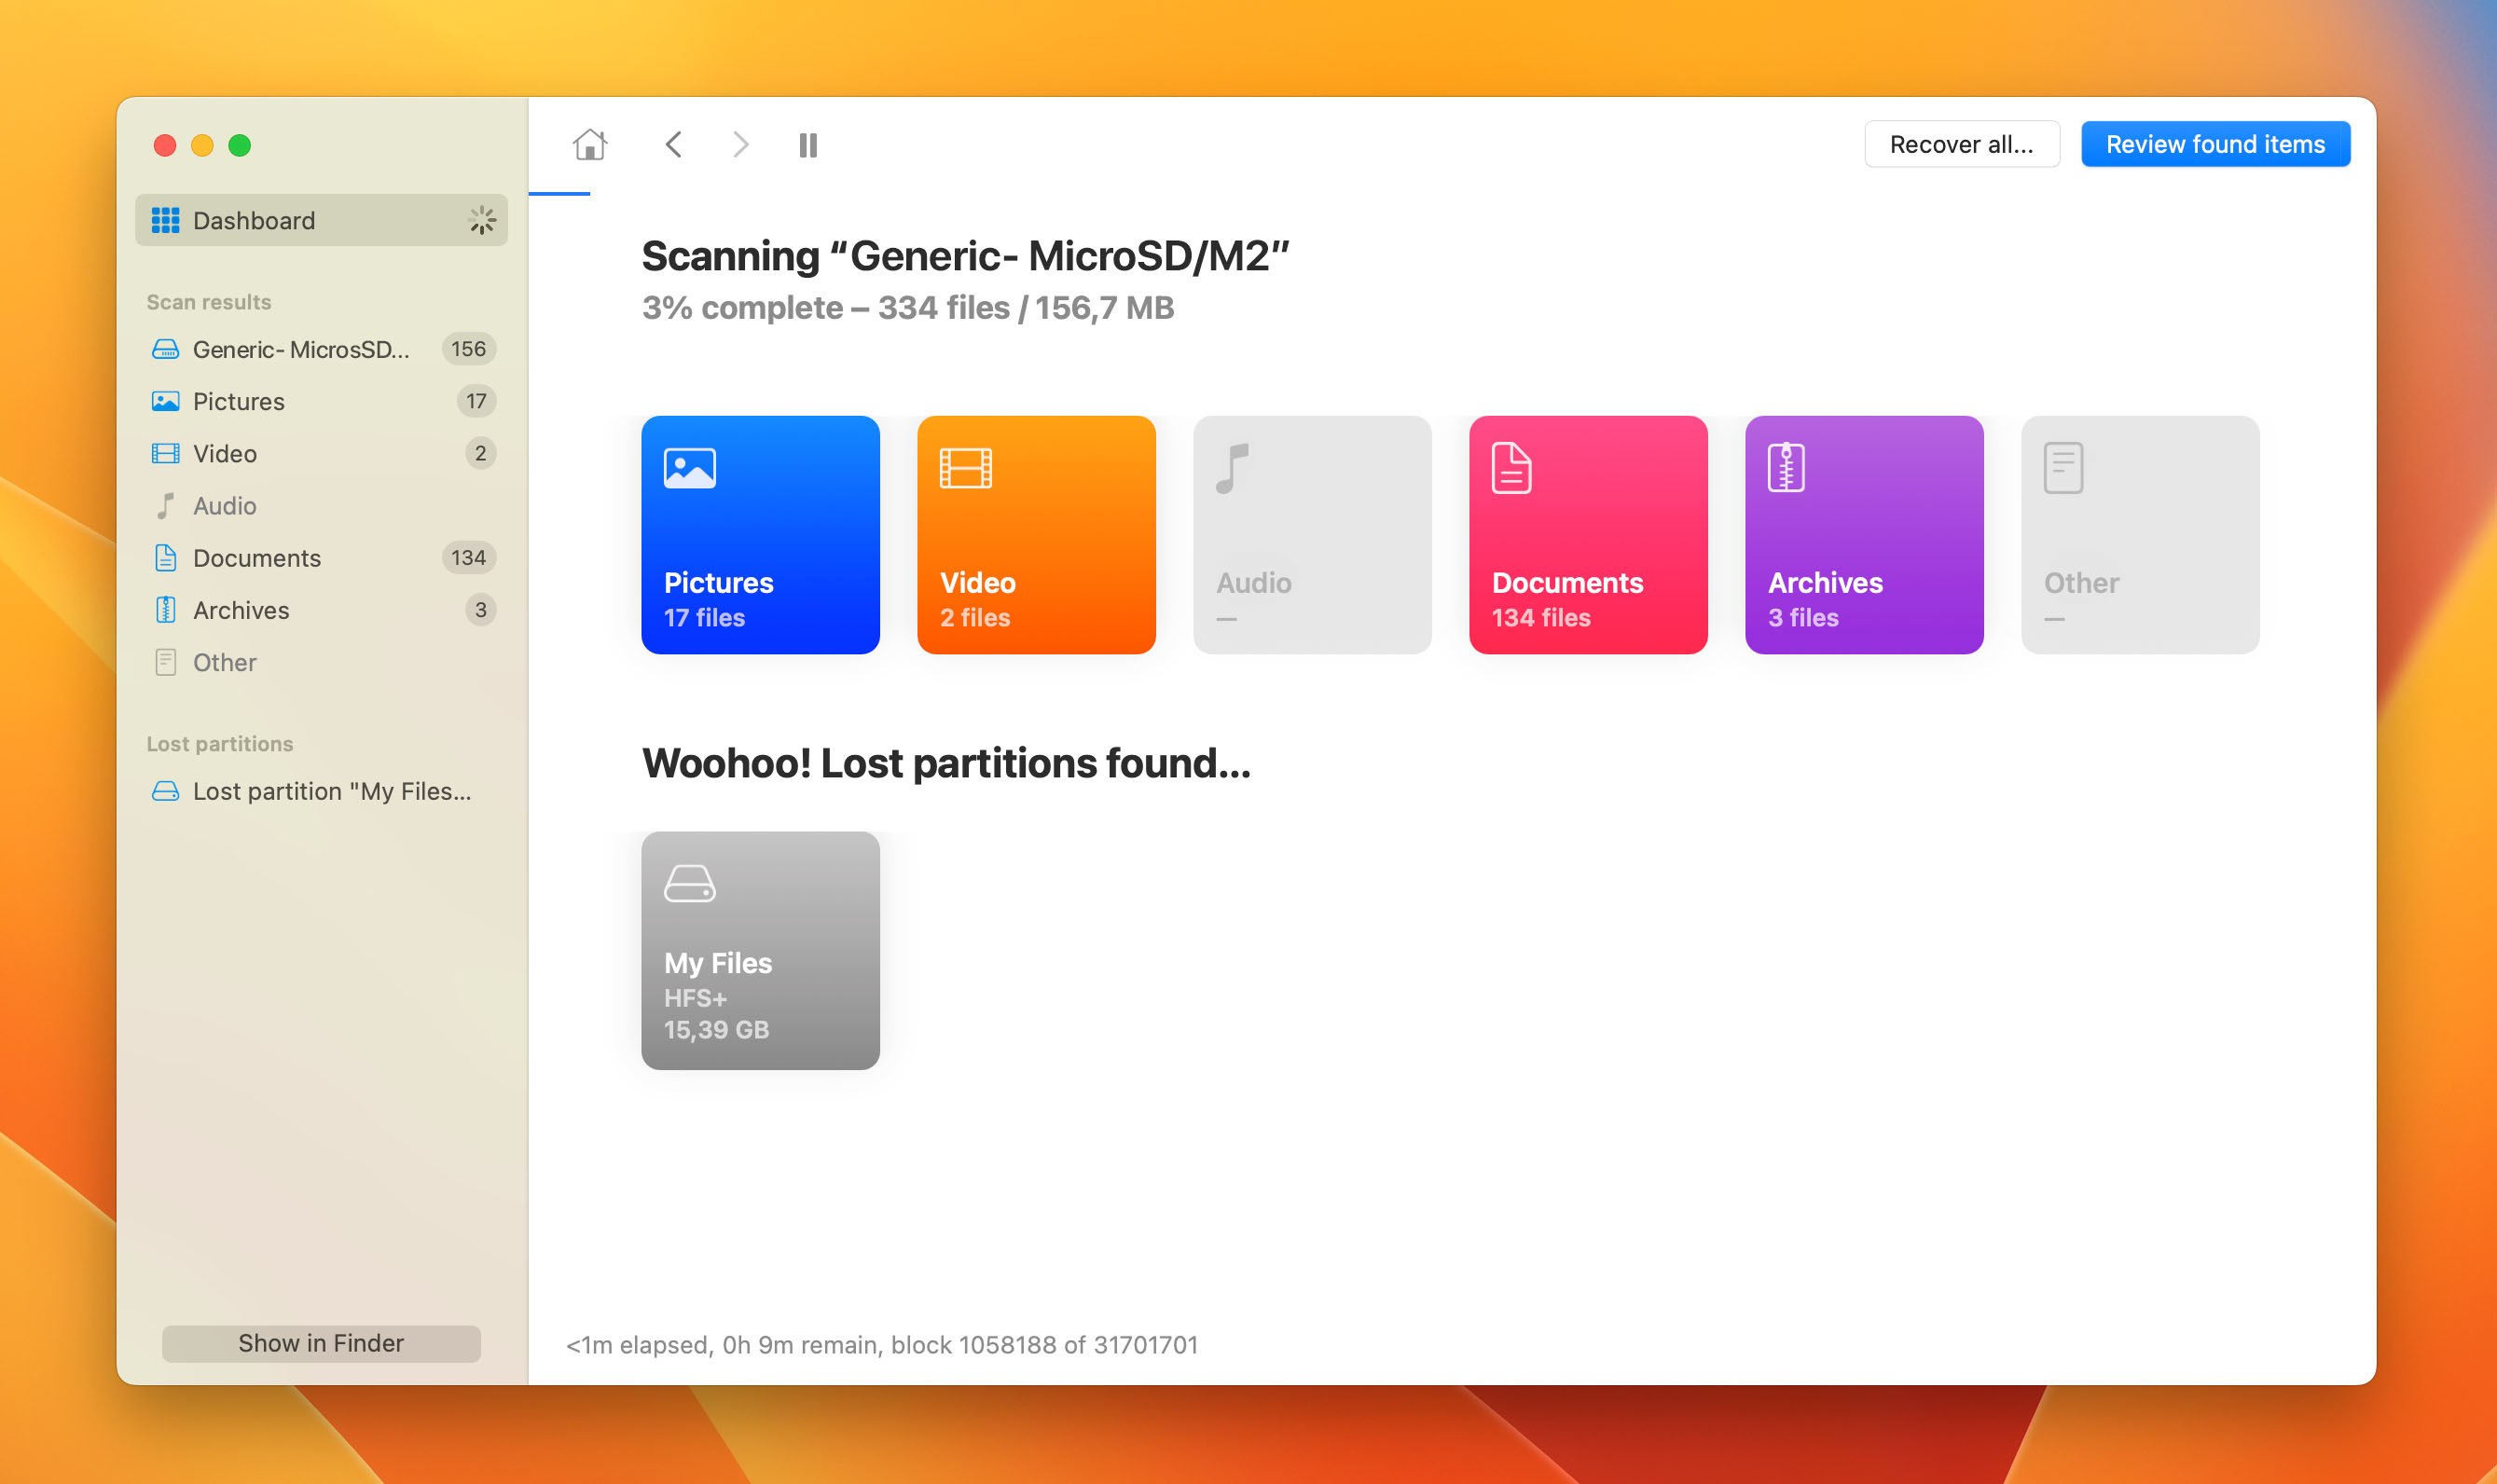 scan in progress
 -
Select and Recover Photos: Choose the photos you wish to recover by checking the corresponding boxes. Then, click the blue “Recover” button to begin the recovery process.
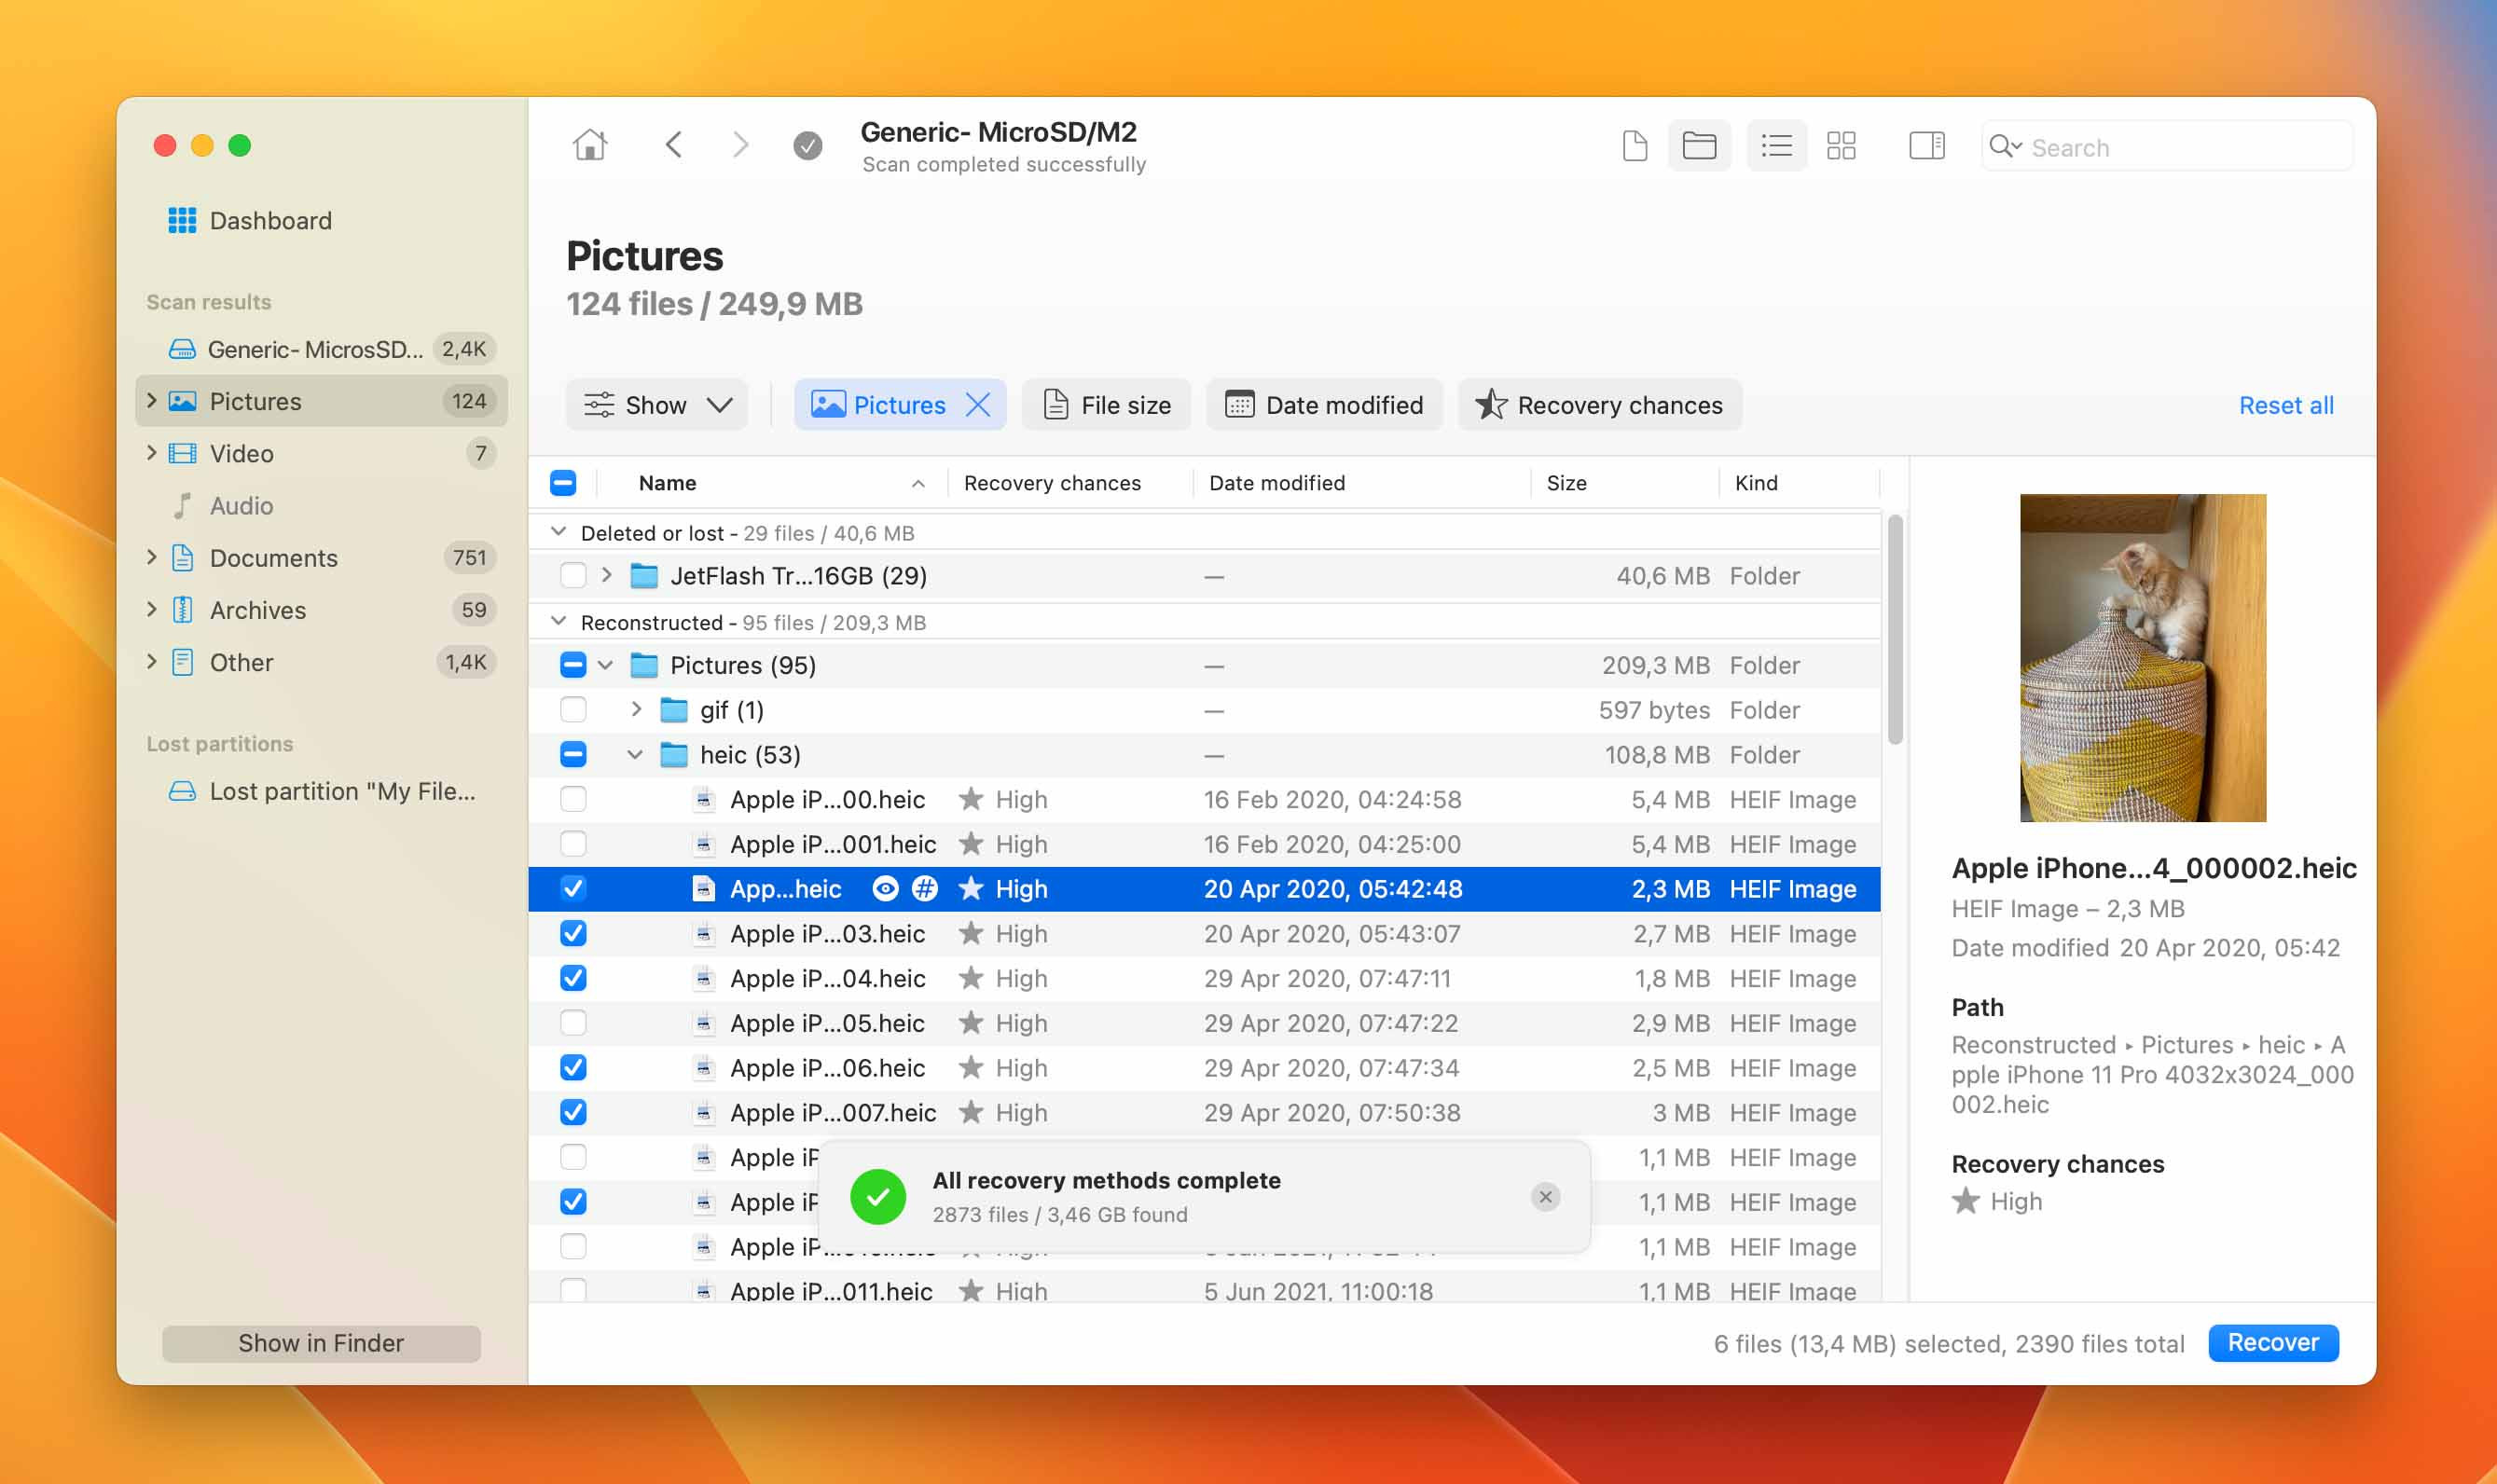 selecting files for recovery in disk drill
 -
Choose a Recovery Location: Select a safe location on your Mac’s internal drive or an external storage device to save the recovered photos. Avoid saving them back to the original SD card to prevent potential data corruption or overwriting. Click “OK” to finalize the recovery.
Method 2: Recovering Pictures Using an Android Data Recovery App
If your deleted photos were on an SD card used in an Android smartphone or tablet, you can attempt recovery directly on the device using an Android data recovery app. DiskDigger photo recovery is a popular and effective app available on the Google Play Store.
Steps to recover deleted photos with DiskDigger:
-
Download and Install DiskDigger: Get DiskDigger photo recovery from the Google Play Store and install it on your Android device.
-
Launch DiskDigger and Scan Your SD Card: Open the DiskDigger app. You will be prompted to select a storage location to scan. Choose your SD card, which is typically listed as “/mnt/sdcard” or a similar designation.
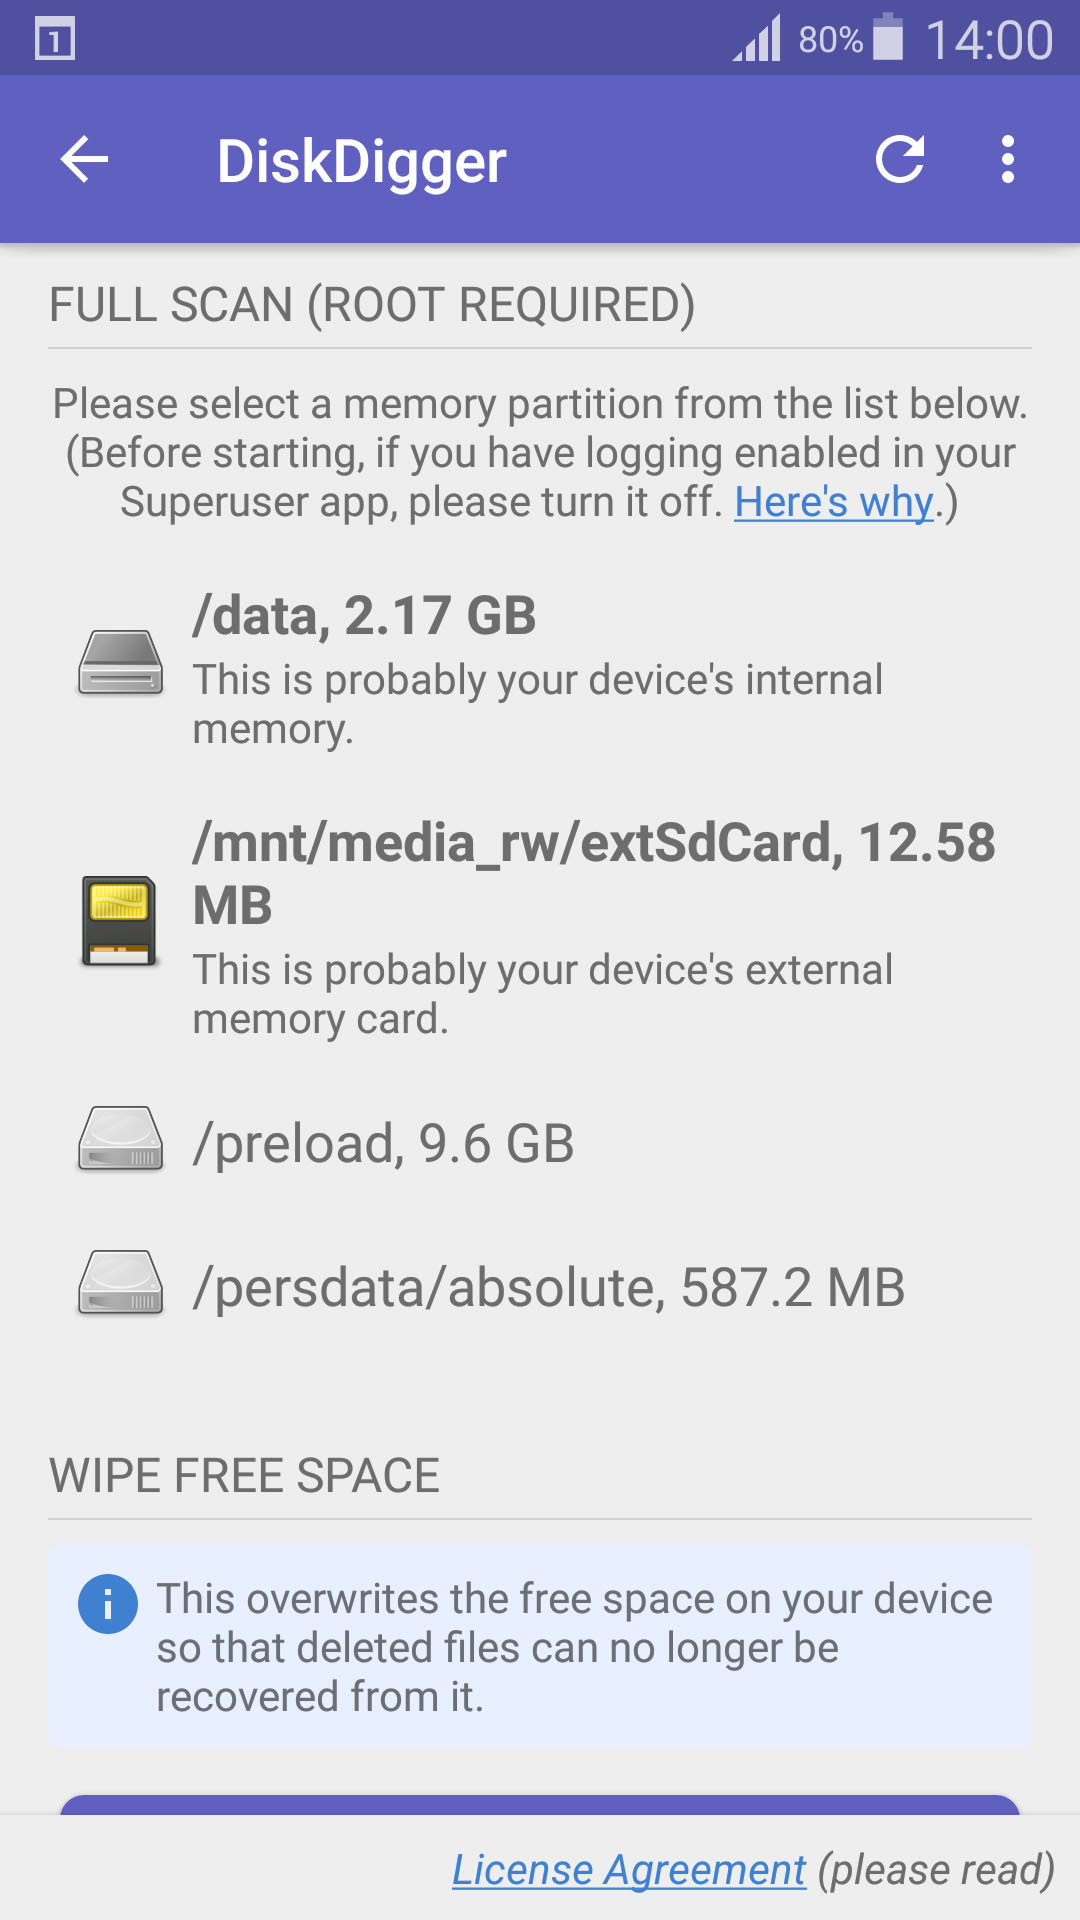 select storage device
 -
Specify File Types (Optional): You can refine your scan by specifying the file types you are looking for (e.g., JPG, PNG). This can speed up the scanning process. Tap “OK” to start the scan.
 select file types
 -
Select Photos for Recovery: DiskDigger will display thumbnails of the photos it finds. Browse through them and select the photos you want to recover.
 select files for recover
 -
Recover Photos to Your Device: Tap the “Recover” button. You will be asked to choose a recovery destination. Select a folder on your Android device to save the recovered photos.
 select recover destination
For optimal results with DiskDigger, especially for deep scans, a rooted Android device is recommended, and the Pro version offers more advanced features. However, even the free version can be effective for recovering recently deleted photos. Keep in mind that Android-based recovery apps may not be as powerful as desktop software like Disk Drill in recovering deeply lost files.
Method 3: Restoring Photos from a Backup
Proactive data backup is always the best defense against data loss. If you’ve been diligent about backing up your photos, recovering deleted images from an SD card becomes a straightforward process.
Retrieving Photos from a Windows Backup
Windows 10 and 11 include a built-in backup tool called File History. If you’ve enabled File History to back up your SD card, you can easily restore deleted photos.
-
Open File History: Click the Start button and type “File History.” Select “File History” from the search results to open the utility.
 Opening File History.
 -
Restore Personal Files: In the File History window, click “Restore personal files” in the left-hand menu.
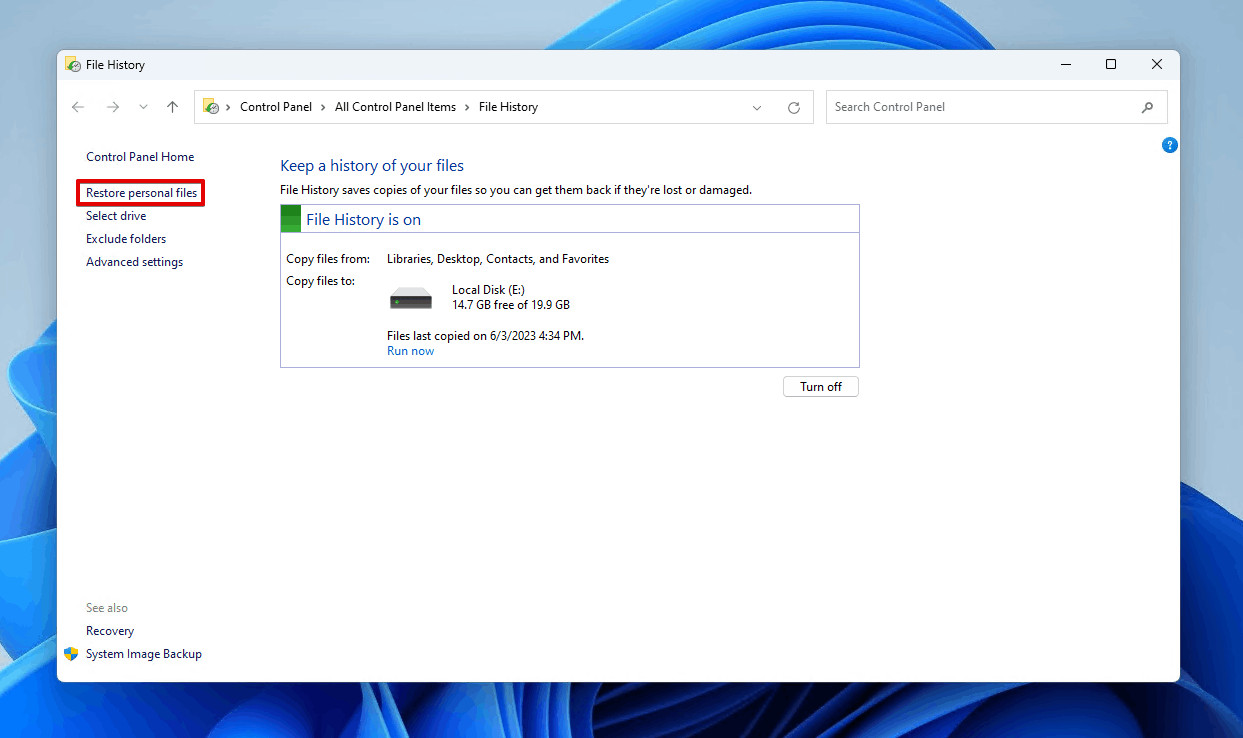 Restoring personal files.
 -
Navigate to Your Backed-Up Photos: Browse through the File History backups to locate the folders where your SD card photos were stored. Use the navigation arrows to go back in time to find versions of your files before deletion. Select the photos you wish to restore.
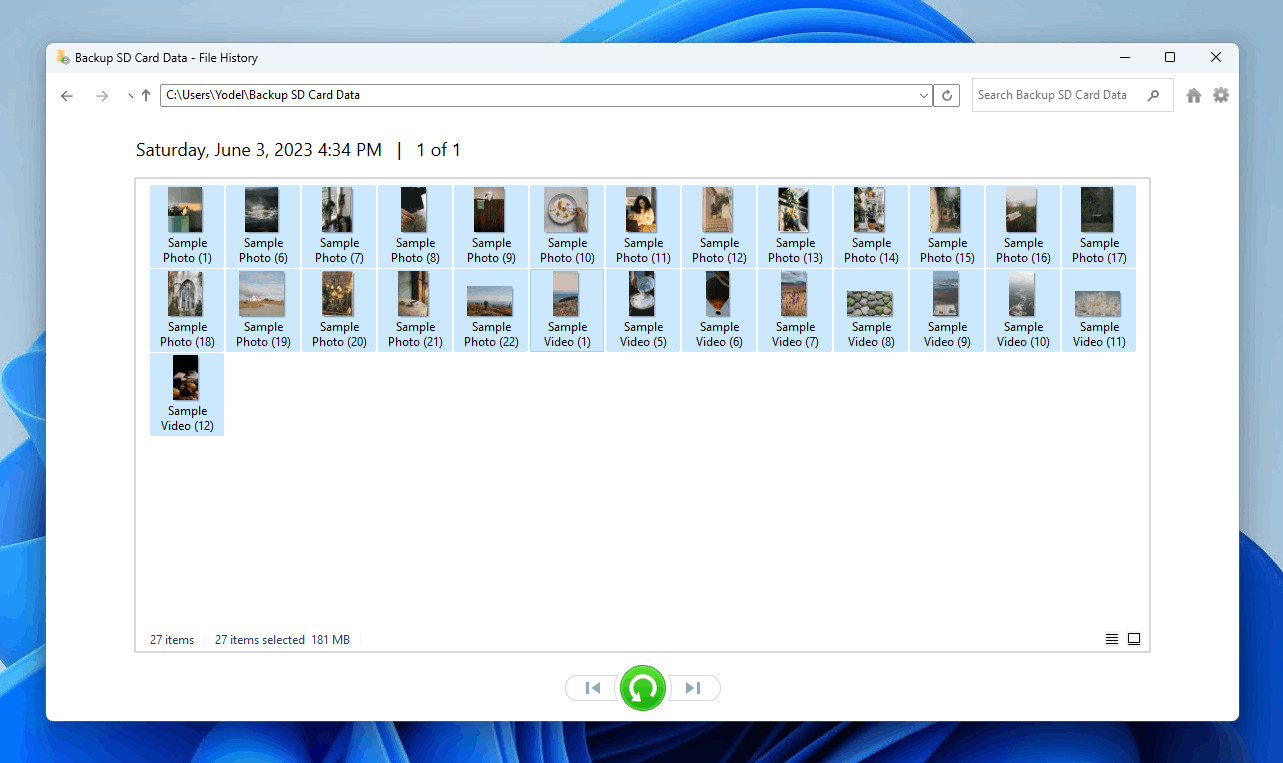 Selecting the SD card photos.
 -
Restore Your Photos: Click the green “Restore” button. To restore the photos to their original location, simply click “Restore”. To choose a different destination, right-click the “Restore” button and select “Restore to…” to specify a custom folder.
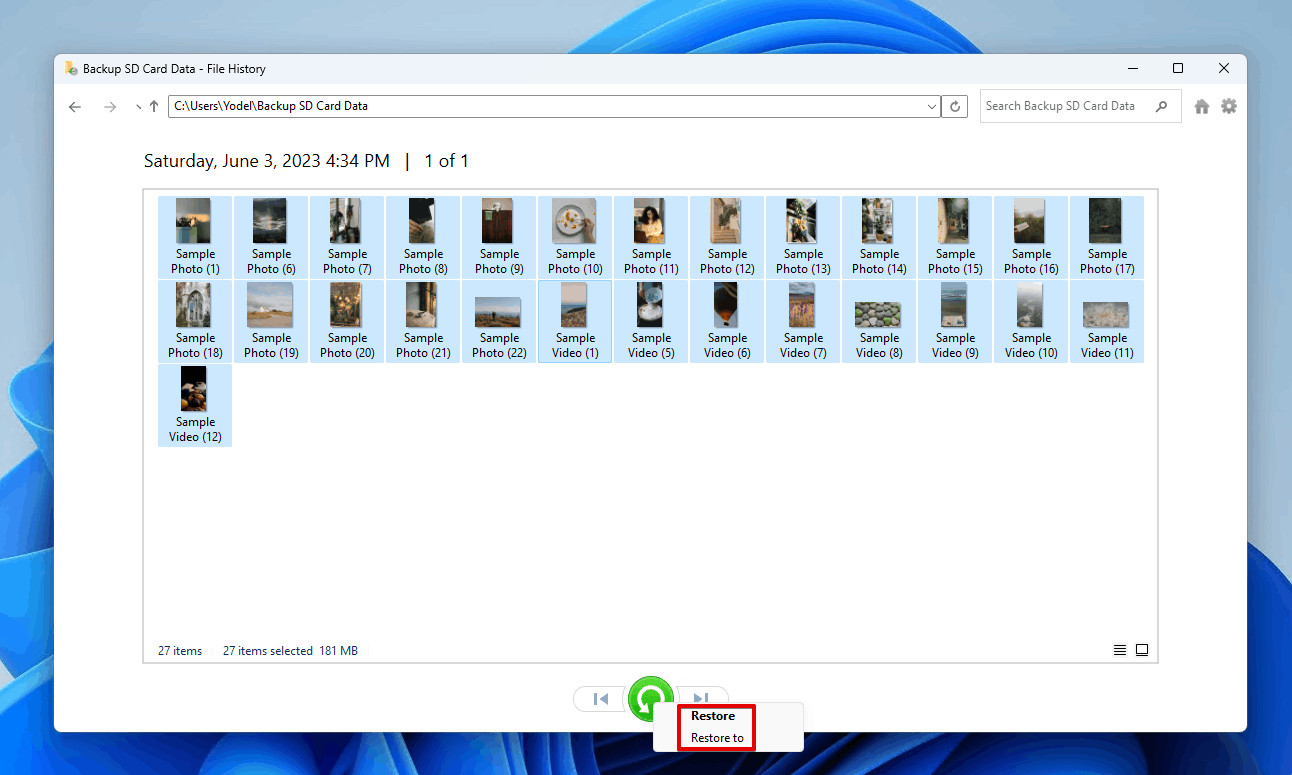 Choosing how to restore the photos.
If you’ve simply copied photos from your SD card to your computer without using File History, you can also try searching for the photos directly on your computer using File Explorer. Use keywords related to the photos or file types in the search bar.
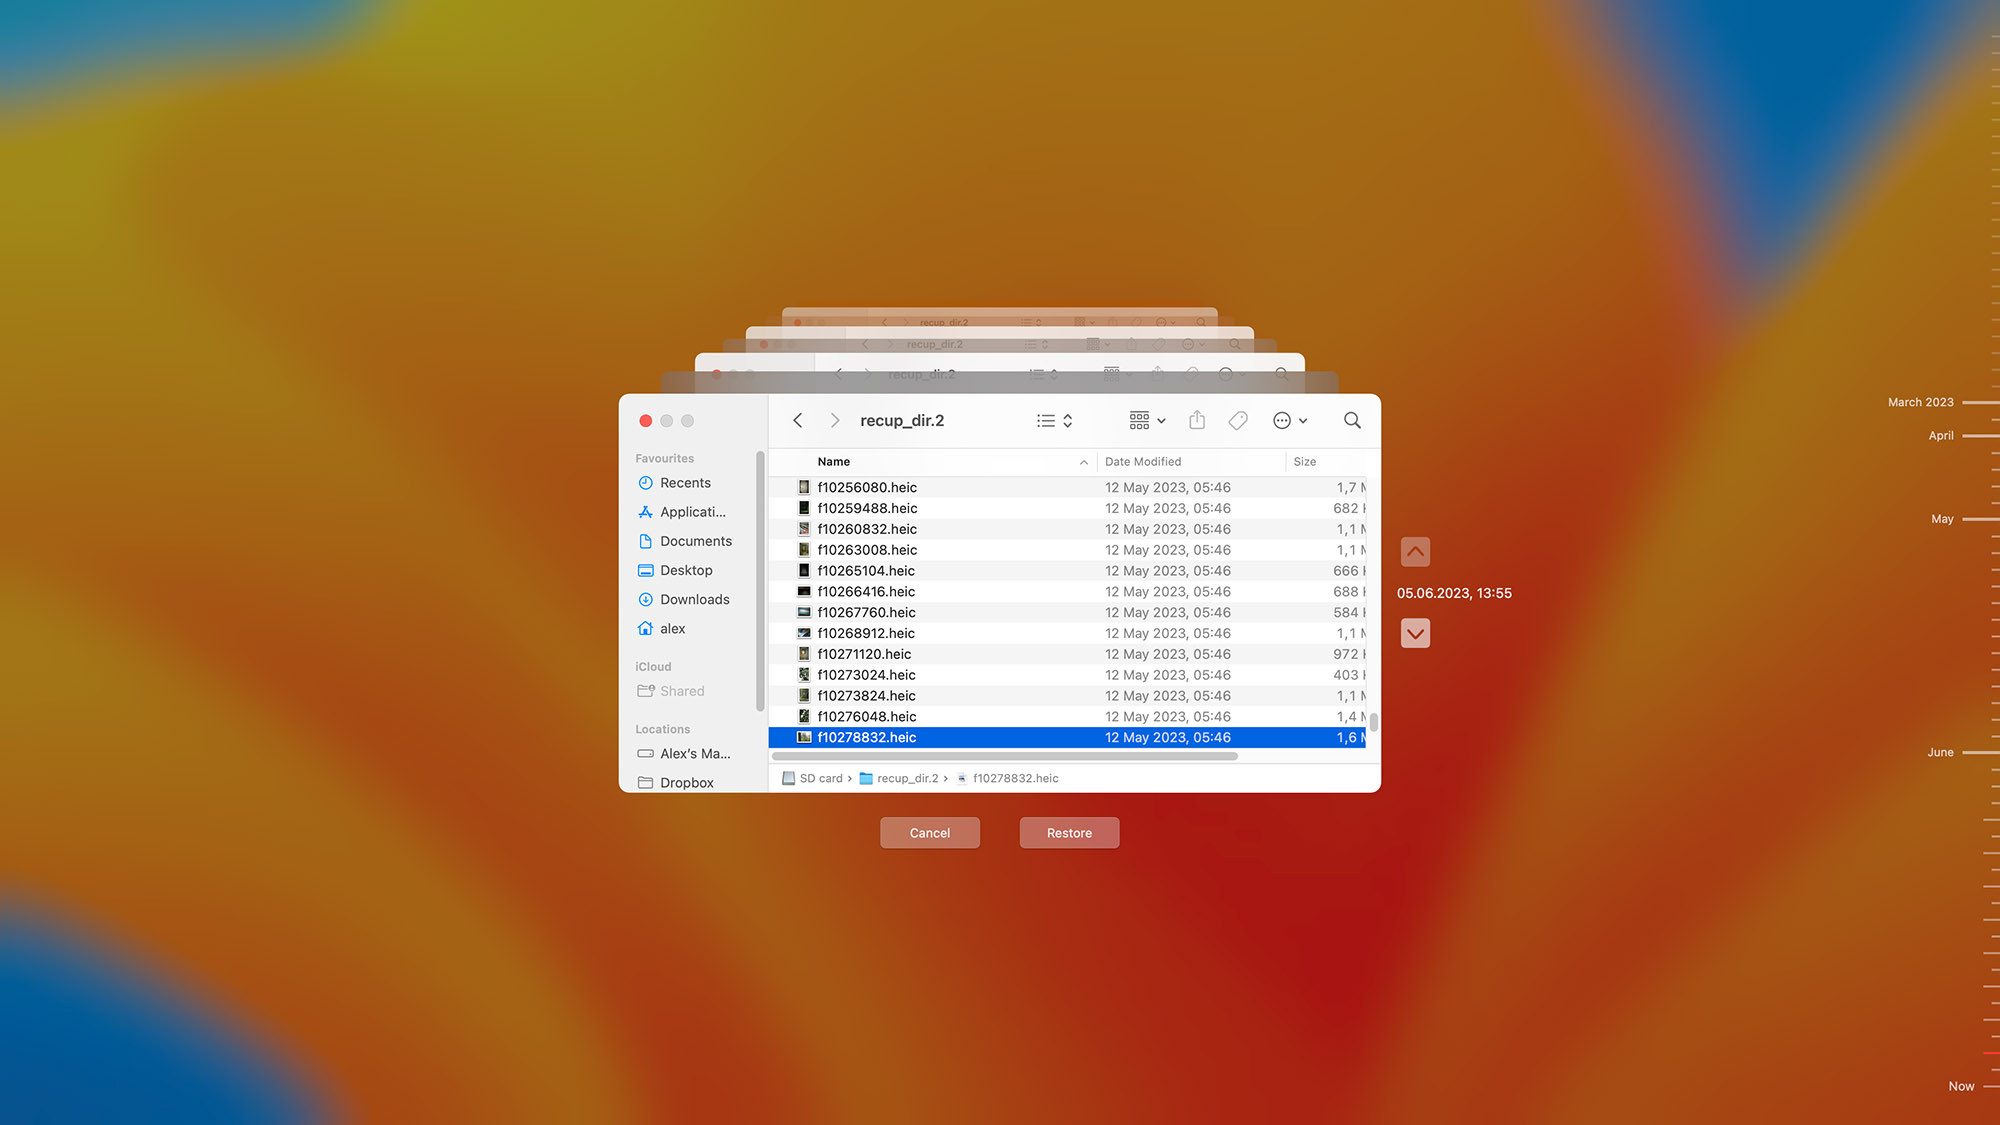
Restoring Photos from a Mac Backup
macOS offers Time Machine as its primary backup solution. If you’ve been using Time Machine to back up your Mac, including external devices like your SD card, you can restore deleted photos easily.
To restore photos from Time Machine, you need to have previously connected your SD card to your Mac at least once while Time Machine backups were enabled.
For detailed instructions on using Time Machine, Apple provides a comprehensive guide here.
A robust backup strategy is crucial for data protection. In scenarios like SD card loss or theft, backups may be the only way to recover your precious photos. Regular backups are highly recommended to safeguard your memories.
 time machine
Method 4: Retrieving Photos from Cloud Backups
Cloud backup services offer another layer of protection for your photos. If you use cloud services like Google Photos, OneDrive, or Dropbox, especially from your Android phone, your photos may already be backed up automatically.
Recovering photos from cloud backups is generally straightforward:
- Access Your Cloud Storage: Open the app or website of your cloud storage service (e.g., Google Photos app, OneDrive website, Dropbox app).
- Navigate to Your Photos: Locate your photo library within the cloud service.
- Download Recovered Photos: Find the deleted photos you wish to restore and download them back to your computer or device.
 Recovering from a Cloud Backup
Consult the official help guides for your specific cloud storage service for detailed instructions on downloading files:
Cloud backups offer the advantage of accessibility from any device, anywhere, making them a valuable recovery option even if your original device is lost or damaged.
Method 5: Checking Your Device’s Internal Memory or Storage
Before resorting to more complex methods, it’s worth checking your device’s internal storage or temporary storage locations, especially on computers.
When you delete a photo, it’s not immediately physically erased. The operating system simply marks the space as available. Therefore, recently deleted photos might still reside in temporary locations.
Important: Stop using your device immediately once you realize you’ve deleted photos you want to recover. This minimizes the chance of new data overwriting the storage space containing your deleted photos, increasing your recovery chances.
On macOS, the Photos app, if used to import photos from your SD card, might retain copies of your images. If you delete photos within the Photos app, they are moved to the “Recently Deleted” folder for 30 days before permanent deletion. Check this folder within the Photos app to restore recently deleted photos.
Similarly, Android photo gallery apps may have “Trash” or “Recently Deleted” folders where deleted photos are temporarily stored. Explore your photo gallery app’s settings and menus to check for such folders.
Method 6: Recovering Photos from the Recycle Bin (Windows) or Trash (macOS)
The Recycle Bin on Windows and Trash on macOS act as safety nets for deleted files. However, it’s crucial to understand their limitations regarding external storage devices like SD cards.
Recovering Photos from the Recycle Bin on Windows
Windows typically sends deleted files to the Recycle Bin only if they are deleted from the internal hard drive. Files deleted directly from an external storage device, including SD cards, generally DO NOT go to the Recycle Bin. For SD card photo recovery, data recovery software is usually necessary.
However, if you copied photos from your SD card to your computer and then deleted them from your computer’s hard drive, they might be in the Recycle Bin.
To check and restore files from the Recycle Bin:
-
Open Recycle Bin: Double-click the “Recycle Bin” icon on your Windows Desktop.
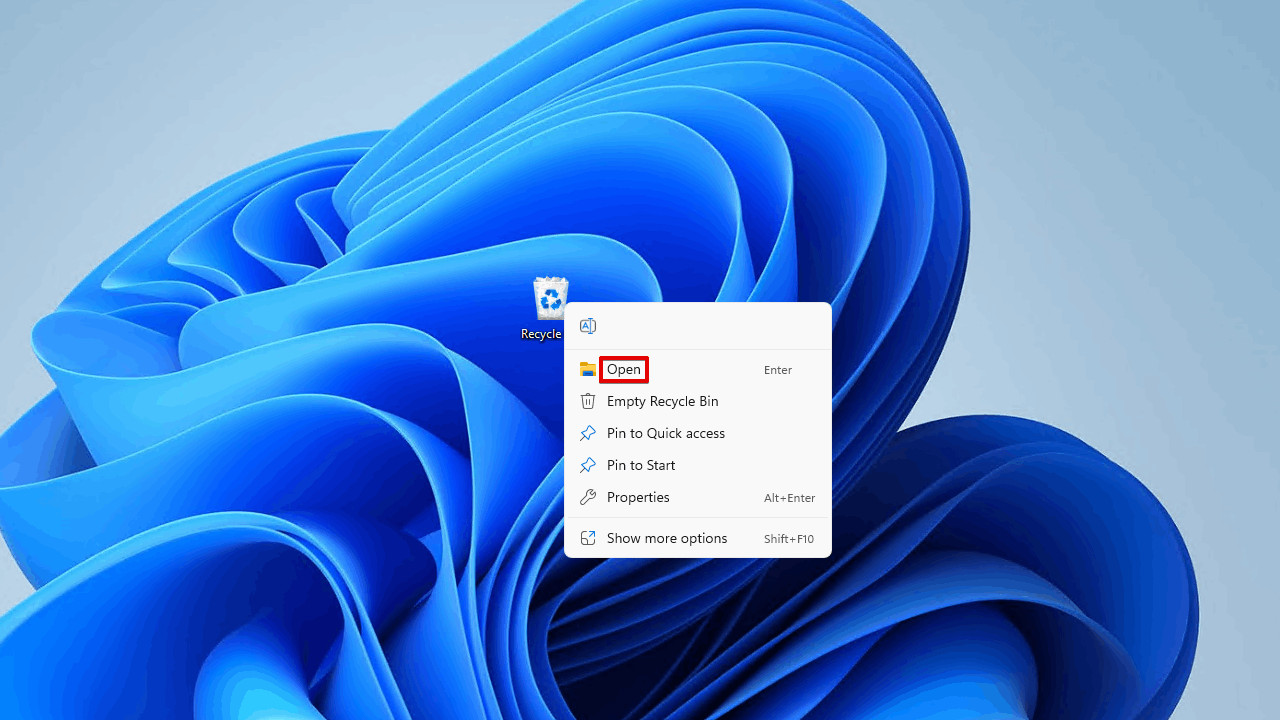 Opening Recycle Bin.
 -
Select and Restore Photos: Browse through the Recycle Bin for your deleted photos. Select the photos you want to restore, and then click “Restore the selected items”.
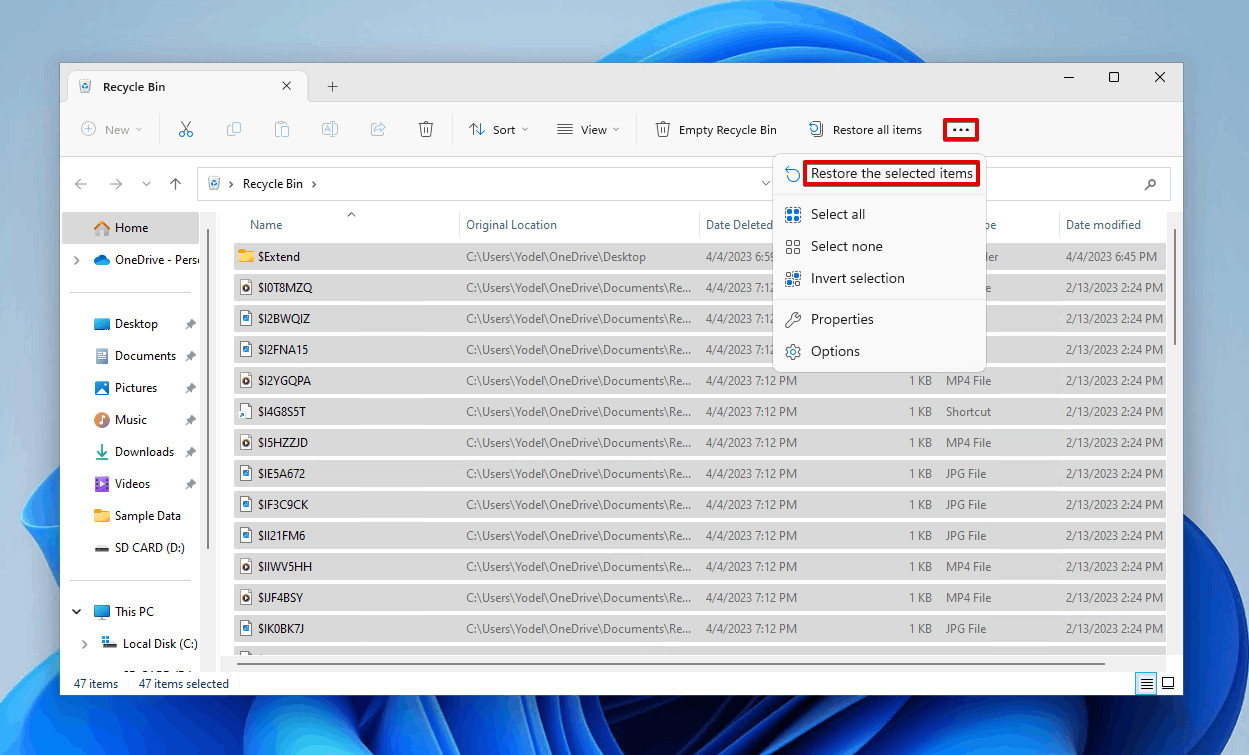 Restoring the selected files.
The restored photos will be returned to their original locations on your computer’s hard drive. You can also drag and drop files from the Recycle Bin to a different folder if desired.
Recovering Photos from Trash on Mac
Similar to Windows Recycle Bin, macOS Trash is designed for files deleted from the internal drive. For older macOS versions, deleting files from external drives might create a hidden “.TRASHES” folder on the external drive itself. However, this behavior is not consistent in current macOS versions.
To check the Trash:
- Open Trash: Open Finder and select “Trash” from the sidebar.
- Restore Photos (If Found): If you find your deleted photos in the Trash, drag and drop them to a safe location on your Mac.
For files deleted directly from an SD card on modern macOS, data recovery software is generally the required solution.
Conclusion: Recovering Your Deleted SD Card Photos
As you’ve learned, recovering deleted photos from an SD card is often achievable through various methods. The best approach depends on the situation, your operating system, and whether you have backups in place.
For the highest chance of success, especially for deeply deleted or formatted SD cards, data recovery software like Disk Drill for Mac or Disk Drill for Windows is highly recommended. These tools offer powerful scanning capabilities and user-friendly interfaces. The free download versions allow you to preview recoverable files, and Windows users can recover up to 500MB for free, making it a risk-free starting point. Download Disk Drill today to safeguard your precious memories from accidental deletion.
Read also:
Ways to Recover Lost Photos from iPhone
Recover Permanently Deleted Photos on Mac
Recover Permanently Deleted Photos From Android
Best Photo Recovery Software Tools
FAQ: Recovering Deleted Photos from SD Cards
[
How to recover deleted photos from an SD card?
](#collapse-item-faq1)
To recover deleted photos from an SD card effectively:
- Download and Install Disk Drill: Obtain and install Disk Drill data recovery software on your Windows or Mac computer.
- Connect SD Card and Launch Disk Drill: Connect your SD card to your computer using a card reader. Launch Disk Drill and select your SD card from the drive list.
- Scan the SD Card for Lost Data: Click “Search for lost data” to initiate a comprehensive scan of your SD card.
- Preview and Select Deleted Photos: After scanning, preview the recoverable photos and select the ones you wish to restore.
- Recover to a Safe Location: Click “Recover” and choose a recovery destination on a different drive than the SD card.
[
How to recover photos from a corrupted SD card?
](#collapse-item-faq2)
Recovering photos from a corrupted SD card depends on the severity of the corruption.
- Recognizable SD Card: If your computer recognizes the corrupted SD card, use SD card recovery software like Disk Drill to scan it and attempt to recover as many photos as possible.
- Unrecognizable SD Card: If the SD card is not recognized by your computer, first try to repair the corruption. On Windows, use CHKDSK. On macOS, use First Aid in Disk Utility. After repair, try data recovery software. If still unrecognizable, professional data recovery services might be needed.
[
How can I recover deleted photos from my SD card for free?
](#collapse-item-faq3)
You can use free SD card recovery applications, although free versions often have limitations:
- Disk Drill (Free for up to 500 MB recovery on Windows): Offers a user-friendly interface and free preview of recoverable files.
- PhotoRec (Free, Open-Source): A powerful command-line tool compatible with Windows, Mac, and Linux. It’s effective but less user-friendly for beginners.
- Windows File Recovery (Free, Windows): A command-line utility from Microsoft for Windows 10 and later.
Disk Drill offers the most accessible free option with a graphical interface, while PhotoRec and Windows File Recovery require command-line knowledge.
[
How to recover deleted photos from memory card without software?
](#collapse-item-faq4)
Unfortunately, it is generally not possible to reliably recover deleted photos from a memory card without using data recovery software. Deleted files are no longer directly accessible by the operating system.
However, you can check for backups:
- Check Backups: Look for backups on your computer, cloud services, or external drives where you might have previously backed up your photos.
- Camera’s Internal Memory: Some cameras may create temporary backups in internal memory; check your camera’s settings and internal storage.
[
How to recover deleted photos from an SD card on Android phone?
](#collapse-item-faq5)
To recover deleted photos from an SD card directly on your Android phone:
- Install DiskDigger App: Download and install the DiskDigger photo recovery app from the Google Play Store.
- Scan SD Card with DiskDigger: Launch DiskDigger and select your SD card (usually listed as “/mnt/sdcard” or similar) to scan for deleted photos.
- Recover Photos: Preview and select the photos you want to recover and choose a location on your Android device to save them.
The free version of DiskDigger is effective, and a paid Pro version offers advanced features.
[
How Do I Recover Photos From a SanDisk SD Card?
](#collapse-item-faq6)
Recovering photos from a SanDisk SD card is the same as recovering from any other SD card brand. Using Disk Drill is a recommended method:
- Download and Install Disk Drill (Mac or Windows): Install Disk Drill on your computer.
- Connect SanDisk SD Card: Connect your SanDisk SD card to your computer via a card reader.
- Scan with Disk Drill: Launch Disk Drill, select your SanDisk SD card, and click “Search for lost data.”
- Preview and Recover: After scanning, preview the recoverable photos, select the ones you need, and click “Recover” to save them to a safe location.
[
Can You Recover Photos From a Formatted SD Card?
](#collapse-item-faq7)
Yes, it is often possible to recover photos from a formatted SD card, especially if a quick format was performed and you act quickly before new data overwrites the card.
- Use Data Recovery Software: Employ SD card recovery software like Disk Drill.
- Scan the Formatted SD Card: Connect your formatted SD card to your computer and scan it with Disk Drill.
- Attempt Recovery: Disk Drill will attempt to find and recover files from the formatted card. Recovery success rates from formatted cards can vary, but it’s worth trying.
Remember, the key to successful SD card photo recovery is to act promptly after data loss and use appropriate recovery methods, with data recovery software being the most powerful tool in your arsenal.