Are you looking to share your visual stories on Instagram? At dfphoto.net, we understand the importance of showcasing your photography and visual art. This guide provides comprehensive steps and insights on how to upload photos to Instagram using various methods, ensuring your content stands out and resonates with your audience. Whether you’re using the mobile app, desktop, or third-party tools, we’ve got you covered with best practices, tips, and SEO optimization strategies to maximize your reach and engagement. Dive in to master the art of sharing your photographic journey with the world, while building a captivating online presence. With our guidance, you will not only learn the technical steps but also gain insights into crafting a compelling narrative, optimizing your images for discoverability, and engaging with the vibrant Instagram community.
1. Understanding the Importance of Visual Content on Instagram
Instagram, a platform built on visual communication, continues to thrive as a powerful tool for sharing and discovering photos. Visual content is essential for many photographers. According to research from the Santa Fe University of Art and Design’s Photography Department, in July 2025, visual content provides an immediate and impactful way to capture attention, convey emotions, and tell stories, making it indispensable for both personal expression and professional branding.
1.1 Why Photos Remain Key for Instagram Content Strategy?
Photos remain a key element of Instagram content strategy because they are universally accessible, easily consumable, and highly engaging. Visuals transcend language barriers, making them ideal for reaching diverse audiences and conveying complex ideas swiftly. High-quality images also enhance brand credibility, foster emotional connections, and drive user interaction, making them essential for effective communication on Instagram.
1.2 Photos vs. Videos: What Type Should You Use?
Deciding between photos and videos depends on your content goals and audience preferences. Photos are excellent for capturing static moments, showcasing details, and conveying artistic expression, while videos are better for dynamic storytelling, tutorials, and behind-the-scenes glimpses. Smaller accounts may prioritize photos for their simplicity and aesthetic appeal, whereas larger accounts often use videos to increase engagement and diversify content formats. Balancing both can create a well-rounded and captivating Instagram presence.
2. Uploading Photos to Instagram from Your Mobile Device
Instagram is designed as a mobile-first platform, making it incredibly easy to upload photos directly from your smartphone or tablet.
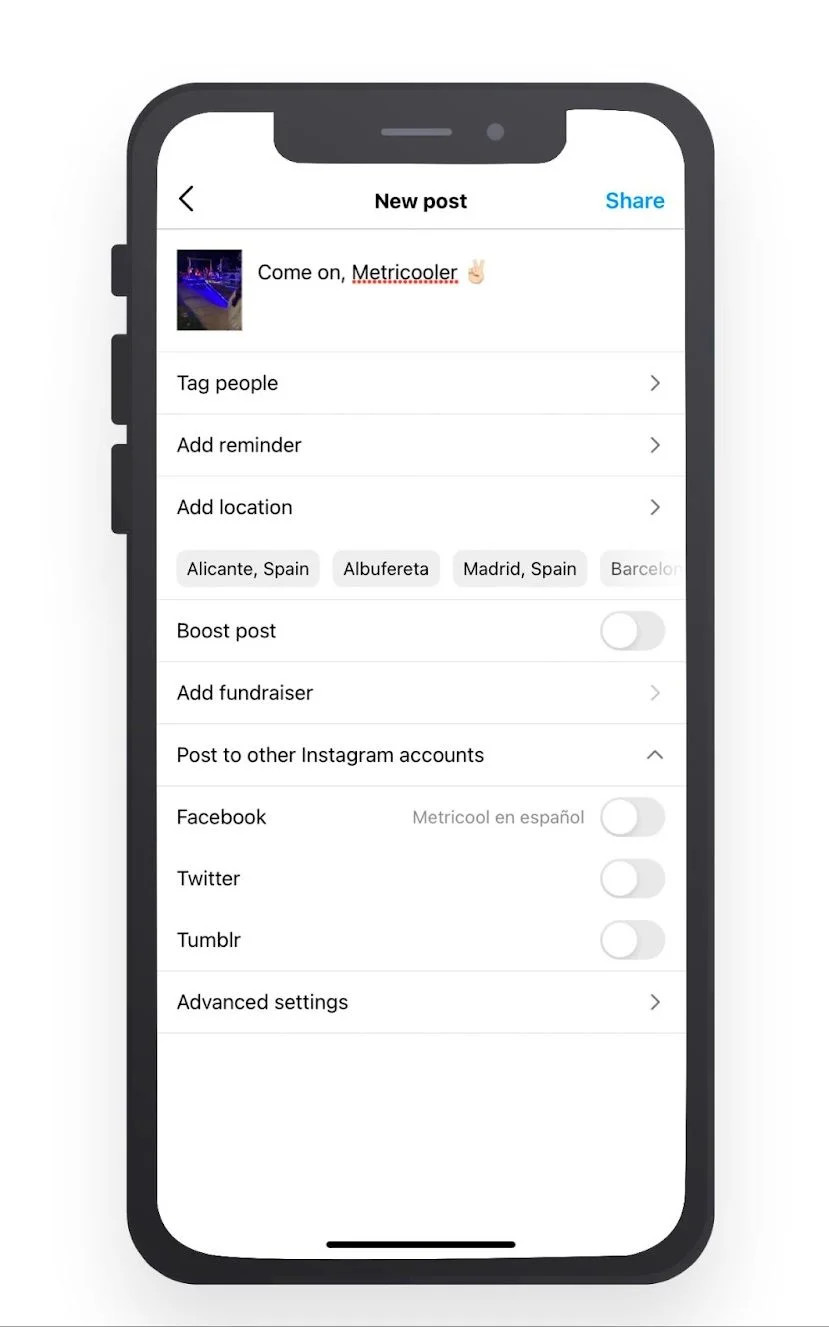
2.1 Step-by-Step Guide to Posting Photos via the Instagram App
To post photos via the Instagram app, follow these simple steps:
- Open Instagram: Launch the Instagram app on your iOS or Android device.
- Tap the ‘+’ Icon: Click the ‘+’ button located at the top right of your screen to create a new post.
- Select Your Photo: Choose a photo from your device’s gallery or take a new one using the in-app camera.
- Edit Your Photo: Enhance your photo with Instagram’s built-in editing tools, such as filters, brightness adjustments, and cropping options.
- Write a Caption: Add a compelling caption, tag relevant accounts, and include relevant hashtags to increase discoverability.
- Add Location: Include your location to help local users find your content.
- Share: Tap the ‘Share’ button to publish your photo to your Instagram feed.
2.2 Optimizing Photos for Mobile Upload: Size, Format, and Quality
To optimize photos for mobile upload, ensure they meet Instagram’s specifications:
- Size: Instagram recommends a maximum width of 1080 pixels.
- Format: Use JPEG for photos to balance quality and file size.
- Quality: Aim for a resolution of 300 DPI for sharp and clear images.
Compressing large files before uploading can help reduce load times and ensure a smoother viewing experience for your followers.
2.3 Using Instagram’s Editing Tools and Filters
Instagram’s editing tools and filters can significantly enhance your photos, but it’s essential to use them judiciously. Experiment with brightness, contrast, saturation, and sharpness adjustments to fine-tune your image. Filters can add a unique aesthetic, but overusing them can make your photos look artificial. Aim for subtle enhancements that complement your original image while maintaining a cohesive visual style across your profile.
3. How to Post on Instagram from a Computer
Although Instagram is primarily a mobile app, you can also upload photos from your computer using Instagram Web or third-party tools.
3.1 Accessing Instagram Web: A Desktop Solution
Accessing Instagram Web is a convenient solution for posting photos from your computer. Simply open your web browser and go to Instagram’s website. Log in with your account credentials, and you’ll have access to many of the same features available on the mobile app, including the ability to upload photos, edit captions, and engage with other users. This is particularly useful for photographers who prefer editing on larger screens or managing their content from a desktop environment.
3.2 Step-by-Step Guide to Uploading Photos via Instagram Web
To upload photos via Instagram Web, follow these steps:
- Log In: Go to the Instagram website and log in to your account.
- Click the ‘+’ Button: Find and click the ‘+’ button, usually located at the top of the page, to start a new post.
- Select Your Photo: Choose the photo you want to upload from your computer’s files.
- Resize and Adjust: Use the available tools to resize your image to the desired scale, such as original, 1:1, 4:5, or 16:9. You can also zoom in for a closer crop.
- Apply Filters and Edits: Enhance your photo by adding filters or adjusting settings like saturation, temperature, and contrast.
- Add Caption and Details: Write an engaging caption, include relevant hashtags, and tag other accounts.
- Advanced Settings: Choose additional settings, such as hiding like counts, if desired.
- Share: Click the ‘Share’ button to post your photo to your Instagram feed.
3.3 Benefits and Limitations of Using Instagram Web
Using Instagram Web offers several benefits, including the convenience of managing your account from a larger screen, easier access to your photo library, and the ability to use advanced editing software before uploading. However, there are limitations, such as fewer editing tools compared to the mobile app and the inability to post Stories directly from the desktop. Despite these limitations, Instagram Web remains a valuable tool for photographers looking to streamline their content creation process.
4. Utilizing Third-Party Tools: Metricool for Instagram Photo Uploads
Third-party tools like Metricool offer advanced features for managing and scheduling Instagram posts, making them a valuable asset for photographers looking to optimize their workflow.
4.1 Introduction to Metricool: A Comprehensive Social Media Management Tool
Metricool is a comprehensive social media management tool that allows you to plan, analyze, and manage your content across multiple platforms, including Instagram. It provides features such as scheduling posts, analyzing metrics, and responding to comments and messages from a single dashboard. For photographers, Metricool simplifies the process of managing their Instagram presence, saving time and effort while maximizing engagement.
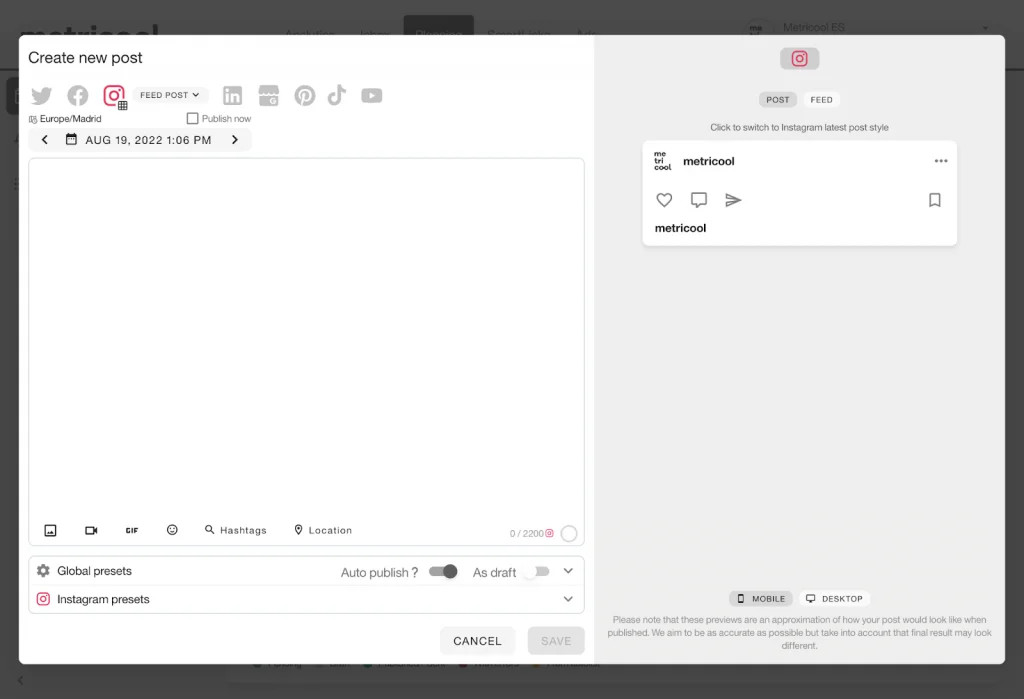
4.2 Step-by-Step Guide to Uploading Photos Using Metricool
To upload photos using Metricool, follow these steps:
- Sign Up: Create a free account on the Metricool website.
- Connect Your Account: Connect your Instagram account to Metricool.
- Go to Planning: Navigate to the ‘Planning’ section of the Metricool dashboard, where you can manage your content calendar.
- Create Post: Click on ‘Create Post’ to start a new post and select the Instagram option.
- Post in Feed: Choose ‘Post in feed’ to create a regular Instagram post.
- Personalize Your Post: Add a caption, hashtags, tags, and mentions to your photo.
- Preview: Preview how your post will look in your Instagram feed.
- Image Finder: Use Metricool’s integration with Pexels to find suitable images if needed.
- Publish Now: Check the ‘Publish Now’ box and click ‘Save’ to publish your photo immediately, or schedule it for a later time.
4.3 Advantages of Using Metricool for Instagram Management
Using Metricool for Instagram management offers several advantages:
- Cross-Platform Planning: Plan content across all your social networks from one dashboard.
- Analytics: Analyze your publication and profile metrics to understand what works best.
- Inbox Management: Respond to comments and private messages efficiently.
- Image Finder: Access a vast library of stock photos through the Pexels integration.
- Scheduling: Schedule posts in advance to maintain a consistent posting schedule.
- Efficiency: Streamline your social media management process and save time.
 How to upload photos to instagram with metricool
5. Optimizing Your Photos for Instagram: Best Practices
Optimizing your photos for Instagram involves several key strategies to ensure they look their best and reach the widest possible audience.
5.1 Image Resolution and Aspect Ratio: Ensuring High-Quality Visuals
Image resolution and aspect ratio are critical for ensuring high-quality visuals on Instagram. For best results, aim for a resolution of 1080 pixels wide and use an aspect ratio of either 1:1 (square), 4:5 (portrait), or 16:9 (landscape). This ensures that your photos are sharp, clear, and optimized for various screen sizes, enhancing the overall viewing experience for your followers.
5.2 The Role of Captions: Engaging Your Audience
Captions play a crucial role in engaging your Instagram audience. A well-crafted caption can add context, tell a story, and encourage interaction. Start with a compelling hook, provide relevant details, and end with a call to action, such as asking a question or inviting followers to share their thoughts. Using emojis and line breaks can also make your captions more visually appealing and easier to read.
5.3 Hashtags: Expanding Your Reach
Hashtags are essential for expanding your reach on Instagram. They help categorize your content and make it discoverable to users who are interested in specific topics. Research relevant hashtags in your niche and use a mix of broad and specific tags to maximize visibility. Tools like RiteTag and Hashtagify can help you find trending and relevant hashtags to boost your posts.
5.4 Geo-Tagging: Connecting with Local Audiences
Geo-tagging, or adding location information to your posts, can help you connect with local audiences and increase visibility within your community. When you tag your location, your post appears in the location’s feed, allowing local users to discover your content. This is particularly useful for businesses and photographers looking to attract local customers or showcase their work in a specific area.
6. Maximizing Engagement: Tips and Tricks
Maximizing engagement on Instagram requires a strategic approach that includes creating compelling content, engaging with your audience, and using various features to boost visibility.
6.1 Creating Visually Appealing Content
Creating visually appealing content is essential for capturing attention on Instagram. Use high-quality images, experiment with different compositions and lighting techniques, and maintain a consistent aesthetic across your profile. Consider using editing tools to enhance your photos, but avoid over-editing, which can make them look artificial. Focus on showcasing your unique style and creating content that resonates with your target audience.
6.2 Engaging with Your Audience: Responding to Comments and Messages
Engaging with your audience is crucial for building relationships and fostering a sense of community. Respond promptly to comments and messages, ask questions to encourage interaction, and show genuine interest in your followers’ thoughts and opinions. Use Instagram’s Stories feature to conduct polls, quizzes, and Q&A sessions to further engage your audience and gather valuable feedback.
6.3 Using Instagram Stories and Reels
Instagram Stories and Reels offer dynamic ways to engage with your audience and showcase your creativity. Stories are ideal for sharing behind-the-scenes glimpses, time-sensitive updates, and interactive content, while Reels are perfect for creating short, entertaining videos that can reach a wider audience through the Explore page. Use these features to diversify your content, experiment with different formats, and keep your audience engaged.
6.4 Collaborating with Other Users and Influencers
Collaborating with other users and influencers can significantly expand your reach and introduce your work to new audiences. Partner with accounts that align with your brand and share similar values to create collaborative content, such as joint posts, giveaways, or takeovers. This can help you tap into their existing audience, gain new followers, and build valuable relationships within your industry.
 How to upload photos to instagram app
7. Troubleshooting Common Issues
Even with the best strategies, you may encounter issues when uploading photos to Instagram. Here are some common problems and their solutions.
7.1 Image Upload Errors: Diagnosing and Resolving Problems
Image upload errors can occur for various reasons, such as file size limitations, incorrect formats, or network connectivity issues. To diagnose and resolve these problems, ensure that your images meet Instagram’s specifications, such as a maximum width of 1080 pixels and a JPEG format. Check your internet connection and try reducing the file size of your image by compressing it before uploading.
7.2 Quality Degradation: Maintaining Sharpness and Clarity
Quality degradation can occur when Instagram compresses your images during the upload process. To maintain sharpness and clarity, start with high-resolution images and avoid over-editing, which can exacerbate compression artifacts. Experiment with different file sizes and formats to find the optimal balance between quality and file size.
7.3 Account Restrictions and Bans: Understanding Instagram’s Guidelines
Account restrictions and bans can occur if you violate Instagram’s guidelines, such as posting inappropriate content, engaging in spam-like behavior, or using unauthorized third-party apps. To avoid these issues, familiarize yourself with Instagram’s terms of service and community guidelines, and refrain from engaging in activities that could be flagged as abusive or harmful. If you believe your account has been wrongfully restricted or banned, contact Instagram’s support team for assistance.
8. Staying Updated with Instagram’s Features and Updates
Instagram is constantly evolving, with new features and updates being introduced regularly. Staying informed about these changes is essential for adapting your strategies and maximizing your success on the platform.
8.1 Following Instagram’s Official Blog and News Channels
Following Instagram’s official blog and news channels is an excellent way to stay updated with the latest features, updates, and best practices. These resources provide valuable insights into how Instagram works, what’s new, and how you can leverage these changes to improve your presence on the platform.
8.2 Participating in Online Communities and Forums
Participating in online communities and forums dedicated to Instagram marketing can provide valuable insights, tips, and support from other users. These communities often discuss the latest trends, share successful strategies, and offer solutions to common problems. Engaging in these discussions can help you stay informed and learn from the experiences of others.
8.3 Experimenting with New Features and Tools
Experimenting with new features and tools is crucial for discovering what works best for your account and staying ahead of the curve. Instagram often releases new features, such as Reels, Guides, and enhanced editing tools, which can provide unique opportunities to engage with your audience and showcase your creativity. Embrace these changes, test different approaches, and adapt your strategies based on the results.
9. Legal Considerations: Copyright and Usage Rights
Understanding copyright and usage rights is essential for protecting your work and respecting the rights of others on Instagram.
9.1 Understanding Copyright Laws for Photographers
As a photographer, you automatically own the copyright to your original images as soon as you create them. This means that you have the exclusive right to control how your photos are used, reproduced, and distributed. Understanding copyright laws is essential for protecting your work from unauthorized use and ensuring that you receive proper credit and compensation for your creations.
9.2 Obtaining Permissions and Licenses for Using Others’ Content
If you want to use someone else’s content on Instagram, such as images, videos, or music, you need to obtain the necessary permissions and licenses from the copyright holder. This typically involves contacting the creator, explaining how you intend to use their work, and agreeing to their terms and conditions. Using copyrighted material without permission can result in legal consequences, such as fines and lawsuits.
9.3 Watermarking Your Photos: Protecting Your Intellectual Property
Watermarking your photos is a simple but effective way to protect your intellectual property on Instagram. Adding a visible watermark, such as your name or logo, to your images can deter unauthorized use and make it clear that the photos belong to you. While watermarks can be removed, they serve as a deterrent and can help you track down instances of copyright infringement.
10. Building a Photography Portfolio on Instagram
Instagram can be a powerful platform for building a photography portfolio, showcasing your work, and attracting new clients or opportunities.
10.1 Curating a Cohesive Visual Style
Curating a cohesive visual style is essential for creating a professional and appealing photography portfolio on Instagram. Choose a consistent color palette, editing style, and subject matter to create a unified aesthetic that reflects your brand and showcases your unique vision. This will help you attract followers who appreciate your style and make your profile stand out from the crowd.
10.2 Showcasing Your Best Work
Showcasing your best work is crucial for impressing potential clients and collaborators. Select your strongest and most compelling images to feature in your portfolio, and prioritize quality over quantity. Aim for a diverse range of subjects, styles, and techniques to demonstrate your versatility and expertise.
10.3 Using Highlights to Organize Your Portfolio
Using Highlights to organize your portfolio can make it easier for visitors to navigate your profile and discover your best work. Create Highlights for different categories, such as portraits, landscapes, or commercial projects, and add relevant Stories to each Highlight. This allows you to showcase specific aspects of your portfolio and provide a curated experience for your audience.
FAQ: Frequently Asked Questions About Posting Photos on Instagram
1. What is the best image size for Instagram?
The best image size for Instagram is a maximum width of 1080 pixels. Instagram supports aspect ratios of 1:1 (square), 4:5 (portrait), and 16:9 (landscape).
2. How do I upload multiple photos to Instagram at once?
You can upload multiple photos to Instagram at once by creating a carousel post. Tap the ‘+’ button, select the multiple photos icon, and choose up to 10 photos or videos.
3. Can I schedule Instagram posts for free?
Yes, you can schedule Instagram posts for free using tools like Facebook Business Suite or Metricool’s free plan.
4. Why is my Instagram photo blurry?
Your Instagram photo may be blurry due to compression. Ensure your image resolution is high (300 DPI) and within Instagram’s recommended size limits.
5. How do I add music to my Instagram photo?
You cannot directly add music to a static Instagram photo. Music can only be added to Instagram Stories or Reels.
6. What are the best hashtags for photographers on Instagram?
Some of the best hashtags for photographers include #photography, #photographer, #travelphotography, #portraitphotography, and #landscapephotography.
7. How do I tag someone in an Instagram photo?
To tag someone in an Instagram photo, tap the ‘+’ button, select your photo, and tap ‘Tag People’ to add tags before posting.
8. How do I edit my Instagram photo after posting?
You can edit your caption, add or remove tags, and add or change your location after posting. However, you cannot replace the photo itself.
9. Can I upload photos to Instagram from my iPad?
Yes, you can upload photos to Instagram from your iPad using the Instagram app or Instagram Web.
10. How do I protect my photos from being stolen on Instagram?
To protect your photos, use watermarks, disable right-clicking on your website, and regularly monitor for unauthorized use of your images.
At dfphoto.net, we’re dedicated to helping you master the art of photography and visual storytelling. Whether you’re looking for inspiration, practical tips, or the latest industry insights, our website is your ultimate resource.
Ready to elevate your Instagram game? Visit dfphoto.net today to explore our extensive collection of tutorials, stunning photo galleries, and a vibrant community of photographers. Don’t miss out on the opportunity to enhance your skills, find inspiration, and connect with fellow creatives. Start your photographic journey with dfphoto.net now!
Address: 1600 St Michael’s Dr, Santa Fe, NM 87505, United States. Phone: +1 (505) 471-6001. Website: dfphoto.net.