When I first began crafting furniture in the 1980s, creating picture frames was among my initial projects. Artists were my primary clients, and they valued the careful selection of wood, precise miter cuts, and the added strength of exposed splines. For me, these commissions were invaluable, not just for the much-needed income, but also as an opportunity to refine fundamental woodworking skills. Over the years, I’ve continued to build frames, evolving my techniques to develop reliable methods for crafting frames that are strong, understated, and elegant.
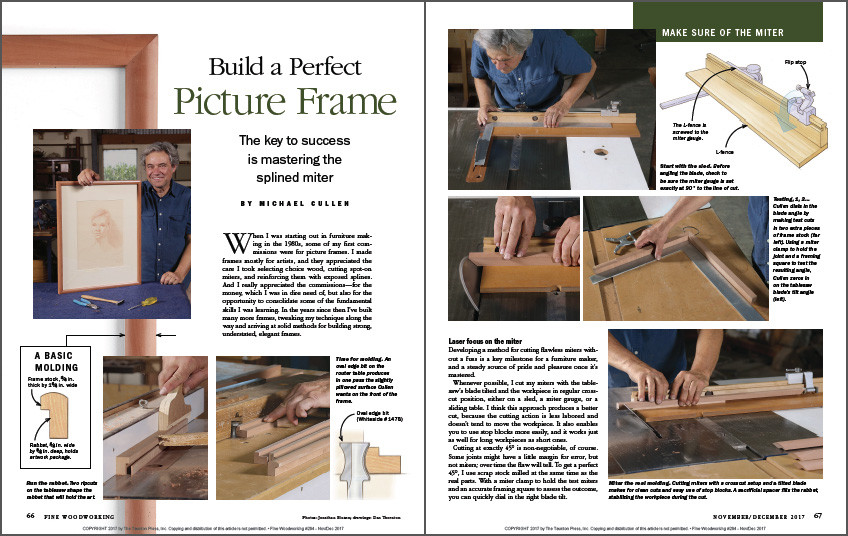
Developing a consistent method for achieving flawless miter joints is a crucial skill for any woodworker, bringing both pride and satisfaction once mastered.
Whenever possible, I prefer to cut my miters using a tablesaw with the blade tilted, keeping the workpiece in the standard crosscut position, whether using a sled, miter gauge, or sliding table. This approach, in my experience, results in a cleaner cut because the action is less strained and minimizes workpiece movement. It also simplifies the use of stop blocks and works equally well for both short and long pieces.
Accuracy is paramount when cutting at 45°. While some joints may allow for slight errors, miters do not; imperfections will become noticeable over time. To ensure a perfect 45° angle, I use scrap wood from the same batch as the frame components for testing. Utilizing a miter clamp to hold the test pieces and a precise framing square to evaluate the joint, you can quickly fine-tune the blade tilt to achieve the exact angle needed.
While many commercial frames rely on nails or corrugated fasteners, for a lasting, robust solid-wood miter joint – and to impart a furniture maker’s quality to your frame – I highly recommend reinforcing the miter joint with splines. I typically cut the spline grooves using a slot cutter on a router table, which creates a perfectly flat-bottomed channel. For wider frames requiring deeper grooves that exceed the router’s capacity, I employ a cradle jig on the tablesaw and then square off the groove bottom with a chisel.
Once the splines are glued and set, the final satisfying step is to trim them flush. At this point, your frame is nearly ready to display your chosen artwork.
 Step-by-step guide on how to build a perfect wooden picture frame
By focusing on precise miter cuts and reinforcing with splines, you can create photo frames that are not only visually appealing but also built to last, showcasing your woodworking skills and beautifully presenting your cherished photos or art.