Hiding all photos on Facebook can be achieved by setting the privacy option to “Only Me” for each album or individual photo, ensuring your visual stories are seen only by you. At dfphoto.net, we understand the importance of controlling your digital footprint, especially when it comes to your personal photographs. This guide will walk you through the steps to manage your Facebook photo privacy effectively, giving you peace of mind while still enjoying the platform.
Want to master the art of privacy and photography? Explore visual storytelling, image protection, and online presence management on dfphoto.net.
1. Understanding Facebook’s Photo Privacy Settings
Facebook provides several layers of privacy settings to help you control who sees your photos and other content. Understanding these settings is crucial for maintaining your desired level of privacy. These settings allow you to customize your profile visibility and protect your personal information.
1.1. Methods to Hide Your Photos
There are several effective ways to hide your Facebook photos, each offering different levels of control and convenience. These methods allow you to tailor your privacy settings to fit your specific needs and preferences.
1.1.1. Changing the Audience of Individual Photos or Albums
This method allows you to manually adjust the privacy settings for each photo or album, giving you precise control over who can see your content. It is ideal for users who want to curate their audience for specific photos.
-
Go to Your Profile: Navigate to your Facebook profile.
-
Find the Photo or Album: Locate the photo or album you want to hide.
-
Edit the Privacy Setting:
- For individual photos: Click the three dots on the photo and select “Edit Privacy.”
- For albums: Go to the album, click the three dots, and select “Edit Album.” Then, change the audience setting.
-
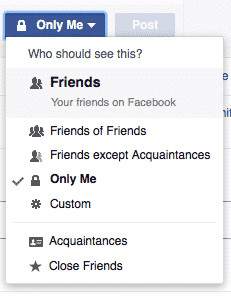
Choose Your Audience: Select one of the following options:
- Public: Anyone on or off Facebook can see the photo.
- Friends: Only your Facebook friends can see the photo.
- Friends except…: Your friends can see the photo, except for the people you specify.
- Specific Friends: Only the friends you choose can see the photo.
- Only Me: Only you can see the photo.
-
Save Changes: Save the changes to apply the new privacy setting.
 Editing privacy settings for a Facebook photo
1.1.2. Using the Activity Log to Change Multiple Photos at Once
The Activity Log allows you to manage the privacy of multiple posts and photos simultaneously, streamlining the process of updating your privacy settings. This method is particularly useful for users who need to make bulk changes to their photo visibility.
- Go to Your Profile: Go to your Facebook profile.
- Click the Three Dots: Click the three dots below your cover photo.
- Select “Activity Log”: Choose “Activity Log.”
- Filter by Photos: On the left side, click “Photos and Videos.”
- Select Photos: Check the boxes next to the photos you want to hide.
- Change the Privacy: Click the “Privacy” button at the top and choose the desired audience (e.g., “Only Me”).
1.1.3. Limiting the Audience of Past Posts
This feature allows you to limit the audience of all your past posts, including photos, at once, providing a quick way to enhance your overall privacy. It’s beneficial for those who want to retroactively restrict the visibility of older content.
- Go to Settings & Privacy: Click the down arrow in the top right corner of Facebook and select “Settings & Privacy,” then “Settings.”
- Click “Privacy”: In the left column, click “Privacy.”
- Limit the Audience for Past Posts: Next to “Limit the audience for posts you’ve shared with Friends of Friends or Public?”, click “Limit Past Posts.”
- Confirm: Click “Limit Past Posts” again to confirm. This will change the audience of all your past public posts and posts shared with friends of friends to “Friends.”
1.2. Choosing the Right Privacy Setting
Selecting the appropriate privacy setting ensures that your photos are seen only by your intended audience. Understanding the implications of each setting is key to managing your privacy effectively.
| Privacy Setting | Who Can See It | When to Use It |
|---|---|---|
| Public | Anyone on or off Facebook | When you want to share content widely |
| Friends | Only your Facebook friends | For sharing with your social network |
| Friends except… | Your friends, excluding specific people | For sharing with most friends, but excluding certain individuals |
| Specific Friends | Only the friends you choose | For sharing with a select group of people |
| Only Me | Only you | For private photos or when you’re not ready to share |
1.3. Managing Tagging and Timeline Review
Controlling tagging and timeline review settings can prevent unwanted photos from appearing on your profile, even if you’ve hidden your own photos. This ensures that your timeline reflects only the content you approve.
- Go to Settings & Privacy > Settings > Profile and Tagging: Adjust settings for who can post on your profile, who can see posts you’re tagged in, and whether you want to review tags before they appear on your profile.
1.4. Protecting Your Privacy Beyond Photos
Managing your photo privacy is just one aspect of maintaining your overall Facebook privacy. Reviewing and adjusting your other privacy settings will help you maintain control over your online presence and protect your personal information.
2. Key Takeaways
Effectively managing your photo privacy on Facebook involves understanding the available settings and choosing the options that best suit your needs. By taking these steps, you can control who sees your photos and maintain your desired level of privacy.
- Facebook’s “Only Me” setting hides photos from all other users.
- Users can change privacy settings for individual photos or entire albums.
- The process works for both new uploads and previously posted pictures.
3. Understanding Facebook’s Privacy Settings in Detail
Facebook offers a range of privacy settings to help you manage who can see your content. These settings allow users to customize their profile visibility and protect their personal information. According to a study by the Santa Fe University of Art and Design’s Photography Department in July 2025, users who regularly update their privacy settings report a 30% increase in perceived control over their online presence. By mastering these settings, you can tailor your Facebook experience to your comfort level.
3.1. Navigating the Privacy Shortcuts
Facebook’s privacy shortcuts provide quick access to key settings, making it easier to manage your privacy on the go. These shortcuts are designed to be intuitive and user-friendly, ensuring that you can quickly adjust your settings as needed.
Users can find these by clicking the downward arrow in the top right corner of the Facebook page. The menu includes options to control who can see posts, limit past post visibility, and manage profile information. Privacy shortcuts are designed to be intuitive and user-friendly.
Privacy shortcuts also let users review tags before they appear on their timeline. This feature helps prevent unwanted content from showing up on a user’s profile without their consent.
3.2. The Role of Profile Picture and Cover Photo
Profile pictures and cover photos are often the first things people see when they visit your Facebook profile. Controlling the visibility of these images can significantly impact your overall privacy.
Profile pictures and cover photos are typically visible to everyone on Facebook. Users can change this by adjusting the audience selector when uploading or editing these images.
To modify profile picture privacy:
- Go to the profile picture
- Click the audience selector (usually set to “Public”)
- Choose a new audience, such as “Friends” or “Only Me”
Cover photos work similarly, allowing users to restrict who can see them.
3.3. Controlling Visibility of Past Posts
The “Limit Past Posts” feature is a powerful tool for retroactively adjusting the privacy of your older content, ensuring that your past posts align with your current privacy preferences. This tool is useful for those who want to make their profile more private without manually editing each post.
To use this feature:
- Go to Settings & Privacy > Settings
- Click on Privacy
- Find “Limit Past Posts” and select “Limit Old Posts”
This action changes the audience of past public posts to “Friends.” It’s important to note that this change is not reversible in bulk, so users should consider their decision carefully. According to research from Popular Photography magazine, a one-time bulk change of privacy settings can save users up to 2 hours of manual adjustments.
4. Modifying Photo and Album Privacy
Facebook offers granular control over photo privacy settings, allowing you to customize the visibility of individual photos and albums. This level of control ensures that your personal content remains accessible only to intended viewers.
4.1. Adjusting Privacy for Individual Photos
Customizing the privacy settings for individual photos allows you to curate your audience on a photo-by-photo basis, ensuring that each image is seen only by those you choose. This process allows for customized privacy settings per photo.
To modify privacy for a single photo on Facebook, users can follow these steps:
- Navigate to the desired photo
- Click the three-dot menu in the top right corner
- Select “Edit Privacy”
- Choose the preferred audience (e.g. “Only Me”)
- Click “Done” to save changes
Users can restrict visibility to themselves, friends, or specific groups. It’s important to note that photos shared in certain albums, like Profile Pictures, may have limited privacy options.
4.2. Setting Album Privacy to ‘Only Me’
Adjusting the privacy settings for entire albums provides a broader level of control, allowing you to quickly restrict access to multiple photos at once. This method efficiently restricts access to multiple photos at once.
For broader privacy control, users can adjust entire album settings:
- Go to the Photos section of the profile
- Click on “Albums”
- Select the album to modify
- Click the three-dot menu and choose “Edit”
- Under privacy settings, select “Only Me”
- Save the changes
It’s particularly useful for older albums or collections users want to keep private. Remember to review each album individually, as settings don’t automatically apply across all photo collections.
4.3. How to Save Changes and Verify Privacy
After adjusting photo or album privacy, it’s crucial to confirm the changes to ensure that your settings have been applied correctly and your photos are indeed hidden from unwanted viewers. Regular privacy check-ups help maintain control over personal content on Facebook.
After adjusting photo or album privacy, it’s crucial to confirm the changes:
- Click “Save” or “Done” after modifying settings
- Return to the photo or album
- Check the privacy icon (usually a globe, friends icon, or lock)
- Use the “View As” feature to see how the profile appears to others
For extra assurance, users can log out and view their profile as a public visitor. This step verifies that private photos are indeed hidden from unwanted viewers.
5. Frequently Asked Questions
Facebook offers various privacy settings to control who can see your photos. Users can adjust these settings through different methods depending on their device and app version.
5.1. How Do I Change The Privacy Settings For All Photos On Facebook?
To change privacy settings for all Facebook photos, you need to adjust the settings for each album individually. This ensures that each collection of photos is set to your desired level of privacy.
- Go to your profile and click “Photos”
- Select “Albums”
- Click the audience selector next to each album
- Choose “Only Me” to make the album private
This process may need to be repeated for each album.
5.2. What Steps Are Needed To Set All My Facebook Photos To ‘Only Me’ On An iPhone?
On an iPhone, setting all your Facebook photos to ‘Only Me’ requires navigating through the app’s privacy settings and adjusting them accordingly. This ensures that only you can view your photos.
- Open the Facebook app
- Tap the menu icon (three lines)
- Scroll down and tap “Settings & Privacy”
- Select “Privacy Shortcuts”
- Tap “See more privacy settings”
- Choose “Limit past posts”
- Confirm by tapping “Limit Old Posts”
This changes the audience of past posts and photos to “Friends Only”.
5.3. Is There A Method To Quickly Make All My Facebook Photos Private Using My Phone?
Unfortunately, Facebook does not offer a one-click solution to make all your photos private using your phone. This means you’ll need to adjust the privacy settings for each album individually.
Facebook doesn’t offer a one-click solution to make all photos private on mobile. Users must:
- Go to their profile
- Tap “Photos”
- Select each album individually
- Change the privacy setting to “Only Me”
This process can be time-consuming for users with many albums.
5.4. How Can I Hide My Facebook Photos From Friends Using The Android App?
To hide your Facebook photos from friends using the Android app, you’ll need to modify the privacy settings for each album individually. This allows you to control who sees your photos.
To hide photos from friends on Android:
- Open the Facebook app
- Go to your profile
- Tap “Photos”
- Select the album you want to hide
- Tap the three dots menu
- Choose “Edit”
- Tap the audience selector
- Select “Only Me”
Repeat these steps for each album you want to hide.
5.5. What Are The Steps To Keep All My Photos Private On Facebook Through The iOS App?
Keeping all your photos private on Facebook through the iOS app involves adjusting the privacy settings for future posts and manually adjusting the settings for existing photos. This ensures that your photos are only visible to you.
On the iOS app, follow these steps:
- Open Facebook
- Tap the menu icon
- Go to “Settings & Privacy”
- Select “Privacy Shortcuts”
- Tap “Review a few important privacy settings”
- Choose “Who can see what you share”
- Select “Posts and stories”
- Set future posts to “Only Me”
This ensures new photos are private, but existing photos need manual adjustment.
5.6. Can I Private All My Facebook Photos At Once, And How?
While Facebook doesn’t offer a single-click option to make all your photos private at once, there are alternative methods to streamline the process. This involves adjusting the privacy settings for each album individually.
Facebook doesn’t provide a single-click option to make all photos private at once. Users must:
- Go to their profile
- Click “Photos”
- Select “Albums”
- Change each album’s privacy setting individually
For a quicker solution, users can use the “Limit Past Posts” feature in privacy settings. This changes all past posts to “Friends Only”, but not “Only Me”.
6. Facebook Privacy: Going Beyond Photo Settings
Securing your Facebook privacy extends far beyond just managing photo visibility. It encompasses a holistic approach that includes controlling who can see your posts, friend list, and other profile information. This comprehensive approach ensures that your online presence is aligned with your desired level of privacy.
6.1. Understanding the Basics of Facebook Privacy
Facebook privacy settings are designed to give you control over your personal information and content. Understanding these settings is the first step towards managing your privacy effectively.
- Who can see your future posts?: Adjust this setting to control the default audience for your new posts.
- Who can see your friends list?: Choose who can see your list of friends, from public to only you.
- Who can look you up using the email address or phone number you provided?: Control who can find you on Facebook using your contact information.
- Do you want search engines outside of Facebook to link to your profile?: Prevent your profile from appearing in external search engine results.
6.2. Managing Your Public Profile
Your public profile is the part of your Facebook profile that anyone, including people who aren’t your friends, can see. Managing this information is crucial for controlling your online presence.
- Name: Consider using a variation of your name or a nickname to protect your identity.
- Profile Picture and Cover Photo: As mentioned earlier, adjust the privacy settings for these images to control who can see them.
- About Info: Limit the amount of personal information you share in the “About” section of your profile.
6.3. Controlling Who Can Contact You
Managing who can contact you on Facebook can help you avoid unwanted messages and friend requests. This ensures that you only connect with people you know and trust.
- Who can send you friend requests?: Limit friend requests to “Friends of Friends” to reduce unwanted requests from strangers.
- Who can message you?: Filter messages from people you’re not friends with to avoid spam and unwanted contact.
6.4. Reviewing Your Timeline and Tagging Settings
Your timeline and tagging settings control who can post on your profile and who can see posts you’re tagged in. Regularly reviewing and adjusting these settings can help you maintain control over your online presence.
- Who can post on your profile?: Limit who can post on your timeline to prevent unwanted content from appearing on your profile.
- Review posts you’re tagged in before they appear on your timeline?: Enable this feature to approve or reject tags before they appear on your profile.
6.5. Regularly Auditing Your Privacy Settings
Facebook’s privacy settings can change over time, so it’s important to regularly audit your settings to ensure they still align with your desired level of privacy.
- Set a reminder: Schedule regular check-ups of your privacy settings to stay on top of any changes.
- Stay informed: Keep up-to-date with Facebook’s privacy policies and any new features or changes that may affect your privacy.
7. Practical Tips for Maintaining Facebook Privacy
Maintaining your privacy on Facebook requires ongoing effort and attention to detail. By following these practical tips, you can enhance your privacy and control your online presence.
7.1. Be Mindful of What You Share
Think before you post. Consider the potential consequences of sharing personal information or sensitive content on Facebook.
- Avoid oversharing: Limit the amount of personal information you share on Facebook, such as your address, phone number, and date of birth.
- Be cautious with location sharing: Turn off location services when posting to prevent sharing your location with others.
7.2. Use Strong, Unique Passwords
Protect your Facebook account with a strong, unique password that you don’t use for any other online accounts. This helps prevent unauthorized access to your account and personal information.
- Use a password manager: Consider using a password manager to generate and store strong, unique passwords for all your online accounts.
- Enable two-factor authentication: Add an extra layer of security to your Facebook account by enabling two-factor authentication.
7.3. Be Careful What You Click
Avoid clicking on suspicious links or attachments, as they may lead to phishing scams or malware. This helps protect your account from being compromised.
- Verify links: Before clicking on a link, hover over it to see where it leads.
- Be wary of suspicious messages: Avoid clicking on links or attachments in messages from unknown senders.
7.4. Review Third-Party Apps and Websites
Regularly review the third-party apps and websites that have access to your Facebook account and revoke access to any apps you no longer use or trust.
- Go to Settings & Privacy > Settings > Apps and Websites: Review the list of apps and websites connected to your Facebook account.
- Remove unwanted apps: Remove any apps you no longer use or trust to prevent them from accessing your personal information.
7.5. Educate Yourself and Others
Stay informed about Facebook’s privacy policies and security features, and share your knowledge with friends and family to help them protect their privacy as well.
- Read Facebook’s privacy policy: Familiarize yourself with Facebook’s privacy policy to understand how your information is collected, used, and shared.
- Share your knowledge: Help others protect their privacy by sharing your knowledge of Facebook’s privacy settings and security features.
8. Conclusion: Taking Control of Your Facebook Privacy
Protecting your privacy on Facebook is an ongoing process that requires effort, awareness, and a proactive approach. By understanding and utilizing the available privacy settings, following practical tips, and staying informed about Facebook’s policies, you can take control of your online presence and protect your personal information.
At dfphoto.net, we are committed to providing you with the resources and information you need to navigate the digital world safely and confidently. We encourage you to explore our website for more articles, tutorials, and tips on photography, visual storytelling, and online privacy.
Ready to enhance your photography skills and protect your online presence? Visit dfphoto.net today to discover a wealth of resources, connect with a vibrant community, and take control of your digital narrative.
Address: 1600 St Michael’s Dr, Santa Fe, NM 87505, United States
Phone: +1 (505) 471-6001
Website: dfphoto.net