iCloud Photos is a fantastic service that ensures your precious photo and video memories are securely backed up and accessible across all your Apple devices, and even on Windows PCs. It seamlessly integrates with the Photos app, making your media library available on your iPhone, iPad, Apple Vision Pro, Mac, Apple TV, and through iCloud.com. If you’re wondering, “How Do You Get To Your Photos On Icloud?”, this guide will walk you through everything you need to know.
Understanding How iCloud Photos Works
Before diving into accessing your photos, it’s helpful to understand the fundamentals of iCloud Photos. This service automatically uploads every photo and video you capture to iCloud. This means that once enabled, any new memories you create are instantly backed up and ready to be viewed on any device logged into your iCloud account.
iCloud Photos organizes your media in a familiar way, grouping them into Years, Months, Days, and All Photos views within the Photos app. Features like Memories and People & Pets albums are also synced across your devices, ensuring a consistent and up-to-date experience wherever you access your library.
Importantly, your photos and videos are stored in iCloud in their original, high-resolution formats. This includes a wide range of formats like HEIF, JPEG, RAW, PNG, GIF, TIFF, HEVC, and MP4, as well as special formats like slo-mo, time-lapse, 4K videos, and Live Photos taken on your iPhone or iPad. The time it takes for your photos and videos to appear on all your devices and iCloud.com can vary depending on your internet connection speed.
Accessing Your Photos: Turning on iCloud Photos
To get started accessing your photos on iCloud, you first need to ensure iCloud Photos is enabled on your devices. You’ll need to be signed in to iCloud with the same Apple ID across all devices where you want to use iCloud Photos. Here’s how to turn it on for different devices:
On Your iPhone, iPad, or Apple Vision Pro
- Open the Settings app and tap on [Your Name] at the top.
- Select iCloud.
- Tap Photos.
- Toggle the switch next to Sync this [Device] to the on position.
On Your Mac
- Click the Apple menu () in the top-left corner of your screen.
- Choose System Settings (or System Preferences depending on your macOS version).
- Click on [Your Name].
- Select iCloud in the sidebar.
- Ensure Photos is selected in the list of iCloud services.
- Click the switch next to Sync this Mac to enable iCloud Photos.
On Apple TV 4K and Apple TV HD
- Go to Settings from the Apple TV Home screen.
- Navigate to Users and Accounts.
- Select iCloud.
- Turn iCloud Photos on.
On Your Windows PC
To access your iCloud Photos on a Windows PC, you need to download and install iCloud for Windows.
Learn how to set up and use iCloud Photos on your PC
Once installed and set up, you’ll be able to access your iCloud Photos directly from your Windows File Explorer.
Accessing Photos Directly on iCloud.com
Perhaps the most direct answer to “how do you get to your photos on iCloud?” is through iCloud.com. This web interface allows you to access your photos from any web browser on any computer, whether it’s a Mac, PC, or even a device that isn’t part of the Apple ecosystem.
- Open your web browser and go to iCloud.com.
- Sign in with your Apple ID and password.
- Click on the Photos icon.
You’ll then be able to view your entire iCloud Photos library, organized just like it is on your Apple devices. From iCloud.com, you can view, download, and even delete photos and videos.
Managing Your iCloud Photos: Edits, Deletions, and Downloads
iCloud Photos isn’t just about storage and access; it also keeps your photo library consistent across all your devices when you make changes.
Edits Sync Seamlessly
When you edit a photo or video in the Photos app on one device, those edits are automatically reflected across all your devices. Whether you’re cropping, adjusting colors, or applying filters on your iPhone, those changes will be visible when you view the same photo on your Mac, iPad, or Apple TV. The original, unedited versions are safely stored in iCloud, and you can always revert to the original if needed.
Deletions are Reflected Everywhere
Similarly, when you delete a photo or video on one device, it’s deleted from iCloud and all your other devices using iCloud Photos. If you accidentally delete something, don’t worry! Deleted items are moved to the Recently Deleted album within the Photos app, where they remain for 30 days before being permanently removed. You can recover photos and videos from this album within that 30-day period.
Downloading Copies of Your Photos and Videos
While iCloud Photos provides convenient access and syncing, you might sometimes want to download copies of your photos and videos for backup or offline use. There are several ways to download your media:
Downloading from iCloud.com:
- Go to iCloud.com and click Photos.
- Select the photos and videos you wish to download.
- Click the download button (cloud icon with a down arrow) in the top-right corner. For more options, click the More button (three dots).
- Choose your download options:
- Most Compatible: Downloads in JPEG and H.264 format, suitable for most devices.
- Unmodified Original: Downloads the original files as they were captured, including original formats and resolutions.
- Click Download.
Downloading to Your iPhone, iPad, or Apple Vision Pro:
- Open the Photos app and select the photos or videos you want to download to another device.
- Tap the Share button (square with an arrow pointing upwards).
- Choose AirDrop and select the device you want to share with.
For transferring large numbers of photos, importing directly to a computer might be more efficient.
Downloading to Your Mac:
- Open the Photos app on your Mac.
- Select the photos and videos you want to download.
- Drag the selected items to your desktop or another folder in Finder. Alternatively, Control-click and choose Share > AirDrop to share wirelessly.
Managing iCloud Storage for Your Photos
Keep in mind that the photos and videos you store in iCloud Photos count towards your iCloud storage quota. When you sign up for iCloud, you get 5GB of free storage. If you have a large photo and video library or need more space for other iCloud services, you might need to upgrade to iCloud+.
Learn how to upgrade to iCloud+
To optimize your device storage, especially if you have a lot of photos and videos, you can use the Optimize Storage feature.
Optimize Storage vs. Download Originals
iCloud Photos offers two storage options:
- Optimize Storage: This option saves space on your device by storing smaller, space-saving versions of your photos and videos on your device while keeping the original, high-resolution versions in iCloud. Originals are downloaded on demand when you need them.
- Download Originals: This option keeps full-resolution originals on both your device and in iCloud, which provides faster access but uses more storage space on your device.
You can choose the option that best suits your needs in your device’s iCloud Photos settings.
To choose a storage setting on iPhone, iPad, or Apple Vision Pro:
- Go to Settings > [Your Name] > iCloud > Photos.
- Select either Optimize [Device] Storage or Download and Keep Originals.
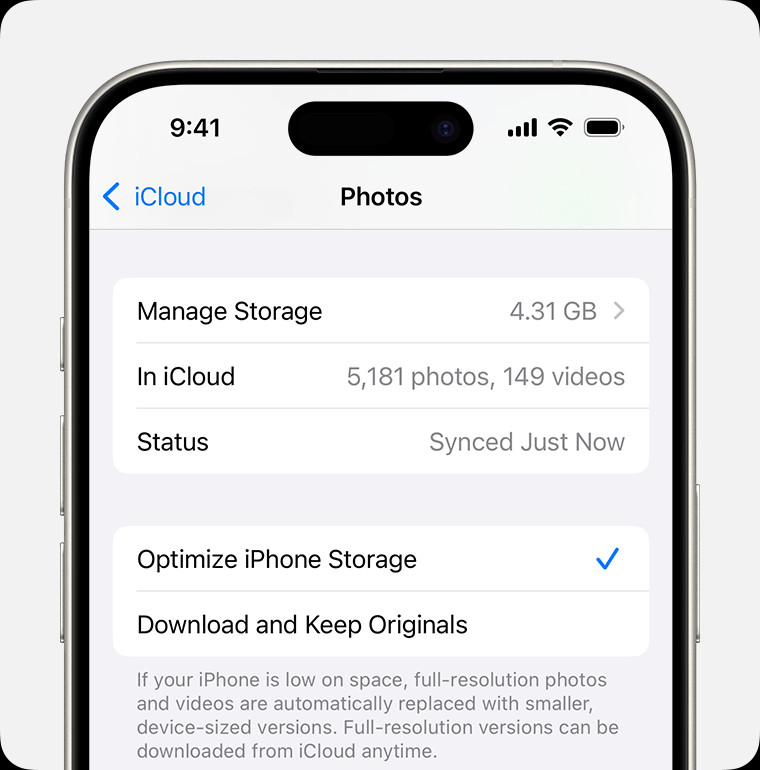 Optimize Storage and Download Originals options in iCloud Photos settings.
To choose a storage setting on Mac:
- Open the Photos app on your Mac.
- In the menu bar, click Photos > Settings (or Photos > Preferences depending on your macOS version).
- Go to the iCloud tab and select your desired storage setting.
Conclusion
Accessing your photos on iCloud is straightforward and offers flexibility across various devices. Whether you prefer using the Photos app on your Apple devices, accessing them through iCloud for Windows, or using the web interface at iCloud.com, your memories are always within reach. By understanding how iCloud Photos works and the different ways to access and manage your library, you can make the most of this powerful service to keep your photos safe and accessible wherever you go.