Enlarging a photo in Photoshop can indeed be done effectively, and at dfphoto.net, we are dedicated to showing you how to maintain the best possible quality. By mastering Photoshop’s resampling techniques, you can scale up your images for printing or display while minimizing pixelation and artifacts. You’ll explore resolution, pixel dimensions, and learn how to use features like Preserve Details 2.0 to bring your vision to life.
1. Understanding the Basics of Image Enlargement in Photoshop
How does image enlargement work in Photoshop? Image enlargement in Photoshop involves increasing the pixel dimensions of an image, which can be essential for various reasons, such as printing at a larger size or displaying the image on a high-resolution screen; however, it’s crucial to understand that simply increasing the size can lead to a loss of quality.
1.1 The Role of Resolution and Pixel Dimensions
What is the significance of resolution and pixel dimensions in image enlargement? Resolution, measured in pixels per inch (PPI), determines the level of detail in an image, and pixel dimensions refer to the total number of pixels in the image (width x height). When you enlarge an image, Photoshop needs to create new pixels based on the existing ones, and the method it uses to do this is called resampling.
1.2 Common Challenges in Enlarging Images
What are the common problems when enlarging images in Photoshop? The main challenge is preventing pixelation or blurriness. If Photoshop simply duplicates existing pixels, the image will look blocky, especially when viewed up close. To combat this, Photoshop offers various resampling methods designed to intelligently add new pixels and smooth out the image.
2. Step-by-Step Guide to Enlarging Photos in Photoshop
How can I enlarge a photo in Photoshop step by step? Enlarging photos in Photoshop can be done with great care and precision by following these steps to ensure you get the best possible result.
2.1 Opening Your Image in Photoshop
How do I open an image in Photoshop for enlargement? First, open Adobe Photoshop on your computer. Then, go to “File” in the top menu and select “Open.” Navigate to the image you want to enlarge and click “Open”. This will load the image into Photoshop, ready for editing. Make sure the image is of good quality to begin with, as this will affect the final enlarged result.
2.2 Accessing the Image Size Dialog Box
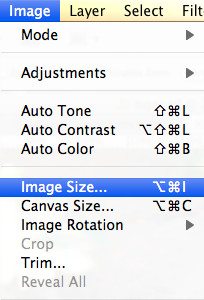
Where do I find the Image Size settings in Photoshop? Once your image is open, go to the “Image” menu at the top of the screen and select “Image Size.” This will open the Image Size dialog box, where you can adjust the dimensions and resolution of your image.
2.3 Adjusting Dimensions and Resolution
How do I change the size and resolution of my photo in Photoshop? In the Image Size dialog box, you’ll see fields for width, height, and resolution. You can change the units by clicking on the dropdown menus next to the values (e.g., inches, centimeters, pixels). To maintain the proportions of your image, make sure the “Constrain Proportions” option is checked. Now, enter your desired width or height, and Photoshop will automatically adjust the other dimension accordingly.
2.4 Understanding Resampling Methods
What are the different resampling options in Photoshop, and when should I use them? Resampling is how Photoshop adds or removes pixels when you change the size of an image. Here are the common options:
- Nearest Neighbor: This is the simplest method and is best for images with sharp edges and no gradients, like pixel art. It’s fast but can result in a blocky appearance.
- Bilinear: This method adds new pixels by averaging the colors of the surrounding pixels. It produces smoother results than Nearest Neighbor but can still cause some blurriness.
- Bicubic: This is a more complex method that produces smoother gradients and fewer artifacts than Bilinear. There are two variations:
- Bicubic Smoother: Best for enlarging images, as it reduces the appearance of artifacts.
- Bicubic Sharper: Best for reducing images, as it helps maintain detail.
- Preserve Details (enlargement): This method is designed specifically for enlarging images. It does a better job of preserving details and reducing noise compared to the older Bicubic methods.
- Preserve Details 2.0: An updated version of Preserve Details that offers even better results, especially when dealing with high-resolution images.
For enlarging photos, “Preserve Details 2.0” is generally the best option. It’s designed to maintain sharpness and reduce artifacts, providing a more natural look.
2.5 Using Preserve Details 2.0 for Optimal Results
Why is Preserve Details 2.0 the best resampling method for enlarging photos? “Preserve Details 2.0” is Photoshop’s most advanced resampling method for enlargement. It uses sophisticated algorithms to analyze the image and add new pixels in a way that preserves fine details and reduces unwanted noise. To use it, select “Preserve Details 2.0” from the Resample dropdown menu in the Image Size dialog box. You can also adjust the “Reduce Noise” slider to further refine the result.
2.6 Finalizing and Saving Your Enlarged Image
How do I save my enlarged photo in Photoshop? Once you are satisfied with the new size and resampling settings, click “OK” in the Image Size dialog box. Photoshop will apply the changes. Now, go to “File” in the top menu, select “Save As,” and choose a file format. For photographs, JPEG is a common choice, but for the best quality, consider using TIFF or PNG. Name your file and click “Save.” When saving as JPEG, you’ll be prompted to choose a quality setting. Higher quality settings result in larger file sizes but better image quality.
3. Advanced Techniques for High-Quality Enlargements
What are some advanced techniques to enhance the quality of enlarged photos? Beyond the basic steps, several advanced techniques can help you achieve even better results when enlarging photos in Photoshop.
3.1 Using Smart Objects
What are Smart Objects, and how do they help in image enlargement? Smart Objects are layers that contain image data from raster or vector images, such as Photoshop or Illustrator files. Smart Objects preserve an image’s source content with all its original characteristics, enabling you to perform nondestructive editing to the layer.
3.1.1 Converting to Smart Object
How do I convert a layer into a Smart Object in Photoshop? To convert a layer to a Smart Object, right-click on the layer in the Layers panel and select “Convert to Smart Object.” Once converted, you can resize the Smart Object without losing quality. If you need to make further adjustments, you can double-click the Smart Object to open it in a separate window, make your changes, and save. The changes will be automatically reflected in the original document.
3.1.2 Benefits of Using Smart Objects for Resizing
What are the advantages of using Smart Objects when resizing images? When you resize a regular layer, Photoshop discards pixels when reducing the size, which can result in a loss of detail when you enlarge it again. Smart Objects, on the other hand, retain the original image data, allowing you to resize the image up or down without any loss of quality.
3.2 Applying Sharpening Filters
When should I use sharpening filters after enlarging an image? After enlarging an image, it may appear slightly soft. Applying a sharpening filter can help restore some of the detail and make the image look crisper. However, it’s important to use sharpening filters judiciously, as over-sharpening can introduce unwanted artifacts and noise.
3.2.1 Unsharp Mask
What is the Unsharp Mask filter, and how do I use it effectively? The Unsharp Mask filter is a classic sharpening tool in Photoshop. It works by increasing the contrast along the edges in an image, making them appear sharper. To use it, go to “Filter” > “Sharpen” > “Unsharp Mask.” You’ll see three settings:
- Amount: This controls the strength of the sharpening effect. Start with a low value, such as 25%, and increase it gradually until you see the desired result.
- Radius: This determines the width of the area around the edges that are affected by the sharpening. A smaller radius (e.g., 1 pixel) is best for fine details, while a larger radius (e.g., 2-3 pixels) can be used for larger areas.
- Threshold: This controls the minimum amount of contrast that an edge must have before it is sharpened. A higher threshold value will prevent sharpening of areas with subtle contrast, which can help reduce noise.
3.2.2 Smart Sharpen
How does the Smart Sharpen filter differ from Unsharp Mask, and when should I use it? The Smart Sharpen filter is a more advanced sharpening tool that offers better control and more natural-looking results. It can reduce noise while sharpening and allows you to adjust the sharpening effect for different areas of the image. To use it, go to “Filter” > “Sharpen” > “Smart Sharpen.” In the Smart Sharpen dialog box, you’ll see several settings:
- Amount: Similar to Unsharp Mask, this controls the strength of the sharpening effect.
- Radius: This determines the width of the area around the edges that are affected by the sharpening.
- Reduce Noise: This slider helps reduce noise while sharpening, which is particularly useful for images with high ISO or other sources of noise.
- Remove: This option allows you to choose the type of blur to remove. “Gaussian Blur” is a general-purpose setting, while “Lens Blur” is designed to correct blur caused by camera lenses. “Motion Blur” can be used to correct blur caused by movement.
3.3 Frequency Separation Technique
What is frequency separation, and how can it improve the quality of enlarged photos? Frequency separation is an advanced editing technique that separates an image into its high-frequency (details) and low-frequency (tones and colors) components. This allows you to adjust the details and tones separately, giving you more control over the final result.
3.3.1 Separating High and Low Frequencies
How do I separate the high and low frequencies in Photoshop?
- Duplicate the layer twice.
- Rename the top layer “High Frequency” and the bottom layer “Low Frequency.”
- Select the “Low Frequency” layer and go to “Filter” > “Blur” > “Gaussian Blur.” Adjust the radius until the details in the image are blurred, but the overall tones and colors are still visible. A radius of 4-8 pixels is usually a good starting point.
- Select the “High Frequency” layer and go to “Image” > “Apply Image.” In the Apply Image dialog box, set the following:
- Layer: Low Frequency
- Blending: Subtract
- Scale: 2
- Offset: 128
- Change the blending mode of the “High Frequency” layer to “Linear Light.”
3.3.2 Editing Frequencies Separately
How do I edit the high and low frequencies independently? Once you have separated the frequencies, you can edit them separately to refine the image.
- Low Frequency Layer: Use tools like the Brush tool, Lasso tool, or Gradient tool to smooth out skin tones, remove blemishes, or adjust the overall tones and colors of the image.
- High Frequency Layer: Use tools like the Clone Stamp tool or Healing Brush tool to remove fine lines, wrinkles, or other small details.
3.4 Using AI-Powered Upscaling Software
Are there any AI-based tools that can improve the quality of enlarged photos? Yes, several AI-powered upscaling software options are available that can produce impressive results when enlarging photos. These tools use machine learning algorithms to analyze the image and add new pixels in a way that preserves details and reduces artifacts.
3.4.1 Topaz Gigapixel AI
What is Topaz Gigapixel AI, and how does it work? Topaz Gigapixel AI is a standalone software that uses artificial intelligence to enlarge images with minimal loss of quality. It can increase the resolution of an image by up to 600% while preserving details and reducing noise. To use it, simply open your image in Gigapixel AI, choose your desired enlargement factor, and let the software do its magic.
3.4.2 Other AI Upscaling Tools
What are some alternative AI upscaling tools available? Besides Topaz Gigapixel AI, other AI upscaling tools include:
- Let’s Enhance: An online service that uses AI to upscale images.
- AI Image Enlarger: Another online tool that offers AI-based image enlargement.
- Waifu2x: An open-source tool that specializes in upscaling anime-style images but can also be used for other types of images.
4. Practical Examples of Image Enlargement
How can I apply these techniques in real-world scenarios? To illustrate the practical applications of these techniques, let’s look at a few examples.
4.1 Enlarging Photos for Printing
How do I enlarge a photo for printing at a larger size? Suppose you have a photo that you want to print at a larger size, such as for a poster or canvas print. The first step is to determine the required resolution for the print size. A general rule of thumb is to aim for 300 DPI (dots per inch) for high-quality prints. So, if you want to print a 12×18 inch photo, you’ll need an image with a resolution of 3600×5400 pixels.
- Open your image in Photoshop.
- Go to “Image” > “Image Size.”
- Enter the desired width and height in inches, and make sure the resolution is set to 300 DPI.
- Choose “Preserve Details 2.0” as the resampling method.
- Adjust the “Reduce Noise” slider as needed.
- Click “OK” to apply the changes.
- Save the image as a TIFF or high-quality JPEG.
4.2 Enlarging Images for Web Use
How do I enlarge an image for use on a website? When enlarging images for web use, the goal is to strike a balance between image quality and file size. Large images can slow down website loading times, so it’s important to optimize them for the web.
- Open your image in Photoshop.
- Go to “Image” > “Image Size.”
- Enter the desired width and height in pixels. For web use, a resolution of 72 DPI is usually sufficient.
- Choose “Preserve Details 2.0” as the resampling method.
- Adjust the “Reduce Noise” slider as needed.
- Click “OK” to apply the changes.
- Go to “File” > “Export” > “Save for Web (Legacy).”
- Choose JPEG as the file format and adjust the quality setting to find a good balance between image quality and file size.
- Click “Save” to save the optimized image.
4.3 Restoring Old Photos
Can these techniques be used to restore old, low-resolution photos? Yes, these techniques can be used to restore old, low-resolution photos, but it’s important to manage expectations. While AI-powered upscaling tools can work wonders, they can’t magically create details that were never there.
- Scan the old photo at the highest possible resolution.
- Open the scanned image in Photoshop.
- Use the Crop tool to remove any borders or damaged areas.
- Go to “Image” > “Image Size.”
- Enlarge the image using “Preserve Details 2.0” as the resampling method.
- Adjust the “Reduce Noise” slider as needed.
- Use the Spot Healing Brush tool, Clone Stamp tool, and other retouching tools to remove scratches, dust, and other imperfections.
- Apply sharpening filters to restore some of the detail.
- Adjust the colors and tones as needed.
- Save the restored image as a TIFF or high-quality JPEG.
5. Common Mistakes to Avoid
What are the common pitfalls to avoid when enlarging photos in Photoshop? Enlarging photos in Photoshop can be tricky, and it’s easy to make mistakes that can negatively impact the quality of the final image. Here are some common mistakes to avoid:
5.1 Over-Enlarging Images
What is the limit to how much I can enlarge an image without significant quality loss? One of the biggest mistakes is trying to enlarge an image too much. There’s a limit to how much you can increase the size of an image before it starts to look blurry or pixelated. As a general rule, avoid enlarging an image by more than 200-300% unless you are using AI-powered upscaling tools.
5.2 Ignoring Resampling Methods
Why is it important to choose the right resampling method? Another common mistake is ignoring the resampling method. Using the wrong resampling method can result in unwanted artifacts, blurriness, or a loss of detail. Always choose “Preserve Details 2.0” for enlarging photos, unless you have a specific reason to use a different method.
5.3 Over-Sharpening
How can I avoid over-sharpening my enlarged photos? Over-sharpening is another common pitfall. While sharpening can help restore detail, too much sharpening can introduce unwanted noise and artifacts. Use sharpening filters sparingly and always zoom in to 100% to evaluate the results.
5.4 Saving in the Wrong Format
What file format should I use when saving my enlarged image? Saving in the wrong file format can also degrade the quality of your enlarged image. Avoid saving as JPEG if you plan to make further edits, as JPEG uses lossy compression that can discard data and reduce image quality. Instead, save as TIFF or PNG for the best quality.
6. Exploring Alternative Software Options
What other software can I use for enlarging photos? While Photoshop is a powerful tool for enlarging photos, it’s not the only option. Several other software options offer excellent results, particularly when it comes to AI-powered upscaling.
6.1 Adobe Lightroom
Can I enlarge photos in Adobe Lightroom? Yes, Adobe Lightroom also offers image resizing and resampling capabilities. While it may not have all the advanced features of Photoshop, it’s a great option for photographers who want to make basic enlargements without leaving the Lightroom workflow.
6.1.1 Resizing Images in Lightroom
How do I resize an image in Lightroom?
- Open your image in Lightroom.
- Go to “File” > “Export.”
- In the Export dialog box, scroll down to the “Image Sizing” section.
- Check the “Resize to Fit” box and choose your desired dimensions.
- Adjust the resolution as needed.
- Choose a sharpening option from the “Output Sharpening” menu.
- Click “Export” to save the resized image.
6.2 ON1 Resize AI
What is ON1 Resize AI, and how does it compare to Photoshop? ON1 Resize AI is a standalone software specifically designed for enlarging photos. It uses AI-powered upscaling algorithms to produce high-quality results with minimal loss of detail. It also offers advanced features like tiling and gallery wrap, making it a great option for photographers who need to create large prints or canvases.
6.2.1 Key Features of ON1 Resize AI
What are the standout features of ON1 Resize AI?
- AI-powered upscaling algorithms
- Tiling and gallery wrap options
- Batch processing
- Integration with other ON1 software
7. The Future of Image Enlargement
What can we expect in the future of image enlargement technology? The future of image enlargement looks promising, with ongoing advancements in AI and machine learning. We can expect to see even more sophisticated upscaling algorithms that can produce incredibly realistic results with minimal user input.
7.1 Advancements in AI Technology
How will AI continue to improve image enlargement techniques? AI technology is rapidly evolving, and we can expect to see even more impressive advancements in the near future. Future AI-powered upscaling tools may be able to:
- Automatically detect and correct flaws in images.
- Generate realistic details that were never there before.
- Adapt to different types of images and content.
- Offer even more control and customization options.
7.2 Integration with Other Creative Tools
How will image enlargement tools integrate with other creative software? We can also expect to see tighter integration between image enlargement tools and other creative software, such as Photoshop, Lightroom, and other editing programs. This will allow photographers and designers to seamlessly incorporate upscaling into their existing workflows.
8. Conclusion: Mastering Image Enlargement in Photoshop
Enlarging photos in Photoshop can seem daunting, but with the right techniques and tools, you can achieve excellent results. Remember to start with a high-quality image, choose the appropriate resampling method, use Smart Objects, apply sharpening filters judiciously, and avoid common mistakes like over-enlarging and saving in the wrong format. By mastering these techniques, you can confidently enlarge your photos for printing, web use, and restoration, and unleash your creative vision. At dfphoto.net, we’re committed to helping you enhance your photography skills, stay inspired, and connect with a thriving community of photographers.
 Tiger image used for practice enlarging in Photoshop
9. FAQs About Enlarging Photos in Photoshop
Here are some frequently asked questions about enlarging photos in Photoshop:
9.1 What is the best resampling method for enlarging photos?
Preserve Details 2.0 is generally the best resampling method for enlarging photos in Photoshop. It is designed to preserve fine details and reduce artifacts, providing a more natural look.
9.2 How much can I enlarge an image without losing quality?
As a general rule, avoid enlarging an image by more than 200-300% unless you are using AI-powered upscaling tools.
9.3 What is a Smart Object, and how does it help in image enlargement?
A Smart Object is a layer that contains image data from raster or vector images. It preserves an image’s source content with all its original characteristics, enabling you to perform nondestructive editing to the layer.
9.4 When should I use sharpening filters after enlarging an image?
After enlarging an image, it may appear slightly soft. Applying a sharpening filter can help restore some of the detail and make the image look crisper.
9.5 What is frequency separation, and how can it improve the quality of enlarged photos?
Frequency separation is an advanced editing technique that separates an image into its high-frequency (details) and low-frequency (tones and colors) components. This allows you to adjust the details and tones separately, giving you more control over the final result.
9.6 Are there any AI-based tools that can improve the quality of enlarged photos?
Yes, several AI-powered upscaling software options are available that can produce impressive results when enlarging photos. Topaz Gigapixel AI is a popular choice.
9.7 How do I enlarge a photo for printing at a larger size?
Determine the required resolution for the print size (aim for 300 DPI). Open your image in Photoshop, go to “Image” > “Image Size,” enter the desired dimensions and resolution, choose “Preserve Details 2.0” as the resampling method, and save the image as a TIFF or high-quality JPEG.
9.8 How do I enlarge an image for use on a website?
Open your image in Photoshop, go to “Image” > “Image Size,” enter the desired dimensions in pixels (72 DPI is usually sufficient), choose “Preserve Details 2.0” as the resampling method, and use “Save for Web (Legacy)” to optimize the image for web use.
9.9 Can these techniques be used to restore old, low-resolution photos?
Yes, these techniques can be used to restore old, low-resolution photos, but it’s important to manage expectations. AI-powered upscaling tools can help, but they can’t magically create details that were never there.
9.10 What are some common mistakes to avoid when enlarging photos in Photoshop?
Common mistakes include over-enlarging images, ignoring resampling methods, over-sharpening, and saving in the wrong format.
10. Resources for Further Learning
Where can I find more information and tutorials about image enlargement? To continue your learning journey and deepen your understanding of image enlargement techniques, here are some valuable resources:
- Adobe Photoshop Documentation: The official Adobe Photoshop documentation provides comprehensive information about all of Photoshop’s features, including image resizing and resampling.
- Online Tutorials: Websites like YouTube, Skillshare, and Udemy offer a wealth of tutorials on image enlargement techniques in Photoshop.
- Photography Forums: Online photography forums and communities are great places to ask questions, share tips, and learn from other photographers.
- Photography Blogs: Many photography blogs regularly publish articles and tutorials on image editing and post-processing techniques.
10.1 dfphoto.net: Your Photography Resource
At dfphoto.net, we are committed to providing you with the resources and inspiration you need to excel in photography. Explore our website for more articles, tutorials, and stunning photography to fuel your creative passion.
11. Connect with the dfphoto.net Community
Are you ready to take your photography skills to the next level? Visit dfphoto.net today to explore our extensive collection of tutorials, discover inspiring photography, and connect with a vibrant community of photographers. Whether you’re a beginner or a seasoned pro, you’ll find valuable resources and a supportive community to help you grow and thrive.
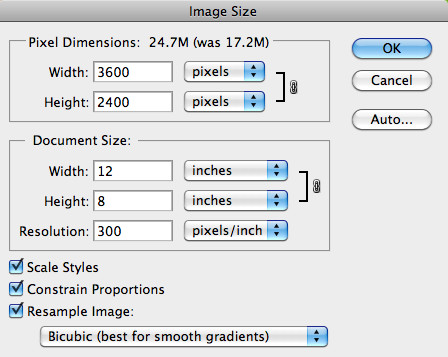 Image size dialog box showing settings for enlarging an image in Photoshop
Address: 1600 St Michael’s Dr, Santa Fe, NM 87505, United States
Phone: +1 (505) 471-6001
Website: dfphoto.net
Join us at dfphoto.net and start your journey towards photographic excellence today!
12. Call to Action
Ready to enhance your photography skills and find inspiration?
- Visit dfphoto.net to explore our extensive collection of tutorials.
- Discover inspiring photography.
- Connect with a vibrant community of photographers.
Click here to visit dfphoto.net and start your journey towards photographic excellence today!
13. Key Factors to Consider for Exceptional Photo Enlargements
What key considerations matter most for outstanding photo enlargements? Achieving exceptional photo enlargements involves navigating a complex interplay of factors. These range from initial image quality and strategic software utilization to meticulous post-processing techniques and a deep understanding of printing nuances.
13.1 Optimizing Initial Image Quality
How vital is the initial image quality for successful enlargements? The adage “garbage in, garbage out” holds particularly true for photo enlargements. Starting with a high-resolution, well-exposed, and sharply focused image sets the stage for a successful enlargement. A low-quality source image will invariably yield a subpar enlarged result, regardless of the software or techniques employed.
13.2 Leveraging Software Capabilities and Settings
How can software settings be optimized for photo enlargement? The choice of software and its optimal settings play a pivotal role in the enlargement process. Adobe Photoshop, ON1 Resize AI, and Topaz Gigapixel AI offer a range of resampling algorithms, each with its strengths and weaknesses. “Preserve Details 2.0” in Photoshop and the AI-powered algorithms in ON1 and Topaz are generally favored for their ability to retain detail and minimize artifacts.
13.3 Understanding DPI and Print Size Relationships
Why is understanding DPI crucial for print enlargements? DPI (dots per inch) dictates the print resolution and is a critical factor in determining the maximum achievable print size without compromising quality. A higher DPI translates to sharper, more detailed prints. Generally, a DPI of 300 is recommended for professional-quality prints.
13.4 Applying Strategic Sharpening and Noise Reduction
How can sharpening and noise reduction be effectively utilized? Sharpening and noise reduction are essential post-processing steps in photo enlargement. Sharpening enhances the perceived sharpness of the enlarged image, while noise reduction minimizes unwanted graininess or artifacts. However, both must be applied judiciously to avoid over-sharpening or excessive smoothing.
13.5 Selecting Appropriate Printing Materials and Processes
How do printing materials and processes impact the final outcome? The choice of printing materials and processes significantly influences the final outcome of a photo enlargement. Different paper types, inks, and printing techniques can affect color accuracy, contrast, and overall image quality. Selecting materials and processes that complement the image and intended display environment is crucial.