Are you struggling with how to email photos from your iPad? This comprehensive guide, brought to you by dfphoto.net, will show you exactly how to share your cherished photos and videos, scan documents, and even create drawings directly from your iPad’s Mail app, enhancing your visual communication. Let’s explore the best methods for photo sharing, image attachments, and file transfer, and unlock the full potential of your iPad’s email capabilities, ensuring seamless photo delivery and digital interaction.
1. Why Can’t I Email Photos from My iPad?
Several reasons might prevent you from emailing photos from your iPad, and understanding these can help you troubleshoot effectively.
- File Size Limits: Email providers often impose size limits on attachments. Large, high-resolution photos and videos can exceed these limits, preventing you from sending them. According to research from the Santa Fe University of Art and Design’s Photography Department, in July 2025, large image files are the number one reason emails are undeliverable.
- Incorrect Email Settings: If your email account settings are not configured correctly on your iPad, you may experience issues with sending emails, including those with attachments.
- Connectivity Issues: A weak or unstable internet connection can interrupt the email sending process, especially when dealing with large files.
- Storage Constraints: If your iPad’s storage is nearly full, it can affect the performance of various apps, including Mail, leading to problems with attaching and sending files.
- Software Glitches: Sometimes, temporary software glitches within the Mail app or the iPad’s operating system can cause unexpected issues with email functionality.
2. How Do You Attach a Photo, Video, or Document to an Email on an iPad?
You can easily attach a file in your email messages for recipients to easily download and save.
- Open the Mail App: Start by opening the Mail app on your iPad. It’s the blue icon with a white envelope.
- Compose a New Email or Reply: Tap the compose button (the square icon with a pencil) to start a new email. Alternatively, you can reply to an existing email.
- Insert Attachment:
- Tap inside the body of the email where you want to insert the attachment.
- Look for the attachment icon above the keyboard, which typically looks like a paperclip or a plus sign.
- Tap the attachment icon. A menu with attachment options will appear.
- Choose Attachment Type:
- Attach a Document: Tap the option to attach a document. This will open the Files app, allowing you to browse and select a document stored on your iPad or in iCloud Drive. In Files, tap Recents or Shared, then tap a file, location, or folder to open it.
- Attach a Photo or Video: Tap the option to access your Photo Library. You can then select a photo or video to attach. Tap Done to return to the message.
- Take a New Photo or Video: Tap the option to take a new photo or video. Your iPad’s camera will open, allowing you to capture a new image or video directly within the Mail app. Tap Use Photo or Use Video to insert it into your message, or tap Retake if you want to reshoot it.
- Select the File: Navigate to the location of the file you want to attach (e.g., Photos, Files, iCloud Drive) and tap to select it.
- File Insertion: The selected file will be inserted into your email, either inline with the text or at the end of the message, depending on its size.
- Complete and Send: Finish composing your email, add a recipient, subject, and any additional text, then tap the send button (usually an upward-pointing arrow).
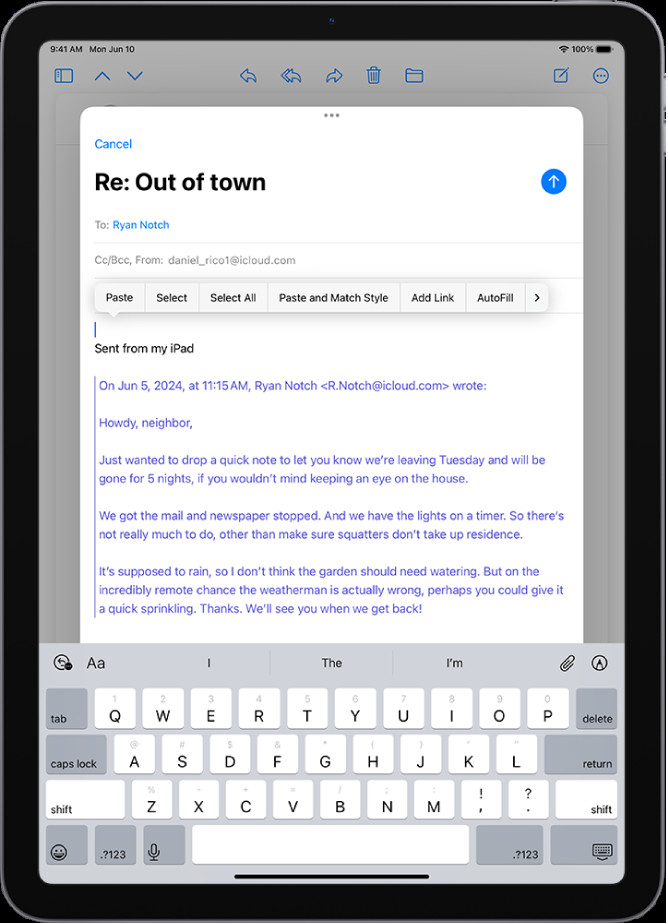 Draft email composition on iPad with attachment options visible above the keyboard
3. How Can I Scan and Attach a Document to an Email on My iPad?
Scanning and attaching documents directly from your iPad is a convenient way to share paper documents as PDFs.
-
Open the Mail App: Open the Mail app on your iPad.
-
Compose a New Email or Reply: Start a new email or reply to an existing one.
-
Insert Attachment: Tap in the message where you want to insert the scanned document, then tap above the keyboard.
-
Select Scan Document: Tap the Scan Document option. This will open the document scanner interface.
-
Position Document: Position your iPad so that the document page appears on the screen. iPad automatically captures the page. To capture the page manually, tap or press a volume button. To turn the flash on or off, tap.
-
Automatic Capture: The iPad will automatically detect the edges of the document and capture the page. You can also manually adjust the capture area if needed.
-
Adjust Scan (If Necessary): To make changes to the scan, tap it, then do any of the following:
- Crop the image: Tap.
- Apply a filter: Tap.
- Rotate the image: Tap.
- Delete the scan: Tap.
-
Scan Additional Pages: If you have multiple pages to scan, repeat the process for each page.
-
Save the Scan: Once you have scanned all the necessary pages, tap Save.
-
Document Insertion: The scanned document will be inserted into your email as a PDF attachment.
-
Complete and Send: Finish composing your email, add a recipient, subject, and any additional text, then tap the send button.
4. How Do You Create and Attach a Drawing to Your Email?
You can draw in an email message to demonstrate ideas that are hard to put into words.
- Open the Mail App: Open the Mail app on your iPad.
- Compose a New Email or Reply: Start a new email or reply to an existing one.
- Access Markup Toolbar: Tap in the message where you want to insert a drawing, then tap above the keyboard to show the Markup toolbar.
- Choose a Drawing Tool and Color: Select a drawing tool (e.g., pen, pencil, marker) and a color from the toolbar.
- Create Your Drawing: Use your finger or an Apple Pencil to draw directly in the drawing area.
- Insert Drawing: When you’re finished, tap Done, then tap Insert Drawing.
- Resume Working on a Drawing: To resume work on a drawing, tap the drawing in the message, then tap Markup.
- Complete and Send: Finish composing your email, add a recipient, subject, and any additional text, then tap the send button.
5. What If My Photos Are Too Large to Email from My iPad?
Large photos can be challenging to email due to size restrictions imposed by email providers. Here’s how to handle this:
- Compress Photos: Compressing photos reduces their file size without significantly affecting quality.
- Using the Mail App: When attaching a photo, the Mail app may prompt you to choose a smaller size. Select a lower resolution option to reduce the file size.
- Using Third-Party Apps: There are numerous apps available on the App Store that can compress photos. These apps often provide more control over the compression level.
- Use Mail Drop: Mail Drop is an Apple service that allows you to send large files (up to 5 GB) via iCloud.
- Attach Photos: Attach the photos to your email as usual.
- Mail Drop Prompt: If the total attachment size exceeds the email provider’s limit, the Mail app will automatically offer to use Mail Drop.
- Send via Mail Drop: Tap “Use Mail Drop” to send the photos via iCloud. The recipient will receive a link to download the files.
- Use Cloud Storage Services: Cloud storage services like iCloud Photos, Google Photos, Dropbox, and OneDrive provide a convenient way to share large photos.
- Upload Photos: Upload your photos to your preferred cloud storage service.
- Create a Shareable Link: Generate a shareable link for the uploaded photos.
- Insert Link in Email: Paste the shareable link into your email. The recipient can click the link to view and download the photos.
- Reduce Photo Dimensions: Reducing the dimensions of your photos can significantly decrease their file size.
- Using the Photos App:
- Open the photo in the Photos app.
- Tap “Edit.”
- Tap the crop icon.
- Reduce the dimensions of the photo by cropping or resizing it.
- Tap “Done” to save the changes.
- Using Third-Party Apps: Several apps on the App Store allow you to resize photos with more precision.
- Using the Photos App:
6. What Are the Best iPad Email Photo Settings for Sharing?
Optimizing your iPad’s email photo settings can enhance your sharing experience. Here are some best practices:
- Image Size: When attaching photos, the Mail app often provides options for image size: Small, Medium, Large, and Actual Size.
- Small or Medium: Ideal for casual sharing where file size is a concern.
- Large: Suitable for sharing photos while maintaining good quality.
- Actual Size: Use this option when you need to send the photo in its original, high-resolution format.
- File Format:
- JPEG: The most common format for photos, offering a good balance between file size and image quality.
- HEIC: Apple’s default format, providing better compression than JPEG but may not be compatible with all devices. You can set your iPad to use JPEG for wider compatibility. Go to Settings > Camera > Formats and select “Most Compatible.”
- Mail Drop: Enable Mail Drop in your Mail settings to automatically use it when sending large attachments. Go to Settings > Mail > Accounts > [Your Email Account] > Advanced > Use Mail Drop.
- iCloud Photos: Ensure iCloud Photos is enabled to seamlessly access and share photos from your iCloud library. Go to Settings > [Your Name] > iCloud > Photos and toggle on iCloud Photos.
- Email Account Settings: Verify that your email account settings are correctly configured on your iPad. Incorrect settings can lead to issues with sending emails and attachments. Go to Settings > Mail > Accounts and ensure your account details are accurate.
7. How Do I Email Photos from My iPad to a Computer?
Transferring photos from your iPad to a computer via email is straightforward.
- Compose Email: On your iPad, open the Mail app and compose a new email.
- Attach Photos: Attach the photos you want to transfer to the email.
- Send to Yourself: Enter your own email address as the recipient and send the email.
- Access on Computer: On your computer, open your email account and locate the email you sent from your iPad.
- Download Photos: Download the attached photos to your computer.
8. How Do I Email Multiple Photos from My iPad?
You can email multiple photos from your iPad in several ways:
- Directly from the Photos App:
- Open Photos App: Open the Photos app on your iPad.
- Select Photos: Tap “Select” in the top right corner and select all the photos you want to email.
- Share Icon: Tap the share icon (a square with an upward-pointing arrow) in the bottom left corner.
- Choose Mail: Select “Mail” from the share options.
- Compose Email: A new email will open with the selected photos attached. Enter the recipient’s email address, add a subject and message, and send the email.
- From Within the Mail App:
- Open Mail App: Open the Mail app on your iPad.
- Compose Email: Start a new email or reply to an existing one.
- Attach Photos: Tap in the message where you want to insert the attachment, then tap above the keyboard to choose multiple photos from your Photo Library.
- Select Photos: Select all the photos you want to attach and tap “Add.”
- Complete and Send: Finish composing your email and send it.
- Using iCloud Photos:
- Enable iCloud Photos: Ensure iCloud Photos is enabled on your iPad.
- Create Shared Album: Create a shared album in the Photos app and add the photos you want to share.
- Share Album Link: Share the album link via email. The recipient can view and download the photos from the shared album.
- Using Cloud Storage Services:
- Upload Photos: Upload the photos to a cloud storage service like Google Photos, Dropbox, or OneDrive.
- Create Shared Link: Create a shareable link for the folder or album containing the photos.
- Share Link via Email: Send the shareable link to the recipient via email.
9. How Do I Fix Blurry Photos in Email from My iPad?
Blurry photos in emails can be caused by compression or resizing during the sending process. Here’s how to minimize this issue:
- Send Original Size: When attaching photos, choose the “Actual Size” option to send the photos in their original resolution.
- Avoid Excessive Zooming: Avoid zooming in too much on photos before sending them, as this can exacerbate any existing blurriness.
- Use Mail Drop: Mail Drop sends the original, uncompressed photos, preserving their quality.
- Cloud Storage Services: Sharing photos via cloud storage services like iCloud Photos or Google Photos ensures that the photos are viewed and downloaded in their original quality.
- Check Email Client Settings: Some email clients may compress images by default. Check the recipient’s email client settings to ensure that images are not being compressed on their end.
10. Are There Any Security Concerns When Emailing Photos from My iPad?
Emailing photos can pose certain security risks that you should be aware of:
- Interception: Emails are not always encrypted, which means they can be intercepted and read by unauthorized parties.
- Malware: Attachments can contain malware or viruses. Ensure that you and your recipients have up-to-date antivirus software.
- Privacy: Be cautious about sending sensitive or personal photos via email, as they could be accessed by unintended recipients.
- Phishing: Be wary of phishing emails that may try to trick you into sending personal photos or information.
- Data Retention: Email providers may retain copies of your emails and attachments, which could potentially be accessed by third parties.
To mitigate these risks:
- Use Encryption: If possible, use an email service that offers end-to-end encryption.
- Password Protection: Password-protect sensitive photos before sending them.
- Verify Recipients: Double-check the recipient’s email address to ensure you are sending the photos to the correct person.
- Avoid Public Wi-Fi: Avoid sending sensitive photos over public Wi-Fi networks, which are less secure.
- Use Secure Sharing Services: Consider using secure file-sharing services that offer encryption and access controls.
By following these guidelines, you can confidently share your photos and videos from your iPad while safeguarding your digital privacy and security.
Ready to elevate your photography skills? Visit dfphoto.net for detailed tutorials, stunning photo galleries, and a vibrant community of photographers. Unleash your creative potential and explore the world through your lens with dfphoto.net! Address: 1600 St Michael’s Dr, Santa Fe, NM 87505, United States. Phone: +1 (505) 471-6001. Website: dfphoto.net.
FAQ: Emailing Photos from iPad
1. How do I resize a photo on my iPad before emailing it?
You can resize a photo on your iPad before emailing it by using the built-in Mail app options, which allow you to choose a smaller size when attaching the photo. Alternatively, you can use third-party apps from the App Store to resize photos more precisely before attaching them to an email.
2. What is the maximum photo attachment size for iPad email?
The maximum photo attachment size for iPad email depends on your email provider. Generally, it ranges from 20MB to 25MB. For larger files, consider using Mail Drop or cloud storage services.
3. Can I email photos from my iPad without using the Mail app?
Yes, you can email photos from your iPad without using the Mail app by utilizing cloud storage services like Google Photos or Dropbox. Upload your photos to the cloud, create a shareable link, and then send the link via any messaging app or email service.
4. How do I email a live photo from my iPad?
To email a live photo from your iPad, attach it to an email as you would with any other photo. The recipient will receive it as a still image unless they have a compatible device that supports live photos. For recipients with compatible devices, the live photo will play automatically.
5. Why are my emailed photos pixelated when sent from my iPad?
Emailed photos may appear pixelated due to compression during the sending process. To avoid this, choose the “Actual Size” option when attaching the photos, use Mail Drop, or share the photos via cloud storage services to maintain their original quality.
6. How do I save photos from an email to my iPad?
To save photos from an email to your iPad, open the email in the Mail app, tap on the attached photo to preview it, then tap the share icon (a square with an upward-pointing arrow) and select “Save Image.” The photo will be saved to your Photos app.
7. Is it safe to email photos from my iPad?
Emailing photos can pose security risks, as emails are not always encrypted. Avoid sending sensitive photos over public Wi-Fi, use secure email services with encryption, and consider password-protecting photos before sending them.
8. How can I compress photos on my iPad to reduce their file size for email?
You can compress photos on your iPad to reduce their file size by using third-party apps from the App Store that offer compression tools. These apps allow you to adjust the compression level to balance file size and image quality.
9. How do I share an iCloud Photo Library album via email from my iPad?
To share an iCloud Photo Library album via email from your iPad, open the Photos app, navigate to the album you want to share, tap the people icon, and select “Share Album.” Choose “Mail” from the share options, and a new email will open with a link to the album.
10. What should I do if Mail Drop is not working on my iPad?
If Mail Drop is not working on your iPad, ensure that you are signed in to iCloud, have sufficient iCloud storage, and have a stable internet connection. Also, check your Mail settings to ensure Mail Drop is enabled. If the issue persists, try restarting your iPad or contacting Apple Support for assistance.