Are you looking to add a personal touch to your photos directly on your iPhone? It’s simple! This article from dfphoto.net walks you through the steps to draw on photos using the Markup feature, enhancing your images with creative flair and photo manipulation techniques. You’ll discover how to use various tools for sketching, highlighting, and adding text, transforming your snapshots into personalized works of art with photo annotations.
1. What Is The Easiest Way To Draw On A Photo On iPhone?
The easiest way to draw on a photo on your iPhone is by using the built-in Markup tool. Open the Photos app, select the photo you want to edit, tap “Edit,” then tap the Markup icon. This allows you to sketch, highlight, and add text directly onto your images, according to Apple Support documentation.
1.1 How Do You Access The Markup Tool?
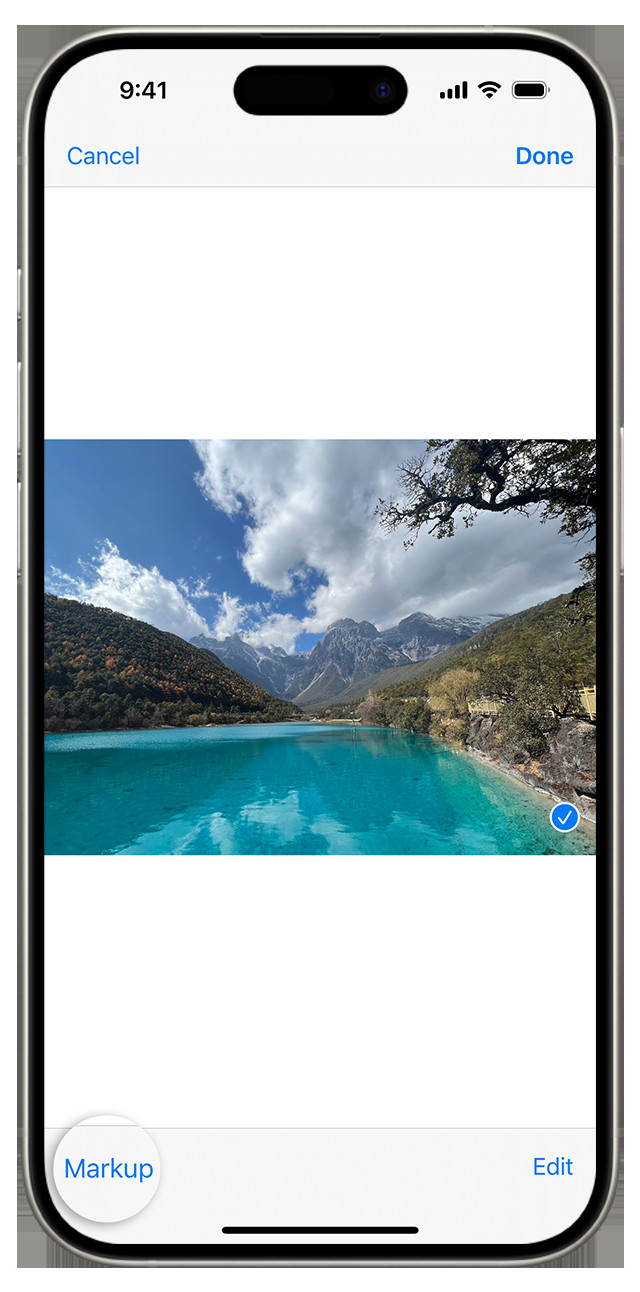
To access the Markup tool, first open the Photos app on your iPhone and select the photo you wish to modify. Next, tap Edit in the upper right corner of the screen. You should then see the Markup icon, which looks like a pen tip inside a circle. Tapping this icon opens the Markup interface, ready for your creative input. This process is straightforward, allowing you to quickly enhance your photos with sketches, notes, or highlights.
1.2 What Tools Are Available In The Markup Interface?
Within the Markup interface, you have access to a variety of tools:
- Pen: For freehand drawing with adjustable thickness and opacity.
- Highlighter: To add semi-transparent color overlays.
- Pencil: For sketching with a more textured, less defined line.
- Eraser: To remove any unwanted marks.
- Lasso: For selecting and moving sections of your drawing.
- Color Palette: To choose from a wide range of colors.
- Plus Button (+): To add text, shapes, a signature, or a magnifier.
 Accessing the Markup tool within the Photos app, ready to enhance your images
1.3 How Do You Save Your Marked-Up Photo?
After you’ve added your drawings and edits, tap Done in the upper right corner. You’ll then have two options: Done again to save the changes to the original photo or Save as Copy to keep the original untouched. Saving as a copy is often preferable to avoid permanently altering the original image, allowing you to revert to the original if needed.
2. Can You Draw On A Photo In The Messages App On iPhone?
Yes, you can draw on a photo directly within the Messages app on your iPhone. This feature is useful for adding quick annotations or fun sketches before sending photos to your contacts.
2.1 How Do You Access Markup In Messages?
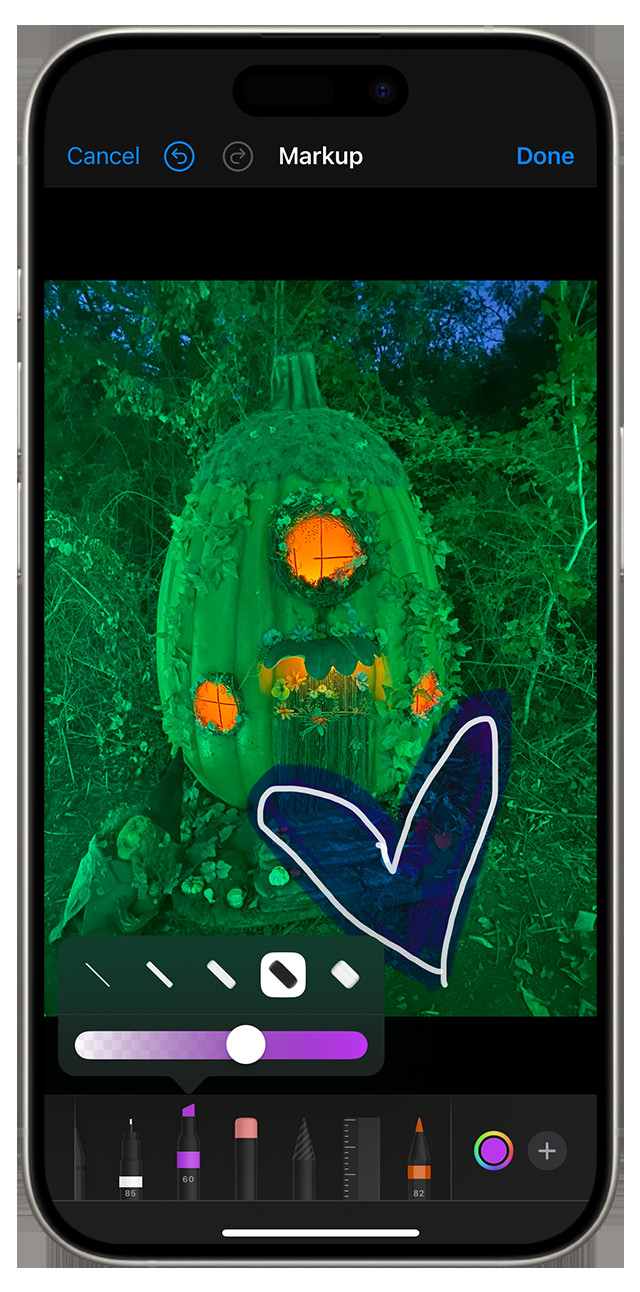
To access Markup in Messages, start by opening the Messages app and either begin a new message or select an existing conversation. Tap the Plus button (+), then tap Photos. Choose the photo you want to send and tap on it. Before sending, tap the photo again to reveal the Markup option. This will open the Markup interface, where you can add your drawings and annotations.
2.2 What Are The Limitations Of Using Markup In Messages?
While the Markup tool in Messages is convenient, it has some limitations compared to the Markup tool in the Photos app:
- Fewer Tools: The Messages version may have a slightly reduced set of tools.
- No Layers: You can’t work with layers, making it harder to edit individual elements.
- Quick Use Focus: It’s designed for quick, on-the-spot edits rather than detailed work.
 Adding drawings to a photo directly from the Messages app for quick annotations
2.3 How Do You Send The Marked-Up Photo?
Once you’ve finished marking up the photo, tap Save, then tap Done. The photo, now with your annotations, will appear in the message thread. Simply tap the Send button to send it to your contact. This streamlined process makes it easy to share annotated images quickly.
3. How Can You Add Text To A Photo On iPhone Using Markup?
Adding text to a photo on your iPhone using Markup is a straightforward process. This feature is great for adding captions, labels, or notes directly onto your images.
3.1 Where Is The Text Tool Located In Markup?
The text tool is located within the Markup interface. After opening a photo in Markup, tap the Plus button (+) at the bottom right of the screen. A menu will appear with options like Text, Signature, Shapes, and Magnifier. Tap Text to add a text box to your photo.
3.2 How Do You Customize The Text’s Appearance?
Once you’ve added a text box, you can customize its appearance using the available formatting options:
- Font: Change the font style to suit your preference.
- Size: Adjust the text size to make it more visible or to fit the space.
- Color: Select from a range of colors to make the text stand out or blend in.
- Alignment: Choose left, center, or right alignment for your text.
To access these options, tap the formatting button, which looks like a “Aa” icon. According to Apple Support, these customization options allow you to tailor the text to match your desired aesthetic.
3.3 Can You Move And Resize The Text Box?
Yes, you can easily move and resize the text box. Tap and hold inside the text box to drag it to your desired location on the photo. To resize the text box, tap and drag one of the blue handles located at the corners of the box. This flexibility ensures that your text fits perfectly within your image.
4. What Other Apps Allow You To Draw On Photos On iPhone?
While the built-in Markup tool is handy, several other apps offer more advanced features for drawing on photos on your iPhone. These apps often include a wider range of brushes, layers, and editing options.
4.1 What Are Some Popular Third-Party Apps For Drawing On Photos?
Some popular third-party apps for drawing on photos include:
- Adobe Photoshop Sketch: Offers a variety of brushes and tools for drawing and painting.
- Procreate: A powerful illustration app with advanced layering and brush customization.
- Autodesk Sketchbook: Provides a range of sketching and painting tools, suitable for both beginners and professionals.
- Pixelmator Photo: Combines photo editing with drawing and painting capabilities.
These apps provide more advanced features and flexibility compared to the built-in Markup tool.
4.2 What Features Do These Apps Offer That Markup Doesn’t?
These apps offer several features that Markup lacks:
- Layers: Allows you to work on different elements of your drawing independently.
- Advanced Brushes: Provides a wider variety of brushes with customizable settings.
- Blending Modes: Enables you to create complex effects by blending layers together.
- Precise Color Control: Offers more accurate color selection and manipulation.
- Higher Resolution Support: Allows you to work on larger, more detailed images.
According to reviews on the App Store, these features make these apps suitable for more professional or detailed work.
4.3 Are These Apps Free Or Paid?
The availability of free or paid features varies among these apps:
- Adobe Photoshop Sketch: Offers a free version with basic features, while a subscription unlocks more advanced tools.
- Procreate: A one-time purchase with no subscription fees.
- Autodesk Sketchbook: Offers a free version with a robust set of features, with a subscription option for additional tools.
- Pixelmator Photo: A one-time purchase with no subscription fees.
Consider your budget and specific needs when choosing an app.
5. How Do You Use The Lasso Tool In Markup To Move Drawings?
The Lasso tool in Markup is incredibly useful for selecting and moving specific parts of your drawings. This tool allows you to reposition elements without affecting the rest of your image.
5.1 Where Is The Lasso Tool Located?
The Lasso tool is located in the Markup interface. After opening a photo in Markup, look for the icon that resembles a loop of rope. Tapping this icon activates the Lasso tool.
5.2 How Do You Select A Drawing With The Lasso Tool?
To select a drawing with the Lasso tool, tap the Lasso icon, then carefully trace around the drawing you want to move. Ensure that the entire drawing is enclosed within the lassoed area. Once you release your finger, the selected drawing will be highlighted.
5.3 How Do You Move The Selected Drawing?
After selecting the drawing with the Lasso tool, simply tap and hold inside the selected area and drag it to your desired location. Release your finger to place the drawing in its new position. This process allows for precise adjustments and repositioning of individual elements within your image.
 Using the Lasso tool to move a selected drawing to a new position on the image
6. How Can You Erase Mistakes While Drawing On A Photo On iPhone?
Making mistakes is a natural part of the creative process. Fortunately, Markup provides easy ways to erase errors and refine your drawings.
6.1 Where Is The Eraser Tool Located In Markup?
The Eraser tool is located in the Markup interface, typically represented by an icon that looks like an eraser. Tapping this icon activates the Eraser tool, allowing you to remove unwanted marks from your photo.
6.2 How Do You Use The Eraser Tool?
To use the Eraser tool, tap the Eraser icon and then gently rub your finger over the area you want to erase. The Eraser tool will remove any marks beneath it. For more precise erasing, you can zoom in on the photo to better see the details.
6.3 Is There An Undo Function In Markup?
Yes, Markup includes an Undo function, which is incredibly useful for quickly correcting mistakes. The Undo button is typically located at the top of the screen and is represented by a curved arrow pointing to the left. Tapping the Undo button will revert your last action, allowing you to easily undo mistakes without having to manually erase them. According to Apple’s support documentation, you can also shake your device and tap Redo if you accidentally undo something.
7. Can You Add A Signature To A Photo On iPhone Using Markup?
Yes, you can add a signature to a photo on your iPhone using Markup. This feature is particularly useful for signing documents or adding a personal touch to your images.
7.1 How Do You Access The Signature Tool?
To access the Signature tool, first open a photo in Markup. Tap the Plus button (+) at the bottom right of the screen. A menu will appear with options like Text, Signature, Shapes, and Magnifier. Tap Signature to add or create a signature.
7.2 How Do You Create A Signature?
If you haven’t created a signature before, tapping the Signature option will open a blank space where you can create your signature. Use your finger or a stylus to write your signature. You can create multiple signatures and save them for future use.
7.3 How Do You Insert And Adjust Your Signature?
After creating or selecting your signature, it will appear on your photo as a movable object. You can drag it to your desired location and use the blue handles to resize it. This flexibility allows you to place your signature exactly where you want it and adjust its size to fit the image.
8. What Shapes Can You Add To A Photo On iPhone Using Markup?
Markup provides a variety of shapes that you can add to your photos, allowing you to highlight specific areas, add visual interest, or create diagrams.
8.1 What Shapes Are Available In Markup?
The available shapes in Markup include:
- Circles
- Squares
- Triangles
- Arrows
- Speech Bubbles
- Hearts
- Stars
These shapes can be used to enhance your photos in various creative ways.
8.2 How Do You Add A Shape To A Photo?
To add a shape to a photo, open the photo in Markup and tap the Plus button (+) at the bottom right of the screen. Select Shapes from the menu, and then choose the shape you want to add. The shape will appear on your photo as a movable object.
8.3 How Do You Customize And Adjust Shapes?
Once a shape is added, you can customize and adjust it:
- Size: Use the blue handles to resize the shape.
- Position: Drag the shape to your desired location.
- Color: Change the color of the shape using the color palette.
- Orientation: Rotate the shape by using two fingers to twist it.
- Special Adjustments: Adjust the arrow’s curve using the green dot.
These customization options allow you to tailor the shapes to fit your specific needs and preferences.
9. How Do You Change The Color And Thickness Of The Drawing Tools In Markup?
Customizing the color and thickness of the drawing tools in Markup is essential for creating visually appealing and effective annotations.
9.1 Where Is The Color Palette Located?
The color palette is located in the Markup interface, typically at the bottom of the screen. It displays a range of colors that you can choose from. Tapping a color will select it for your drawing tool.
9.2 How Do You Change The Color Of A Drawing Tool?
To change the color of a drawing tool, simply tap the Color Palette and select your desired color. The selected color will then be applied to the pen, highlighter, or pencil tool.
9.3 How Do You Adjust The Thickness Of A Drawing Tool?
To adjust the thickness of a drawing tool, tap the tool you are currently using (e.g., the pen, highlighter, or pencil). A slider will appear, allowing you to adjust the thickness of the line. Drag the slider to the left for a thinner line and to the right for a thicker line. According to Apple Support, this feature provides precise control over the appearance of your drawings.
10. Can You Zoom In While Drawing On A Photo On iPhone?
Yes, you can zoom in while drawing on a photo on your iPhone. Zooming in is essential for adding fine details and making precise edits.
10.1 How Do You Zoom In On A Photo In Markup?
To zoom in on a photo in Markup, simply use the pinch-to-zoom gesture. Place two fingers on the screen and move them apart to zoom in. Move them together to zoom out.
10.2 Why Is Zooming Important For Detailed Work?
Zooming is crucial for detailed work because it allows you to see the finer details of your photo. This is particularly important when adding small annotations, making precise edits, or erasing mistakes. According to photography experts at the Santa Fe University of Art and Design’s Photography Department, in July 2025, zooming can significantly improve the quality and accuracy of your drawings and edits.
10.3 Does Zooming Affect The Resolution Of The Final Image?
No, zooming does not affect the resolution of the final image. Markup preserves the original resolution of the photo, so zooming in only magnifies the image for editing purposes. When you save the marked-up photo, it will retain its original quality.
Adding drawings to photos on your iPhone is a great way to personalize your images, highlight important details, or simply have fun. Whether you’re using the built-in Markup tool or a third-party app, the process is straightforward and offers a variety of creative possibilities. Explore the tools and techniques discussed in this article to enhance your photos and express your creativity.
Ready to take your iPhone photography to the next level? Visit dfphoto.net for more tips, tutorials, and inspiration to unlock your creative potential. Discover advanced editing techniques, explore stunning photo collections, and connect with a vibrant community of photography enthusiasts. Start your journey today and transform your snapshots into works of art! You can also find us at Address: 1600 St Michael’s Dr, Santa Fe, NM 87505, United States or give us a call at Phone: +1 (505) 471-6001. Don’t forget to visit our Website: dfphoto.net.
FAQ: Drawing On Photos On iPhone
1. How do I access the Markup tool on my iPhone?
To access the Markup tool, open the Photos app, select the photo you want to edit, tap “Edit” in the upper right corner, and then tap the Markup icon (a pen tip inside a circle).
2. Can I use Markup in the Messages app?
Yes, you can use Markup in the Messages app. Tap the Plus button (+), select Photos, choose a photo, tap the photo again, and then tap Markup to add drawings and annotations.
3. What tools are available in the Markup interface?
The Markup interface includes tools such as a pen, highlighter, pencil, eraser, lasso tool, color palette, and options to add text, shapes, signatures, and a magnifier.
4. How do I add text to a photo using Markup?
To add text, tap the Plus button (+) in Markup and select Text. You can then customize the font, size, color, and alignment of the text.
5. How can I move a drawing I made in Markup?
Use the Lasso tool to trace around the drawing you want to move. Once selected, tap and hold inside the selected area and drag it to your desired location.
6. How do I erase mistakes while drawing on a photo?
Tap the Eraser icon and gently rub your finger over the area you want to erase. You can also use the Undo button to revert your last action.
7. Can I add my signature to a photo using Markup?
Yes, tap the Plus button (+) in Markup and select Signature. You can create a new signature or use a saved one and then adjust its size and position on the photo.
8. What shapes can I add to a photo in Markup?
Markup offers shapes such as circles, squares, triangles, arrows, speech bubbles, hearts, and stars, which can be customized in size, color, and position.
9. How do I change the color and thickness of the drawing tools?
Tap the Color Palette to change the color and tap the tool you are using (e.g., pen, highlighter) to adjust the thickness of the line.
10. Does zooming in affect the resolution of the final image?
No, zooming in while drawing on a photo in Markup does not affect the resolution of the final image. The original resolution is preserved when you save the marked-up photo.