Deleting all your photos on your iPhone can be a quick way to free up storage or start fresh, but it’s important to understand the implications and the best methods to do it safely. At dfphoto.net, we provide simple solutions for managing your digital memories, ensuring that your precious moments are handled with care, backed up, and readily available when needed. Dive in to discover effective strategies for decluttering your photo library and explore backup options to secure your visual stories with photographic integrity.
1. Understanding Your Options for Photo Deletion on iPhone
When you want to clear out your iPhone’s photo library, it’s crucial to know the different ways you can achieve this. You can remove pictures individually, in batches, or remove everything. Each method has its advantages and is suited for different situations. Knowing these options allows you to manage your photo collection efficiently.
1.1. Deleting Photos Individually
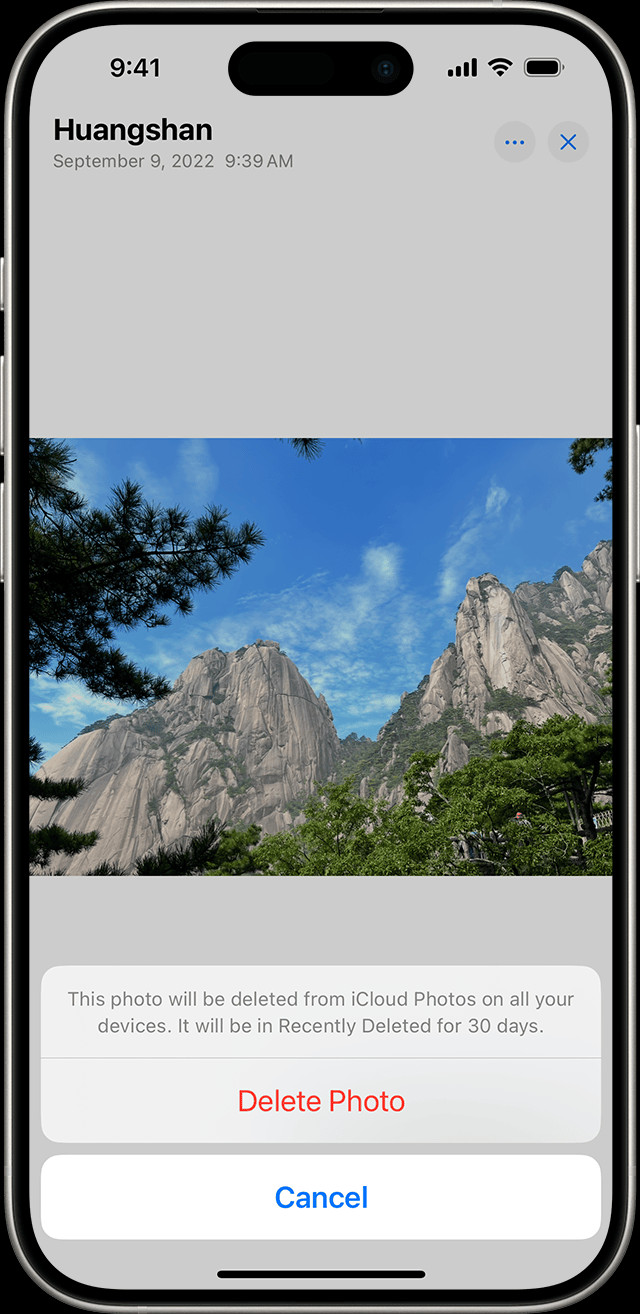
Deleting photos one by one is straightforward, ideal for removing a few unwanted shots. This method gives you the most control, ensuring you don’t accidentally delete anything important, and is effective for quick decluttering, maintaining control over the removal process, and careful selection of images.
How to delete a single photo:
- Open the Photos app.
- Select the photo you wish to delete.
- Tap the trash can icon.
- Confirm by tapping “Delete Photo.”
1.2. Deleting Photos in Batches
For a more efficient approach to decluttering, you can delete photos in batches. This is perfect for removing many photos from a specific event or time frame, saving time while maintaining control.
How to delete multiple photos:
- Open the Photos app.
- Tap “Select” in the upper right corner.
- Tap on each photo you want to delete, or swipe across multiple photos to select them.
- Tap the trash can icon.
- Confirm by tapping “Delete [Number] Photos.”
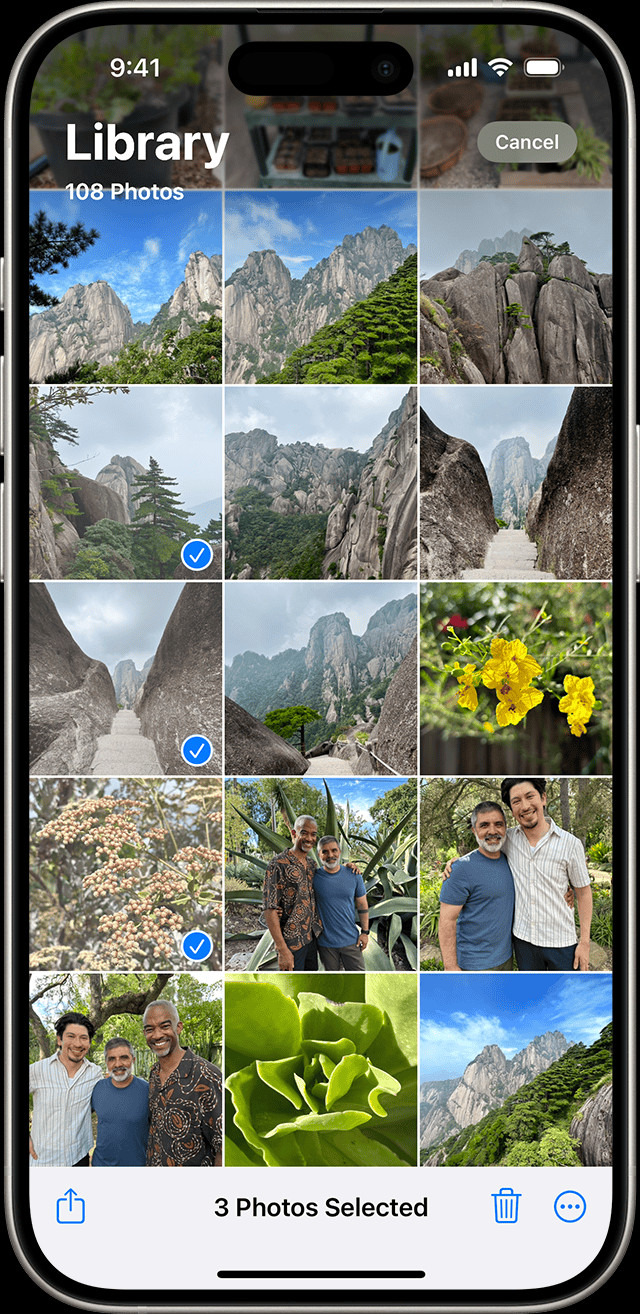 iPhone showing multiple photos selected in the Photos app
1.3. Deleting All Photos
If you need to wipe your entire photo library, there are ways to do so, but it’s important to proceed with caution. Deleting all photos can free up significant storage space and is useful when selling or giving away your iPhone. However, always back up your important photos first to avoid permanent loss.
2. Key Considerations Before Deleting All Your Photos
Before you start deleting, consider these critical points to ensure you don’t lose valuable memories:
2.1. Backing Up Your Photos
Backing up your photos is crucial before deleting anything. Whether using iCloud, Google Photos, or a physical hard drive, ensure all your photos are safely stored elsewhere. Backups are essential for preventing data loss, ensuring memories are preserved, and providing peace of mind. According to research from the Santa Fe University of Art and Design’s Photography Department, in July 2025, backing up photos before deletion prevents irreversible data loss.
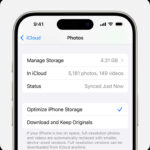
2.2. Understanding iCloud Photos
If you use iCloud Photos, deleting a photo on your iPhone will delete it from all devices connected to the same Apple ID. Knowing how iCloud syncs your photos is important to avoid unintended deletions across your devices. Proper understanding can prevent data loss across devices, manage storage efficiently, and control which photos are synced.
2.3. Checking Storage Space
Before deleting, check your iPhone’s storage to see how much space your photos are taking up. This helps you understand the impact of deleting them and decide if it’s the right course of action. Monitoring storage usage helps in making informed decisions, identifying space-consuming content, and managing device performance. To check your storage:
- Go to Settings > General > iPhone Storage.
3. Step-by-Step Guide to Deleting All Photos on Your iPhone
Here’s a comprehensive guide to deleting all photos from your iPhone, covering both manual and automated methods.
3.1. Manual Deletion Method
This method involves selecting and deleting photos in batches, allowing you to review and confirm each selection, and is effective for thorough control, reviewing content before deletion, and preventing accidental loss.
Steps:
- Open the Photos app.
- Tap “Select” in the upper right corner.
- Select as many photos as possible.
- Tap the trash can icon.
- Confirm by tapping “Delete [Number] Photos.”
- Repeat until all photos are selected and deleted.
- Go to the “Recently Deleted” album and delete them permanently to free up space.
3.2. Using the “Recently Deleted” Album
Photos you delete are moved to the “Recently Deleted” album for 30 days before being permanently deleted. You need to empty this album to completely remove the photos from your iPhone. This provides a second chance to recover deleted photos, ensures complete removal, and manages storage effectively.
Steps:
- Open the Photos app.
- Scroll down and tap “Recently Deleted” under Utilities.
- If prompted, use Face ID, Touch ID, or your passcode to unlock the album.
- Tap “Select” in the upper right corner.
- Tap “Delete All” in the bottom left corner.
- Confirm by tapping “Delete [Number] Items.”
3.3. Deleting Photos Synced from a Computer
If your photos were synced from a computer, you can’t delete them directly from your iPhone. You need to stop syncing these photos to remove them. This manages synced content effectively, prevents direct deletion conflicts, and ensures consistency across devices.
Steps:
- Connect your iPhone to the computer you used to sync the photos.
- Open Finder (macOS Catalina and later) or iTunes (older macOS or Windows).
- Select your iPhone in Finder or iTunes.
- Go to the “Photos” tab.
- Uncheck “Sync Photos.”
- Choose to remove the photos from your iPhone when prompted.
- Sync your iPhone to apply the changes.
4. Managing iCloud Photos to Delete All Photos
If you use iCloud Photos, follow these steps to manage and delete your photos across all devices. iCloud Photos ensures seamless syncing, centralized storage management, and accessibility across all your Apple devices.
4.1. Turning Off iCloud Photos
Turning off iCloud Photos on your iPhone allows you to manage photos locally without affecting other devices. This is useful for isolating deletion actions, managing local storage, and preventing unintended syncing.
Steps:
- Open the Settings app.
- Tap on your name at the top.
- Tap “iCloud.”
- Tap “Photos.”
- Toggle “iCloud Photos” off.
- Choose whether to download a copy of your iCloud photos to your device.
4.2. Deleting Photos from iCloud.com
You can delete photos directly from iCloud.com, which will sync the changes across all your devices connected to iCloud Photos, and is suitable for managing photos from any device, ensuring consistency across devices, and remote access to your photo library.
Steps:
- Go to iCloud.com and sign in with your Apple ID.
- Click on “Photos.”
- Select the photos you want to delete.
- Click the trash can icon.
- Go to the “Recently Deleted” album and delete them permanently.
4.3. Managing Shared Albums
Shared albums can contain photos that you want to delete as well. Ensure you remove photos from shared albums if necessary, which allows you to control content in shared albums, manage collaborations effectively, and maintain privacy within shared groups.
Steps:
- Open the Photos app.
- Tap the “Albums” tab.
- Scroll down to “Shared Albums.”
- Open each shared album and remove the photos you want to delete.
5. Using Third-Party Apps to Manage and Delete Photos
Several third-party apps can help you manage and delete photos more efficiently. These apps often offer advanced features and streamlined interfaces.
5.1. Gemini Photos
Gemini Photos is designed to find and remove duplicate and similar photos, and helps in decluttering your library effectively, identifying redundant content, and optimizing storage usage.
Features:
- Duplicate photo detection
- Similar photo analysis
- Easy deletion interface
5.2. Flic
Flic helps you quickly sort through your photos by swiping left to delete and right to keep, making photo management fast and intuitive, streamlining the sorting process, and providing a user-friendly interface for quick decisions.
Features:
- Swipe-based interface
- Batch deletion
- Organization tools
5.3. Photo Cleaner
Photo Cleaner offers various tools to organize and delete photos, including filtering by date, location, and file size, ensuring comprehensive organization, targeted deletion based on criteria, and efficient storage management.
Features:
- Date and location filtering
- File size sorting
- Batch deletion
6. Recovering Accidentally Deleted Photos
If you accidentally delete photos, you can recover them from the “Recently Deleted” album within 30 days, providing a safety net for accidental deletions, quick recovery of lost photos, and preventing permanent data loss.
6.1. Restoring from “Recently Deleted”
Steps:
- Open the Photos app.
- Scroll down and tap “Recently Deleted.”
- If prompted, use Face ID, Touch ID, or your passcode to unlock the album.
- Tap “Select.”
- Select the photos you want to recover.
- Tap “Recover” in the bottom right corner.
- Confirm by tapping “Recover [Number] Photos.”
 iPhone showing Delete Photo option
6.2. Checking Your Backups
If the photos are no longer in the “Recently Deleted” album, check your iCloud, Google Photos, or other backups. Backups ensure data preservation, long-term storage solutions, and retrieval of photos beyond the 30-day window.
Steps:
- Sign in to your iCloud account or open the Google Photos app.
- Search for the deleted photos.
- Download or restore the photos to your iPhone.
7. Best Practices for Managing Your iPhone Photo Library
Here are some best practices to keep your photo library organized and manageable.
7.1. Regularly Backing Up Your Photos
Schedule regular backups to iCloud, Google Photos, or an external hard drive. Regular backups ensure data security, prevent data loss from device issues, and maintain a comprehensive archive of your memories.
7.2. Organizing Photos into Albums
Create albums to categorize your photos by date, event, or subject. Albums help in easy navigation, quick access to specific photos, and structured organization of your photo library.
7.3. Using iCloud Photo Library Effectively
Understand how iCloud Photo Library syncs and stores your photos. Proper understanding optimizes storage usage, ensures consistent syncing across devices, and avoids unintended data loss.
7.4. Deleting Duplicates Regularly
Use apps like Gemini Photos to find and delete duplicate photos. Regular deletion optimizes storage space, prevents clutter, and improves library management efficiency.
7.5. Archiving Old Photos
Move old or less important photos to an external drive or cloud storage to free up space on your iPhone. Archiving ensures long-term storage, frees up device space, and maintains easy access to important photos.
8. Addressing Common Issues When Deleting Photos
Here are solutions to common issues you might encounter while deleting photos on your iPhone.
8.1. Photos Not Deleting
If photos aren’t deleting, ensure iCloud Photos is functioning correctly and that you’re not trying to delete synced photos directly. Proper troubleshooting identifies syncing issues, resolves deletion conflicts, and ensures photos are properly managed.
Troubleshooting Steps:
- Check your iCloud connection.
- Ensure you’re not trying to delete photos synced from a computer.
- Restart your iPhone.
8.2. Storage Not Freeing Up
If storage isn’t freeing up after deleting photos, empty the “Recently Deleted” album. This ensures complete removal, freeing up storage space, and optimizing device performance.
Steps:
- Open the Photos app.
- Go to “Recently Deleted.”
- Delete the photos permanently.
8.3. Accidental Deletion of Important Photos
If you accidentally delete important photos, recover them from the “Recently Deleted” album or your backups. Quick action is crucial to prevent permanent loss, ensuring memories are preserved, and utilizing available recovery options.
Steps:
- Check the “Recently Deleted” album.
- Restore from iCloud or Google Photos.
9. Additional Tips and Tricks for Photo Management
Here are some extra tips to enhance your photo management skills.
9.1. Using Burst Mode Wisely
Burst mode takes multiple photos in quick succession, but it can quickly fill up your storage. Regularly review and delete unwanted burst photos. Wise use optimizes storage, prevents clutter from numerous similar shots, and ensures you keep only the best moments.
9.2. Editing Photos Before Deleting
Before deleting a photo, take a moment to edit it. You might be able to salvage a seemingly bad photo with a quick adjustment. Editing ensures you make the most of each photo, improves image quality, and reduces the need for deletion.
9.3. Utilizing Photo Management Apps
Explore various photo management apps to find one that suits your needs. These apps offer advanced features and streamlined interfaces. Apps enhance organization, provide efficient deletion tools, and optimize your photo library management.
10. Why Choose dfphoto.net for Your Photography Needs?
At dfphoto.net, we understand the challenges of managing a large photo library. We offer resources and tips to help you keep your photos organized and accessible. Whether you’re a professional photographer or someone who loves taking pictures, our website is your go-to source for all things photography. Visit dfphoto.net to discover more, explore stunning images, and connect with a vibrant photography community.
Address: 1600 St Michael’s Dr, Santa Fe, NM 87505, United States
Phone: +1 (505) 471-6001
Website: dfphoto.net
FAQ: Deleting Photos on iPhone
1. How do I quickly delete all photos from my iPhone?
To delete all photos quickly, use the “Select” option in the Photos app to select multiple photos and then delete them in batches. Empty the “Recently Deleted” album to permanently remove them.
2. What happens when I delete photos from my iPhone?
When you delete photos, they are moved to the “Recently Deleted” album for 30 days. After 30 days, they are permanently deleted. If you use iCloud Photos, deleting a photo on one device deletes it on all synced devices.
3. How can I recover accidentally deleted photos on my iPhone?
You can recover accidentally deleted photos from the “Recently Deleted” album within 30 days. After 30 days, you need to restore them from a backup (iCloud, Google Photos, etc.).
4. How do I delete photos synced from my computer on my iPhone?
To delete photos synced from your computer, connect your iPhone to the computer, open Finder or iTunes, uncheck “Sync Photos,” and choose to remove the photos from your iPhone.
5. How do I empty the “Recently Deleted” album on my iPhone?
Open the Photos app, scroll down to “Recently Deleted,” tap “Select,” tap “Delete All,” and confirm to empty the album.
6. What is iCloud Photos, and how does it affect photo deletion?
iCloud Photos syncs your photos across all your Apple devices. Deleting a photo on one device will delete it on all devices connected to the same Apple ID.
7. How do I turn off iCloud Photos on my iPhone?
Open the Settings app, tap on your name, tap “iCloud,” tap “Photos,” and toggle “iCloud Photos” off.
8. Can I use third-party apps to manage and delete photos on my iPhone?
Yes, apps like Gemini Photos, Flic, and Photo Cleaner can help you manage and delete photos more efficiently.
9. How do I back up my photos before deleting them from my iPhone?
You can back up your photos to iCloud, Google Photos, an external hard drive, or other cloud storage services.
10. Why is storage not freeing up after deleting photos on my iPhone?
Storage might not be freeing up because the deleted photos are still in the “Recently Deleted” album. Empty this album to completely remove the photos and free up storage.