Deleting a page in your Shutterfly photo book is straightforward when you know the steps. Shutterfly photo books are a fantastic way to preserve memories, and dfphoto.net is here to guide you through the process of customizing your book to perfection. Let’s explore methods for removing pages, common issues, and design tips to elevate your photo book experience and help you create lasting keepsakes with the help of photo editing software and visual storytelling.
1. Understanding Shutterfly Photo Books
Shutterfly photo books offer a creative way to showcase your cherished memories. Before diving into how to delete a page, let’s understand the basics of these photo books.
1.1. What is a Shutterfly Photo Book?
A Shutterfly photo book is a custom-designed album where you can arrange your photos, add text, and select from various layouts to create a personalized keepsake. These books are ideal for preserving memories from special events, travels, or everyday life.
1.2. Why Customize Your Photo Book?
Customizing your photo book allows you to tell your story in a unique way. You can choose the order of the photos, add captions, and select backgrounds that match the theme of your memories. Customization turns a simple photo album into a cherished heirloom.
1.3. Common Reasons to Delete a Page
There are several reasons why you might want to delete a page in your Shutterfly photo book:
- Removing Duplicate Pages: Sometimes, duplicate pages are accidentally added, which you need to remove.
- Correcting Mistakes: You might spot an error in the layout or text that requires deleting the page to start over.
- Improving the Flow: Deleting a page can help improve the narrative flow of your photo book, making it more engaging.
- Reducing Page Count: If you want to reduce the overall size of the book, removing unnecessary pages is a good option.
- Changing Themes: When switching themes or redesigning the book, some pages might no longer fit and need to be removed.
2. Step-by-Step Guide to Deleting a Page in Shutterfly
Deleting a page in Shutterfly is a simple process. Here’s how to do it:
2.1. Accessing Your Photo Book Project
- Log in to Your Shutterfly Account: Go to the Shutterfly website (dfphoto.net) and log in to your account.
- Navigate to “My Projects”: Find and click on the “My Projects” section. This is where all your saved projects are stored.
- Open Your Photo Book: Locate the photo book you want to edit and click on it to open the project.
2.2. Using the “All Pages” View
- Switch to “All Pages” View: Once your project is open, look for an option to switch to the “All Pages” view. This view displays all the pages of your book in a grid format, making it easy to navigate.
- Select the Page to Delete: In the “All Pages” view, find the page you want to delete and click on it to select it.
- Right-Click to Open Contextual Menu: After selecting the page, right-click on it. This will open a contextual menu with several options.
- Choose “Remove Page”: From the contextual menu, select the “Remove Page” option.
- Confirm Deletion: A confirmation prompt may appear. Click “Yes” or “OK” to confirm that you want to delete the page.
2.3. Using the “Add/Remove Page” Option
- Open the Photo Book Editor: Log into your Shutterfly account and open the photo book project you want to edit.
- Navigate to the Specific Page: Use the navigation arrows to go to the page you want to delete.
- Locate the “Add/Remove Page” Button: Look for the “Add/Remove Page” button, usually located in the top right corner of the editor.
- Click the Button: Click on the “Add/Remove Page” button to activate the options.
- Select “Remove Page”: From the options, choose “Remove Page”.
- Confirm Deletion: A confirmation prompt may appear. Click “Yes” or “OK” to confirm that you want to delete the page.
2.4. Keyboard Shortcuts for Deleting Pages
Using keyboard shortcuts can speed up the deletion process.
- Select the Page: In the “All Pages” view, click on the page you wish to delete to select it.
- Press the “Delete” Key: Simply press the “Delete” key on your keyboard.
- Confirm Deletion: Confirm the deletion if prompted.
2.5. Considerations for Double-Page Spreads
When working with double-page spreads, keep these points in mind:
- Deleting a Spread: To delete an entire spread, select both pages and follow the removal steps.
- Impact on Layout: Deleting a spread can significantly impact the layout, so review the surrounding pages to ensure they still look good.
- Adjusting Content: After deleting a spread, you may need to adjust the content on the remaining pages to maintain a balanced design.
2.6. Addressing Common Issues
Sometimes, deleting a page might not work as expected. Here are some common issues and how to address them:
- “Remove Page” Option is Greyed Out: This can happen if the page is part of a mandatory spread or if deleting the page would leave the book with fewer than the minimum number of pages.
- Solution: Ensure that deleting the page doesn’t violate any minimum page requirements.
- Page Not Deleting: If the page doesn’t delete, try refreshing the page or clearing your browser’s cache.
- Solution: Clear your browser’s cache and try again, or try using a different browser.
- Accidental Deletion: If you accidentally delete a page, use the “Undo” function (usually Ctrl+Z or Cmd+Z) to restore it.
- Solution: Use the “Undo” function immediately after the accidental deletion.
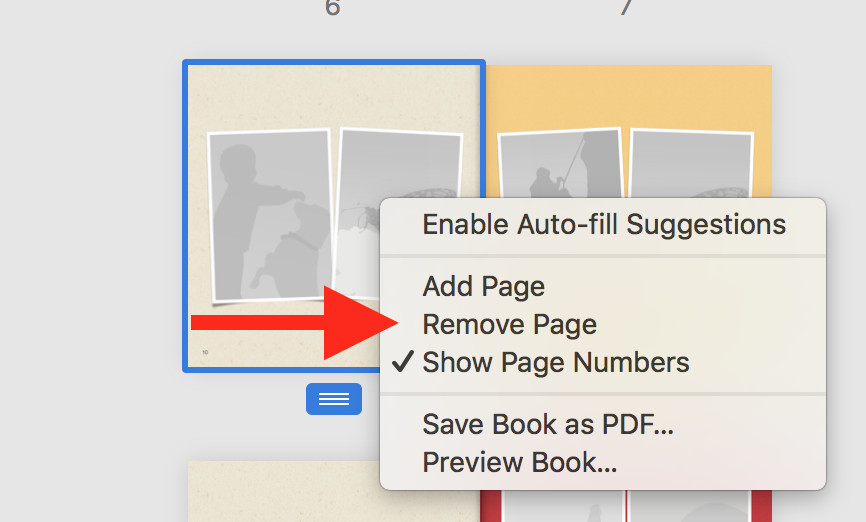 Screenshot of Shutterfly's "All Pages" view, highlighting the "Remove Page" option in the contextual menu, demonstrating how to easily delete a page.
3. Tips for Editing and Customizing Your Shutterfly Photo Book
Customizing your Shutterfly photo book can be a fun and creative process. Here are some tips to help you make the most of it:
3.1. Planning Your Layout
Planning the layout of your photo book is essential for creating a cohesive and visually appealing album.
- Theme Selection: Choose a theme that reflects the occasion or subject of your photos. Shutterfly offers various themes, such as travel, wedding, family, and more.
- Storyboarding: Before you start arranging photos, create a storyboard to plan the flow of your book. Decide which photos you want to highlight and where they should be placed.
- Page Balance: Aim for a balance between single-image pages and multi-image pages. Too many of one type can make the book monotonous.
- Color Coordination: Use backgrounds and embellishments that complement the colors in your photos.
3.2. Choosing the Right Photos
Selecting the right photos is crucial for telling your story effectively.
- Quality Over Quantity: Choose high-resolution photos that are clear and well-lit. Avoid blurry or pixelated images.
- Variety: Include a mix of portraits, landscapes, and candid shots to capture different aspects of your memories.
- Chronological Order: Arrange your photos in chronological order to tell a coherent story, especially for events like weddings or vacations.
- Highlight Key Moments: Select photos that represent the most important moments of the event or story you’re telling.
3.3. Adding Text and Captions
Text and captions add context and personality to your photo book.
- Descriptive Captions: Write captions that provide context and tell the story behind the photos. Include names, dates, and interesting details.
- Font Selection: Choose fonts that are easy to read and match the theme of your book. Shutterfly offers a variety of font options.
- Consistent Style: Maintain a consistent style throughout the book. Use the same font, size, and color for all captions.
- Quotes and Anecdotes: Add quotes, anecdotes, or personal stories to make your photo book more engaging.
3.4. Using Embellishments and Backgrounds
Embellishments and backgrounds can enhance the visual appeal of your photo book.
- Theme-Appropriate Embellishments: Choose embellishments that match the theme of your book. Shutterfly offers a wide range of stickers, frames, and other decorative elements.
- Subtle Backgrounds: Select backgrounds that complement your photos without overpowering them. Neutral colors and subtle patterns work best.
- Consistent Use: Use embellishments and backgrounds consistently throughout the book to create a cohesive design.
- Avoid Clutter: Don’t overcrowd your pages with too many embellishments. Less is often more.
3.5. Reviewing and Finalizing Your Photo Book
Before ordering your photo book, take the time to review and finalize your design.
- Proofread Carefully: Check for spelling and grammar errors in your captions and text.
- Image Placement: Ensure that all your photos are correctly placed and aligned.
- Layout Consistency: Review the layout of each page to ensure consistency and balance.
- Preview Mode: Use the preview mode to see how your photo book will look when printed.
- Second Opinion: Ask a friend or family member to review your photo book for feedback.
4. Advanced Tips and Tricks for Shutterfly Photo Books
To take your Shutterfly photo book to the next level, consider these advanced tips and tricks.
4.1. Using Custom Layouts
Shutterfly provides pre-designed layouts, but you can also create custom layouts to make your photo book unique.
- Start with a Template: Begin with a pre-designed template and modify it to suit your needs.
- Adjust Image Sizes: Resize and reposition your photos to create a custom arrangement.
- Add Text Boxes: Insert text boxes anywhere on the page to add captions, quotes, or stories.
- Experiment: Try different combinations of photos, text, and embellishments to create a layout that reflects your personal style.
4.2. Enhancing Photos with Editing Tools
Shutterfly offers basic photo editing tools, but you can also use external photo editing software for more advanced enhancements.
- Color Correction: Adjust the brightness, contrast, and saturation of your photos to improve their appearance.
- Sharpening: Sharpen your photos to make them look crisper and more detailed.
- Cropping: Crop your photos to remove unwanted elements and improve the composition.
- Filters: Use filters to add a unique style to your photos.
4.3. Creating Themed Photo Books
Themed photo books are a great way to celebrate special occasions or interests.
- Travel Photo Books: Create a travel photo book to document your adventures. Include photos of landscapes, landmarks, and local culture.
- Wedding Photo Books: Design a wedding photo book to preserve your special day. Include photos of the ceremony, reception, and key moments.
- Family Photo Books: Compile a family photo book to celebrate your loved ones. Include photos of family gatherings, vacations, and everyday life.
- Baby Photo Books: Create a baby photo book to capture your child’s first year. Include photos of milestones, such as their first smile, first steps, and first birthday.
4.4. Collaborating on Photo Books
Shutterfly allows you to collaborate with others on photo books, making it easy to create a shared album.
- Invite Contributors: Invite friends and family members to contribute photos and captions to your photo book.
- Set Permissions: Control who can edit the photo book and what they can do.
- Share Ideas: Discuss the layout and design of the photo book with your collaborators.
- Review Contributions: Review all contributions before finalizing the photo book.
4.5. Archiving and Sharing Your Photo Books
After creating your photo book, consider archiving and sharing it with others.
- Digital Backup: Save a digital copy of your photo book to your computer or a cloud storage service.
- Print Multiple Copies: Order multiple copies of your photo book to give as gifts to friends and family members.
- Share Online: Share your photo book online through social media or email.
- Create a Slideshow: Create a slideshow of your photo book to share at family gatherings or events.
5. Troubleshooting Common Issues with Shutterfly
Even with careful planning, you might encounter issues while using Shutterfly. Here’s how to troubleshoot some common problems.
5.1. Photos Not Uploading
- Check File Size: Ensure your photos meet Shutterfly’s file size requirements. Large files may take longer to upload or fail altogether.
- Internet Connection: Verify you have a stable internet connection. A weak connection can interrupt the upload process.
- Browser Compatibility: Make sure you’re using a compatible browser. Shutterfly works best with the latest versions of Chrome, Firefox, Safari, and Edge.
- Clear Cache and Cookies: Clear your browser’s cache and cookies to resolve potential conflicts.
5.2. Layout Issues
- Template Restrictions: Understand that some templates have fixed layouts that can’t be fully customized.
- Image Resolution: Low-resolution images may appear blurry when enlarged. Use high-resolution photos for best results.
- Text Overlap: Adjust text box sizes and positions to prevent text from overlapping with images or other elements.
- Alignment Problems: Use Shutterfly’s alignment tools to ensure elements are properly aligned on the page.
5.3. Ordering Problems
- Review Your Order: Before placing your order, carefully review all pages to ensure there are no errors.
- Shipping Address: Double-check your shipping address to avoid delivery issues.
- Payment Information: Verify your payment information is accurate and up-to-date.
- Contact Support: If you encounter any issues during the ordering process, contact Shutterfly’s customer support for assistance.
5.4. Printing Quality Issues
- Image Quality: Ensure your photos are high-resolution and well-lit for optimal printing quality.
- Color Calibration: Calibrate your monitor to ensure accurate color representation.
- Paper Type: Choose the right paper type for your photo book. Premium paper options offer better quality and durability.
- Review Proof: If possible, order a proof copy of your photo book to review the printing quality before ordering multiple copies.
5.5. Account and Login Problems
- Password Reset: If you forget your password, use the password reset option to regain access to your account.
- Email Verification: Ensure your email address is verified to receive important updates and notifications from Shutterfly.
- Contact Support: If you’re unable to log in to your account, contact Shutterfly’s customer support for assistance.
6. The Benefits of Using Shutterfly for Photo Books
Shutterfly offers numerous benefits for creating and customizing photo books.
6.1. User-Friendly Interface
Shutterfly’s interface is intuitive and easy to navigate, making it simple for anyone to create a professional-looking photo book.
6.2. Wide Variety of Templates
Shutterfly offers a wide variety of templates for different occasions and themes, allowing you to find the perfect design for your photo book.
6.3. Customization Options
Shutterfly provides extensive customization options, including layouts, backgrounds, embellishments, and text styles, giving you full control over the design of your photo book.
6.4. High-Quality Printing
Shutterfly uses high-quality printing techniques to ensure your photos look vibrant and sharp in your photo book.
6.5. Affordable Pricing
Shutterfly offers competitive pricing for photo books, with frequent sales and discounts available to help you save money.
6.6. Excellent Customer Support
Shutterfly provides excellent customer support to assist you with any questions or issues you may encounter while creating your photo book.
7. Creative Ideas for Your Shutterfly Photo Book
Need some inspiration for your Shutterfly photo book? Here are some creative ideas to get you started.
7.1. Travel Journal Photo Book
Create a travel journal photo book to document your adventures. Include photos of landscapes, landmarks, and local culture, along with captions describing your experiences.
7.2. Family Recipe Photo Book
Compile a family recipe photo book to preserve your favorite recipes. Include photos of the dishes, handwritten recipes, and stories about the people who created them.
7.3. Pet Photo Book
Design a pet photo book to celebrate your furry friend. Include photos of your pet in various poses, along with captions describing their personality and quirks.
7.4. Milestone Photo Book
Create a milestone photo book to document important events in your life, such as graduations, birthdays, and anniversaries.
7.5. “Year in Review” Photo Book
Compile a “year in review” photo book to capture the highlights of the past year. Include photos of family gatherings, vacations, and special moments.
8. Frequently Asked Questions (FAQs)
8.1. Can I delete multiple pages at once in Shutterfly?
Yes, you can delete multiple pages at once in Shutterfly by selecting them in the “All Pages” view and then choosing the “Remove Pages” option.
8.2. Is there a way to recover a deleted page in Shutterfly?
Yes, you can recover a deleted page by using the “Undo” function (usually Ctrl+Z or Cmd+Z) immediately after deleting the page.
8.3. What is the minimum number of pages required for a Shutterfly photo book?
The minimum number of pages required for a Shutterfly photo book varies depending on the type of book, but it is typically around 20 pages.
8.4. Can I add pages to my Shutterfly photo book after I have already started designing it?
Yes, you can add pages to your Shutterfly photo book at any time during the design process.
8.5. How do I change the order of pages in my Shutterfly photo book?
You can change the order of pages in the “All Pages” view by dragging and dropping them to the desired location.
8.6. Can I collaborate with others on a Shutterfly photo book?
Yes, Shutterfly allows you to collaborate with others on photo books by inviting them to contribute photos and captions.
8.7. How do I save my Shutterfly photo book project?
Your Shutterfly photo book project is automatically saved as you work on it. You can also manually save it by clicking the “Save” button.
8.8. Can I view a preview of my Shutterfly photo book before ordering it?
Yes, Shutterfly provides a preview mode that allows you to see how your photo book will look when printed.
8.9. What file formats are supported for photos in Shutterfly?
Shutterfly supports JPEG, PNG, and GIF file formats for photos.
8.10. How do I contact Shutterfly customer support?
You can contact Shutterfly customer support through their website or by phone. Their contact information is available in the “Contact Us” section of their website.
9. Conclusion: Create Your Perfect Photo Book with Confidence
Knowing how to delete a page in Shutterfly photo book is essential for creating a perfect keepsake. Whether you’re removing duplicate pages, correcting mistakes, or improving the flow of your book, the process is straightforward. By following the steps outlined in this guide and utilizing the tips and tricks provided, you can customize your Shutterfly photo book to reflect your unique style and memories. dfphoto.net encourages you to explore the creative possibilities of photo books and preserve your cherished moments for years to come. So start designing your photo book today and capture your favorite memories in a beautiful, personalized album. Visit dfphoto.net for more inspiration and guidance on creating stunning photo books and mastering your photo editing skills!
Address: 1600 St Michael’s Dr, Santa Fe, NM 87505, United States.
Phone: +1 (505) 471-6001.
Website: dfphoto.net.