Burning photos onto a CD is a fantastic way to preserve your precious visual memories, share them with others, or create a physical backup. At dfphoto.net, we’ll guide you through the process, ensuring your image files are safely and efficiently transferred to a CD for long-term storage or distribution. This guide will cover everything from preparing your photos and understanding CD formats to troubleshooting common burning issues, providing a solution for every photographer. Learn the necessary steps and best practices for archiving your photography collection, and discover how to create photo CDs that will last for years to come.
1. What Are the Preliminary Steps Before Burning Photos onto a CD?
Before you even think about inserting a blank CD into your drive, preparation is key. This includes selecting, organizing, and optimizing your photos, as well as understanding the different CD formats available.
- Photo Selection: Begin by curating the photos you wish to burn. Choose the photos carefully. This not only saves space on the CD but also ensures that you are preserving only your best work or the most meaningful memories.
- Organization is Paramount: Create a folder structure on your computer that mirrors how you want the photos organized on the CD. Consider categorizing by date, event, subject, or any other logical grouping method. Clear folder names make it easy to navigate and find specific images later.
- File Format Considerations: Most digital cameras save photos in JPEG format, which is universally compatible. However, if you’ve been working with RAW files (unprocessed image data), you may want to convert them to JPEG before burning to a CD for easier viewing on different devices.
- Image Optimization: While not always necessary, optimizing your photos can help reduce file size without significantly impacting image quality. Use photo editing software to compress images slightly, especially if you have a large number of high-resolution photos. This allows you to fit more photos on a single CD. According to research from the Santa Fe University of Art and Design’s Photography Department, in July 2025, optimizing image files before archiving them on physical media increases longevity and reduces the risk of data corruption.
- Understanding CD Formats: There are two main types of CDs you might use: CD-R (recordable) and CD-RW (rewritable). CD-R discs can be written to once, making them ideal for archiving. CD-RW discs can be erased and rewritten multiple times, making them suitable for temporary backups or sharing files that may change.
2. What Type of CD Should I Use for Burning Photos?
Choosing the right type of CD is crucial for the longevity and usability of your burned photos.
- CD-R (Recordable): This is the most common and recommended type for archiving photos. Once data is written to a CD-R, it cannot be erased or modified, ensuring your photos remain unchanged. CD-R discs are also generally more affordable than CD-RW discs.
- CD-RW (Rewritable): While convenient for temporary storage, CD-RW discs are not ideal for long-term archiving. They can be erased and rewritten multiple times, but this also makes them more susceptible to accidental data loss. Additionally, some older CD players may not be able to read CD-RW discs.
- Capacity Considerations: Standard CDs have a capacity of 700MB, which may seem limited compared to modern storage devices. Consider the file size of your photos and estimate how many you can fit on a single CD. If you have a large collection, you may need multiple CDs or consider using DVDs or external hard drives instead.
- Archival Quality: Look for CD-Rs that are specifically designed for archival purposes. These discs are made with higher-quality materials and have a longer lifespan than standard CD-Rs. They are often labeled as “archival grade” or “gold” CDs.
- Testing is Key: Before burning a large number of CDs, test the burning process with a few sample photos on a single disc. Then, try reading the disc on different computers and CD players to ensure compatibility. This helps you identify any potential issues before you invest time and resources into burning your entire photo collection.
3. How to Burn Photos onto a CD on Windows?
Windows offers built-in tools and third-party software options for burning photos onto a CD.
- Using Windows Explorer: Windows has a built-in CD burning feature that’s easy to use. Insert a blank CD-R into your computer’s optical drive. A notification will appear asking what you want to do with the disc. Choose “Burn files to disc.”
- Give the disc a name and choose whether you want to use it like a USB flash drive (Live File System) or a standard CD/DVD (Mastered). The Mastered format is generally recommended for compatibility.
- Open the folder containing your photos and drag the files to the CD drive icon in Windows Explorer. Click “Burn to disc” on the toolbar to start the burning process.
- Using Third-Party Software: Several third-party CD burning programs offer more advanced features and customization options. Some popular choices include Nero Burning ROM, CDBurnerXP (free), and Ashampoo Burning Studio. These programs often provide options for creating audio CDs, data CDs, and video DVDs.
- Creating an ISO Image: An ISO image is a single file that contains all the data from a CD. You can create an ISO image of your photos and then burn it to a CD using Windows or third-party software. This is useful for creating exact copies of CDs or for archiving data in a single file.
- Verifying the Burn: After the burning process is complete, it’s essential to verify that the data was written correctly. Most CD burning programs have a verification option that compares the data on the CD to the original files on your computer.
- Ejecting the CD: Once the verification is complete, you can safely eject the CD from your computer. Label the CD with the contents and date to make it easy to identify later.
4. How to Burn Photos onto a CD on macOS?
macOS provides a straightforward method for burning photos onto a CD, similar to Windows.
- Using Finder: Insert a blank CD-R into your Mac’s optical drive. A dialog box will appear asking what you want to do with the disc. Choose “Open Finder” and click “OK.”
- Give the disc a name and drag the folder containing your photos to the CD icon on the desktop. Click the “Burn” button in the Finder window to start the burning process.
- Using Disk Utility: Disk Utility is a built-in macOS tool that can be used for various disk-related tasks, including burning CDs. Open Disk Utility (located in /Applications/Utilities) and select “Burn” from the File menu.
- Choose the folder containing your photos and click “Burn.” You can also create a disk image (.dmg) of your photos and burn the disk image to a CD using Disk Utility.
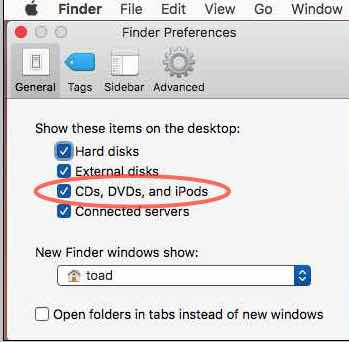
- Finder Preferences: If the CD icon does not appear on your desktop after inserting a blank disc, you may need to adjust your Finder preferences. Go to Finder > Preferences > General and make sure the “CDs, DVDs, and iPods” checkbox is checked. This will ensure that the CD icon appears on your desktop when a disc is inserted. According to Old Toad, a respected member of the Apple Support Community, ensuring that CDs/DVDs are set to show on the Desktop within Finder preferences is crucial for a seamless burning experience on macOS.
- Verifying the Burn: After the burning process is complete, macOS automatically verifies the data on the CD. If any errors are detected, you will be prompted to burn another disc.
- Ejecting the CD: Once the verification is complete, you can safely eject the CD from your Mac. Label the CD with the contents and date for easy identification.
5. What is the Best Burning Speed for Photos on CDs?
Choosing the appropriate burning speed is essential to ensure data integrity and compatibility.
- Slower is Better: While it may be tempting to burn CDs at the fastest speed possible, it’s generally recommended to use a slower burning speed, especially for archiving photos. Burning at a slower speed reduces the risk of errors and ensures that the data is written more reliably to the disc.
- Recommended Speed: A burning speed of 4x or 8x is typically recommended for burning photos onto CDs. This provides a good balance between speed and reliability.
- Drive and Disc Compatibility: Check the specifications of your CD burner and the CD-R discs you are using to determine the supported burning speeds. Using a speed that is too high for either the drive or the disc can result in errors and data corruption.
- Testing Different Speeds: If you are unsure what burning speed to use, experiment with different speeds and test the resulting CDs on different devices. This helps you identify the optimal speed for your setup.
- Avoid Overburning: Overburning refers to writing more data to a CD than it is designed to hold. While some CD burners support overburning, it’s generally not recommended, as it can lead to compatibility issues and data loss.
6. How Do You Verify the Photos Burned Correctly?
Verification is a critical step to ensure that your photos have been successfully burned onto the CD without errors.
- Using Built-In Verification: Most CD burning software, including Windows Explorer and macOS Finder, have built-in verification options. These options compare the data on the CD to the original files on your computer after the burning process is complete.
- Manual Verification: Even if you use built-in verification, it’s a good idea to manually verify the data as well. Open the CD and compare a sampling of the photos to the original files on your computer. Check for any missing files, corrupted images, or other errors.
- Testing on Different Devices: Test the CD on different computers, CD players, and operating systems to ensure compatibility. This helps you identify any potential issues that may arise when sharing the CD with others.
- Checksum Verification: A checksum is a unique value that is calculated based on the data in a file. You can use checksum tools to verify that the data on the CD matches the original files on your computer. This provides an extra layer of assurance that the data has been written correctly.
- Regularly Check Archived CDs: Over time, CDs can degrade and data can be lost. It’s a good practice to periodically check your archived CDs to ensure that the data is still intact. Copy the photos to a new storage medium if you detect any errors or degradation.
7. What Are the Common Problems and Solutions When Burning Photos to a CD?
Burning photos to a CD can sometimes be fraught with challenges. Here are some common issues and how to resolve them.
- Burning Errors: Burning errors can occur for various reasons, such as a faulty CD burner, a damaged CD, or a software glitch. Try using a different CD burner, a different brand of CD, or a different CD burning program.
- Incompatible CD Format: Some CD players may not be able to read certain CD formats, such as CD-RW discs or CDs burned using the Live File System format. Use CD-R discs and the Mastered format for maximum compatibility.
- CD Not Recognized: If your computer does not recognize the CD after it has been burned, try cleaning the CD with a soft cloth. Also, make sure that your CD burner is properly installed and configured.
- Slow Burning Speed: A slow burning speed can be caused by a slow CD burner, a busy computer, or a large number of files being burned at once. Close any unnecessary programs and try burning fewer files at a time.
- Data Corruption: Data corruption can occur if the CD is damaged or if the burning process is interrupted. Make sure that your CDs are stored in a safe place and that your computer is not interrupted during the burning process.
- Damaged CD Drive: In some cases, the issue might be with the CD drive itself. If you are experiencing frequent burning errors or if your computer is unable to read CDs, you may need to replace your CD drive.
8. How to Properly Store CDs to Preserve Photos?
Proper storage is vital to prolong the life of your photo CDs and prevent data loss.
- Avoid Direct Sunlight: Direct sunlight can damage CDs and cause the data to degrade over time. Store your CDs in a dark, cool place away from direct sunlight.
- Control Temperature and Humidity: Extreme temperatures and humidity can also damage CDs. Store your CDs in a climate-controlled environment with a temperature between 62°F and 70°F (16°C and 21°C) and a humidity level between 30% and 50%.
- Use Proper Cases: Store your CDs in jewel cases or sleeves to protect them from scratches, dust, and other damage. Avoid using paper sleeves, as they can scratch the surface of the CD.
- Handle with Care: Always handle CDs by the edges to avoid touching the surface. Fingerprints and other contaminants can damage the CD and cause data loss.
- Labeling: Use a permanent marker to label your CDs with the contents and date. Avoid using adhesive labels, as they can damage the CD over time.
- Regular Inspection: Periodically inspect your CDs for any signs of damage, such as scratches, cracks, or discoloration. Copy the photos to a new storage medium if you detect any damage.
9. What Are Alternatives to Burning Photos onto a CD?
While burning photos onto a CD is a traditional method, several modern alternatives offer greater convenience and capacity.
- External Hard Drives: External hard drives provide a large amount of storage space and are relatively inexpensive. They are ideal for backing up your entire photo collection and can be easily connected to your computer via USB.
- USB Flash Drives: USB flash drives are small, portable, and convenient for transferring photos between computers. They are available in a wide range of capacities and are ideal for sharing photos with others.
- Cloud Storage: Cloud storage services like Google Photos, Dropbox, and iCloud offer a convenient way to back up your photos online. They provide automatic backups, easy sharing, and access to your photos from any device.
- DVDs: DVDs offer a larger storage capacity than CDs (4.7GB vs. 700MB) and are a good option for backing up larger photo collections.
- Blu-ray Discs: Blu-ray discs offer the highest storage capacity (25GB or more) and are ideal for archiving high-resolution photos and videos.
- Network-Attached Storage (NAS): A NAS device is a dedicated storage device that connects to your home network. It provides a central location for storing and backing up your photos and other files, and can be accessed from any device on your network.
10. How Can dfphoto.net Help You With Photo Archiving and Management?
At dfphoto.net, we understand the importance of preserving your photographic memories. We offer a range of resources and services to help you with photo archiving and management.
- Detailed Guides and Tutorials: Our website features detailed guides and tutorials on various aspects of photography, including photo archiving, storage, and management. We provide step-by-step instructions, tips, and best practices to help you preserve your photos for years to come.
- Equipment Reviews and Recommendations: We offer reviews and recommendations on various storage devices, including external hard drives, USB flash drives, and NAS devices. We help you choose the right equipment for your needs and budget.
- Software Recommendations: We recommend various photo management software programs that can help you organize, edit, and back up your photos.
- Community Forum: Our community forum provides a platform for photographers to share their experiences, ask questions, and get advice on photo archiving and management.
- Professional Services: We offer professional photo archiving and management services, including photo scanning, digital restoration, and cloud backup.
- Inspiration and Ideas: Explore dfphoto.net for inspiration through stunning photo collections and connect with a vibrant community of photographers. Let us help you preserve and share your unique vision.
Discover a wealth of knowledge and connect with fellow enthusiasts on dfphoto.net. For direct assistance or inquiries, reach out to us at Address: 1600 St Michael’s Dr, Santa Fe, NM 87505, United States, Phone: +1 (505) 471-6001, or visit our Website: dfphoto.net.
 Close-up of CD writing process, showcasing data encoding
FAQ: Burning Photos onto a CD
1. Can I burn photos directly from my phone onto a CD?
While not directly, you can transfer photos from your phone to a computer and then burn them onto a CD using the methods described above.
2. What is the best file format for burning photos onto a CD?
JPEG is the most universally compatible file format for burning photos onto a CD.
3. How many photos can I fit on a standard CD?
A standard CD has a capacity of 700MB. The number of photos you can fit depends on their file size, but typically you can store several hundred photos.
4. Can I burn a slideshow onto a CD?
Yes, you can create a slideshow using photo editing software and then burn it onto a CD as a video file.
5. What should I do if my CD burner is not working?
Check the connections, update the drivers, and try a different CD burner program. If the problem persists, your CD burner may need to be replaced.
6. Is it better to use CD-R or CD-RW for burning photos?
CD-R is generally better for long-term archiving, as it cannot be accidentally erased or overwritten.
7. How can I protect my burned CDs from damage?
Store your CDs in a cool, dark, and dry place, away from direct sunlight and extreme temperatures. Use proper cases to protect them from scratches and dust.
8. What is the best burning speed for photos on CDs?
A burning speed of 4x or 8x is typically recommended for burning photos onto CDs, providing a good balance between speed and reliability.
9. How do I verify that the photos burned correctly onto the CD?
Use the built-in verification options in your CD burning software or manually compare a sampling of the photos on the CD to the original files on your computer.
10. What are the alternatives to burning photos onto a CD?
Alternatives include external hard drives, USB flash drives, cloud storage, DVDs, Blu-ray discs, and network-attached storage (NAS) devices.