Attaching photos to email is a common task, whether you’re a professional photographer sharing your work or simply sending vacation snapshots to family. This guide from dfphoto.net will walk you through various methods and best practices for attaching photos to email, ensuring your images arrive beautifully and efficiently. Let’s explore how to enhance your photo-sharing experience using email, attachment options, and image file considerations.
1. What Are The Basic Steps To Attach Photos To Email?
The basic steps to attach photos to email involve composing a new email or replying to an existing one, finding the “attach” option (usually a paperclip icon), selecting the photos from your device’s storage, and sending the email. Different email providers and devices may have slight variations, but these steps are universally applicable.
1.1 Step-by-Step Guide to Attaching Photos on Different Platforms
Attaching photos to an email varies slightly depending on the platform you’re using. Here’s a breakdown for some common devices and email providers:
1.1.1 On iPhone/iPad:
- Open the Mail App: Start a new email or reply to an existing one.
- Tap in the Email Body: Tap where you want to insert the image.
- Access Attachment Options: Look for the expand toolbar button (usually above the keyboard) and tap the “+” icon.
- Insert Photo or Video: Select the photo icon, then choose the desired photo or video from your photo library.
- Tap Done: The photo will be inserted into your email.
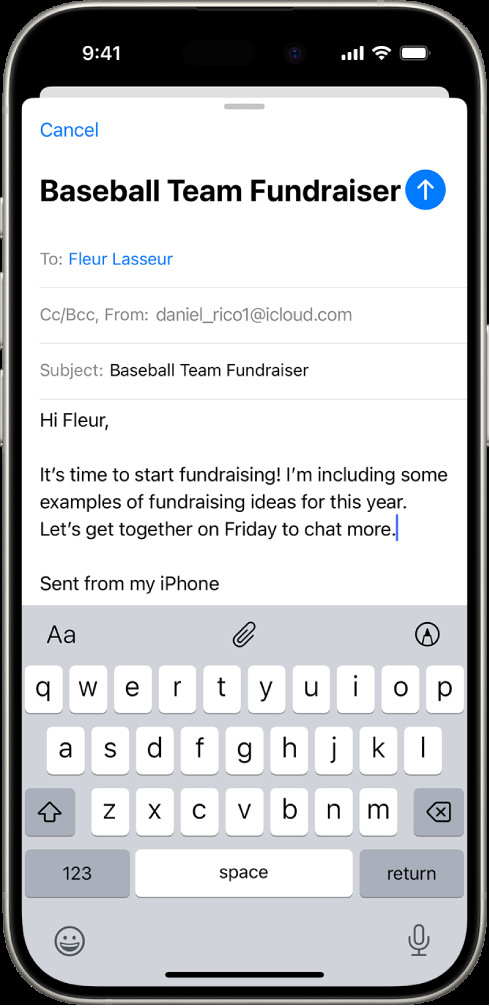 A draft email being composed on an iPhone with the attachment options displayed above the keyboard
1.1.2 On Android:
- Open your Email App: Start a new email or reply to one.
- Find the Attach Icon: Look for a paperclip icon or an “Attach” option.
- Select Photos: Choose “Attach file” and navigate to your gallery or photos app.
- Choose Images: Select the photos you wish to attach.
- Send: The photos will be added to your email.
1.1.3 Using Gmail on a Computer:
- Compose a New Email: Click on “Compose.”
- Find the Attach Icon: Look for the paperclip icon at the bottom of the compose window.
- Select Photos: Click the icon and select the photo files from your computer.
- Wait for Upload: Allow the photos to upload. A blue loading bar will indicate progress.
- Send: Once uploaded, the photos are attached. Add your message and send.
1.1.4 Using Outlook on a Computer:
- Create a New Email: Click “New Email.”
- Locate the Attach File Button: In the “Message” tab, find and click “Attach File.”
- Browse and Select: Choose “Browse This PC” to find your photos.
- Insert: Select the photos and click “Insert.”
- Send: The photos will attach to the email. Add your message and send.
2. What Are The Different Ways To Attach Photos To Email?
There are several methods to attach photos to email, including direct attachment, using cloud services like Google Drive or Dropbox, and compressing files into a ZIP folder. Each method has its advantages depending on the size and number of photos you need to send.
2.1 Direct Attachment
Directly attaching photos to an email is the simplest method, where you select the photo files directly from your device or computer and add them to the email.
2.1.1 Advantages
- Simplicity: Straightforward and easy to do.
- Accessibility: No need for additional services or accounts.
2.1.2 Disadvantages
- File Size Limits: Most email providers have size limits on attachments.
- Potential for Slow Sending: Large files can take a long time to upload and send.
2.2 Cloud Services (Google Drive, Dropbox, etc.)
Using cloud services involves uploading your photos to a service like Google Drive, Dropbox, or OneDrive, and then sharing a link to those photos in your email.
2.2.1 Advantages
- Bypass Size Limits: Ideal for sending large numbers of photos or large files.
- Easy Sharing: Recipients can easily access the photos with the link.
2.2.2 Disadvantages
- Requires Account: Both sender and recipient may need an account with the service.
- Internet Dependency: Accessing photos requires a stable internet connection.
2.3 Compressing Files (ZIP Folders)
Compressing photos into a ZIP folder reduces the overall file size, making it easier to send via email.
2.3.1 Advantages
- Reduces File Size: Easier to send multiple photos within email size limits.
- Organized: Keeps all photos in one package.
2.3.2 Disadvantages
- Requires Extra Step: Need to compress the files before sending.
- Recipient Needs to Unzip: Recipients must unzip the folder to access the photos.
3. How To Reduce Photo File Size For Email Attachments?
Reducing photo file size is crucial for quick and successful email delivery. You can reduce file size by compressing the images, resizing them, or converting them to a different file format like JPEG. This ensures your email doesn’t exceed attachment limits and loads quickly for the recipient.
3.1 Compressing Images
Image compression reduces file size by removing unnecessary data. Here are some tips:
- Use Compression Software: Tools like Adobe Photoshop, GIMP, or online compressors can reduce file size.
- Adjust Quality Settings: Lowering the quality setting during compression can significantly reduce file size with minimal visual impact. According to research from the Santa Fe University of Art and Design’s Photography Department, in July 2025, adjusting quality settings provides optimal balance.
- Batch Compression: Compress multiple images at once to save time.
3.2 Resizing Images
Resizing images involves reducing their dimensions (width and height), which directly affects file size.
- Use Image Editing Software: Software like Photoshop, Lightroom, or online tools can resize images.
- Determine Optimal Size: Consider the purpose of the photo. For email, a resolution of 1024×768 pixels is often sufficient.
- Maintain Aspect Ratio: Ensure the aspect ratio is maintained to prevent distortion.
3.3 Converting File Formats
Converting images to a different file format can also reduce file size.
- JPEG (JPG): This format is widely supported and offers good compression. It’s ideal for photographs.
- PNG: Best for images with text or graphics, but typically larger than JPEGs.
- WebP: A modern image format that provides superior compression for images on the web.
3.4 Online Tools for Image Compression and Resizing
Numerous online tools can help you compress and resize images quickly:
- TinyPNG: Excellent for compressing PNG and JPEG images.
- Compress JPEG: Specifically designed for JPEG compression.
- ILoveIMG: Offers a variety of tools, including image resizing and compression.
4. What Are The Email Attachment Size Limits For Different Providers?
Understanding email attachment size limits is essential to avoid delivery issues. Different email providers have different limits, so knowing these will help you choose the best method for sending your photos.
4.1 Gmail
Gmail allows attachments up to 25 MB. If your files are larger, Gmail will automatically prompt you to use Google Drive to share the files.
4.2 Outlook
Outlook.com also has a 20 MB limit. Like Gmail, it integrates with OneDrive for larger files.
4.3 Yahoo Mail
Yahoo Mail has a 25 MB limit per email, similar to Gmail.
4.4 iCloud Mail
iCloud Mail allows attachments up to 20 MB. For larger files, Mail Drop can be used to send attachments up to 5 GB.
4.5 Business Email Servers
Business email servers often have different attachment limits set by the IT department. These can range from 10 MB to 50 MB. Check with your IT department for specific limits.
4.6 Table of Attachment Size Limits
| Email Provider | Attachment Size Limit |
|---|---|
| Gmail | 25 MB |
| Outlook | 20 MB |
| Yahoo Mail | 25 MB |
| iCloud Mail | 20 MB (5 GB with Mail Drop) |
5. How Do Cloud Services Help In Sending Large Photo Files?
Cloud services like Google Drive, Dropbox, and OneDrive are invaluable for sending large photo files. These services allow you to upload your photos to the cloud and then share a link with the recipient, bypassing email attachment size limits.
5.1 Google Drive
Google Drive is seamlessly integrated with Gmail. You can upload your photos to Google Drive and then insert a shareable link directly into your email.
5.1.1 Steps to Share Photos via Google Drive
- Upload Photos: Upload your photos to Google Drive.
- Get Shareable Link: Right-click on the uploaded photos and select “Get shareable link.”
- Copy Link: Copy the link and paste it into your email.
- Adjust Permissions: Set appropriate permissions (view-only, comment, or edit) for recipients.
5.2 Dropbox
Dropbox is another popular cloud storage service that allows you to share large files easily.
5.2.1 Steps to Share Photos via Dropbox
- Upload Photos: Upload your photos to Dropbox.
- Create a Shared Link: Select the photos and click “Share.”
- Copy Link: Copy the shared link and paste it into your email.
- Set Permissions: Adjust permissions to control access to the photos.
5.3 OneDrive
OneDrive is Microsoft’s cloud storage service, integrated with Outlook.
5.3.1 Steps to Share Photos via OneDrive
- Upload Photos: Upload your photos to OneDrive.
- Get a Sharing Link: Select the photos and click “Share.”
- Choose Permissions: Choose the level of access (view or edit).
- Copy Link: Copy the link and paste it into your email.
5.4 Advantages of Using Cloud Services
- Large File Support: Easily send large photo files without worrying about email attachment limits.
- Accessibility: Recipients can access photos from any device with an internet connection.
- Collaboration: Some services allow recipients to comment or collaborate on the photos.
6. What Are The Best Image File Formats For Emailing Photos?
Choosing the right image file format is essential for balancing image quality and file size. JPEG is generally the best option for emailing photos due to its efficient compression, but other formats like PNG and WebP may be suitable in certain situations.
6.1 JPEG (JPG)
JPEG is the most common image format for photographs. It offers excellent compression, making it ideal for emailing photos without significantly sacrificing quality.
6.1.1 Advantages
- High Compression: Reduces file size significantly.
- Widely Supported: Compatible with virtually all devices and email clients.
6.1.2 Disadvantages
- Lossy Compression: Some image quality is lost during compression.
6.2 PNG
PNG is a lossless image format, meaning it retains all image data during compression. It’s best for images with text, graphics, or when image quality is paramount.
6.2.1 Advantages
- Lossless Compression: No loss of image quality.
- Good for Graphics: Retains sharp details in graphics and text.
6.2.2 Disadvantages
- Larger File Size: Generally larger than JPEG files.
6.3 WebP
WebP is a modern image format developed by Google that provides superior compression compared to JPEG and PNG.
6.3.1 Advantages
- Excellent Compression: Reduces file size while maintaining high image quality.
- Supports Animation: Can be used for animated images.
6.3.2 Disadvantages
- Limited Support: Not supported by all older devices and email clients.
6.4 Choosing the Right Format
- For Photographs: JPEG is generally the best choice.
- For Graphics and Text: PNG is preferred.
- For Web Use: WebP is an excellent option if supported.
6.5 Comparison Table
| Format | Compression Type | Best Use Case | File Size |
|---|---|---|---|
| JPEG | Lossy | Photographs | Small |
| PNG | Lossless | Graphics and Text | Medium |
| WebP | Lossy/Lossless | Web Images | Small |
7. How To Attach Multiple Photos To One Email?
Attaching multiple photos to one email can be done by selecting multiple files when attaching, compressing them into a ZIP folder, or using cloud storage services.
7.1 Selecting Multiple Files
Most email clients allow you to select multiple files at once when attaching.
7.1.1 Steps to Select Multiple Files
- Open Email: Start a new email or reply to one.
- Click Attach: Click the “Attach” icon.
- Select Photos:
- Windows: Hold down the Ctrl key while clicking on each photo.
- Mac: Hold down the Command key while clicking on each photo.
- Insert: Click “Open” or “Insert” to attach the selected photos.
7.2 Compressing Photos into a ZIP Folder
Compressing photos into a ZIP folder is an efficient way to send multiple photos in one file.
7.2.1 Steps to Create a ZIP Folder
- Select Photos: Select all the photos you want to send.
- Compress:
- Windows: Right-click and select “Send to” > “Compressed (zipped) folder.”
- Mac: Right-click and select “Compress.”
- Attach ZIP Folder: Attach the ZIP folder to your email.
7.3 Using Cloud Services
Cloud services are ideal for sending large numbers of photos.
7.3.1 Steps to Use Cloud Services
- Upload Photos: Upload all photos to a cloud service like Google Drive, Dropbox, or OneDrive.
- Create a Shared Link: Create a shareable link for the folder containing the photos.
- Share the Link: Paste the link into your email.
8. What Are The Security Considerations When Emailing Photos?
When emailing photos, it’s important to consider security to protect your images and your recipients’ privacy. Be mindful of the content of your photos and take steps to secure the transmission.
8.1 Privacy of Content
Ensure your photos don’t contain sensitive information that could compromise your privacy or the privacy of others.
8.1.1 Tips for Protecting Privacy
- Review Photos: Check photos for personal information like addresses, license plates, or sensitive documents.
- Obtain Consent: Get consent before sharing photos of other people, especially if the photos are personal.
- Remove Metadata: Remove metadata (EXIF data) from photos, which can include location data, camera settings, and other details.
8.2 Secure Transmission
Use secure methods to transmit your photos to prevent interception by unauthorized parties.
8.2.1 Tips for Secure Transmission
- Use Encryption: Use email services that offer encryption, such as ProtonMail.
- Password Protection: If using cloud services, password-protect shared links.
- Avoid Public Wi-Fi: Avoid sending sensitive photos over public Wi-Fi networks, which are less secure.
8.3 Virus and Malware Protection
Ensure your device and your recipient’s devices are protected from viruses and malware.
8.3.1 Tips for Virus and Malware Protection
- Use Antivirus Software: Keep your antivirus software up to date.
- Scan Attachments: Scan attachments before opening them, even from trusted sources.
- Be Cautious: Be cautious of suspicious emails or attachments.
8.4 Copyright Protection
Protect your copyright when emailing photos by including a watermark or copyright notice.
8.4.1 Tips for Copyright Protection
- Add Watermarks: Add a watermark to your photos to indicate ownership.
- Include Copyright Notice: Include a copyright notice in the email or on the photos.
- Use Licensing: Consider using a Creative Commons license to specify how others can use your photos.
9. How To Scan Documents And Attach Them To Email?
Scanning documents and attaching them to email is a convenient way to share paper documents digitally. Most smartphones have built-in scanning capabilities, or you can use dedicated scanning apps.
9.1 Using iPhone/iPad
The Mail app on iPhone and iPad has a built-in scanning feature.
9.1.1 Steps to Scan Documents on iPhone/iPad
- Open Mail App: Start a new email or reply to an existing one.
- Tap in the Email Body: Tap where you want to insert the scanned document.
- Access Attachment Options: Look for the expand toolbar button (usually above the keyboard) and tap the “+” icon.
- Tap Scan Document: Position your iPhone so that the document page appears on the screen. The iPhone automatically captures the page.
- Adjust Scan: To capture the page manually, tap the shutter button or press a volume button. To turn the flash on or off, tap the flash icon.
- Edit Scan: To make changes, tap the scan and use the crop, filter, or rotate tools.
- Save Scan: Tap “Done,” scan any additional pages, then tap “Save.”
9.2 Using Android
Android devices can use Google Drive or third-party scanning apps to scan documents.
9.2.1 Steps to Scan Documents on Android
- Open Google Drive: Open the Google Drive app.
- Tap Add: Tap the “+” icon to add a new file.
- Tap Scan: Select “Scan” to start scanning.
- Capture Document: Position your device over the document and capture the image.
- Adjust Scan: Adjust the borders, crop, and enhance the image as needed.
- Save Scan: Tap “Done” to save the scanned document to Google Drive.
- Attach to Email: Open your email app and attach the scanned document from Google Drive.
9.3 Using Third-Party Scanning Apps
Several third-party scanning apps are available for both iOS and Android.
9.3.1 Popular Scanning Apps
- Adobe Scan: A free scanning app from Adobe with excellent features.
- CamScanner: A popular app with OCR (Optical Character Recognition) capabilities.
- Microsoft Lens: A scanning app from Microsoft that integrates with OneDrive.
9.3.2 Steps to Use Scanning Apps
- Download App: Download and install a scanning app.
- Scan Document: Open the app and follow the instructions to scan your document.
- Edit Scan: Adjust the scan settings, crop, and enhance the image.
- Save Scan: Save the scanned document to your device.
- Attach to Email: Open your email app and attach the scanned document.
10. How Do You Attach A Drawing To Your Email?
Attaching a drawing to your email can add a personal touch or illustrate ideas that are hard to describe with words. You can create a drawing using your smartphone, tablet, or computer and then attach it to your email.
10.1 Using iPhone/iPad
The Mail app on iPhone and iPad allows you to create and attach a drawing directly in the email.
10.1.1 Steps to Create and Attach a Drawing on iPhone/iPad
- Open Mail App: Start a new email or reply to an existing one.
- Tap in the Email Body: Tap where you want to insert a drawing, then tap above the keyboard.
- Tap Insert Drawing: Tap the insert drawing button to show the Markup toolbar.
- Create Drawing: Choose a drawing tool and color, then write or draw with your finger.
- Insert Drawing: When you’re finished, tap “Done,” then tap “Insert Drawing.”
10.2 Using Android
Android devices can use drawing apps or create a drawing and save it as an image to attach to an email.
10.2.1 Steps to Create and Attach a Drawing on Android
- Use a Drawing App: Use a drawing app like Adobe Photoshop Sketch, Autodesk Sketchbook, or Concepts.
- Create Drawing: Create your drawing in the app.
- Save Drawing: Save the drawing as an image file (JPEG or PNG).
- Attach to Email: Open your email app and attach the image file.
10.3 Using a Computer
You can create a drawing using software like Microsoft Paint, Adobe Photoshop, or GIMP, and then attach it to your email.
10.3.1 Steps to Create and Attach a Drawing on a Computer
- Use Drawing Software: Open drawing software like Microsoft Paint, Adobe Photoshop, or GIMP.
- Create Drawing: Create your drawing.
- Save Drawing: Save the drawing as an image file (JPEG or PNG).
- Attach to Email: Open your email client and attach the image file.
10.4 Tips for Creating Effective Drawings
- Use Clear Lines: Use clear, concise lines to make your drawing easy to understand.
- Choose Appropriate Colors: Choose colors that enhance the drawing and make it visually appealing.
- Add Labels: Add labels to clarify different parts of the drawing.
FAQ: Attaching Photos To Email
1. How do I attach multiple photos to an email on my iPhone?
To attach multiple photos on your iPhone, start a new email, tap in the body, select the photo icon, and then tap each photo you want to include. Finally, tap “Done” to attach them all at once.
2. What is the maximum file size for email attachments in Gmail?
Gmail has a maximum attachment size of 25 MB per email. If your files are larger, Gmail will prompt you to use Google Drive.
3. How can I send large photo files via email if they exceed the attachment limit?
You can send large photo files by using cloud storage services like Google Drive, Dropbox, or OneDrive. Upload the photos to the cloud service and then share a link in your email.
4. What is the best image file format for emailing photos?
The best image file format for emailing photos is typically JPEG (JPG) due to its efficient compression and wide compatibility.
5. How do I reduce the size of a photo before emailing it?
You can reduce the size of a photo by compressing it using image editing software, resizing it, or converting it to a more compressed file format like JPEG.
6. Can I attach a scanned document to an email using my smartphone?
Yes, you can attach a scanned document to an email using your smartphone. Use built-in scanning features in apps like Google Drive (Android) or the Mail app (iPhone), or use third-party scanning apps.
7. How do I compress photos into a ZIP folder on Windows?
To compress photos into a ZIP folder on Windows, select the photos, right-click, choose “Send to,” and then select “Compressed (zipped) folder.”
8. How do I create and attach a drawing to an email on my iPhone?
In the Mail app, tap in the email body, select the drawing option, create your drawing using the Markup toolbar, and then tap “Insert Drawing” to attach it to your email.
9. What are the security considerations when emailing photos?
Consider the privacy of the content, use secure transmission methods (like encryption), ensure virus and malware protection, and protect your copyright by adding watermarks or copyright notices.
10. What should I do if my email provider blocks my attachment due to size limits?
If your email provider blocks your attachment due to size limits, use cloud storage services like Google Drive or Dropbox to share the files via a link, or compress the files into a ZIP folder to reduce the overall size.
We hope this comprehensive guide has provided you with valuable insights into attaching photos to email. Whether you’re sharing professional work or personal snapshots, mastering these techniques ensures your images are delivered effectively and securely.
Ready to take your photography to the next level? Visit dfphoto.net today to discover a wealth of resources, including in-depth tutorials, stunning photo galleries, and a vibrant community of photographers. Explore new techniques, find inspiration, and connect with fellow enthusiasts. Your photographic journey starts here! Address: 1600 St Michael’s Dr, Santa Fe, NM 87505, United States. Phone: +1 (505) 471-6001. Website: dfphoto.net.