Allowing Instagram access to your photos enables seamless sharing of your visual stories, artistic photos, and snapshots with your friends and followers; dfphoto.net provides resources to enhance your photography skills. Understanding how to grant and manage these permissions is crucial for maintaining privacy and controlling your digital footprint. This article will guide you through the steps to ensure you can share your photographic moments easily while keeping your personal information secure, and discover visual storytelling, image sharing, and media permissions management.
1. Why Can’t Instagram Access My Photos? Understanding Permission Issues
Instagram might not be able to access your photos due to privacy settings on your iPhone, app restrictions, or software glitches; resolving these issues typically involves adjusting your device settings to grant the necessary permissions. Let’s dive deeper into the common reasons:
- iOS Privacy Settings: The most common culprit is the privacy settings on your iPhone. Apple prioritizes user privacy, and as such, app permissions are strictly controlled. If you’ve recently updated your iOS or changed your privacy settings, Instagram might have lost its permission to access your photos.
- Limited Access vs. Full Access: iOS offers two types of photo access: “Selected Photos” and “Full Access”. If you’ve chosen “Selected Photos”, Instagram can only see the photos you’ve explicitly allowed it to see. If the photo you’re trying to post isn’t in that selection, Instagram won’t be able to access it.
- App Restrictions: Sometimes, restrictions are accidentally enabled that limit an app’s functionality. These restrictions can be found in the “Screen Time” settings on your iPhone.
- Software Glitches: Like any software, iOS and Instagram can experience glitches. These can sometimes interfere with app permissions.
- Instagram Updates: Occasionally, Instagram updates can cause permission issues. This is usually due to changes in how the app interacts with iOS.
- Insufficient Storage: While less common, if your iPhone is critically low on storage, it can sometimes affect app functionality, including photo access.
- iCloud Photo Library Issues: If your photos are stored in iCloud Photo Library and not fully downloaded to your device, Instagram might have trouble accessing them. This is because the app needs the actual photo file on your device, not just a thumbnail.
2. How to Grant Instagram Access to Your Photos: A Step-by-Step Guide
Granting Instagram access to your photos involves navigating your iPhone’s settings to allow the app to view and use your media; this process ensures you can easily share your visual content. Follow these steps:
-
Open the Settings App: Locate and tap the “Settings” app icon on your iPhone’s home screen.
-
Scroll Down and Find “Privacy & Security”: In the Settings menu, scroll down until you find “Privacy & Security” and tap on it.
-
Select “Photos”: Within the “Privacy & Security” menu, you will see a list of different types of data and permissions. Find and tap on “Photos.”
-
Find Instagram in the List: You will see a list of apps that have requested access to your photos. Locate “Instagram” in the list.
-
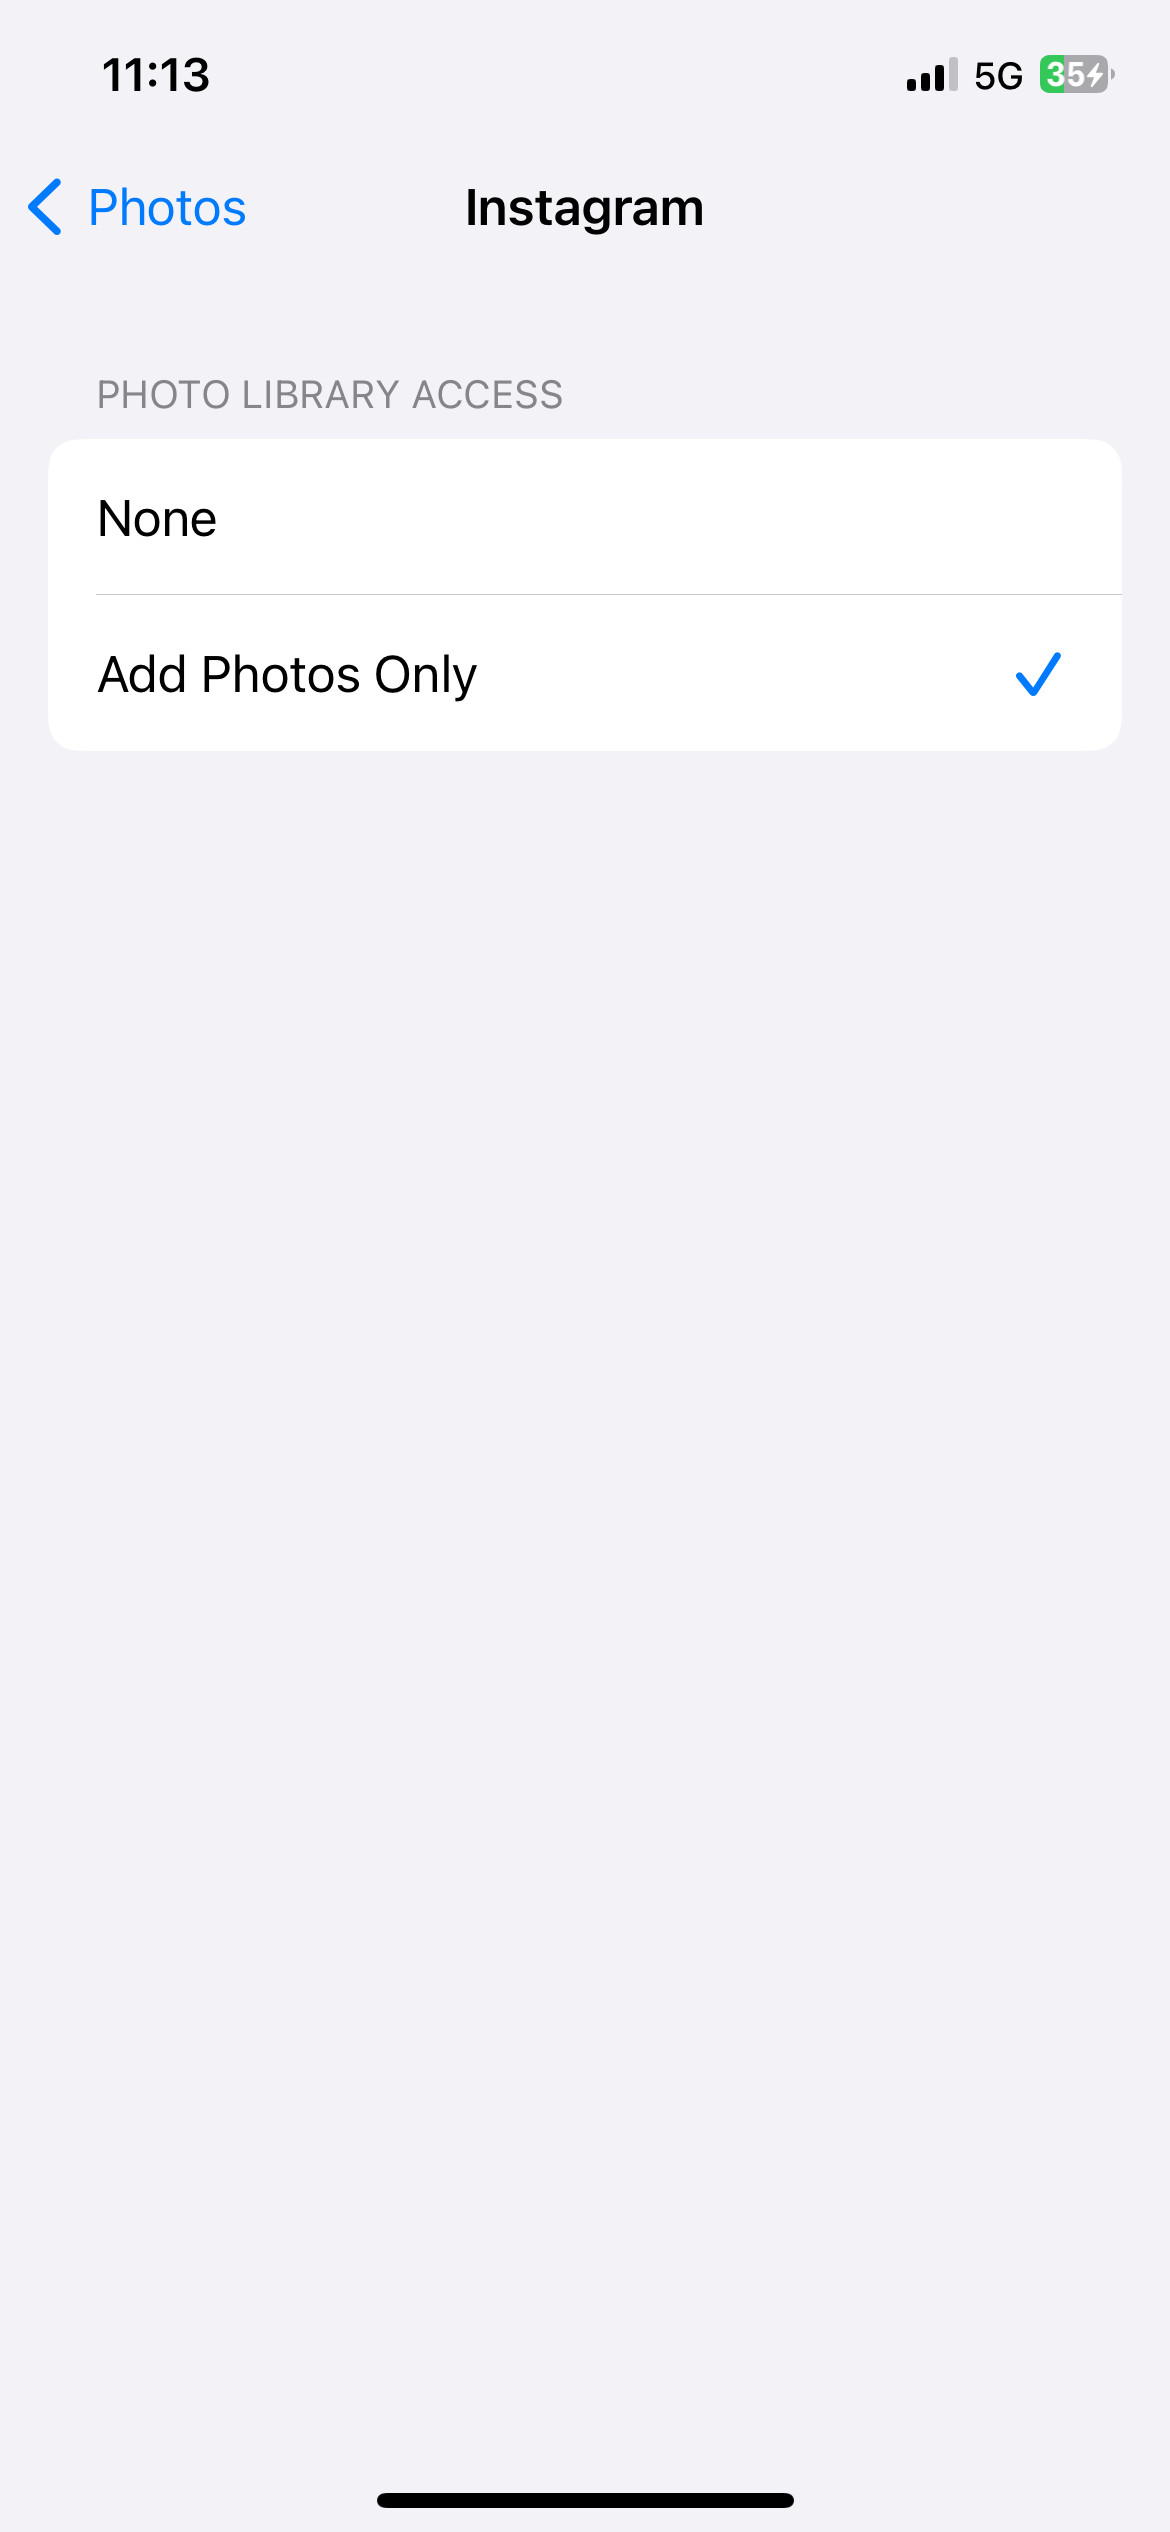
Choose Your Preferred Level of Access: Tap on “Instagram.” You will be presented with three options:
- “None”: This means Instagram has no access to your photos.
- “Limited Access”: This allows Instagram to only access the photos you specifically select.
- “Full Access”: This grants Instagram access to all the photos and videos in your photo library.
Select “Full Access” to allow Instagram to see all your photos. If you prefer to grant access only to specific photos, choose “Limited Access.”
-
Verify the Change: After selecting your preferred level of access, go back to the Instagram app and try to upload a photo. If you chose “Limited Access,” you will be prompted to select the photos you want to share with Instagram.
-
Restart Instagram (If Necessary): In some cases, the changes might not take effect immediately. Close the Instagram app completely (swipe up from the bottom of the screen and swipe the app away) and then reopen it.
 iPhone Settings to Allow Instagram Access to Photos
2.1. Understanding the Different Access Levels
Choosing the right access level for Instagram is crucial for balancing convenience and privacy.
| Access Level | Description |
|---|---|
| Full Access | Instagram can access all photos and videos in your library. This is the most convenient option, as you don’t have to manually select photos each time you want to upload. |
| Limited Access | You choose which specific photos and videos Instagram can access. This offers more privacy, as Instagram can only see the items you’ve explicitly allowed. |
| None | Instagram has no access to your photos or videos. You won’t be able to upload anything from your library. |
2.2. Managing Access for Other Apps
The process for granting photo access is similar for other apps as well. Simply navigate to the “Photos” section in “Privacy & Security” and adjust the permissions for each app individually. Regularly reviewing these permissions is a good practice to ensure your privacy.
3. Troubleshooting: Common Issues and Solutions
Even after granting permissions, you might still encounter issues with Instagram accessing your photos. Here are some common problems and how to fix them:
3.1. “Allow Access” Prompt Keeps Appearing
If Instagram keeps asking for photo access even after you’ve granted it, try these solutions:
- Restart Your iPhone: A simple restart can often resolve temporary glitches.
- Update Instagram: Make sure you have the latest version of the Instagram app installed. Outdated versions can sometimes have bugs that cause permission issues.
- Reinstall Instagram: Delete the Instagram app, restart your iPhone, and then reinstall the app from the App Store. This can help clear any corrupted data that might be causing the problem.
- Check Screen Time Settings: Go to “Settings” > “Screen Time” > “Content & Privacy Restrictions” > “Photos.” Make sure “Instagram” is set to “Allow Changes.”
- Reset Privacy Settings: As a last resort, you can try resetting your privacy settings. Go to “Settings” > “General” > “Transfer or Reset iPhone” > “Reset” > “Reset Location & Privacy.” Note that this will reset all your privacy settings, so you’ll need to re-grant permissions to all your apps.
3.2. Photos Not Showing Up in Instagram
If you’ve granted Instagram access but your photos aren’t showing up in the app, consider these possibilities:
- iCloud Photo Library Syncing: If your photos are stored in iCloud Photo Library, make sure they’re fully downloaded to your device. Instagram can only access photos that are physically stored on your iPhone.
- Hidden Photos: Check if the photos are hidden in your Photos app. Instagram won’t be able to see hidden photos.
- File Format: Instagram supports JPEG, PNG, and MP4 formats. Make sure your photos are in one of these formats.
- Album Visibility: If the photos are in a specific album, ensure that the album is visible to Instagram.
- Wait for Indexing: After granting access or adding new photos, it may take a few minutes for Instagram to index your photo library.
3.3. Grayed-Out Permissions
If the photo permissions for Instagram are grayed out and you can’t change them, it’s likely due to restrictions set by a profile or Mobile Device Management (MDM).
- Check for Profiles: Go to “Settings” > “General” > “VPN & Device Management.” If there’s a profile installed, it might be restricting app permissions.
- Contact Administrator: If the iPhone is managed by an organization (e.g., a school or workplace), contact the IT administrator to adjust the profile settings.
4. Privacy Best Practices: Protecting Your Photo Data
While granting Instagram access to your photos is necessary for sharing content, it’s essential to protect your privacy. Here are some best practices to follow:
- Review App Permissions Regularly: Periodically review the photo permissions for all apps on your iPhone. Revoke access for apps that no longer need it.
- Use “Limited Access” When Possible: If you’re concerned about privacy, opt for “Limited Access” and only grant access to the specific photos you want to share.
- Be Mindful of What You Share: Before posting a photo, consider whether it contains any sensitive information (e.g., your location, license plate, or personal documents).
- Adjust Instagram’s Settings: Instagram has its own privacy settings that you can adjust. For example, you can control who can see your posts, stories, and profile.
- Use Two-Factor Authentication: Enable two-factor authentication on your Instagram account to protect it from unauthorized access.
- Beware of Phishing Scams: Be cautious of suspicious emails or messages that ask for your Instagram login credentials. These could be phishing scams designed to steal your account.
- Keep Your iPhone Secure: Use a strong passcode or Face ID to protect your iPhone from unauthorized access.
- Update Your Software: Keep your iPhone and Instagram app up to date to patch any security vulnerabilities.
5. Advanced Tips: Optimizing Instagram Photo Access
To get the most out of Instagram photo access, consider these advanced tips:
5.1. Using iCloud Photo Library Effectively
iCloud Photo Library can be a great way to store and sync your photos across devices, but it can also cause issues with Instagram access. Here’s how to use it effectively:
- Enable “Download and Keep Originals”: In “Settings” > “Photos,” choose “Download and Keep Originals.” This ensures that all your photos are stored on your device, making them readily accessible to Instagram.
- Manage Storage: If you’re running low on storage, you can enable “Optimize iPhone Storage.” This will store smaller, optimized versions of your photos on your device and keep the full-resolution originals in iCloud. However, you’ll need to download the originals before you can share them on Instagram.
- Check Upload Status: Make sure your photos have finished uploading to iCloud before trying to share them on Instagram. You can check the upload status in the Photos app.
5.2. Creating Separate Albums for Instagram
To streamline the sharing process, consider creating separate albums for photos you frequently post on Instagram. This makes it easier to find and select photos when using “Limited Access.”
5.3. Using Third-Party Apps for Photo Management
Several third-party apps can help you manage your photos and optimize them for Instagram. These apps often offer features like:
- Batch Editing: Edit multiple photos at once to ensure consistency.
- Resizing and Cropping: Optimize your photos for Instagram’s dimensions.
- Adding Watermarks: Protect your photos from unauthorized use.
- Organizing and Tagging: Easily find and manage your photos.
5.4. Exploring Instagram’s Built-In Editing Tools
Instagram offers a range of built-in editing tools that you can use to enhance your photos before posting. These tools include:
- Filters: Apply pre-set filters to quickly change the look and feel of your photos.
- Adjustments: Fine-tune brightness, contrast, saturation, and other settings.
- Cropping and Rotating: Adjust the framing and orientation of your photos.
- Text and Stickers: Add text and stickers to your photos to make them more engaging.
- Explore dfphoto.net: For in-depth tutorials and creative inspiration, explore dfphoto.net to master advanced photo editing techniques.
6. Addressing Specific Scenarios: Instagram and iOS Updates
iOS updates can sometimes disrupt app permissions, including photo access for Instagram. Here’s how to handle these situations:
6.1. After Updating to a New iOS Version
After updating to a new version of iOS, it’s a good practice to check the photo permissions for Instagram and other apps.
- Verify Permissions: Go to “Settings” > “Privacy & Security” > “Photos” and make sure Instagram still has the desired level of access.
- Restart Your iPhone: If Instagram is still having trouble accessing your photos, try restarting your iPhone.
- Update Instagram: Check the App Store for any updates to the Instagram app.
- Reinstall Instagram: As a last resort, try deleting and reinstalling the Instagram app.
6.2. When Instagram Releases an Update
Similarly, Instagram updates can sometimes affect photo access.
- Read the Release Notes: Check the release notes for the update to see if there are any known issues with photo access.
- Clear Cache: Try clearing Instagram’s cache. Go to “Settings” > “General” > “iPhone Storage” > “Instagram” > “Offload App.” This will clear the app’s cache without deleting the app itself.
- Contact Instagram Support: If you’re still having trouble, contact Instagram support for assistance.
7. Alternatives to Granting Full Access: Exploring Other Options
If you’re not comfortable granting Instagram full access to your photos, here are some alternative options:
7.1. Using the “Share” Sheet
Instead of granting Instagram access to your entire photo library, you can use the “Share” sheet to share individual photos directly from the Photos app.
- Open the Photos App: Locate and tap the “Photos” app icon on your iPhone’s home screen.
- Select the Photo You Want to Share: Tap on the photo you want to share on Instagram.
- Tap the “Share” Icon: Tap the “Share” icon in the bottom-left corner of the screen.
- Select Instagram: Scroll through the list of apps and select “Instagram.”
- Choose Your Sharing Option: You’ll be presented with options to share the photo to your feed, story, or direct message.
7.2. Copying and Pasting Photos
Another option is to copy the photo from the Photos app and paste it into Instagram.
- Open the Photos App: Locate and tap the “Photos” app icon on your iPhone’s home screen.
- Select the Photo You Want to Share: Tap on the photo you want to share on Instagram.
- Tap the “Share” Icon: Tap the “Share” icon in the bottom-left corner of the screen.
- Select “Copy Photo”: Scroll through the list of options and select “Copy Photo.”
- Open Instagram: Open the Instagram app and start creating a new post or story.
- Paste the Photo: Tap on the screen where you want to insert the photo and select “Paste.”
7.3. Using Instagram’s “Choose From Library” Option
When creating a new post or story, Instagram offers a “Choose From Library” option that allows you to select photos without granting full access.
- Open Instagram: Open the Instagram app and tap the “+” icon to create a new post or story.
- Tap “Choose From Library”: Tap the “Choose From Library” option.
- Select the Photo You Want to Share: Select the photo you want to share.
- Grant Limited Access (If Prompted): If you haven’t already granted Instagram access to your photos, you’ll be prompted to grant limited access. Select the photos you want to share and tap “Done.”
8. Real-World Examples: How Photographers Manage Instagram Access
To illustrate how photographers manage Instagram access, here are a few real-world examples:
- Amateur Photographer: Sarah, an amateur photographer who enjoys sharing her nature photos on Instagram, grants Instagram full access to her photos for convenience. She regularly reviews her privacy settings and is mindful of the photos she shares.
- Professional Photographer: Mark, a professional photographer who uses Instagram to showcase his portfolio, opts for “Limited Access” to maintain greater control over his photo data. He creates separate albums for photos he wants to share on Instagram and only grants access to those albums.
- Travel Blogger: Emily, a travel blogger who posts photos from her adventures, uses the “Share” sheet to share individual photos directly from the Photos app. This allows her to share photos without granting Instagram full access.
9. The Future of Photo Access: What to Expect
As technology evolves, we can expect changes in how apps access and manage photo data. Here are some potential future trends:
- More Granular Permissions: Apple and other operating system developers may introduce more granular photo permissions, allowing users to specify exactly what type of data an app can access (e.g., metadata, location information, or face recognition data).
- AI-Powered Privacy: Artificial intelligence could be used to automatically identify and redact sensitive information in photos before they’re shared.
- Blockchain-Based Photo Ownership: Blockchain technology could be used to create a secure and transparent system for managing photo ownership and permissions.
- Enhanced User Control: Users will likely have more control over how their photo data is used and shared.
- dfphoto.net’s Role: Stay updated with the latest trends and best practices in photography and privacy by regularly visiting dfphoto.net, your go-to resource for all things photography.
10. FAQ: Addressing Your Questions About Instagram Photo Access
Here are some frequently asked questions about Instagram photo access:
1. Why does Instagram need access to my photos?
Instagram needs access to your photos so you can share them with your followers. Without access, you wouldn’t be able to post photos from your camera roll to your feed, stories, or direct messages.
2. Is it safe to give Instagram full access to my photos?
Giving Instagram full access to your photos is generally safe, but it’s important to be aware of the privacy implications. Instagram is a reputable company with security measures in place to protect your data. However, like any online service, there’s always a risk of data breaches or misuse. If you’re concerned about privacy, you can opt for “Limited Access” instead.
3. How do I revoke Instagram’s access to my photos?
To revoke Instagram’s access to your photos, go to “Settings” > “Privacy & Security” > “Photos” and select “None” for Instagram.
4. Can Instagram access my photos if I have “Limited Access” enabled?
Yes, but only the photos you’ve specifically selected. When you choose “Limited Access,” Instagram can only see the photos you’ve allowed it to see.
5. What happens if I accidentally deny Instagram access to my photos?
If you accidentally deny Instagram access to your photos, you won’t be able to upload photos from your camera roll. To fix this, go to “Settings” > “Privacy & Security” > “Photos” and grant Instagram the desired level of access.
6. How can I tell if Instagram is accessing my photos?
iOS displays an indicator (a small dot) in the status bar when an app is accessing your camera or microphone. However, there’s no such indicator for photo access. The best way to monitor photo access is to review the permissions for each app in “Settings” > “Privacy & Security” > “Photos.”
7. Does Instagram store my photos on its servers?
Yes, Instagram stores the photos you upload on its servers. This is necessary for displaying your photos to your followers and for providing features like editing and filtering.
8. Can I delete my photos from Instagram’s servers?
Yes, you can delete your photos from Instagram’s servers by deleting them from your account. Once you delete a photo, it will be removed from Instagram’s servers.
9. Does Instagram share my photos with third parties?
Instagram’s privacy policy states that it may share your information with third-party service providers, partners, and affiliates. However, Instagram claims that it does not sell your personal information to third parties.
10. What are the risks of granting Instagram access to my photos?
The risks of granting Instagram access to your photos include potential data breaches, misuse of your photos, and privacy violations. To minimize these risks, follow the privacy best practices outlined in this article.
Allowing Instagram access to your photos is a straightforward process that enhances your social media experience. By understanding the steps, troubleshooting common issues, and adhering to privacy best practices, you can confidently share your moments while safeguarding your personal information; dfphoto.net is dedicated to empowering you with the knowledge and resources to navigate the world of photography responsibly and creatively.
Ready to take your photography to the next level? Visit dfphoto.net today to discover a wealth of tutorials, stunning photo collections, and a vibrant community of photographers in the USA. Explore new techniques, find inspiration, and connect with fellow photography enthusiasts. Whether you’re an amateur or a professional, dfphoto.net has something for everyone.
Address: 1600 St Michael’s Dr, Santa Fe, NM 87505, United States.
Phone: +1 (505) 471-6001.
Website: dfphoto.net.