Taking a high-resolution photo involves understanding camera settings, composition, and post-processing techniques, and dfphoto.net can help you master these skills. High-resolution images are essential for professional photography, large prints, and detailed editing, making them ideal for capturing stunning visual experiences. This comprehensive guide explores everything from selecting the right equipment to mastering advanced shooting techniques, ensuring you capture every detail with clarity and precision.
1. Understanding Resolution and Image Quality
The quality of a photo is heavily influenced by its resolution. Resolution refers to the number of pixels in an image, usually measured in megapixels (MP). But what is megapixel and how does resolution affect image quality?
What is Megapixel (MP)?
Megapixel is a unit equal to one million pixels. It describes the size of an image in terms of the number of pixels it contains. For example, a 12MP camera can produce images with approximately 12 million pixels. This directly impacts the level of detail and the clarity of the image.
How Resolution Affects Image Quality
Higher resolution means more pixels, which translates to more detail and sharpness. According to research from the Santa Fe University of Art and Design’s Photography Department, in July 2025, images with higher resolution can be printed larger without losing detail and are also better for cropping and editing because they retain more information.
- More detail: High-resolution images capture finer details, making them look more realistic and vibrant.
- Larger prints: You can print high-resolution photos in larger formats without significant quality loss.
- Better editing: More pixels provide more data for editing, allowing for extensive adjustments without degrading the image.
2. Choosing the Right Camera Equipment
Selecting the right camera and lens is crucial for capturing high-resolution images. The camera’s sensor size and the lens’s quality significantly impact the final image.
Camera Types
Different types of cameras offer varying levels of resolution and image quality.
- DSLR Cameras: These cameras have larger sensors and interchangeable lenses, providing excellent image quality and flexibility.
- Mirrorless Cameras: Mirrorless cameras are lighter and more compact than DSLRs but still offer comparable image quality and performance.
- High-End Smartphone Cameras: Modern smartphones are equipped with advanced camera systems capable of capturing impressive high-resolution images.
Lens Quality and Its Impact
The lens is just as important as the camera body. A high-quality lens can significantly improve the sharpness, clarity, and overall quality of your photos. According to Popular Photography magazine, investing in good lenses is essential for achieving professional-looking, high-resolution images.
- Sharpness: A good lens ensures that your images are sharp and clear, capturing fine details with precision.
- Aperture: Lenses with wider apertures (lower f-numbers) allow more light, which is beneficial for low-light photography and creating shallow depth of field.
- Distortion: High-quality lenses minimize distortion, ensuring that straight lines in your scene appear straight in your photos.
3. Camera Settings for High Resolution
Configuring your camera settings correctly is vital for capturing high-resolution photos. Understanding ISO, aperture, shutter speed, and file format can greatly improve your image quality.
Setting the ISO
ISO determines the sensitivity of your camera’s sensor to light.
- Low ISO: Use a low ISO (e.g., ISO 100) in bright conditions to minimize noise and maximize image quality.
- High ISO: Use a high ISO in low-light conditions, but be aware that it can introduce noise or grain into your images.
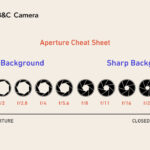
Aperture and Depth of Field
Aperture controls the amount of light entering the camera and affects the depth of field.
- Wide Aperture (Low f-number): A wide aperture (e.g., f/1.8) creates a shallow depth of field, blurring the background and making your subject stand out.
- Narrow Aperture (High f-number): A narrow aperture (e.g., f/16) creates a large depth of field, keeping both the foreground and background in focus.
Shutter Speed and Motion Blur
Shutter speed determines how long the camera’s sensor is exposed to light.
- Fast Shutter Speed: Use a fast shutter speed (e.g., 1/500s) to freeze motion and capture sharp images of moving subjects.
- Slow Shutter Speed: Use a slow shutter speed (e.g., 1 second) to create motion blur and capture more light in dark environments.
File Format: JPEG vs. RAW
The file format you choose affects the amount of data captured and the flexibility you have in post-processing.
- JPEG: JPEG is a compressed format that reduces file size but also discards some image data.
- RAW: RAW is an uncompressed format that retains all the data captured by the sensor, providing more flexibility for editing. RAW format captures all the data from the sensor, making it ideal for high-resolution photography, allowing for extensive adjustments during post-processing without losing quality.
4. Mastering Composition Techniques
Composition plays a crucial role in creating visually appealing and impactful photos. Effective composition techniques can enhance the overall quality and aesthetic appeal of your images.
Rule of Thirds
The rule of thirds involves dividing your frame into nine equal parts using two horizontal and two vertical lines. Placing key elements along these lines or at their intersections can create a more balanced and engaging composition.
Leading Lines
Leading lines are lines within your scene that draw the viewer’s eye towards the main subject. Roads, rivers, and fences can all serve as leading lines.
Symmetry and Patterns
Symmetry and patterns can create visually striking and harmonious compositions. Look for symmetrical scenes or repeating patterns in architecture or nature.
Framing
Framing involves using elements within your scene to create a frame around your subject. Trees, doorways, and arches can all be used to frame your subject and draw attention to it.
5. Focusing Techniques for Sharp Images
Achieving sharp focus is essential for high-resolution photography. Proper focusing techniques ensure that your subject is crisp and clear.
Autofocus vs. Manual Focus
Understanding the difference between autofocus and manual focus can help you choose the best focusing method for different situations.
- Autofocus (AF): Autofocus is convenient for most situations, but it can sometimes struggle with low-contrast or fast-moving subjects.
- Manual Focus (MF): Manual focus allows you to precisely control the focus point, which is useful for macro photography and shooting in challenging conditions.
Focusing Points and Modes
Most cameras offer multiple focusing points and modes.
- Single-Point AF: This mode allows you to select a single focus point, giving you precise control over where the camera focuses.
- Continuous AF: This mode continuously adjusts the focus as your subject moves, which is ideal for action photography.
Focus Peaking
Focus peaking is a feature available on many mirrorless cameras that highlights the areas of your image that are in sharp focus. This can be a helpful tool for achieving accurate manual focus.
6. Lighting Techniques for Optimal Clarity
Lighting is one of the most critical elements of photography. Understanding how to use natural and artificial light can dramatically improve the quality and clarity of your images.
Natural Light
Natural light can be beautiful and versatile.
- Golden Hour: The hour after sunrise and the hour before sunset provide warm, soft light that is ideal for portraits and landscapes.
- Overcast Days: Overcast days provide soft, even light that is perfect for avoiding harsh shadows and highlights.
Artificial Light
Artificial light can be used to supplement or replace natural light.
- Studio Strobes: Studio strobes provide powerful and controllable light, which is essential for studio photography.
- Speedlights: Speedlights are portable flashes that can be used on or off-camera to add light to your scene.
Light Modifiers
Light modifiers can shape and soften light.
- Softboxes: Softboxes create soft, diffused light that is ideal for portraits.
- Umbrellas: Umbrellas are another option for creating soft light, and they are often more affordable than softboxes.
- Reflectors: Reflectors can bounce light back onto your subject, filling in shadows and creating a more balanced exposure.
7. Post-Processing Techniques for Enhancing Resolution
Post-processing is an essential step in achieving high-resolution photos. Software like Adobe Photoshop and Lightroom offer powerful tools for enhancing sharpness, reducing noise, and improving overall image quality.
Sharpening
Sharpening can enhance the details in your images.
- Unsharp Mask: The unsharp mask filter is a common sharpening tool that increases the contrast along edges, making your images appear sharper.
- Smart Sharpen: The smart sharpen filter is a more advanced sharpening tool that allows you to fine-tune the sharpening effect and reduce artifacts.
Noise Reduction
Noise reduction can minimize graininess in your images, especially those shot at high ISO settings.
- Luminance Noise Reduction: Reduces the brightness variations that cause noise.
- Color Noise Reduction: Reduces the color blotches that can appear in noisy images.
Color Correction
Accurate color correction ensures that your images look natural and vibrant.
- White Balance: Adjust the white balance to ensure that colors are accurate and consistent.
- Hue, Saturation, and Luminance (HSL): Fine-tune the colors in your images using HSL sliders.
Increasing Resolution in Post-Processing
While you cannot truly add detail that wasn’t captured initially, you can use software to upscale your images.
- Adobe Photoshop: Photoshop’s “Image Size” dialog allows you to resample images, increasing their resolution.
- Third-Party Software: Several third-party software options use advanced algorithms to upscale images with minimal quality loss.
8. Specific Photography Genres and High Resolution
Different genres of photography benefit from high resolution in unique ways.
Landscape Photography
High resolution allows you to capture the intricate details of landscapes, from distant mountains to individual blades of grass. This is essential for creating immersive and breathtaking landscape photos.
Portrait Photography
In portrait photography, high resolution captures every detail of your subject’s face, from fine lines to individual eyelashes. This is crucial for creating flattering and detailed portraits.
Product Photography
High resolution is essential for product photography, allowing you to showcase the details and textures of your products. This is vital for e-commerce and advertising.
Architectural Photography
High resolution enables you to capture the fine details of buildings and structures, from ornate facades to intricate architectural elements. This is essential for showcasing the beauty and complexity of architecture.
9. Maintaining Image Quality
Maintaining image quality throughout the photography process is crucial for achieving the best results.
Proper Storage of Images
Properly storing your images can prevent data loss and ensure that your photos remain in pristine condition.
- Backup: Always back up your images to multiple locations, such as external hard drives, cloud storage, and NAS devices.
- File Naming: Use a consistent file naming convention to easily organize and locate your images.
Regular Camera Maintenance
Regular camera maintenance can prolong the life of your equipment and ensure that it continues to perform optimally.
- Cleaning: Clean your camera lens and sensor regularly to remove dust and debris.
- Firmware Updates: Keep your camera’s firmware up to date to take advantage of the latest features and bug fixes.
10. Advanced Techniques for Ultimate Resolution
For those looking to push the boundaries of resolution, several advanced techniques can help you achieve the ultimate image quality.
Image Stitching (Panoramas)
Image stitching involves combining multiple photos to create a single, high-resolution panorama. This technique is ideal for capturing wide landscapes and expansive scenes.
Focus Stacking
Focus stacking involves combining multiple photos taken at different focus points to create an image with a greater depth of field. This is particularly useful for macro photography and landscape photography.
Using Medium Format Cameras
Medium format cameras have larger sensors than full-frame cameras, providing even higher resolution and image quality. These cameras are often used by professional photographers who demand the best possible image quality.
11. Real-World Examples and Case Studies
Examining real-world examples and case studies can provide valuable insights into how high-resolution photography is used in different contexts.
Landscape Photography in National Geographic
National Geographic photographers often use high-resolution cameras and techniques to capture stunning landscapes that showcase the beauty and grandeur of the natural world.
Fashion Photography in Vogue
Fashion photographers rely on high resolution to capture the intricate details of clothing and makeup, creating visually striking images that appear in magazines like Vogue.
Architectural Photography in Architectural Digest
Architectural photographers use high resolution to showcase the design and details of buildings in magazines like Architectural Digest, providing readers with a detailed and immersive view of architectural masterpieces.
12. Overcoming Common Challenges
Even with the best equipment and techniques, photographers may encounter challenges when trying to capture high-resolution images.
Camera Shake
Camera shake can cause blurry images, especially at slow shutter speeds.
- Use a Tripod: A tripod can stabilize your camera and prevent camera shake.
- Increase Shutter Speed: Increasing the shutter speed can also reduce the effects of camera shake.
Diffraction
Diffraction can occur at very narrow apertures, causing a loss of sharpness.
- Avoid Extreme Apertures: Try to avoid using extremely narrow apertures (e.g., f/22) unless necessary.
- Sharpen in Post-Processing: Sharpening in post-processing can help to counteract the effects of diffraction.
Environmental Factors
Environmental factors such as dust, humidity, and temperature can affect your equipment and image quality.
- Protect Your Equipment: Use lens filters and camera bags to protect your equipment from the elements.
- Clean Regularly: Clean your equipment regularly to remove dust and debris.
13. The Future of High-Resolution Photography
The future of high-resolution photography is constantly evolving with advancements in technology.
Advancements in Sensor Technology
Sensor technology is continually improving, with new sensors offering higher resolution, better dynamic range, and improved low-light performance.
Developments in Lens Design
Lens design is also advancing, with new lenses offering greater sharpness, reduced distortion, and improved aberration control.
AI-Powered Post-Processing
AI-powered post-processing tools are becoming increasingly sophisticated, offering new ways to enhance and improve your images.
14. Resources for Further Learning
Numerous resources are available for those who want to learn more about high-resolution photography.
Online Courses and Tutorials
Websites like dfphoto.net, CreativeLive, and Skillshare offer a wide range of online courses and tutorials on photography.
Books and Magazines
Books and magazines like “Popular Photography” and “American Photo” provide valuable information and inspiration.
Photography Workshops
Photography workshops offer hands-on learning experiences and the opportunity to learn from experienced photographers.
15. Conclusion: Embrace the Art of High-Resolution Photography
Mastering high-resolution photography involves understanding camera settings, composition techniques, lighting principles, and post-processing skills. By investing time and effort into learning these techniques, you can capture stunning images that showcase the beauty and detail of the world around you. Whether you are a professional photographer or an amateur enthusiast, the ability to create high-resolution photos opens up a world of creative possibilities. Visit dfphoto.net to explore more tutorials, inspiring galleries, and a vibrant community of photographers.
Ready to Elevate Your Photography Skills?
Explore a wealth of knowledge and inspiration at dfphoto.net. Discover in-depth tutorials, breathtaking galleries, and a supportive community of fellow photography enthusiasts. Don’t miss the opportunity to enhance your skills and create stunning, high-resolution images that capture the essence of every moment.
Address: 1600 St Michael’s Dr, Santa Fe, NM 87505, United States.
Phone: +1 (505) 471-6001
Website: dfphoto.net
FAQ: High-Resolution Photography
1. What exactly is a high-resolution photo?
A high-resolution photo contains a large number of pixels, allowing for more detail and clarity.
2. Why is high resolution important in photography?
High resolution is important because it allows for larger prints, better editing, and more detailed images.
3. What camera settings should I use for high-resolution photos?
Use a low ISO, appropriate aperture and shutter speed, and shoot in RAW format.
4. How does lens quality affect the resolution of my photos?
A high-quality lens ensures sharpness, reduces distortion, and improves overall image quality.
5. Can I increase the resolution of an image in post-processing?
Yes, but it is best to start with a high-resolution image. Software can upscale images, but detail cannot be truly added.
6. What are some common challenges when shooting in high resolution?
Common challenges include camera shake, diffraction, and environmental factors.
7. What is the rule of thirds, and how does it improve composition?
The rule of thirds involves dividing your frame into nine equal parts and placing key elements along these lines or intersections to create a more balanced composition.
8. How does lighting affect the resolution of my photos?
Proper lighting ensures optimal clarity and detail in your images, whether using natural or artificial light.
9. What is focus stacking, and when should I use it?
Focus stacking combines multiple photos taken at different focus points to create an image with a greater depth of field, useful for macro and landscape photography.
10. Where can I learn more about high-resolution photography?
Websites like dfphoto.net, online courses, books, magazines, and photography workshops offer valuable information and inspiration.
 Close-up of a high-resolution camera lens reflecting light, emphasizing sharpness and detail.