iCloud Photos is a seamless service that works hand-in-hand with the Photos app to ensure all your precious photos and videos are securely backed up in iCloud, and effortlessly synchronized across your entire Apple ecosystem, including iPhone, iPad, Apple Vision Pro, Mac, Apple TV, and even accessible via iCloud.com.
Understanding How iCloud Photos Works
iCloud Photos operates automatically in the background, taking the hassle out of manually backing up and transferring your media. Every single photo and video you capture is instantly uploaded to iCloud, providing you with a centralized library accessible from any device at any time. Simply open the Photos app, and your entire collection is at your fingertips.
The beauty of iCloud Photos lies in its synchronization capabilities. Any edits, deletions, or organizational changes you make on one device are mirrored across all your other devices. Your photos and videos are neatly organized into Years, Months, Days, and the comprehensive “All Photos” view, mirroring the familiar structure within the Photos app. Furthermore, your personalized Memories and People & Pets albums are also kept in sync, ensuring that you can quickly find exactly what you’re looking for, no matter which device you are using.
Your photos and videos are stored in iCloud in their original, high-resolution formats, preserving the quality you expect. This includes a wide range of formats such as HEIF, JPEG, RAW, PNG, GIF, TIFF, HEVC, and MP4, as well as specialized formats like slo-mo, time-lapse, 4K videos, and Live Photos captured on your iPhone or iPad. It’s worth noting that photos and videos taken with these devices are efficiently stored in HEIF and HEVC formats to save space without compromising quality. The synchronization speed may vary depending on your internet connection, but rest assured, your library will eventually be consistent across all your devices and accessible on iCloud.com.
Turning on iCloud Photos: Step-by-Step Guide
Before you begin, ensure you have iCloud set up and are logged in with the same Apple ID across all your devices. This is crucial for seamless synchronization.
Enabling iCloud Photos on your iPhone, iPad, or Apple Vision Pro
- Open the Settings app on your device.
- Tap on [Your Name] at the top.
- Select iCloud.
- Tap on Photos.
- Toggle the switch next to Sync this [Device] to the on position.
 Screenshot showing how to enable Sync this iPhone option for iCloud Photos in iOS settings. The user is in the Photos section under iCloud settings.
Enabling iCloud Photos on your Mac
- Click the Apple menu () in the top-left corner of your screen.
- Choose System Settings (or System Preferences depending on your macOS version).
- Click on [Your Name] (or Apple ID).
- Select iCloud from the sidebar.
- Ensure Photos is selected in the list of iCloud services.
- Click the switch next to Sync this Mac to activate iCloud Photos.
Enabling iCloud Photos on Apple TV 4K and Apple TV HD
- Navigate to Settings on your Apple TV.
- Select Users and Accounts.
- Choose iCloud.
- Turn iCloud Photos to On.
Setting up iCloud Photos on your Windows PC
For users with Windows PCs, Apple provides iCloud for Windows, which allows you to sync your iCloud Photos library.
Learn how to set up and use iCloud Photos on your PC
How Edits and Deletions are Handled in iCloud Photos
iCloud Photos keeps your library consistent by reflecting any changes you make across all your connected devices.
Edits Synchronization Across Devices
When you enhance a photo, apply filters, or make any adjustments within the Photos app on your iPhone, iPad, or Mac, these edits are automatically updated across all your devices, including your Apple TV and iCloud.com. This means you can start editing on your iPhone and seamlessly continue refining your photos on your Mac, ensuring a consistent look and feel across your entire library. Importantly, your original, unedited photos and videos are safely stored in iCloud, allowing you to revert to the original version at any time and undo any edits you’ve made.
Deleting Photos and Videos Across Your Library
Deleting photos or videos on one device results in their removal from iCloud and all other devices using iCloud Photos. This synchronized deletion ensures your library remains consistent and clutter-free. However, to prevent accidental data loss, iCloud provides a “Recently Deleted” folder where deleted items are stored for 30 days. You can easily recover accidentally deleted photos and videos from this folder within this period. After 30 days, the items are permanently deleted.
Downloading Copies of Your Photos and Videos from iCloud
While iCloud Photos keeps your library readily accessible, it’s always a good practice to have local backups. iCloud Photos does not duplicate your photos in your iCloud Backup, so downloading copies is essential for creating separate backups of your precious memories.
Downloading Photos and Videos from iCloud.com
-
Go to iCloud.com in your web browser and sign in with your Apple ID.
-
Click on the Photos app icon.
-
Select the photos and videos you wish to download. You can select multiple items by holding down the Shift or Command (Ctrl on Windows) key while clicking.
-
Click the download button (cloud icon with a down arrow) located in the top-right corner of the window. For more download options, click the More button (three dots).
-
Choose your download preferences:
- Most Compatible: Downloads photos in JPEG format and videos in H.264 format, ensuring compatibility with most devices.
- Unmodified Original: Downloads your content in its original format as captured or imported, preserving the highest quality.
-
Click Download to start the download process.
Downloading Photos and Videos from iPhone, iPad, or Apple Vision Pro
-
Open the Photos app and select the photos or videos you want to download to another device.
-
Tap the Share button (box with an upward arrow).
-
Choose AirDrop from the share options.
-
Select the target device you want to share with. Ensure AirDrop is enabled on the receiving device.
For transferring large numbers of photos, consider using the “Import” function to directly import your library to a Mac or PC for a faster and more efficient process. Learn how to import your photos.
Downloading Photos and Videos from your Mac
- Open the Photos app on your Mac.
- Select the photos or videos you want to download.
- Drag the selected content directly to your desktop or another folder in Finder. Alternatively, you can Control-click (right-click) and choose Share > AirDrop to share wirelessly to another Apple device.
Managing iCloud Storage for Photos and Videos
iCloud Photos utilizes your iCloud storage quota. Understanding and managing your storage is crucial to ensure uninterrupted syncing and prevent running out of space.
Understanding iCloud Storage and Device Storage
Photos and videos stored in iCloud Photos count towards your total iCloud storage. When you sign up for iCloud, you automatically receive 5GB of free storage. For extensive photo and video libraries, you might need to upgrade to iCloud+ for more storage and access to premium features.
Learn more about iCloud storage and device storage
Upgrading to iCloud+ for More Storage
If you require more than the free 5GB of iCloud storage, upgrading to iCloud+ provides you with increased storage options and additional features like iCloud Private Relay and Hide My Email.
Learn how to upgrade to iCloud+
Optimizing Storage on Your Devices
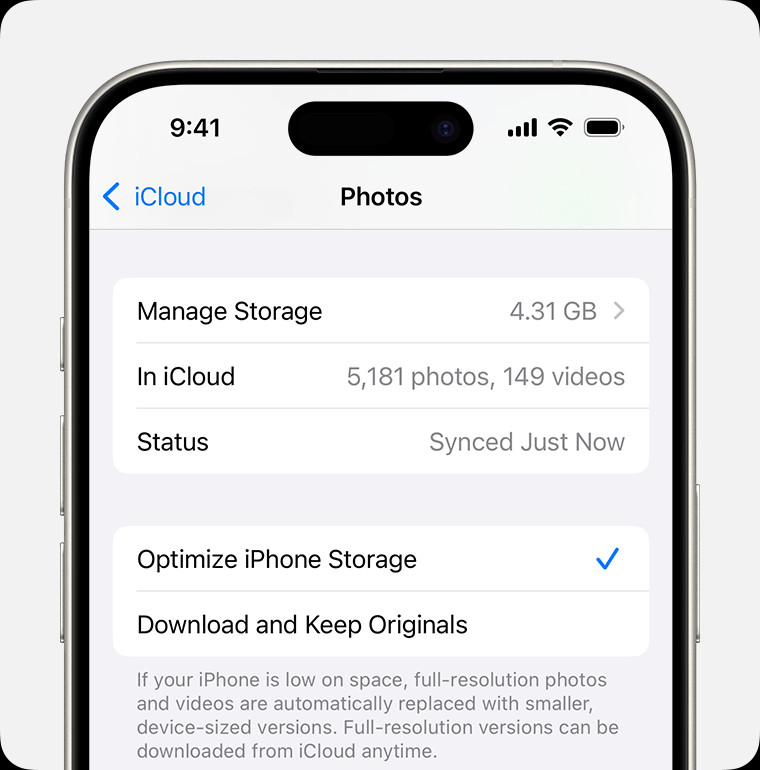
To efficiently manage storage space on your devices, especially iPhones and iPads with limited storage, iCloud Photos offers “Optimize Storage.”
When “Optimize Storage” is enabled, iCloud Photos intelligently manages your library size on each device. Full-resolution originals are securely stored in iCloud, while space-saving, optimized versions are kept on your device. This optimization is dynamic, prioritizing space-saving for photos and videos you access less frequently. You can always download the original, full-resolution versions over Wi-Fi or cellular when needed.
Alternatively, you can choose “Download Originals” to keep full-resolution photos and videos both in iCloud and on your device, provided you have sufficient storage space.
Enabling Optimize Storage on iPhone, iPad, or Apple Vision Pro
- Go to Settings > [Your Name] > iCloud.
- Tap on Photos.
- Select Optimize [Device] Storage to enable space-saving optimized versions on your device.
Enabling Optimize Storage on Mac
- Open the Photos app on your Mac.
- In the menu bar at the top, click Photos > Settings (or Photos > Preferences depending on your macOS version).
- Go to the iCloud tab.
- Choose your preferred storage setting: Optimize Mac Storage or Download Originals to this Mac.
Temporarily Pausing iCloud Photos Uploads
In situations where you have a slow internet connection or are on a limited data plan, you might want to temporarily pause iCloud Photos uploads.
When iCloud Photos is syncing a large library, the initial upload can take time depending on your collection size and internet speed. You can monitor the upload status and pause it for a day if needed. The pause option might not always be available depending on your library’s current sync status.
- On iPhone, iPad, or Apple Vision Pro: Open the Photos app, scroll to the bottom of the Library tab and tap Pause. Alternatively, tap your profile picture in the Photos app and tap Pause. In older iOS versions, go to the Library tab, tap All Photos, scroll to the bottom, and tap Pause.
- On Mac: Open the Photos app, select Library in the sidebar, then click All Photos in the toolbar. Scroll to the bottom of your photos and click Pause.
By understanding and utilizing these features, you can effectively sync photos with iCloud and enjoy seamless access to your photo and video library across all your Apple devices and beyond.
