Storing your photos in iCloud can be a game-changer for photographers, especially for those in the United States who value both convenience and security. dfphoto.net is here to guide you through understanding the best ways to use iCloud Photos, ensuring your precious memories are safe, accessible, and optimized for your devices. Whether you’re in Santa Fe or anywhere else, let’s dive into how to make the most of iCloud for your photography workflow, including cloud storage options and image quality considerations.
1. Understanding iCloud Photos: What Is It and How Does It Work?
Yes, iCloud Photos is a service that seamlessly synchronizes your photos and videos across all your Apple devices. With iCloud Photos, every snapshot and video clip you capture is automatically uploaded to the cloud, ensuring it’s safely backed up and accessible from your iPhone, iPad, Mac, and even your PC. This synchronization not only provides a secure backup, safeguarding your memories from device loss or damage, but also optimizes storage space on your devices.
1.1 How iCloud Photos Works
iCloud Photos functions by uploading your original, high-resolution photos and videos to iCloud. Once uploaded, these files are securely stored and synchronized across all your devices where you’re signed in with the same Apple ID. When you enable “Optimize Storage” on your iPhone or iPad, iCloud Photos intelligently manages your device’s storage by keeping smaller, space-saving versions of your photos and videos on your device while the original, high-resolution versions remain safely stored in iCloud.
1.2 Benefits of Using iCloud Photos
- Automatic Backup: Your photos and videos are automatically backed up to iCloud, protecting them from loss due to device damage or theft.
- Cross-Device Access: Access your entire photo and video library from any Apple device, as well as on Windows PCs through the iCloud for Windows app.
- Storage Optimization: Save space on your iPhone, iPad, and Mac by storing full-resolution originals in iCloud and keeping optimized versions on your devices.
- Easy Sharing: Share photos and videos with friends and family through iCloud Photo Sharing, creating shared albums that everyone can contribute to.
- Organization: iCloud Photos helps organize your photos with features like automatic face recognition, location-based albums, and smart search capabilities.
1.3 Potential Drawbacks
- Storage Limitations: The free iCloud storage tier provides only 5GB, which may not be sufficient for users with extensive photo and video libraries. Upgrading to a paid iCloud+ plan is often necessary.
- Privacy Concerns: While Apple employs robust encryption measures, some users may have concerns about storing their personal photos and videos in the cloud.
- Reliance on Internet Connectivity: Accessing full-resolution photos and videos requires a stable internet connection, which may be a limitation in areas with poor connectivity.
2. Setting Up iCloud Photos on Your Devices: A Step-by-Step Guide
Yes, setting up iCloud Photos is straightforward. Follow these steps to enable it on your iPhone, iPad, and Mac, and ensure your photos are safely backed up and synchronized across your devices. These steps will guide you through the process, no matter where you are.
2.1 On iPhone and iPad:
- Open Settings: Tap the Settings app on your home screen.
- Tap Your Name: At the top of the Settings menu, tap your name (Apple ID, iCloud, Media & Purchases).
- Select iCloud: Tap “iCloud” from the Apple ID menu.
- Tap Photos: In the iCloud settings, find and tap “Photos”.
- Enable iCloud Photos: Toggle the switch next to “Sync this iPhone” (or “iCloud Photos” in older iOS versions) to the ON position.
- Choose Storage Option: Select “Optimize iPhone Storage” to save space on your device or “Download and Keep Originals” if you prefer to keep full-resolution photos on your device.
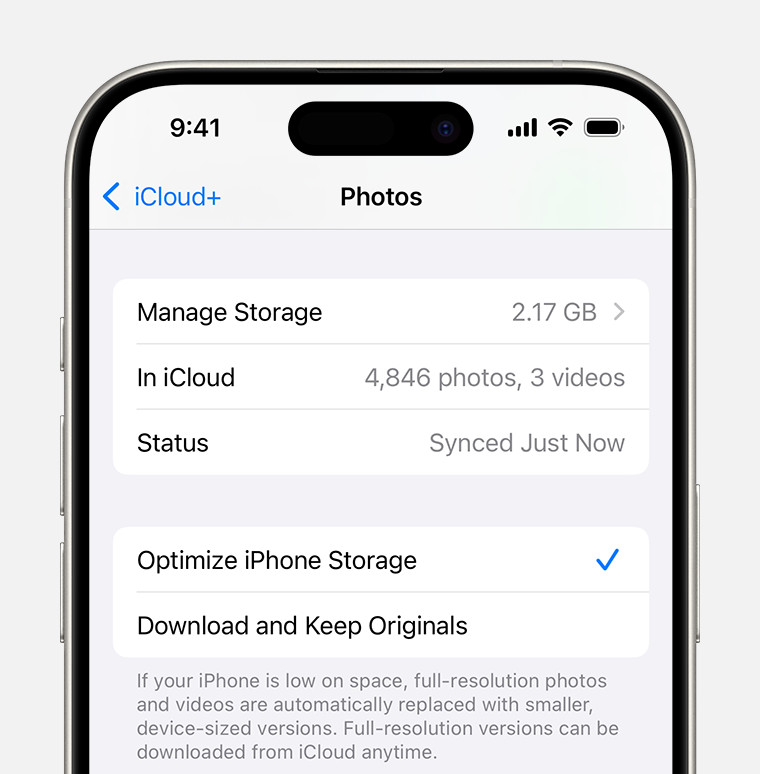 iCloud Photos section of iCloud settings showing status and photo storage options
2.2 On Mac:
- Open System Preferences: Click the Apple menu in the top-left corner of your screen and select “System Preferences”.
- Click Apple ID: If you’re using macOS Mojave or later, click “Apple ID”. In earlier versions of macOS, click “iCloud”.
- Sign In (If Necessary): Sign in with your Apple ID if you haven’t already.
- Select Photos: In the Apple ID (or iCloud) settings, check the box next to “Photos”.
- Open Photos App: Launch the Photos app on your Mac.
- Enable iCloud Photos: In the Photos app, go to “Photos” in the menu bar, then select “Preferences”. Click the “iCloud” tab and check the box next to “iCloud Photos”.
- Choose Storage Option: Similar to iOS, you can choose to “Download Originals to this Mac” or “Optimize Mac Storage”.
2.3 On Windows PC:
- Download iCloud for Windows: Download and install iCloud for Windows from the Microsoft Store.
- Open iCloud for Windows: Launch the iCloud for Windows app.
- Sign In: Sign in with your Apple ID.
- Select Photos: Check the box next to “Photos” and click “Apply”.
- Configure Options: Click the “Options” button next to “Photos” to choose the location for your iCloud Photos folder on your PC and whether to download new photos and videos to your PC.
2.4 Important Considerations During Setup
- Sufficient iCloud Storage: Ensure you have enough iCloud storage to accommodate your photo and video library. If necessary, upgrade to an iCloud+ plan.
- Stable Internet Connection: The initial synchronization process may take a significant amount of time, especially for large libraries. Connect to a stable Wi-Fi network to avoid using cellular data.
- Backup Before Enabling: As a precaution, back up your photos and videos to an external drive or another cloud service before enabling iCloud Photos.
3. Managing iCloud Storage: Tips for Optimizing Your Photo Library
Yes, managing your iCloud storage is essential. Here are some practical tips to help you optimize your photo library and make the most of your available iCloud storage. This will keep your photos safe and your storage efficient, whether you’re a pro or just love taking pictures.
3.1 Understanding iCloud Storage Plans
Apple offers several iCloud+ storage plans to suit different needs:
- 5GB: Free (insufficient for most users with extensive photo libraries)
- 50GB: $0.99 per month
- 200GB: $2.99 per month (suitable for families)
- 2TB: $9.99 per month (ideal for photographers and users with large libraries)
- 6TB: $29.99 per month
- 12TB: $59.99 per month
Consider your current and future storage needs when selecting a plan.
3.2 Identifying and Deleting Unnecessary Photos and Videos
- Review Your Library: Regularly review your photo library and identify duplicate photos, blurry shots, and unwanted videos.
- Use Smart Albums: Create smart albums in the Photos app to automatically identify potential candidates for deletion (e.g., albums for screenshots, selfies, or low-quality images).
- Delete in Batches: Delete unwanted photos and videos in batches to save time. Remember that deleted items are moved to the “Recently Deleted” album, where they remain for 30 days before being permanently removed.
- Empty “Recently Deleted”: To free up storage immediately, empty the “Recently Deleted” album.
3.3 Optimizing Photo and Video Formats
- HEIF and HEVC: If your device supports it, use HEIF (High Efficiency Image File Format) for photos and HEVC (High Efficiency Video Coding) for videos. These formats offer better compression while maintaining high image and video quality.
- Convert Large Videos: Consider converting large video files to lower resolutions or compressing them using video editing software.
- Photo Editing Apps: Use photo editing apps to optimize image sizes without significant quality loss.
3.4 Using “Optimize Storage” Feature
- Enable “Optimize Storage”: On your iPhone, iPad, and Mac, enable the “Optimize Storage” feature in iCloud Photos settings.
- How It Works: This feature automatically manages your device’s storage by keeping smaller, space-saving versions of your photos and videos on your device while the original, high-resolution versions are stored in iCloud.
- Accessing Originals: When you need to access a full-resolution photo or video, it will be downloaded from iCloud on demand.
3.5 Archiving Photos to External Drives or Other Cloud Services
- Create a Backup: Periodically back up your entire iCloud Photos library to an external drive or another cloud service (e.g., Google Photos, Dropbox) as a secondary backup.
- Download Originals: Before archiving, ensure you download the original, full-resolution versions of your photos and videos from iCloud.
- Delete from iCloud: Once you have a secure backup, you can delete older or less important photos and videos from iCloud to free up storage space.
4. Privacy and Security: Keeping Your Photos Safe in iCloud
Yes, understanding the privacy and security measures is key to protecting your photos in iCloud. Learn about encryption, two-factor authentication, and other safeguards to keep your memories secure from unauthorized access. This ensures your work and personal memories are protected.
4.1 Apple’s Security Measures for iCloud Photos
- Encryption: Apple uses strong encryption both in transit and at rest to protect your photos and videos stored in iCloud.
- Two-Factor Authentication: Enabling two-factor authentication adds an extra layer of security to your Apple ID, requiring a verification code from a trusted device when signing in on a new device.
- Data Centers: Apple’s data centers are equipped with advanced physical security measures to prevent unauthorized access.
4.2 Enabling Two-Factor Authentication for Enhanced Security
- Open Settings: On your iPhone or iPad, open the Settings app.
- Tap Your Name: Tap your name at the top of the Settings menu.
- Select Password & Security: Tap “Password & Security”.
- Turn On Two-Factor Authentication: Tap “Turn On Two-Factor Authentication” and follow the on-screen instructions.
4.3 Understanding Data Encryption in iCloud Photos
- End-to-End Encryption: While Apple uses encryption to protect your data, iCloud Photos does not use end-to-end encryption by default. This means that Apple has the keys to decrypt your data.
- Advanced Data Protection: Apple offers an “Advanced Data Protection” option, which provides end-to-end encryption for most iCloud data, including iCloud Photos. When enabled, only you can access your data, and Apple does not have the keys.
4.4 Using Advanced Data Protection for Maximum Privacy
- Eligibility: Ensure your devices are running the latest software versions (iOS 16.2, iPadOS 16.2, macOS 13.1, or later).
- Enable Advanced Data Protection:
- On your iPhone or iPad: Open Settings, tap your name, select “iCloud,” then “Advanced Data Protection,” and tap “Turn On Advanced Data Protection.”
- Follow the on-screen instructions to set up recovery contacts or a recovery key.
- Recovery Contacts and Recovery Key:
- Recovery Contacts: Choose trusted individuals who can help you regain access to your data if you lose access to your Apple ID.
- Recovery Key: Generate a 28-character recovery key that you must keep safe. If you lose access to your Apple ID and your recovery contacts are unavailable, you will need this key to recover your data.
4.5 Being Aware of Phishing and Other Security Threats
- Phishing Scams: Be cautious of phishing emails or messages that attempt to trick you into providing your Apple ID and password.
- Strong Passwords: Use strong, unique passwords for your Apple ID and other online accounts.
- Software Updates: Keep your devices and software up to date to protect against security vulnerabilities.
5. Sharing Photos with Family and Friends: iCloud Photo Sharing Explained
Yes, iCloud Photo Sharing is a fantastic way to share your photos with loved ones. Learn how to create shared albums, invite participants, and manage permissions for collaborative photo collections. This makes sharing memories easy and fun for everyone.
5.1 Creating a Shared Album in iCloud Photos
- Open Photos App: Launch the Photos app on your iPhone, iPad, or Mac.
- Tap the “+” Button:
- On iPhone/iPad: Tap the “+” button at the top-left corner of the “Albums” tab.
- On Mac: Click the “+” button in the toolbar.
- Select “New Shared Album”: Choose “New Shared Album” from the menu.
- Name Your Album: Enter a name for your shared album and tap “Next”.
- Invite People: Enter the names, email addresses, or phone numbers of the people you want to invite to the shared album. Tap “Create”.
5.2 Inviting Participants to Your Shared Album
- Adding Participants: To add more participants to an existing shared album:
- On iPhone/iPad: Open the shared album, tap the “People” icon, and tap “Invite People”.
- On Mac: Open the shared album, click the “People” icon in the toolbar, and click the “+” button.
- Sending Invitations: Invitations are sent via email or iMessage. Recipients will receive a notification and can choose to subscribe to the shared album.
5.3 Managing Permissions and Settings for Shared Albums
- Subscriber Posting:
- By default, only the album creator can add photos and videos to the shared album. To allow subscribers to contribute:
- On iPhone/iPad: Open the shared album, tap the “People” icon, and toggle “Subscriber Posting” to the ON position.
- On Mac: Open the shared album, click the “People” icon in the toolbar, and check the box next to “Subscribers Can Post”.
- By default, only the album creator can add photos and videos to the shared album. To allow subscribers to contribute:
- Notifications:
- Enable notifications to be alerted when new photos and videos are added to the shared album.
- On iPhone/iPad: Open Settings, tap “Notifications,” find “Photos,” and customize the notification settings.
- On Mac: Open System Preferences, click “Notifications,” find “Photos,” and customize the notification settings.
- Public Website:
- You can create a public website for your shared album, allowing anyone with the link to view the photos and videos.
- On iPhone/iPad: Open the shared album, tap the “People” icon, and toggle “Public Website” to the ON position.
- On Mac: Open the shared album, click the “People” icon in the toolbar, and check the box next to “Public Website”.
5.4 Adding Photos and Videos to Shared Albums
- Select Photos and Videos: In the Photos app, select the photos and videos you want to add to the shared album.
- Tap the Share Button:
- On iPhone/iPad: Tap the share button (the square with an arrow pointing up).
- On Mac: Click the share button in the toolbar.
- Choose “Add to Shared Album”: Select “Add to Shared Album” from the share sheet.
- Select the Album: Choose the shared album you want to add the photos and videos to and tap “Post”.
5.5 Viewing and Downloading Photos from Shared Albums
- Viewing: Subscribers can view photos and videos in the shared album directly in the Photos app on their iPhone, iPad, or Mac.
- Downloading: To download photos and videos from a shared album:
- On iPhone/iPad: Open the shared album, tap the photo or video, tap the share button, and choose “Save Image” or “Save Video”.
- On Mac: Open the shared album, select the photo or video, and choose “File” > “Export”.
6. Troubleshooting Common iCloud Photos Issues: Quick Fixes
Yes, it’s common to encounter issues with iCloud Photos. Here are some quick fixes for common problems, such as syncing delays, storage errors, and image quality concerns. These solutions will help you keep your photo library running smoothly.
6.1 Photos Not Syncing to iCloud
- Check Internet Connection: Ensure your device is connected to a stable Wi-Fi network.
- Sign Out and Back In: Sign out of iCloud and then sign back in on your device.
- On iPhone/iPad: Open Settings, tap your name, scroll down, and tap “Sign Out.”
- On Mac: Open System Preferences, click “Apple ID,” select “Overview,” and click “Sign Out.”
- Restart Your Device: Restart your iPhone, iPad, or Mac.
- Check iCloud Status: Visit the Apple System Status page to see if there are any known issues with iCloud Photos.
6.2 iCloud Storage Full Errors
- Upgrade Your Storage Plan: Upgrade to a larger iCloud+ storage plan if you are running out of space.
- Delete Unnecessary Photos and Videos: Review your photo library and delete duplicate photos, blurry shots, and unwanted videos.
- Empty “Recently Deleted” Album: Empty the “Recently Deleted” album to free up storage immediately.
- Optimize Storage: Enable the “Optimize Storage” feature on your devices.
6.3 Image Quality Issues
- Check Original Uploads: Ensure that your original, high-resolution photos and videos have been uploaded to iCloud.
- Download Originals: If you are using “Optimize Storage,” download the original versions of your photos and videos to your device for viewing or editing.
- Adjust Download Settings: In the Photos app preferences, adjust the download settings to ensure you are downloading the highest quality versions.
6.4 iCloud Photos Not Working on Windows PC
- Update iCloud for Windows: Ensure you have the latest version of iCloud for Windows installed.
- Check Apple ID: Verify that you are signed in to iCloud for Windows with the same Apple ID you use on your other devices.
- Restart iCloud for Windows: Restart the iCloud for Windows app.
- Reinstall iCloud for Windows: If the problem persists, uninstall and then reinstall iCloud for Windows.
6.5 Shared Album Issues
- Invitation Problems: If someone is not receiving invitations to a shared album, ensure that you have entered their email address or phone number correctly.
- Subscriber Posting: If subscribers are unable to add photos and videos to a shared album, ensure that “Subscriber Posting” is enabled.
- Notification Issues: If you are not receiving notifications for shared album activity, check your notification settings for the Photos app.
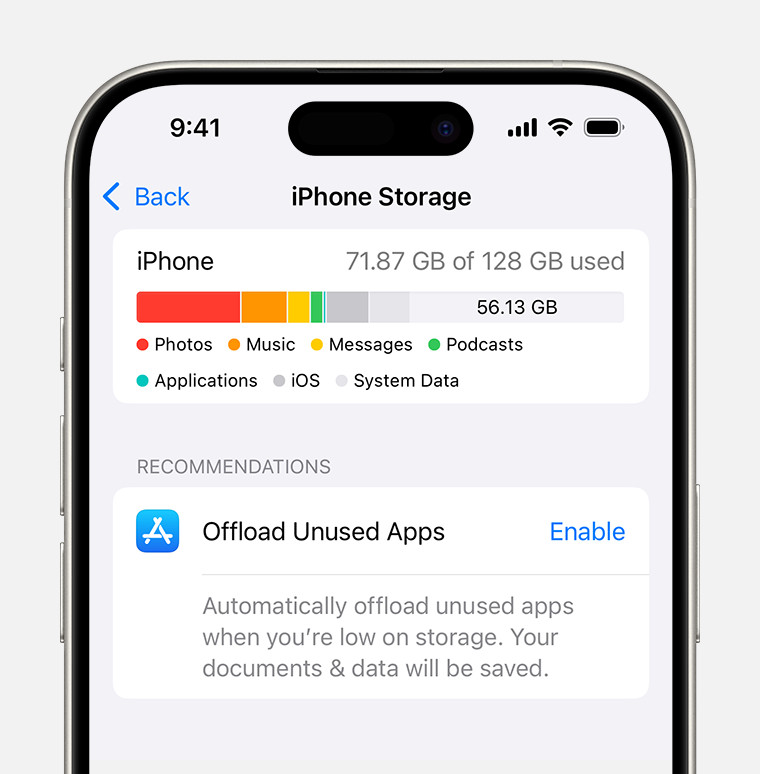 iPhone storage section of Settings displaying a recommendation to Offload Unused Apps
7. Alternatives to iCloud Photos: Exploring Other Cloud Storage Options
Yes, while iCloud Photos is a popular choice, several other cloud storage options are available. Explore alternatives like Google Photos, Dropbox, and Amazon Photos to find the best fit for your needs. Understanding these options can help you make an informed decision about where to store your photos.
7.1 Google Photos
- Free Storage: Google Photos offers 15GB of free storage, which is shared across Google Drive and Gmail.
- Storage Plans: Additional storage plans are available through Google One, starting at $1.99 per month for 100GB.
- Features: Google Photos offers automatic backup, AI-powered search and organization, and editing tools.
7.2 Dropbox
- Storage: Dropbox offers 2GB of free storage.
- Plans: Paid plans start at $11.99 per month for 2TB of storage.
- Features: Dropbox is known for its file syncing and sharing capabilities, making it a good option for users who need to collaborate on photo projects.
7.3 Amazon Photos
- Storage: Amazon Photos offers unlimited full-resolution photo storage for Amazon Prime members.
- Plans: Non-Prime members can purchase storage plans starting at $1.99 per month for 100GB.
- Features: Amazon Photos includes automatic backup, facial recognition, and the ability to order prints and photo products.
7.4 Microsoft OneDrive
- Storage: OneDrive offers 5GB of free storage.
- Plans: Paid plans start at $1.99 per month for 100GB or $6.99 per month for 1TB with Microsoft 365 Personal.
- Features: OneDrive integrates seamlessly with Windows and Microsoft Office apps, making it a good option for users who rely on these tools.
7.5 Comparing Features and Pricing
| Feature | iCloud Photos | Google Photos | Dropbox | Amazon Photos | Microsoft OneDrive |
|---|---|---|---|---|---|
| Free Storage | 5GB | 15GB | 2GB | Unlimited (Prime) | 5GB |
| Paid Plans | From $0.99/month | From $1.99/month | From $11.99/month | From $1.99/month | From $1.99/month |
| Auto Backup | Yes | Yes | Yes | Yes | Yes |
| AI Organization | Yes | Yes | No | Yes | Yes |
| Sharing | iCloud Photo Sharing | Google Photos Sharing | File Sharing | Amazon Photos Sharing | OneDrive Sharing |
| Integration | Apple Ecosystem | Google Ecosystem | Cross-Platform | Amazon Ecosystem | Windows/Microsoft Office |
7.6 Choosing the Right Cloud Storage for Your Needs
Consider the following factors when choosing a cloud storage solution:
- Storage Needs: How much storage do you need for your photo and video library?
- Budget: How much are you willing to spend on cloud storage?
- Ecosystem: How well does the cloud storage solution integrate with your existing devices and software?
- Features: What features are most important to you (e.g., automatic backup, AI organization, sharing capabilities)?
- Privacy: How comfortable are you with the privacy policies of the cloud storage provider?
8. Integrating iCloud Photos with Your Photography Workflow: Tips for Professionals
Yes, professionals can benefit greatly from integrating iCloud Photos into their workflow. Learn how to use iCloud Photos for backup, collaboration, and client proofing, optimizing your photography business. This streamlines processes and ensures your valuable work is always protected.
8.1 Using iCloud Photos for Backup and Archiving
- Automatic Backup: Set up iCloud Photos to automatically back up your photos and videos as soon as they are captured.
- Originals in the Cloud: Ensure that you are storing the original, high-resolution versions of your files in iCloud.
- Secondary Backup: Create a secondary backup of your iCloud Photos library to an external drive or another cloud service for added security.
8.2 Collaborating with Other Photographers and Editors
- Shared Albums: Use shared albums to collaborate with other photographers, editors, and assistants on photo projects.
- Subscriber Posting: Enable subscriber posting to allow collaborators to add their own photos and videos to the shared album.
- Comments and Feedback: Use the comments feature to provide feedback and discuss edits.
8.3 Client Proofing and Delivery
- Shared Albums for Clients: Create shared albums for clients to review and select their favorite photos.
- Watermarks: Add watermarks to your photos to protect your copyright.
- High-Resolution Downloads: Provide clients with high-resolution downloads of their selected photos.
8.4 Integrating with Photo Editing Software
- Access Photos from Editing Apps: Access your iCloud Photos library directly from photo editing apps like Adobe Lightroom and Affinity Photo.
- Edit in Place: Edit your photos in place without having to download them to your device.
- Sync Edits: Sync your edits back to iCloud Photos so that they are available on all your devices.
8.5 Managing Large Photo Libraries
- Organization: Use albums, folders, and keywords to organize your photo library.
- Smart Albums: Create smart albums to automatically organize photos based on criteria such as date, location, and keywords.
- Storage Management: Regularly review your photo library and delete unnecessary photos and videos to manage your iCloud storage.
9. iCloud Photos and Video Editing: A Seamless Workflow?
Yes, using iCloud Photos for video editing offers a seamless workflow. Discover how to access, edit, and sync your videos across devices, making the editing process efficient and flexible. This ensures your video projects are always up-to-date and accessible.
9.1 Accessing iCloud Videos on Different Devices
- Automatic Sync: Ensure iCloud Photos is enabled on all your devices to automatically sync your videos.
- Optimize Storage: Use the “Optimize Storage” feature to save space on your devices while keeping your videos accessible in iCloud.
- Download Originals: Download original videos to your device when you need to work on them offline or in higher resolution.
9.2 Editing Videos Directly from iCloud
- Photos App Editing: Use the built-in video editing tools in the Photos app on your iPhone, iPad, or Mac.
- Third-Party Apps: Access your iCloud videos directly from third-party video editing apps like iMovie, LumaFusion, and Adobe Premiere Rush.
- Non-Destructive Editing: Edit your videos non-destructively, so you can always revert to the original version.
9.3 Syncing Edits Across Devices
- Automatic Syncing: Edits made to your videos in the Photos app or third-party editing apps are automatically synced back to iCloud and across all your devices.
- Cloud-Based Projects: Some video editing apps offer cloud-based project syncing, allowing you to collaborate with others and work on projects from different devices.
- Version History: Keep track of different versions of your videos and revert to previous versions if needed.
9.4 Tips for Efficient Video Editing with iCloud Photos
- Organize Your Videos: Use albums and folders to organize your videos in iCloud Photos.
- Use Keywords: Add keywords to your videos to make them easier to find.
- Optimize Video Size: Compress your videos to reduce their file size without sacrificing too much quality.
- External Storage: Use external storage for large video projects to avoid filling up your iCloud storage.
- Backup Your Videos: Create a backup of your iCloud videos to an external drive or another cloud service for added security.
10. Frequently Asked Questions (FAQ) About Storing Photos in iCloud
10.1 What Happens If I Run Out of iCloud Storage?
If you run out of iCloud storage, new photos and videos will not be backed up to iCloud. You may also experience issues with syncing other iCloud data, such as documents and settings. To resolve this, you can either delete unnecessary files from iCloud or upgrade to a larger iCloud+ storage plan.
10.2 Can I Access My iCloud Photos on an Android Device?
No, there isn’t a dedicated iCloud Photos app for Android. However, you can access your iCloud Photos on an Android device by signing in to iCloud for Windows on a PC and then accessing the photos through the iCloud Photos folder.
10.3 How Do I Download All My Photos from iCloud?
To download all your photos from iCloud, you can use the following methods:
- On a Mac: Open the Photos app, select all the photos, and choose File > Export > Export Unmodified Originals.
- On a PC: Open iCloud for Windows and download the photos to your PC.
- Via iCloud.com: Sign in to iCloud.com, select the Photos app, and download the photos in batches.
10.4 Does Deleting a Photo from My iPhone Delete It from iCloud?
Yes, if you have iCloud Photos enabled, deleting a photo from your iPhone will also delete it from iCloud and all your other synced devices.
10.5 Is iCloud Photos a True Backup Solution?
While iCloud Photos provides a secure way to store and sync your photos, it is not a true backup solution. A true backup solution involves creating a separate copy of your data that is stored independently of your primary storage. It is recommended to create a secondary backup of your iCloud Photos library to an external drive or another cloud service for added security.
10.6 What Is the Difference Between “Optimize Storage” and “Download and Keep Originals”?
“Optimize Storage” saves space on your device by keeping smaller, space-saving versions of your photos and videos on your device while storing the original, high-resolution versions in iCloud. “Download and Keep Originals” downloads and stores the original, high-resolution versions of all your photos and videos on your device, which can take up a significant amount of storage space.
10.7 How Do I Stop Photos from Uploading to iCloud?
To stop photos from uploading to iCloud, you can disable iCloud Photos on your device.
- On iPhone/iPad: Open Settings, tap your name, select “iCloud,” tap “Photos,” and toggle “Sync this iPhone” to the OFF position.
- On Mac: Open System Preferences, click “Apple ID,” select “iCloud,” and uncheck the box next to “Photos.”
10.8 Can I Use iCloud Photos with Multiple Apple IDs?
No, you can only use iCloud Photos with one Apple ID at a time.
10.9 How Do I Recover Deleted Photos from iCloud?
Deleted photos and videos are moved to the “Recently Deleted” album, where they remain for 30 days. To recover deleted photos, open the “Recently Deleted” album and select the photos you want to recover.
10.10 Is There a Limit to the Number of Photos I Can Store in iCloud?
There is no limit to the number of photos you can store in iCloud, as long as you have enough storage space in your iCloud+ plan.
By understanding and implementing these strategies, you can confidently manage your photo storage in iCloud, ensuring your memories are secure, accessible, and optimized for your digital lifestyle. For more tips and tricks on mastering your photography, visit dfphoto.net. Whether you are looking to improve your skills, find inspiration, or connect with a community of fellow photographers, dfphoto.net is your go-to resource.