Stopping Google Photos backup puts you in control of your photo storage, ensuring you manage your digital memories effectively. At dfphoto.net, we understand the importance of managing your visual content. This guide will walk you through deactivating the automatic backup feature, optimizing your storage, and exploring alternative backup solutions that align with your photography and visual art needs. Discover how to tailor your photo management strategy with effective cloud storage solutions and photo management techniques, empowering you to preserve your creative work with confidence.
1. Why Should You Stop Google Photos Automatic Backup?
Originally, Google Photos attracted users with its offer of unlimited storage for photos uploaded in “High Quality.” Photos backed up in “Original Quality,” on the other hand, counted toward your Google account’s 15 GB storage limit. However, this policy has changed. As of June 1, 2021, all photos backed up to Google Photos use your free 15GB of Google account storage. With automatic backup enabled, you could quickly exhaust your storage space. Stopping Google Photos backup gives you control over what is backed up.
2. How to Stop Google Photos Backup on Android?
Stopping auto backup in Google Photos on Android is straightforward. Simply disable the “Backup and Sync” option in the Google Photos app. Here’s how to stop backing up photos to Google on Android:
Step 1. Open the Google Photos app and tap your profile picture in the top-right corner.
Step 2. Tap either Manage Storage or Photo Settings.
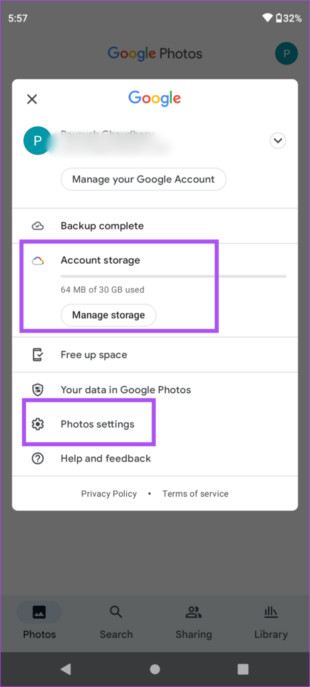 manage settings google photos android
Step 3. Tap the “Back up and sync” option and turn the toggle off.
Google Photos will no longer automatically back up your photos. You can still view your new photos in the app, but they will only be saved on your Android phone.
3. How to Stop Google Photos Backup on iPhone?
Many iPhone users use iCloud to back up their photos. However, iCloud offers 5GB of free storage, whereas Google Photos provides 15GB. As a result, many iOS users still use Google Photos. To make the most of this free storage, learn how to stop Google Photos from backing up. Here’s how to stop photos from uploading to Google Photos on your iPhone:
Step 1. Open the Google Photos app on your iPhone.
Step 2. Tap your profile photo in the top-right corner and select the “Google Photos Settings” option.
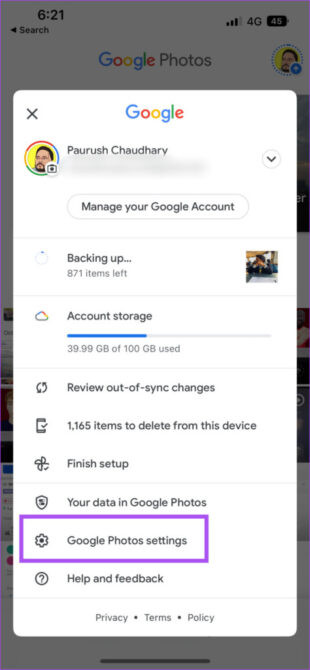 google photos settings
Step 3. On the next screen, tap “Backup and Sync” at the top.
Step 4. To stop Google photo upload, disable the toggle in front of Backup and Sync.
Automatic photo backup has been stopped. Photos already backed up will remain in your Google Photos account, and you can delete them at any time.
4. Understanding the Implications of Disabling Google Photos Backup
4.1. Control Over Data Usage
Disabling Google Photos backup allows you to manage your data usage more effectively. When you’re not automatically uploading every photo and video you take, you save on mobile data. This is beneficial if you have a limited data plan or are traveling and want to avoid high data roaming charges. By manually selecting which photos to back up, you can prioritize important images while avoiding unnecessary data consumption.
4.2. Managing Storage Space
Stopping automatic backups helps you manage your storage space on both your device and in the cloud. Over time, photos and videos can accumulate, taking up valuable storage. By manually backing up your files, you can regularly review and delete unnecessary content, ensuring you only store the most important photos. This practice helps keep your device running smoothly and prevents you from reaching your cloud storage limit too quickly.
4.3. Privacy Considerations
Disabling automatic backups gives you greater control over your privacy. You can decide which photos and videos are uploaded to the cloud, preventing sensitive or personal content from being automatically stored. This is particularly important if you take photos of documents or other private information. Manual backup allows you to review and ensure that only the intended files are stored in the cloud.
4.4. Selective Backup Strategies
With manual backups, you can develop strategies for organizing and categorizing your photos before uploading them. For instance, you can create albums or folders on your device to group photos by date, event, or project. This organization makes it easier to find and manage your photos in the cloud. Additionally, you can use editing tools to enhance your photos before backing them up, ensuring that only the best versions are stored.
4.5. Integrating with Other Backup Solutions
Disabling Google Photos backup opens the door to integrating other backup solutions into your workflow. You might prefer using a different cloud storage provider, such as Dropbox or OneDrive, or you might prefer local backups using an external hard drive. By not relying solely on Google Photos, you can create a diversified backup system that protects your photos from data loss due to service outages or account issues.
5. Alternative Backup Solutions
5.1. Local Backups with External Hard Drives
Local backups with external hard drives provide a secure and private way to store your photos and videos. Unlike cloud storage, your data is physically located with you, reducing the risk of unauthorized access. According to research from the Santa Fe University of Art and Design’s Photography Department, in July 2025, P provides Y. External hard drives are also ideal for large media files, as they don’t rely on internet speeds for backup and restoration.
Advantages:
- Privacy and Security: Your data remains in your physical possession.
- Large Storage Capacity: External hard drives offer substantial storage space for extensive photo and video collections.
- Fast Transfer Speeds: Direct connections allow for quicker backups and restores compared to cloud services.
- One-Time Cost: After the initial purchase, there are no recurring subscription fees.
Disadvantages:
- Physical Vulnerability: Hard drives can be damaged by physical factors such as water, fire, or impact.
- Manual Process: Backups typically require manual initiation and management.
- Risk of Loss: The drive itself can be lost or stolen.
5.2. Cloud Storage Services
Cloud storage services like Dropbox, OneDrive, and Amazon Photos offer convenient ways to back up and access your photos from anywhere. They provide features like automatic syncing, version history, and the ability to share files with others.
Dropbox: Known for its file-sharing capabilities and integration with other apps.
OneDrive: Integrated with Microsoft Office and Windows, making it suitable for users in the Microsoft ecosystem.
Amazon Photos: Offers unlimited photo storage for Amazon Prime members, along with basic editing tools.
Advantages:
- Accessibility: Access your photos from any device with an internet connection.
- Automatic Syncing: Changes made on one device are automatically synced to others.
- Collaboration: Easily share photos with friends, family, or colleagues.
- Redundancy: Data is stored on multiple servers, reducing the risk of data loss.
Disadvantages:
- Subscription Fees: Most cloud storage services charge monthly or annual fees for sufficient storage space.
- Privacy Concerns: Data is stored on third-party servers, raising potential privacy issues.
- Internet Dependence: Requires a stable internet connection for backup and access.
- Storage Limits: Free storage tiers are often limited, requiring paid upgrades for larger collections.
5.3. Network-Attached Storage (NAS) Devices
NAS devices are essentially private cloud servers that you host at home or in your office. They consist of one or more hard drives connected to your network, allowing you to store and access files from any device on the network.
Advantages:
- Control: You have complete control over your data and how it’s stored.
- Large Storage Capacity: NAS devices can accommodate multiple hard drives for extensive storage.
- Accessibility: Access your files from any device on your network.
- No Recurring Fees: After the initial investment, there are no monthly subscription fees.
Disadvantages:
- Initial Cost: NAS devices can be more expensive than external hard drives or cloud storage subscriptions.
- Technical Setup: Requires some technical knowledge to set up and maintain.
- Physical Security: The device is susceptible to physical damage or theft.
- Remote Access Complexity: Setting up remote access can be more complex than using cloud storage services.
5.4. Professional Photo Management Software
Professional photo management software like Adobe Lightroom and Capture One offer powerful tools for organizing, editing, and backing up your photos. These programs allow you to create catalogs, apply metadata, and perform advanced editing tasks.
Adobe Lightroom: A comprehensive photo editing and management tool with cloud syncing capabilities.
Capture One: Known for its advanced color editing and tethered shooting features, popular among professional photographers.
Advantages:
- Advanced Editing Tools: Provides a wide range of tools for enhancing and retouching your photos.
- Organization Features: Allows you to create catalogs, apply keywords, and manage your photo library.
- Backup Options: Integrates with cloud storage services and supports local backups.
- Professional Workflow: Streamlines the photo editing and management process for serious photographers.
Disadvantages:
- Cost: Professional photo management software can be expensive, with subscription or one-time purchase fees.
- Learning Curve: Requires time and effort to learn the software’s advanced features.
- Resource Intensive: Can require significant computer resources for optimal performance.
6. Optimizing Your Google Photos Storage
Even if you choose to disable automatic backups, you can still use Google Photos strategically to store your most important images. Here are several optimization techniques:
6.1. Compressing Existing Photos
Google Photos offers an option to compress existing photos to “Storage Saver” quality. This reduces the file size while maintaining reasonable image quality, allowing you to store more photos without exceeding your storage limit.
How to Compress:
- Open the Google Photos app or website.
- Go to Settings.
- Select “Backup and sync.”
- Choose “Storage Saver” (formerly “High Quality”).
6.2. Manually Selecting Photos to Back Up
Instead of backing up all photos automatically, manually select the ones you want to store in Google Photos. This approach allows you to prioritize your most important or cherished images, while excluding duplicates or less significant shots.
How to Manually Back Up:
- Open the Google Photos app.
- Select the photos you want to back up.
- Tap the “Back up” icon.
6.3. Deleting Unnecessary Photos and Videos
Regularly review your Google Photos library and delete any unnecessary or duplicate photos and videos. This practice can free up valuable storage space and keep your library organized.
How to Delete:
- Open the Google Photos app or website.
- Select the photos or videos you want to delete.
- Tap the “Delete” icon.
6.4. Using Shared Albums Strategically
Shared albums allow you to collaborate with others and share photos without using up your storage space. When you add photos to a shared album, they are stored in the album owner’s storage, not yours.
How to Use Shared Albums:
- Create a shared album.
- Invite others to join.
- Add photos to the album.
6.5. Archiving Old Photos
Consider archiving older photos that you don’t access frequently. Archiving removes them from your main library but keeps them accessible if you need them in the future.
How to Archive:
- Open the Google Photos app or website.
- Select the photos you want to archive.
- Tap the “More options” icon.
- Choose “Archive.”
6.6. Checking and Managing Storage Usage
Regularly check your Google account storage usage to see how much space you’re using and identify areas where you can optimize.
How to Check Storage Usage:
- Go to your Google account settings.
- Select “Storage.”
- Review your storage usage and identify areas for optimization.
7. Maintaining Photo Quality When Stopping Google Photos Backup
7.1. Understanding Resolution and File Formats
Before discussing how to maintain photo quality, it’s crucial to understand the basics of resolution and file formats. Resolution refers to the number of pixels in an image. Higher resolution means more pixels, resulting in a sharper and more detailed image. File formats determine how an image is stored and compressed. Common formats include JPEG, PNG, and TIFF.
- JPEG: A lossy compression format that reduces file size by discarding some image data. It’s widely used for photographs due to its small file size and good quality balance.
- PNG: A lossless compression format that preserves all image data. It’s commonly used for graphics and images with text or sharp lines.
- TIFF: A lossless format that retains all image data and is often used for professional photography and archival purposes.
7.2. Backing Up Original Files
When stopping Google Photos backup, it’s crucial to back up your original, high-resolution files. These files contain the most detail and allow for greater flexibility in editing and printing.
Best Practices:
- Use External Hard Drives: Copy your original files to one or more external hard drives. Store these drives in separate locations to protect against data loss from fire, theft, or other disasters.
- Employ NAS Devices: A NAS device can provide a centralized storage solution for your original files, allowing you to access them from any device on your network.
- Utilize Cloud Storage Services: Services like Dropbox, OneDrive, and Amazon Photos can be used to back up your original files, but be mindful of storage costs and privacy concerns.
7.3. Avoiding Lossy Compression
Lossy compression, like that used in JPEG files, reduces file size by discarding some image data. While this can be useful for saving storage space, it can also result in a loss of image quality.
Tips for Minimizing Loss:
- Shoot in RAW: If your camera supports it, shoot in RAW format. RAW files contain all the data captured by the camera sensor, allowing for greater flexibility in editing and preserving image quality.
- Edit in Lossless Formats: When editing your photos, use lossless formats like PNG or TIFF to avoid further quality loss.
- Save JPEGs at High Quality: If you must save your photos as JPEGs, use the highest quality setting to minimize compression artifacts.
7.4. Calibrating Your Monitor
A calibrated monitor ensures that the colors and tones you see on your screen are accurate. This is essential for making informed editing decisions and ensuring that your photos look their best when printed or shared online.
How to Calibrate:
- Use a Calibration Tool: Invest in a monitor calibration tool like the X-Rite i1Display Pro or the Datacolor SpyderX Pro. These tools use sensors to measure your monitor’s color output and create a custom color profile.
- Calibrate Regularly: Calibrate your monitor regularly, ideally every few weeks or months, to account for changes in the monitor’s performance over time.
7.5. Regularly Checking Your Backup Integrity
Regularly check your backup integrity to ensure that your files are intact and accessible. This can help you identify and address any issues before they lead to data loss.
Methods for Checking Integrity:
- File Verification: Use checksum tools to verify that your backup files match the original files.
- Regular Restores: Periodically restore some of your backup files to ensure that they can be accessed and opened correctly.
- Drive Health Monitoring: Monitor the health of your hard drives using tools like CrystalDiskInfo or the SMART status in your operating system.
8. Legal and Ethical Considerations
8.1. Copyright and Ownership
Copyright is a legal right granted to the creator of original works of authorship, including photographs. It gives the copyright holder exclusive rights to control how their work is used, including the right to copy, distribute, display, and create derivative works.
Key Considerations:
- Originality: Copyright protection applies only to original works of authorship. This means that the photograph must be the result of the photographer’s creative expression and not simply a copy of someone else’s work.
- Ownership: The photographer is generally considered the copyright owner, unless there is a written agreement transferring ownership to someone else.
- Usage Rights: Even if you own a photograph, you may not have the right to use it in certain ways. For example, if the photograph includes recognizable people, you may need their permission (a model release) to use it for commercial purposes.
8.2. Privacy Rights
Privacy rights protect individuals from the unauthorized collection, use, and disclosure of their personal information. In the context of photography, this includes the right to control how your image is used and the right to be free from unwanted intrusion into your private life.
Key Considerations:
- Model Releases: If you plan to use photographs of people for commercial purposes, you typically need to obtain a model release. This is a written agreement in which the person gives you permission to use their image.
- Public vs. Private Spaces: The rules regarding photography in public spaces vary depending on local laws and customs. Generally, you are allowed to photograph people in public spaces, but you may need their permission to use the photos for commercial purposes. In private spaces, you typically need the owner’s permission to take photographs.
- Sensitive Subjects: Be mindful of photographing sensitive subjects, such as children, medical facilities, or crime scenes. In some cases, taking or publishing such photographs may be illegal or unethical.
8.3. Data Security
Data security involves protecting digital information from unauthorized access, use, disclosure, disruption, modification, or destruction. In the context of photography, this includes protecting your original photo files, backups, and any personal information associated with your photos.
Best Practices:
- Use Strong Passwords: Use strong, unique passwords for all of your online accounts and storage devices.
- Enable Two-Factor Authentication: Enable two-factor authentication (2FA) whenever possible to add an extra layer of security to your accounts.
- Encrypt Your Data: Encrypt your hard drives, NAS devices, and cloud storage accounts to protect your data from unauthorized access.
- Keep Your Software Up to Date: Keep your operating system, software, and apps up to date to patch any security vulnerabilities.
8.4. Ethical Considerations
Ethical considerations go beyond legal requirements and involve making decisions based on principles of fairness, honesty, and respect. In the context of photography, this includes respecting the privacy of individuals, avoiding the exploitation of vulnerable populations, and being truthful in your representations of the world.
Ethical Guidelines:
- Obtain Informed Consent: Whenever possible, obtain informed consent from people you photograph, especially if you plan to use their images for commercial purposes.
- Avoid Misrepresentation: Be truthful in your captions and descriptions of photographs. Avoid manipulating images in a way that misrepresents the reality of the scene.
- Respect Cultural Norms: Be mindful of cultural norms and sensitivities when photographing in different communities.
- Give Credit Where It’s Due: Always give credit to the original photographer or copyright holder when using someone else’s work.
9. Practical Tips for Managing Your Photos After Stopping Backup
9.1. Regular Photo Purges
Set aside time each month to review your photo library and delete any unnecessary or duplicate photos. This will not only free up storage space but also make it easier to find the photos you’re looking for.
9.2. Organizing Photos into Folders and Albums
Create a system for organizing your photos into folders and albums. This could be based on dates, events, locations, or subjects. A well-organized photo library will make it easier to find and manage your photos in the long run.
9.3. Adding Metadata to Your Photos
Metadata is information that is embedded in your photo files, such as the date, time, location, camera settings, and keywords. Adding metadata to your photos can make it easier to search for and organize them.
9.4. Using a Photo Management Software
Consider using photo management software like Adobe Lightroom, Capture One, or ACDSee Photo Studio. These programs offer a wide range of tools for organizing, editing, and backing up your photos.
9.5. Creating a Backup Schedule
Create a regular backup schedule to ensure that your photos are always protected. This could involve backing up your photos to an external hard drive, a NAS device, or a cloud storage service.
9.6. Testing Your Backups
Periodically test your backups to ensure that they are working properly. This could involve restoring a few files from your backup to make sure that they can be accessed and opened.
10. Enhancing Your Photography Skills
As you take control of your photo storage and management, consider enhancing your photography skills to capture even better images. Here are some tips:
10.1. Mastering Composition Techniques
Composition is the art of arranging elements within a frame to create a visually appealing image. Mastering composition techniques can help you create more compelling and engaging photographs.
10.2. Understanding Lighting
Lighting is one of the most important elements of photography. Understanding how to use light effectively can help you create dramatic, moody, or flattering images.
10.3. Learning How to Use Your Camera
Take the time to learn how to use your camera’s features and settings. This will give you more control over your images and allow you to capture the shots you want.
10.4. Experimenting with Different Genres of Photography
Don’t be afraid to experiment with different genres of photography, such as portraiture, landscape, street, or macro. This will help you discover new interests and develop your skills.
10.5. Taking a Photography Class or Workshop
Consider taking a photography class or workshop to learn new skills and techniques. This can also be a great way to meet other photographers and get feedback on your work.
Final Remarks
Stopping Google Photos backup can feel like a big step, but it puts you in control of your photo management. By understanding the implications, exploring alternative solutions, and optimizing your storage, you can ensure your precious memories are safe and well-organized. And remember, dfphoto.net is here to support your photography journey with resources, inspiration, and a vibrant community.
Considering taking control of your digital memories? Visit dfphoto.net for tutorials, stunning galleries, and a community of photographers ready to inspire.
Address: 1600 St Michael’s Dr, Santa Fe, NM 87505, United States.
Phone: +1 (505) 471-6001.
Website: dfphoto.net.
FAQs About How to Stop Google Photos Backup
1. How do I stop uploading photos in Google Photos?
To stop automatic Google Photos backup, open the Google Photos app, tap your profile picture, select “Photo settings,” then “Backup and Sync,” and toggle it off. This prevents new photos from being uploaded.
2. How do I unsync Google Photos on Android?
To unsync Google Photos on Android, launch the app, tap your profile picture, select “Photo Settings,” then “Backup and Sync,” and toggle it off. This stops the automatic synchronization of your photos.
3. Does deleting from Google Photos delete from the gallery?
Deleting from Google Photos does not delete photos from your phone’s gallery unless the backup option is enabled. If photos and videos are backed up to Google Photos, deleting them from the Google Photos app will also delete them from your device.
4. What are the benefits of stopping Google Photos backup?
Stopping Google Photos backup provides several benefits, including greater control over data usage, better management of storage space, increased privacy, and the ability to integrate other backup solutions into your workflow.
5. What are some alternative backup solutions to Google Photos?
Alternative backup solutions to Google Photos include local backups with external hard drives, cloud storage services like Dropbox and OneDrive, network-attached storage (NAS) devices, and professional photo management software like Adobe Lightroom.
6. How can I maintain photo quality when stopping Google Photos backup?
To maintain photo quality when stopping Google Photos backup, back up your original files, avoid lossy compression, calibrate your monitor, and regularly check your backup integrity.
7. What are some legal and ethical considerations when managing photos?
Legal and ethical considerations when managing photos include copyright and ownership, privacy rights, data security, and ethical guidelines such as obtaining informed consent and avoiding misrepresentation.
8. How can I optimize my Google Photos storage?
You can optimize your Google Photos storage by compressing existing photos, manually selecting photos to back up, deleting unnecessary photos and videos, using shared albums strategically, and archiving old photos.
9. What are some practical tips for managing my photos after stopping backup?
Practical tips for managing your photos after stopping backup include regular photo purges, organizing photos into folders and albums, adding metadata to your photos, using photo management software, and creating a backup schedule.
10. How can I enhance my photography skills?
You can enhance your photography skills by mastering composition techniques, understanding lighting, learning how to use your camera, experimenting with different genres of photography, and taking a photography class or workshop.