While instant messaging and social media platforms have surged in popularity, email remains a fundamental tool for online communication. It’s still widely used for many purposes, but it wasn’t originally designed to handle large multimedia files, especially high-resolution photos. If you’ve ever tried sending a bunch of pictures via email, you might have faced issues like messages bouncing back, uploads failing, or exceeding attachment limits. This problem is only getting more pronounced as cameras and smartphones produce ever-larger image files.
This guide will walk you through the steps to successfully send photos via email, even large collections, while avoiding common pitfalls. We’ll assume you have a collection of images, perhaps from a digital camera’s memory card. These tips apply to photos from any source, including iPhones, Android phones, or tablets. However, for managing a large number of images, it’s generally easier to work on a laptop or desktop computer rather than a mobile device.
1. Check the Total File Size of Your Photos
Before you attempt to send anything, it’s crucial to know the total size of the photos you’re dealing with. Start by gathering all the photos you want to email into a single folder on your computer. If you’re selecting specific photos from a larger group, create a temporary folder and copy just those photos into it for easier management.
Now, let’s determine the total size. On Windows, select all files in the folder (press Ctrl+A in File Explorer), right-click on the selection, and choose “Properties”. For macOS, you can find instructions here on how to check the total size.
Make a note of the combined size, usually displayed in MB (Megabytes) or GB (Gigabytes). This is important because email providers have attachment size limits, and knowing the size will help you estimate upload time in the next step.
2. Estimate Upload Time
If you are on a slower internet connection, particularly a mobile connection, understanding how long uploading will take can be helpful. You can estimate this using an upload time calculator. First, test your upload speed using a service like speedtest.net.
Once you know your upload speed, you can use a calculator (many are available online, or you can find simple formulas) to estimate upload time. Simply enter the total file size (in MB) and your upload speed.
Keep in mind that this calculation assumes you are using an internet-based email service like Gmail or Yahoo Mail. If you are using a local network mail system, like in a corporate environment, upload speeds are usually significantly faster.
If the estimated upload time seems too long, the next step will help reduce it.
3. Reduce Photo Size if Necessary
Unless you intend the recipient to print the photos at a large size, sending them at their original, full resolution is often unnecessary. Reducing the photo dimensions can significantly decrease file size without noticeably compromising quality for screen viewing. In fact, sometimes reducing dimensions can even make photos appear sharper, as some cameras use interpolation to artificially increase resolution.
Reducing photo dimensions dramatically cuts down file size and, consequently, upload times. You can often expect the file size to be reduced to less than half the original, and potentially up to ten times smaller if the original photos were saved at unnecessarily high quality settings.
To efficiently resize multiple images, you’ll need batch photo resizing software.
Important Note: It’s highly recommended to work on copies of your original photos when batch resizing. This ensures you always have the original, high-resolution files if anything goes wrong during the resizing process.
Windows: IrfanView is a free and excellent option for batch photo resizing on Windows. After installing IrfanView, go to “File” > “Batch conversion/rename”. In the window that appears, select the image files from the file browser on the top right and click “Add” to add them to the processing list. (Note: There may be a minor bug where the “Add” button doesn’t work with a single file selected; if this happens, double-click the file to add it).
Next, check the “Use advanced options” box and click the “Advanced” button beside it. In the advanced options dialog, check the “Resize” box. In the “Set new size as percentage of original” boxes, enter “50%” (this will resize both width and height to 50% of the original). Click “OK” in the Advanced settings to return to the Batch Conversion window.
Finally, check the “Output directory for result files” option to specify where the resized images should be saved. Change it if needed. Click “Start Batch” to begin the resizing process.
Mac: macOS users can easily resize images using the built-in Preview app. Detailed instructions are available here. When resizing in Preview, choose to resize by “percent” rather than “pixels” for more consistent results across different image sizes.
Chromebook: Batch image resizing on Chromebooks is somewhat limited. However, you can try the free Chrome extension “Bulk Resize Photos” from the Chrome Web Store.
4. Combine Photos into a Single File (ZIP)
If you’re sending more than a few photos (say, 5 or 6), it’s much more efficient to send them as a single archived file, typically a ZIP file.
Creating a ZIP archive simplifies sending multiple files and can sometimes slightly reduce the overall file size through compression.
For creating ZIP files on Windows, 7-Zip is a free and highly recommended tool. After installing 7-Zip, select all the photos you want to include, right-click on the selection, and choose “7-Zip” > “Add to archive…”. This will create a single .zip file containing all your photos.
On macOS, select the files, Control-click (or right-click), and choose “Compress [number] items”. For Chromebooks, instructions for creating ZIP files are available here.
If you resized your images in the previous step, double-check that you are selecting the smaller, resized versions when creating the ZIP archive, unless you need to send both versions.
Creating a ZIP file doesn’t drastically reduce file size for images, as image files (like JPEGs) are already compressed. However, it’s still beneficial to have all photos in one easily manageable file for sending and downloading.
5. Send Your Photos via Email
Now you’re ready to send your photos. The traditional way is to attach files directly to your email. However, email attachments have size limitations. Think of email servers like postal services with limited space for packages.
Due to storage and bandwidth constraints, email providers impose limits on the maximum size of attachments you can send and receive. For most popular email services, this limit is around 25MB per message for both sending and receiving.
25MB can be restrictive for photos and videos. To overcome this, email providers offer an alternative: uploading large files to their online storage services (like Google Drive or OneDrive) and then inserting a link to the file in your email. Since only the link is sent within the email, not the actual file, you can share much larger files, often hundreds of megabytes or even gigabytes.
Delivery Failures
Even if your email provider (like Gmail) allows sending up to 25MB attachments, recipient email services might have stricter incoming limits. This is especially common with corporate or business email addresses.
If your email exceeds the recipient’s attachment size limit, you’ll usually receive an automated error message from their mail system. This only means delivery failed to that specific address. If you sent the email to multiple recipients, others may have received it successfully, and you don’t need to resend to them.
In case of delivery failure due to size limits, try sending the file using Google Drive, Dropbox, or OneDrive link sharing, as described below.
Let’s look at how to attach your ZIP archive (or individual photos if they are small enough) and use cloud services in popular email providers:
Gmail
- Start a new email in Gmail and click the paperclip icon to “Attach files”. If your file is 25MB or smaller, it will attach directly to the email.
- If your file is larger than 25MB, Gmail will automatically offer to send it using Google Drive. Google Drive allows files up to 10GB (10,000MB).
- If using Google Drive, you’ll be prompted to upload the file. Click the “Upload” tab and select your file if necessary. Then click the blue “Upload” button.
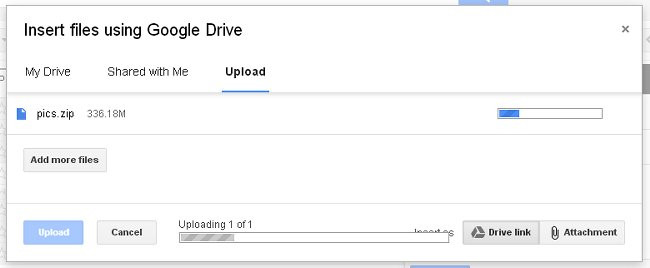 Gmail Google Drive Upload
- Keep the browser tab open during upload, although you can switch to another tab or window as the upload continues in the background.
- Once the upload is complete (especially when using Google Drive), Gmail may ask about sharing permissions. The default “Share & Send” option is usually fine. This means the recipient can view the file in your Google Drive storage, but not other files unless you’ve explicitly shared them previously. Recipients don’t need a Gmail or Google account to access the file through the link. However, be aware that anyone who gets the email (including through forwarding) can access the file link.
- The “Send without sharing” option requires recipients to request access to the file. This can be useful when sending to a group but wanting to control access on a request basis. Recipients will need a Google account (not necessarily Gmail) to request access.
Gmail also offers a slightly confusing “Attachment” option for files already in Google Drive, alongside the “Drive link” option. The “Attachment” option is less useful for files not already in Drive, as you can directly attach files via the paperclip icon. However, if you regularly use Google Drive for storage (e.g., Chromebook users), this might be convenient if you want the file to remain associated with the email, unlike files that might be deleted from Google Drive later, potentially breaking shared links.
Outlook.com (Hotmail)
- In Outlook.com, create a new email and click “Insert” from the top menu.
- If your total file size is under 25MB, choose “Files as attachments” and upload your file.
- For files larger than 25MB, Outlook.com will prompt you to use OneDrive, Microsoft’s cloud storage service. The integration is slightly less seamless than Gmail’s Google Drive integration. You’ll be redirected to OneDrive to upload the file.
- After uploading to OneDrive, you’ll need to return to your Outlook.com email, click “Insert” again, and then select “Share from OneDrive”. Choose the file to include a OneDrive link in your email.
Recipients of OneDrive links don’t need a OneDrive account to view or download the files.
Yahoo Mail
- While Yahoo Mail was reported to have removed attachment limits, this isn’t entirely accurate. For files exceeding 25MB, Yahoo Mail prompts you to use Dropbox for storage before sending the email.
- This works similarly to Google Drive and OneDrive. You upload your file to Dropbox, and a link is inserted into your email. Recipients can access the file via the link without necessarily needing a Dropbox account. You can manage your files in Dropbox as a separate virtual drive or folder on your computer.
Alternatives to Email for Sending Photos
While email is universally accessible, dedicated file-sharing methods can be better for frequent photo sharing, especially with the same people.
- Social Networks and Photo Sharing Sites: Platforms like Facebook, Google Photos, Flickr, and Instagram allow you to create photo albums and control sharing permissions. These are ideal for social sharing over time rather than sending large batches of photos at once.
- Messaging Services: Services like Skype can transfer files, but often require both sender and receiver to be online simultaneously.
- Cloud Storage Services (Outside of Email): Services like Google Drive, Microsoft OneDrive, Apple iCloud Photo Sharing, and Dropbox are designed for easy file access and sharing. They become very efficient when both parties utilize their full capabilities, such as installing client programs for synchronized folders.
Image Credits: Waterfall photo courtesy of Gareth Thomas (Creative Commons 2.0 BY-ND license). Microsoft Outlook icon courtesy dAKirby309.