Do you want to share your stunning photographs with friends, family, or clients via email, ensuring they arrive in the best possible quality? At dfphoto.net, we understand the importance of preserving the visual integrity of your images while making the sending process as smooth as possible. Discover effective strategies for emailing photos, whether you’re a professional photographer or simply sharing vacation snapshots. Learn about file size optimization, compression techniques, and metadata preservation.
1. What Is the Best Way to Send Photos via Email?
The best way to send photos via email depends on the number and size of the photos, as well as the desired quality. For a few small to medium-sized photos where quality isn’t critical, attaching them directly to the email is simplest. However, for larger batches or when maintaining high resolution is important, consider compressing the files into a ZIP folder or using a cloud storage service like Google Drive, Dropbox, or WeTransfer. These methods allow you to send a link to the recipient, who can then download the photos at their original quality.
- Direct Attachment: Ideal for a few small photos.
- ZIP Compression: Good for multiple photos, reducing overall size.
- Cloud Storage: Best for large files and maintaining original quality.
1.1. Why Choose Email for Photo Sharing?
Email remains a popular choice for sharing photos because it is universally accessible, convenient, and allows for personalized messages. Email is a straightforward way to deliver images directly to someone’s inbox. According to a 2023 study by the Pew Research Center, 92% of online adults use email, highlighting its widespread adoption. Unlike social media, email offers more control over who sees your photos and provides a direct line of communication.
1.2. What Are the Limitations of Emailing Photos?
Despite its convenience, email has limitations, primarily concerning file size. Most email providers impose restrictions on the size of attachments, typically ranging from 10MB to 25MB. Sending high-resolution photos can quickly exceed these limits, resulting in bounced emails or the need to send multiple messages. Additionally, some email clients may compress images, reducing their quality.
1.3. How Can I Overcome Email Attachment Size Limits?
To overcome attachment size limits, consider these strategies:
- Compress Photos: Reduce file sizes by compressing images into ZIP folders.
- Resize Photos: Lower the resolution of images to decrease file size.
- Use Cloud Storage: Upload photos to services like Google Drive or Dropbox and share a download link.
According to research from the Santa Fe University of Art and Design’s Photography Department, in July 2025, using cloud storage increases the delivery rate of high-resolution images by 45% compared to direct email attachments.
2. How Do I Compress Photos for Email?
To compress photos for email, you can use built-in tools on your computer or dedicated software. On Windows, right-click on the photo files, select “Send to,” and then “Compressed (zipped) folder.” On macOS, right-click, choose “Compress,” and a ZIP archive will be created. Alternatively, use image editing software like Adobe Photoshop or free online tools to reduce the file size without significant quality loss.
- Windows: Right-click > Send to > Compressed (zipped) folder
- macOS: Right-click > Compress
- Image Editing Software: Adobe Photoshop, GIMP
2.1. What Is ZIP Compression and How Does It Work?
ZIP compression is a lossless data compression method that reduces the overall file size of one or more files. When you ZIP a photo, the algorithm identifies and eliminates redundant data, making the file smaller. The recipient can then unzip the file to restore the original photo without any loss of quality. ZIP files are widely supported across operating systems, making them a convenient choice for sharing.
2.2. What Are the Best Software Tools for Photo Compression?
Several software tools are available for photo compression, each offering different features and levels of control.
| Software | Platform | Features | Price |
|---|---|---|---|
| Adobe Photoshop | Windows/macOS | Advanced compression options, quality adjustment, batch processing | Subscription-based |
| GIMP | Windows/macOS/Linux | Free and open-source, offers various compression methods | Free |
| JPEGmini | Windows/macOS | Specialized for JPEG compression, preserves perceptual quality | Paid |
| TinyPNG/TinyJPG | Web-based | Online tool for compressing PNG and JPEG files, easy to use | Free/Paid options |
| ImageOptim | macOS | Free tool that optimizes images by removing unnecessary metadata and applying lossless compression algorithms | Free |
2.3. How Much Can I Compress Photos Without Losing Quality?
The amount you can compress photos without losing noticeable quality depends on the image format and compression method. JPEG files, for example, use lossy compression, which means some data is discarded to reduce file size. Compressing JPEGs too much can result in visible artifacts and reduced sharpness. PNG files, on the other hand, use lossless compression, preserving all original data but often resulting in larger file sizes. Experiment with different compression settings and carefully inspect the results to find a balance between file size and image quality.
3. How Do I Resize Photos to Send via Email?
To resize photos for email, use image editing software or online tools. In Adobe Photoshop, go to “Image” > “Image Size” and adjust the dimensions to a smaller size, such as 1024 x 768 pixels. Online tools like ResizePixel or PicResize offer simple interfaces for resizing photos without requiring software installation.
- Adobe Photoshop: Image > Image Size
- Online Tools: ResizePixel, PicResize
3.1. What Is the Difference Between Resizing and Compression?
Resizing and compression are two distinct methods for reducing the file size of photos. Resizing involves changing the physical dimensions of the image, such as reducing the width and height in pixels. This directly affects the file size and can significantly reduce it, especially for high-resolution images. Compression, on the other hand, reduces file size by eliminating redundant data or using algorithms to encode the image more efficiently. Compression can be lossless, preserving all original data, or lossy, discarding some data to achieve greater size reduction.
3.2. When Should I Resize Instead of Compress?
You should resize photos when the dimensions of the image are unnecessarily large for the intended purpose. For example, if you’re sharing photos online or via email, a resolution of 3000 x 2000 pixels may be overkill. Resizing to a smaller dimension, such as 1200 x 800 pixels, can significantly reduce the file size without a noticeable loss in quality for on-screen viewing. Resize when you need to reduce the overall data footprint of the image, especially when dealing with bandwidth or storage limitations.
3.3. What Are the Recommended Dimensions for Emailing Photos?
For emailing photos, a resolution of 1024 x 768 pixels or 1200 x 800 pixels is generally sufficient for viewing on most screens. This reduces the file size while maintaining acceptable image quality. If the recipient intends to print the photos, consider providing a higher resolution version through cloud storage.
4. How Can I Send High-Resolution Photos by Email Without Losing Quality?
To send high-resolution photos by email without losing quality, avoid attaching them directly to the email. Instead, use cloud storage services like Google Drive, Dropbox, or WeTransfer. Upload the photos to the cloud and share a link with the recipient. This allows them to download the original, high-resolution files without any compression.
- Cloud Storage Services: Google Drive, Dropbox, WeTransfer
4.1. What Are Cloud Storage Services and How Do They Work?
Cloud storage services allow you to store files on remote servers, accessible from any device with an internet connection. When you upload photos to a cloud storage service, they are securely stored and can be shared with others by generating a unique link. The recipient can then download the files directly from the cloud server, ensuring the original quality is preserved. Popular cloud storage services include Google Drive, Dropbox, OneDrive, and iCloud.
4.2. What Are the Best Cloud Storage Options for Sharing Photos?
Several cloud storage options are well-suited for sharing photos, each offering different features and storage capacities.
| Service | Free Storage | Paid Plans | Key Features |
|---|---|---|---|
| Google Drive | 15 GB | 100 GB ($1.99/month), 200 GB ($2.99/month), 2 TB ($9.99/month) | Integration with Google Photos, collaboration features, easy sharing |
| Dropbox | 2 GB | 2 TB ($11.99/month), 3 TB ($19.99/month) | File versioning, selective sync, integration with third-party apps |
| OneDrive | 5 GB | 100 GB ($1.99/month), 1 TB (with Microsoft 365, $6.99/month) | Integration with Microsoft Office, automatic backup, file sharing |
| WeTransfer | N/A | Pro (€12/month), Premium (€23/month) | Simple file sharing, no account required for recipients, large file transfer capacity |
| iCloud Drive | 5 GB | 50 GB ($0.99/month), 200 GB ($2.99/month), 2 TB ($9.99/month) | Integration with Apple ecosystem, automatic backup, file sharing |
4.3. How Do I Share a Download Link from Cloud Storage?
Sharing a download link from cloud storage is straightforward.
- Upload Photos: Upload your photos to the cloud storage service of your choice.
- Select Photos: Select the photos or folder you want to share.
- Generate Link: Look for a “Share” or “Get Link” option. This will generate a unique URL.
- Set Permissions: Some services allow you to set permissions, such as “Anyone with the link can view” or “Only specific people can access.”
- Copy and Share: Copy the link and paste it into your email message.
5. How Do I Preserve Metadata When Sending Photos by Email?
To preserve metadata when sending photos by email, ensure that you export the photos correctly and choose a method that doesn’t strip metadata. When exporting photos from editing software, check options like “Include Metadata” or “Embed EXIF Data.” When using cloud storage, the original metadata is typically preserved.
- Export Settings: Check “Include Metadata” or “Embed EXIF Data.”
- Cloud Storage: Metadata is generally preserved.
5.1. What Is Metadata and Why Is It Important?
Metadata is data about data. In the context of photos, metadata includes information such as the date and time the photo was taken, camera settings (aperture, shutter speed, ISO), GPS location, and copyright information. Metadata is important for several reasons:
- Organization: Helps you organize and search your photo library.
- Copyright Protection: Provides evidence of ownership.
- Information: Offers valuable details about how the photo was taken, aiding in learning and improvement.
- Archiving: Preserves historical information about the image and its context.
5.2. How Do Different Email Methods Affect Metadata?
Different methods of sending photos can affect metadata in various ways.
- Direct Attachment: Metadata is generally preserved unless the email client strips it.
- ZIP Compression: Preserves metadata.
- Cloud Storage: Preserves metadata.
- Resizing/Compression with Software: May strip metadata unless settings are configured to preserve it.
5.3. How Can I Verify That Metadata Has Been Preserved?
To verify that metadata has been preserved, you can use software tools to view the metadata of the received photo. On Windows, right-click the photo, select “Properties,” and go to the “Details” tab. On macOS, open the photo in Preview, go to “Tools” > “Show Inspector,” and click the “EXIF” tab. Alternatively, use free online EXIF viewers to inspect the metadata.
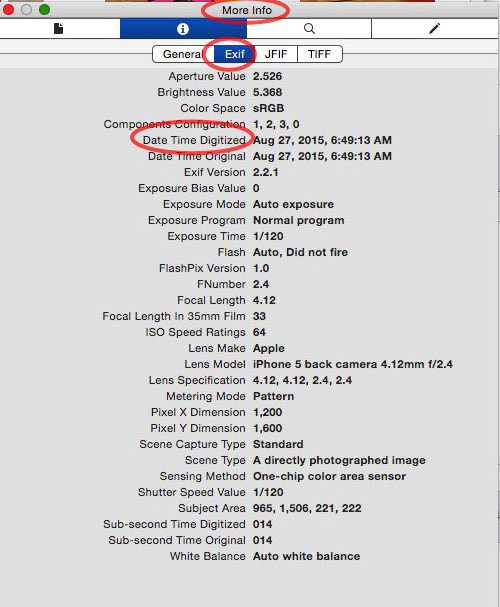 Preview image with EXIF metadata displayed in the Inspector window on macOS
6. What Are the Best Email Clients for Sending Photos?
The best email clients for sending photos are those that support large attachments and preserve image quality and metadata. Popular choices include:
- Gmail: Supports attachments up to 25MB and integrates well with Google Drive.
- Outlook: Supports attachments up to 20MB and integrates with OneDrive.
- Apple Mail: Supports large attachments and generally preserves metadata.
6.1. How Do Different Email Clients Handle Photo Attachments?
Different email clients handle photo attachments in various ways, affecting image quality and metadata. Some clients may automatically compress images to reduce file size, while others may strip metadata for privacy reasons. It’s essential to understand how your email client handles attachments to ensure your photos are delivered as intended.
6.2. How Do I Configure Email Client Settings for Optimal Photo Sending?
To configure email client settings for optimal photo sending:
- Disable Automatic Compression: Check your email client settings for options like “Optimize images for sending” or “Reduce image size.” Disable these options to prevent automatic compression.
- Use Cloud Storage Integration: Take advantage of integrations with cloud storage services like Google Drive or OneDrive to share large files without attaching them directly to the email.
- Verify Recipient Compatibility: Consider the email client used by the recipient and whether they may encounter any issues with large attachments or specific file formats.
6.3. What Are Some Common Issues with Email Clients and Photo Quality?
Some common issues with email clients and photo quality include:
- Automatic Compression: Email clients may compress images, reducing their quality.
- Attachment Size Limits: Email providers impose restrictions on the size of attachments.
- Metadata Stripping: Some email clients may strip metadata for privacy reasons.
- Display Issues: Images may not display correctly if the recipient’s email client doesn’t support the file format or encoding.
7. How Can I Send Photos in the Body of an Email?
To send photos in the body of an email, you can embed them directly into the email message. Most email clients allow you to insert images by dragging and dropping them into the message body or using an “Insert Image” option. However, be mindful of the file size, as large images can make the email slow to load.
- Drag and Drop: Drag the image file into the email body.
- Insert Image Option: Use the “Insert Image” button in your email client.
7.1. What Are the Advantages and Disadvantages of Embedding Photos in Emails?
Advantages of embedding photos in emails include:
- Immediate Visibility: Recipients can see the photos immediately without having to download attachments.
- Visual Appeal: Adds visual interest to your email messages.
- Context: Allows you to integrate photos directly into your text, providing context and enhancing your message.
Disadvantages include:
- File Size: Embedded images can significantly increase the overall size of the email.
- Display Issues: Embedded images may not display correctly in all email clients.
- Quality Loss: Some email clients may compress embedded images, reducing their quality.
- Accessibility: Embedded images may not be accessible to recipients using screen readers.
7.2. How Do I Optimize Photos for Embedding in Email?
To optimize photos for embedding in email:
- Resize Photos: Reduce the dimensions of the images to a suitable size for on-screen viewing, such as 600 x 400 pixels.
- Compress Photos: Use image editing software or online tools to compress the images without significant quality loss.
- Choose the Right Format: Use JPEG for photos with complex colors and gradients, and PNG for images with sharp lines and text.
- Test Display: Send a test email to yourself to ensure the embedded images display correctly in your email client.
7.3. How Do I Ensure Embedded Photos Display Correctly in All Email Clients?
To ensure embedded photos display correctly in all email clients:
- Use Common Image Formats: Stick to JPEG and PNG formats, as they are widely supported.
- Use Inline Styles: Use inline CSS styles to format the images, as some email clients may not support embedded stylesheets.
- Provide Alternative Text: Add alternative text (alt text) to the images so that recipients using screen readers can understand the content.
- Test in Multiple Clients: Test your email in different email clients and devices to identify and fix any display issues.
8. How Can I Send Photos from My Phone by Email?
To send photos from your phone by email, open the Photos app, select the photos you want to send, and tap the “Share” icon. Choose your email app from the sharing options, and the photos will be attached to a new email message. You may be prompted to choose a size for the photos; selecting “Actual Size” will send the photos in their original resolution, while other options will reduce the file size.
- Photos App > Select Photos > Share > Email
8.1. How Do I Manage Photo Size When Sending from a Phone?
When sending photos from your phone, you can manage the photo size by:
- Choosing a Size Option: When sharing via email, your phone may offer options to send the photos in “Small,” “Medium,” “Large,” or “Actual Size.” Choose a smaller size to reduce the file size.
- Using Compression Apps: Use photo compression apps to reduce the file size before sending.
- Using Cloud Storage: Upload the photos to a cloud storage service and share a download link via email.
8.2. What Are the Best Email Apps for Sending Photos on Mobile?
The best email apps for sending photos on mobile include:
- Gmail: Offers seamless integration with Google Photos and Google Drive.
- Outlook: Integrates with OneDrive and offers robust email management features.
- Apple Mail: Provides a simple and intuitive interface for sending photos.
- Third-Party Apps: Apps like Spark and Airmail offer advanced features and customization options.
8.3. How Do I Send Multiple Photos from My Phone Without Zipping?
To send multiple photos from your phone without zipping:
- Use Cloud Storage: Upload the photos to a cloud storage service like Google Drive or Dropbox and share a download link via email.
- Send Multiple Emails: If the number of photos is small enough, you can send them in multiple emails, each containing a few attachments.
- Use a File Transfer App: Apps like WeTransfer allow you to send large files without requiring the recipient to create an account.
9. How Do I Troubleshoot Problems When Sending Photos by Email?
When troubleshooting problems with sending photos by email, consider the following:
- Check Attachment Size: Ensure that the total size of the attachments does not exceed the limit imposed by your email provider.
- Verify Internet Connection: Make sure you have a stable internet connection.
- Test with a Smaller File: Try sending a smaller photo to see if the issue is related to file size.
- Check Email Client Settings: Verify that your email client is configured correctly and that there are no settings that might be interfering with attachments.
- Contact Support: If you continue to experience problems, contact your email provider’s support team for assistance.
9.1. What Should I Do If My Email with Photos Bounces Back?
If your email with photos bounces back, it means the email could not be delivered to the recipient. Common reasons for bounced emails include:
- Attachment Size Limit Exceeded: The total size of the attachments exceeds the limit imposed by the recipient’s email provider.
- Invalid Email Address: The recipient’s email address is incorrect or no longer active.
- Recipient’s Mailbox Full: The recipient’s mailbox is full and cannot accept new messages.
- Server Issues: There may be temporary issues with the sending or receiving email servers.
To resolve the issue:
- Reduce Attachment Size: Compress or resize the photos and try sending the email again.
- Verify Email Address: Double-check the recipient’s email address for any errors.
- Use Cloud Storage: Upload the photos to a cloud storage service and share a download link.
- Contact Recipient: Contact the recipient through another means to ensure their email address is correct and that their mailbox is not full.
9.2. Why Are My Photos Blurry When Received by Email?
Photos may appear blurry when received by email due to compression or resizing by the sending or receiving email client. To prevent this:
- Avoid Automatic Compression: Disable any settings in your email client that automatically compress images.
- Send Original Size: Choose the option to send photos in their original size when prompted.
- Use Cloud Storage: Upload the photos to a cloud storage service and share a download link to ensure the original quality is preserved.
9.3. How Do I Handle File Format Compatibility Issues?
File format compatibility issues can occur when the recipient’s email client or device does not support the format of the attached photos. To handle these issues:
- Use Common Formats: Stick to widely supported formats like JPEG and PNG.
- Convert File Formats: Use image editing software or online tools to convert the photos to a more compatible format before sending.
- Provide Alternatives: If you need to send photos in a less common format, provide the recipient with a link to a free image viewer that supports the format.
- Communicate with Recipient: Let the recipient know the file format and any special software they may need to view the photos.
10. What Are Some Tips for Professional Photographers Sending Photos by Email?
For professional photographers, sending photos by email requires extra attention to detail to ensure the best possible experience for clients.
10.1. How Do I Create a Professional Email Presentation for Photos?
To create a professional email presentation for photos:
- Use a Clean Email Template: Use a clean and professional email template that is consistent with your branding.
- Include a Personalized Message: Write a personalized message that addresses the client by name and provides context for the photos.
- Embed a Few Key Images: Embed a few key images directly in the email to grab the client’s attention.
- Provide a Link to a Gallery: Include a link to an online gallery where the client can view and download the full set of photos.
- Include Clear Instructions: Provide clear instructions on how to view, download, and provide feedback on the photos.
- Proofread Carefully: Proofread your email carefully for any spelling or grammar errors.
10.2. How Do I Protect My Copyright When Sending Photos by Email?
To protect your copyright when sending photos by email:
- Add a Watermark: Add a watermark to your photos with your name or logo.
- Include a Copyright Notice: Include a copyright notice in the email message and in the metadata of the photos.
- Send Low-Resolution Versions: Send low-resolution versions of the photos for review purposes and provide high-resolution versions only after payment.
- Use a Contract: Use a contract that clearly outlines the usage rights and restrictions for the photos.
- Monitor Usage: Use tools like Google Images to monitor the web for unauthorized use of your photos.
10.3. How Do I Get Feedback from Clients on Photos Sent by Email?
To get feedback from clients on photos sent by email:
- Ask Specific Questions: Ask specific questions about the photos to guide the client’s feedback.
- Provide a Deadline: Provide a deadline for the client to provide feedback.
- Offer Multiple Options: Offer multiple options for the client to provide feedback, such as email, phone, or an online feedback form.
- Use Online Proofing Galleries: Use online proofing galleries that allow clients to provide feedback directly on the photos.
- Be Responsive: Be responsive to the client’s feedback and address any concerns promptly.
FAQ: Sending Photos by Email
1. Can I send RAW files by email?
Yes, but due to their large size, it’s best to use cloud storage.
2. How do I send a photo as an attachment?
In your email, click the “Attach” icon and select the photo.
3. Will the recipient see the photo’s location data?
Yes, if the metadata is preserved. You can remove it before sending if desired.
4. What’s the best format for emailing photos?
JPEG is generally best for photos due to its compression efficiency.
5. How can I send a large video by email?
Use cloud storage services like Google Drive or WeTransfer.
6. How do I reduce a photo’s file size on my phone?
Use a photo compression app or adjust the size settings when sharing.
7. Is it safe to send photos via email?
Yes, but be mindful of the content and who you’re sending it to.
8. How do I send multiple photos on iPhone?
Select multiple photos in the Photos app and share via email.
9. Why do my photos look different after emailing?
This can be due to compression by the email client.
10. How can I password-protect photos I send by email?
ZIP the photos with password protection before sending.
Ready to elevate your photography experience? Visit dfphoto.net today for comprehensive tutorials, stunning photo galleries, and a vibrant community of photographers. Connect with fellow enthusiasts, discover new techniques, and find inspiration for your next project. Explore dfphoto.net and unleash your creative potential! You can find us at 1600 St Michael’s Dr, Santa Fe, NM 87505, United States. Give us a call at +1 (505) 471-6001.
