Sending photos via email is a common practice, but ensuring all the important information, like date, time, and location, is included can be tricky. At dfphoto.net, we’ll guide you through the steps to share your visual storytelling while preserving essential metadata. Understanding how to embed and extract metadata ensures your images retain their narrative integrity when sharing photographic content.
1. Understanding the Importance of Photo Metadata
Metadata is essentially data about data. In the context of photos, it includes information like the date the photo was taken, camera settings, location, and even copyright details. This information is embedded within the image file and is crucial for organization, archiving, and protecting your work.
1.1. What is EXIF Data?
EXIF (Exchangeable Image File Format) is a standard that defines the format for images, sound, and ancillary tags used by digital cameras (including smartphones). It stores a variety of metadata, such as:
- Camera model
- Aperture
- Shutter speed
- ISO
- Date and time the photo was taken
- GPS coordinates (if location services are enabled)
1.2. What is IPTC Metadata?
IPTC (International Press Telecommunications Council) metadata is another standard used to embed information in images. It allows photographers to include details like:
- Keywords
- Titles
- Descriptions
- Copyright information
- Contact details
1.3. Why is Metadata Important?
- Organization: Metadata helps you organize and search your photo library. You can easily find photos based on date, location, or keywords.
- Copyright Protection: Including copyright information in the metadata can help protect your intellectual property.
- Context: Metadata provides valuable context for your photos, allowing viewers to understand when and where the photo was taken, as well as your creative intent.
- Professionalism: For professional photographers, including detailed metadata is essential for clients and publications.
2. Preparing Your Photos for Emailing
Before you send your photos, it’s essential to ensure the metadata is intact and properly embedded. Here’s how to prepare your photos for emailing:
2.1. Using Photo Management Software
Photo management software like Adobe Lightroom, Adobe Bridge, or Apple Photos allows you to view, edit, and manage metadata.
- Adobe Lightroom: Lightroom is a powerful tool for photographers, offering extensive metadata management capabilities. You can add, edit, and export metadata in various formats.
- Adobe Bridge: Bridge is a free application that comes with Adobe Creative Suite. It’s excellent for browsing and managing files, including viewing and editing metadata.
- Apple Photos: Apple Photos is a built-in photo management application for macOS and iOS. It allows you to view and edit basic metadata, such as date, time, and location.
2.2. Embedding Metadata
Make sure your photo management software is set up to embed metadata when exporting or sharing photos.
For Lightroom:
- Go to Edit > Catalog Settings.
- Select the Metadata tab.
- Ensure that the Automatically Write Changes into XMP option is checked. This will ensure that any changes you make to the metadata are saved within the image file.
For Apple Photos:
- When exporting photos, go to File > Export > Export Unmodified Original.
- Make sure to check the box that says Include IPTC as XMP. This will include the IPTC metadata in an .xmp file.
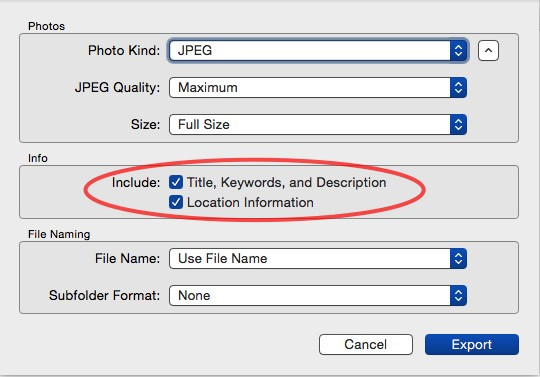 Screenshot of Lightroom's Metadata settings
2.3. Exporting Photos with Metadata
When exporting photos for emailing, choose the appropriate settings to preserve metadata.
For Lightroom:
- Select the photos you want to export.
- Go to File > Export.
- In the Metadata section, choose Include All Metadata.
- Set your desired image quality, file size, and other settings.
- Click Export.
For Apple Photos:
- Select the photos you want to export.
- Go to File > Export > Export Unmodified Original.
- Check the box that says Include IPTC as XMP.
- Click Export.
3. Methods for Sending Photos via Email
There are several ways to send photos via email, each with its own advantages and disadvantages.
3.1. Attaching Photos Directly to the Email
This is the simplest method, but it has limitations on file size.
- Pros: Easy and straightforward.
- Cons:
- Email providers often have file size limits (typically around 20-25MB per email).
- Large attachments can take a long time to upload and download.
- The recipient’s email client may have trouble handling large attachments.
How to Attach Photos:
- Open your email client (e.g., Gmail, Outlook, Yahoo Mail).
- Create a new email.
- Click the Attach button (usually a paperclip icon).
- Select the photos you want to attach.
- Compose your email and send it.
3.2. Compressing Photos into a ZIP File
Compressing photos into a ZIP file can reduce the file size and make it easier to send multiple photos in one email.
- Pros:
- Reduces file size.
- Allows you to send multiple photos in a single file.
- Cons:
- Requires the recipient to have software to unzip the file.
- Can still be problematic if the ZIP file is too large.
How to Compress Photos into a ZIP File:
On Windows:
- Select the photos you want to compress.
- Right-click and choose Send to > Compressed (zipped) folder.
- A ZIP file will be created in the same location.
- Attach the ZIP file to your email.
On macOS:
- Select the photos you want to compress.
- Right-click and choose Compress [number] items.
- A ZIP file will be created in the same location.
- Attach the ZIP file to your email.
3.3. Using Cloud Storage Services
Cloud storage services like Google Drive, Dropbox, or WeTransfer are excellent for sending large files, including photos.
- Pros:
- No file size limits.
- Easy to share files with multiple people.
- Recipients don’t need special software to download the photos.
- Cons:
- Requires both the sender and recipient to have an internet connection.
- Recipients need to download the files.
How to Use Cloud Storage Services:
- Upload your photos to a cloud storage service (e.g., Google Drive, Dropbox, WeTransfer).
- Create a shareable link.
- Copy the link and paste it into your email.
- Compose your email and send it.
3.4. Resizing Photos Before Sending
Resizing your photos to a smaller size can significantly reduce file size without noticeably affecting quality for viewing on screens.
- Pros:
- Reduces file size.
- Faster to upload and download.
- Cons:
- May reduce image quality if not done carefully.
- Requires you to have image editing software.
How to Resize Photos:
- Open your photo in an image editing program (e.g., Photoshop, GIMP, Preview).
- Go to Image > Resize (or similar).
- Enter the desired dimensions (e.g., 1920 pixels wide for a landscape photo).
- Save the resized photo.
- Attach the resized photo to your email.
3.5. Using Dedicated File Transfer Services
Dedicated file transfer services like WeTransfer, Send Anywhere, or Filemail are designed for sending large files quickly and easily.
- Pros:
- No file size limits.
- Simple and user-friendly.
- Often offer additional features like password protection and download tracking.
- Cons:
- May have limitations on the number of transfers per month for free accounts.
How to Use Dedicated File Transfer Services:
- Go to the website of a file transfer service (e.g., WeTransfer).
- Upload your photos.
- Enter the recipient’s email address and your email address.
- Click Transfer.
- The recipient will receive an email with a link to download the photos.
4. Ensuring Metadata is Retained
Regardless of the method you choose, it’s crucial to ensure that the metadata is retained when sending photos via email.
4.1. Testing Metadata Retention
Before sending a large batch of photos, test the process with a single photo to ensure that the metadata is retained.
- Send a test photo to yourself using your chosen method.
- Download the photo.
- Open the photo in an image viewing program (e.g., Preview, Windows Photo Viewer) and check the metadata.
- Verify that the date, time, location, and other important information are present.
4.2. Using XMP Files
If you’re concerned about metadata loss, you can include an XMP (Extensible Metadata Platform) file with your photos. An XMP file is a separate file that contains the metadata for a photo.
- Pros:
- Ensures metadata is retained even if the image file is modified.
- Compatible with a wide range of software.
- Cons:
- Adds an extra file to manage.
- Requires the recipient to have software that can read XMP files.
How to Use XMP Files:
- In your photo management software, export the photo with an XMP file.
- Send both the photo and the XMP file to the recipient.
- The recipient can then import the XMP file into their photo management software to restore the metadata.
4.3. Avoiding Image Optimization Services
Be cautious when using image optimization services or plugins, as some may strip metadata to reduce file size. If you need to optimize your images, make sure to choose settings that preserve metadata.
5. Viewing Metadata on the Recipient’s End
Once the recipient receives the photos, they need to know how to view the metadata.
5.1. Using Image Viewing Software
Most image viewing software, such as Preview (macOS), Windows Photo Viewer, or Adobe Bridge, allows you to view metadata.
On macOS (Preview):
- Open the photo in Preview.
- Go to Tools > Show Inspector.
- Click the EXIF tab to view EXIF data, or the IPTC tab to view IPTC data.
On Windows (Windows Photo Viewer):
- Open the photo in Windows Photo Viewer.
- Right-click and choose Properties.
- Click the Details tab.
5.2. Using Online Metadata Viewers
There are also online metadata viewers that allow you to view metadata without installing any software. Simply upload the photo to the website, and it will display the metadata.
Examples of online metadata viewers include:
5.3. Using Mobile Apps
If the recipient is viewing the photos on a mobile device, they can use a metadata viewing app to see the metadata.
Examples of metadata viewing apps include:
- Exif Wizard (iOS)
- Exif Tool (Android)
6. Troubleshooting Metadata Issues
Sometimes, metadata may be lost or corrupted during the emailing process. Here are some common issues and how to troubleshoot them.
6.1. Metadata is Missing
If the metadata is missing from the photo, it may have been stripped during the emailing process or by an image optimization service.
- Solution: Try sending the photo using a different method (e.g., cloud storage service).
- Solution: Make sure you’re not using an image optimization service that strips metadata.
- Solution: Include an XMP file with the photo.
6.2. Incorrect Date or Time
If the date or time is incorrect, it may be due to a time zone issue or an incorrect camera setting.
- Solution: Check the camera’s date and time settings.
- Solution: Adjust the time zone settings in your photo management software.
6.3. Location Data is Missing
If the location data is missing, it may be because location services were disabled on the camera or smartphone.
- Solution: Enable location services on your camera or smartphone.
- Solution: Manually add the location data in your photo management software.
7. Advanced Tips for Managing Photo Metadata
For professional photographers and serious enthusiasts, managing photo metadata is an essential part of the workflow. Here are some advanced tips to help you manage your photo metadata effectively.
7.1. Creating Metadata Templates
Create metadata templates in your photo management software to quickly apply common metadata to multiple photos.
In Lightroom:
- Select a photo that has the metadata you want to save as a template.
- Go to Metadata > Save Metadata as Preset.
- Enter a name for the preset and choose which metadata fields to include.
- Click Create.
To apply the preset to other photos, select them and go to Metadata > Apply Metadata Preset and choose the preset you want to use.
7.2. Using Keywords Effectively
Use keywords to tag your photos with relevant terms that describe the content, location, and subject matter.
- Be specific: Use specific keywords rather than general terms.
- Use a hierarchy: Create a hierarchy of keywords to organize your photos.
- Use synonyms: Use synonyms to ensure that your photos are found regardless of the search terms used.
7.3. Backing Up Metadata
Regularly back up your photo library, including the metadata. This will ensure that you don’t lose your metadata if your computer crashes or your files become corrupted.
- Use a backup service: Use a cloud-based backup service like Backblaze or Carbonite.
- Create a local backup: Create a local backup on an external hard drive.
8. Best Practices for Emailing Photos
To ensure a smooth experience for both you and your recipient, follow these best practices when emailing photos.
8.1. Choose the Right Method
Choose the method that’s most appropriate for the number and size of the photos you’re sending.
- Small number of small photos: Attach directly to the email.
- Large number of small photos: Compress into a ZIP file.
- Large photos or large number of photos: Use a cloud storage service or a dedicated file transfer service.
8.2. Resize Photos When Necessary
Resize your photos to a smaller size if they’re too large to send via email.
8.3. Test Before Sending
Test the process with a single photo to ensure that the metadata is retained and that the recipient can open the photo.
8.4. Communicate with the Recipient
Let the recipient know how you’re sending the photos and how they can view the metadata.
8.5. Consider Copyright
If you’re sending photos that are copyrighted, include a copyright notice in the email and in the metadata.
9. Exploring dfphoto.net for More Photography Tips
For more in-depth photography tips, techniques, and inspiration, visit dfphoto.net. We offer a wealth of resources to help you improve your photography skills, from beginner tutorials to advanced techniques.
At dfphoto.net, you can find:
- Detailed guides on various photography techniques: Learn about composition, lighting, and camera settings.
- Reviews of the latest photography equipment: Stay up-to-date on the latest cameras, lenses, and accessories.
- Inspiration from talented photographers: Discover stunning photos and learn about the stories behind them.
- A vibrant community of photographers: Connect with other photographers, share your work, and get feedback.
10. Frequently Asked Questions (FAQ) About Sending Photos on Email
10.1. Will resizing my photos remove the metadata?
Not necessarily. When resizing photos, use image editing software that allows you to preserve metadata. Look for options like “Preserve EXIF Data” or “Include Metadata” during the resizing process.
10.2. How can I check if my photos still have metadata after sending them?
After sending the photos, download them from your email and use a metadata viewer (like Preview on macOS or an online EXIF viewer) to inspect the image. This ensures the critical information is still embedded.
10.3. What’s the best way to send a large number of photos without losing quality?
For large batches, cloud storage services like Google Drive, Dropbox, or WeTransfer are ideal. These platforms let you share a link, allowing recipients to download the photos in their original quality.
10.4. How do I ensure the recipient can view the metadata on their end?
Inform the recipient about how to view metadata. On macOS, they can use Preview; on Windows, they can right-click the image and select “Properties.” Alternatively, they can use online EXIF viewers.
10.5. Can I add metadata to a photo after it has been taken?
Yes, you can. Photo management software like Adobe Lightroom and Bridge allows you to add or edit metadata even after the photo has been taken.
10.6. Is it possible to password-protect photos sent via email?
While you can’t directly password-protect photos attached to an email, you can compress them into a password-protected ZIP file or use file transfer services that offer password protection.
10.7. What are the file size limits for sending photos via email?
Most email providers have file size limits, typically around 20-25 MB per email. If your photos exceed this limit, consider using cloud storage or file transfer services.
10.8. How do I prevent others from using my photos without permission?
Include copyright information in the metadata and consider adding a watermark to your photos. This helps protect your intellectual property.
10.9. What is the difference between EXIF and IPTC metadata?
EXIF data primarily includes camera settings and technical information, while IPTC metadata is used for descriptive information like titles, descriptions, keywords, and copyright details.
10.10. Should I remove metadata from photos before sharing them online?
It depends on your privacy preferences. Removing metadata can protect sensitive information like your location, but it also removes valuable context and copyright information. Consider balancing privacy with the benefits of including metadata.
Sending photos via email while preserving metadata requires understanding the different methods available and choosing the right one for your needs. By following these tips and best practices, you can ensure that your photos retain their important information and are shared effectively. Remember to visit dfphoto.net for more photography tips and inspiration!
Ready to take your photography to the next level? Visit dfphoto.net today to explore our extensive collection of tutorials, stunning photo galleries, and connect with a vibrant community of photographers. Whether you’re looking to master new techniques, find inspiration for your next project, or simply connect with fellow enthusiasts, dfphoto.net is your ultimate resource. Join us and unlock your full potential behind the lens! Address: 1600 St Michael’s Dr, Santa Fe, NM 87505, United States. Phone: +1 (505) 471-6001.