Managing photos in iCloud can be a seamless experience for Apple users, but when it comes to selecting all your photos for downloading or transferring, you might find yourself looking for a feature that seems to be missing: a simple “select all” button. Many users have voiced their frustration about the absence of this seemingly basic function. If you’re wondering how to select all your photos in iCloud, you’re not alone. While there isn’t a straightforward “select all” button, there are effective workarounds to help you manage your iCloud photo library efficiently.
This guide will walk you through the available methods to select and download your iCloud photos in bulk, addressing the common pain points and offering practical solutions.
Understanding the Challenge: Why No Direct “Select All” Button?
Before diving into solutions, it’s helpful to understand why Apple doesn’t offer a simple “select all” button on iCloud.com or in iCloud for Windows. As some users in online forums have pointed out, iCloud Photos is primarily designed as a syncing and sharing service, not an archival storage solution like Google Drive or Dropbox. This design philosophy influences how bulk operations are handled.
While services like Google Photos and Dropbox prioritize bulk file management, iCloud Photos focuses on keeping your photo library synchronized across all your Apple devices. This difference in primary function may explain the absence of a one-click “select all” option for downloading all your photos directly from iCloud.com.
Method 1: The Most Efficient Way – Using iCloud for Windows (or Mac) to Download Originals
The most efficient method to “select all” and download your iCloud photos is by using the iCloud for Windows application or leveraging the features on a Mac. This approach allows for a complete download of your original photos and videos stored in iCloud.
Steps for iCloud for Windows:
-
Download and Install iCloud for Windows: If you haven’t already, download iCloud for Windows from the official Apple website: Download iCloud for Windows – Apple Support. Install the application on your Windows PC.
-
Open iCloud for Windows and Sign In: Launch the iCloud for Windows application and sign in with your Apple ID and password.
-
Configure Photos Options: Next to “Photos,” click the “Options” button.
Alt Text: iCloud for Windows interface showing the Options button next to Photos, used to configure iCloud Photo settings.
-
Enable “iCloud Photo Library” and “Download Originals”: Ensure that “iCloud Photo Library” is selected. Then, choose the option “Download new photos and videos to my PC” or “Download Originals to this computer” (depending on the iCloud for Windows version). This ensures that all your original, full-resolution photos and videos from iCloud will be downloaded to your PC.
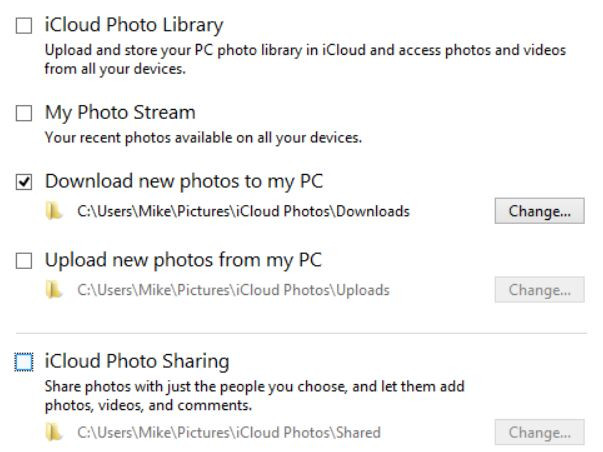 iCloud for Windows Download Photos Option
 -
Apply Changes: Click “Done” and then “Apply” in the main iCloud for Windows window.
-
Access Your Downloaded Photos: iCloud for Windows will create an “iCloud Photos” folder in File Explorer. Within this folder, you will find your photos and videos organized in “Downloads” and “Uploads” folders. Depending on the size of your library, the download process might take some time.
Steps for Mac:
On a Mac, the process is even more integrated:
-
Open the Photos App: Launch the Photos application on your Mac.
-
Ensure iCloud Photos is Enabled: Go to Photos > Preferences in the menu bar, then click on the “iCloud” tab. Make sure “iCloud Photos” is checked.
-
Download Originals: Select “Download Originals to this Mac.” This option ensures that full-resolution versions of your photos and videos are downloaded and stored on your Mac.
Once iCloud Photos is set up on your Mac or Windows PC to download originals, all your photos and videos will be downloaded automatically. This effectively “selects all” by downloading everything to your local machine.
Method 2: Selecting Photos by Date/Location on iCloud.com (Limited Bulk Selection)
While iCloud.com doesn’t have a “select all” button, it does offer a way to select photos in groups based on date and location, which can be helpful for downloading photos in chunks.
-
Go to iCloud.com and Sign In: Open your web browser and navigate to iCloud.com. Sign in with your Apple ID.
-
Open Photos: Click on the “Photos” icon.
-
View Photos by “Photos” (Dates): In the left sidebar, click on “Photos.” This organizes your photos by date and location groupings.
-
Use the “+” Icon to Select a Group: Hover your mouse to the right of a date/location grouping. A “+” icon should appear. Click on this “+” icon.
 iCloud.com Plus Icon for Photo Selection
 -
Download Selected Photos: After clicking the “+”, all photos within that date/location group will be selected. The download icon (cloud with a down arrow) in the top right corner will become active. Click the download icon to download the selected photos.
Limitations of this Method: This method only allows you to select photos group by group. If you have a very large library, you’ll need to repeat this process for each date/location grouping, which can still be time-consuming, but it’s more efficient than selecting each photo individually.
Method 3: Using Shift or Control/Command for Multiple Selection (Limited and Inconsistent)
Some users have mentioned using the Shift key or Control/Command key for multiple selection on iCloud.com.
-
Shift Key (Range Selection): In theory, holding the Shift key and clicking on the first and last photo in a range should select all photos in between. However, user reports suggest this method can be inconsistent on iCloud.com, especially on Windows.
-
Control/Command Key (Individual Selection): You can hold down the Control key (Windows) or Command key (Mac) and click on individual photos to select multiple files. This is still a manual process and not suitable for selecting all photos, but it can be useful for selecting a specific subset of images.
Important Note: The effectiveness of Shift and Control/Command key selection can vary depending on your browser, operating system, and the current state of iCloud.com. It’s not a reliable method for selecting all photos, but it might be helpful for selecting a smaller number of photos.
Why Doesn’t Apple Offer a Simple “Select All”?
The lack of a “select all” button in iCloud Photos, particularly on the web interface, remains a point of frustration for many users. While the exact reasons aren’t publicly stated by Apple, possible explanations include:
- Service Design Philosophy: As mentioned earlier, iCloud Photos prioritizes syncing and device integration over bulk file management.
- Performance Considerations: For extremely large photo libraries, a “select all” operation on the web could be resource-intensive and potentially lead to performance issues.
- User Error Prevention: Accidental “select all” and delete actions could be detrimental. Apple might be prioritizing caution over convenience in this case.
Tips for Efficiently Managing iCloud Photos
While waiting for a potential “select all” feature update from Apple, here are some tips for managing your iCloud Photos efficiently:
- Regularly Download Originals: Use iCloud for Windows or Mac to regularly download originals to your computer as a backup and for easier bulk management.
- Organize Photos into Albums: Organize your photos into albums within the Photos app. This can help you manage photos in logical groups and potentially make selection easier in the future.
- Use Third-Party Tools (with Caution): Some third-party applications claim to offer enhanced iCloud photo management features, including bulk download options. However, exercise caution when using third-party tools and always prioritize your account security.
- Provide Feedback to Apple: If you feel strongly about the need for a “select all” feature, provide feedback directly to Apple through their feedback portal: Feedback – iCloud – Apple. User feedback can influence future feature updates.
Conclusion: Managing iCloud Photos Selection Efficiently
While the absence of a direct “select all” button in iCloud Photos can be inconvenient, especially when you need to download your entire library, the methods outlined in this guide provide effective workarounds. Using iCloud for Windows or a Mac to download originals remains the most efficient way to “select all” and access all your iCloud photos. For web-based access, grouping by date/location on iCloud.com offers a limited but helpful bulk selection option.
By understanding these methods and managing your iCloud Photos proactively, you can overcome the “select all” challenge and maintain control over your valuable photo library.
