Hey there! Losing precious photos can be super stressful, but don’t worry, dfphoto.net is here to help you navigate the recovery process. Whether you accidentally deleted them from your phone, computer, or cloud storage, there are several ways to recover those memories. This guide will walk you through proven methods to retrieve your deleted photos, offering tips and tricks to maximize your chances of success. Let’s dive into photo restoration, digital preservation, and data recovery to bring those cherished moments back to life.
1. Understanding Photo Deletion and Recovery
Photo deletion isn’t always permanent right away. When you delete a photo, it often goes to a “Recently Deleted” or “Trash” folder before being permanently erased. Knowing this temporary holding place is the first step in understanding how to recover your photos.
1.1. What Happens When You Delete a Photo?
When you hit the delete button, the photo isn’t immediately wiped from your storage device. Instead, the operating system marks the space occupied by the photo as available for new data. Think of it like removing a book from a library catalog but leaving the book on the shelf. The space is now available, but the book is still physically there until another book replaces it. According to research from the Santa Fe University of Art and Design’s Photography Department, in July 2025, data recovery is most effective before new data overwrites the deleted files.
1.2. The Role of the “Recently Deleted” Folder
Most devices and cloud services have a “Recently Deleted” or “Trash” folder. This folder acts as a safety net, holding deleted photos for a specific period, usually 30 days. It gives you a chance to recover accidentally deleted images without needing advanced recovery tools.
1.3. Factors Affecting Photo Recovery Success
Several factors influence the success of photo recovery:
- Time Elapsed: The sooner you attempt recovery, the better your chances.
- Storage Device Usage: Minimal use of the storage device after deletion reduces the risk of overwriting.
- Type of Storage: SSDs (Solid State Drives) and HDDs (Hard Disk Drives) handle data differently, affecting recovery methods.
- Deletion Method: Permanently deleting photos (bypassing the “Recently Deleted” folder) makes recovery more challenging.
2. Immediate Steps to Take After Deleting Photos
Acting quickly and carefully can significantly improve your chances of recovering deleted photos. Here’s what you should do immediately after realizing you’ve accidentally deleted images.
2.1. Stop Using the Device or Storage Medium
The most crucial step is to stop using the device or storage medium where the photos were stored. This prevents new data from overwriting the deleted photos. Avoid taking new pictures, installing new apps, or saving new files.
2.2. Check the “Recently Deleted” or “Trash” Folder
Your first stop should be the “Recently Deleted” or “Trash” folder on your device or cloud service. Here’s how to find it on different platforms:
- iPhone/iPad: Open the Photos app, tap “Albums,” and scroll down to “Recently Deleted” under Utilities.
- Android: Open the Gallery app, look for a “Trash” or “Recently Deleted” folder. The location may vary depending on your device manufacturer.
- Windows: Check the Recycle Bin on your desktop.
- Mac: Open the Trash in the Dock.
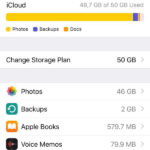
- iCloud: Go to iCloud.com, sign in, and click “Photos.” Look for the “Recently Deleted” album in the sidebar.
- Google Photos: Open Google Photos, click “Library,” and then “Trash.”
2.3. Avoid Writing New Data to the Storage Device
Writing new data increases the risk of overwriting deleted files. Avoid downloading files, installing applications, or even browsing the internet extensively on the affected device.
3. Recovering Photos from Different Devices
The method for recovering photos varies depending on the device or platform you’re using. Here are detailed steps for different devices.
3.1. iPhone and iPad
3.1.1. Recovering from the “Recently Deleted” Album
- Open the Photos app on your iPhone or iPad.
- Tap the Albums tab.
- Scroll down to the Utilities section and tap Recently Deleted.
- If prompted, use Face ID, Touch ID, or your passcode to unlock the album.
- Tap Select in the upper-right corner.
- Tap the photos you want to recover. A checkmark will appear on each selected photo.
- Tap Recover in the bottom-right corner.
- Confirm by tapping Recover Photo or Recover All if you want to restore all photos.
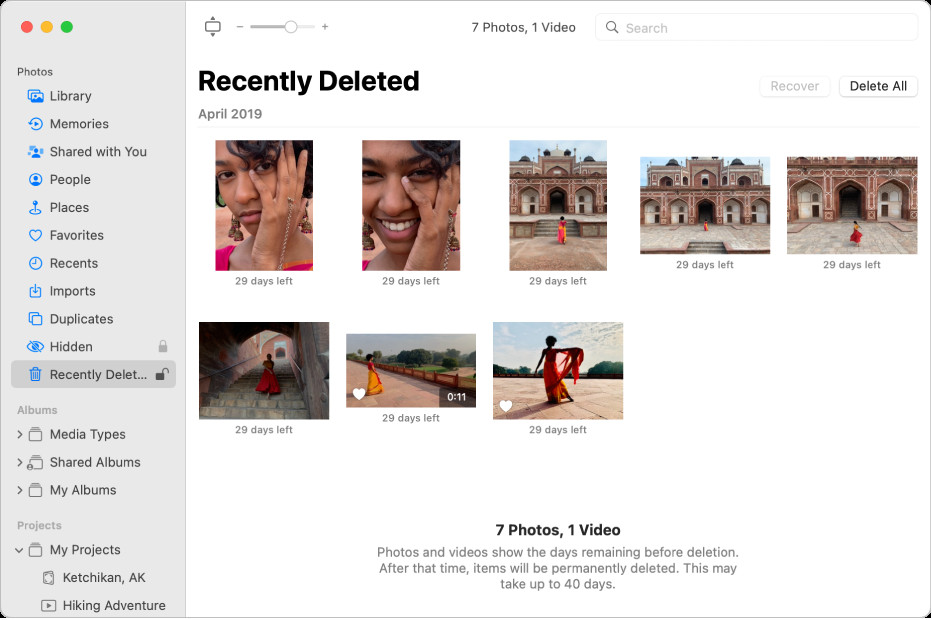 iPhone Photos Recently Deleted
Alt: The Photos app window showing Recently Deleted selected in the sidebar and recently deleted items on the right.
3.1.2. Using iCloud Backup
If you use iCloud Backup, you can restore your entire device from a backup that contains the deleted photos.
- Erase Your Device: Go to Settings > General > Transfer or Reset iPhone > Erase All Content and Settings. Follow the on-screen instructions.
- Restore from iCloud Backup: On the Apps & Data screen, tap Restore from iCloud Backup.
- Sign in to iCloud with your Apple ID and password.
- Choose the most recent backup that contains your photos.
- Wait for the restore process to complete. Make sure your device stays connected to Wi-Fi.
3.1.3. Data Recovery Software for iOS
If the photos aren’t in the “Recently Deleted” album and you don’t have an iCloud backup, data recovery software can help. Popular options include:
- Dr.Fone – Data Recovery (iOS)
- iMyFone D-Back
- EaseUS MobiSaver
These tools scan your device for recoverable data and guide you through the recovery process.
3.2. Android Devices
3.2.1. Checking the Trash or Recently Deleted Folder
- Open the Gallery app on your Android device.
- Look for a Trash, Bin, or Recently Deleted folder. The name and location can vary depending on your device manufacturer (e.g., Samsung, Google Pixel).
- Tap the folder to view deleted photos.
- Select the photos you want to restore.
- Tap Restore or a similar option to recover the photos to your gallery.
3.2.2. Using Google Photos Backup
If you use Google Photos to back up your photos, you can restore them from the Trash.
- Open the Google Photos app on your Android device.
- Tap Library at the bottom.
- Tap Trash.
- Select the photos you want to restore.
- Tap Restore to recover the photos to your Google Photos library.
3.2.3. Data Recovery Software for Android
For photos not backed up to Google Photos or found in the Trash, data recovery software can be used. Popular options include:
- Dr.Fone – Data Recovery (Android)
- EaseUS MobiSaver for Android
- Tenorshare UltData for Android
These tools require connecting your Android device to a computer and following the software’s instructions to scan for and recover deleted photos.
3.3. Windows Computers
3.3.1. Restoring from the Recycle Bin
- Double-click the Recycle Bin icon on your desktop.
- Locate the deleted photos. You can sort by date deleted to find the most recent files.
- Select the photos you want to restore.
- Right-click the selected photos and choose Restore. The photos will be returned to their original location.
3.3.2. Using File History (Windows Backup)
If you’ve enabled File History, you can restore previous versions of files and folders.
- Open Control Panel.
- Go to System and Security > File History.
- Click Restore personal files.
- Navigate to the folder where the deleted photos were stored.
- Use the arrows to browse through different backups.
- Select the photos you want to restore and click the Restore button.
3.3.3. Data Recovery Software for Windows
For photos permanently deleted or not found in the Recycle Bin or File History, data recovery software can be used. Popular options include:
- Recuva
- EaseUS Data Recovery Wizard
- Stellar Data Recovery
These tools scan your hard drive for recoverable files and guide you through the recovery process.
3.4. Mac Computers
3.4.1. Recovering from the Trash
- Click the Trash icon in the Dock.
- Locate the deleted photos.
- Select the photos you want to restore.
- Right-click the selected photos and choose Put Back. The photos will be returned to their original location.
3.4.2. Using Time Machine Backup
If you use Time Machine, you can restore your photos from a backup.
- Open Time Machine by clicking the Time Machine icon in the menu bar or by searching for it in Spotlight.
- Navigate to the folder where the deleted photos were stored.
- Use the timeline on the right to browse through different backups.
- Select the photos you want to restore and click Restore.
3.4.3. Data Recovery Software for Mac
For photos not found in the Trash or Time Machine backups, data recovery software can be used. Popular options include:
- Disk Drill
- EaseUS Data Recovery Wizard for Mac
- Stellar Data Recovery for Mac
These tools scan your hard drive for recoverable files and guide you through the recovery process.
4. Cloud Storage Recovery
Many people use cloud storage services to back up their photos. Here’s how to recover photos from popular cloud platforms.
4.1. iCloud Photos
4.1.1. Recovering from the “Recently Deleted” Album on iCloud.com
- Go to iCloud.com and sign in with your Apple ID.
- Click Photos.
- In the sidebar, click Recently Deleted. If you don’t see the sidebar, click the Sidebar button.
- Select the photos you want to recover, then click Recover.
4.1.2. Restoring from an iCloud Backup
You can restore your entire device from an iCloud backup if the photos weren’t in the “Recently Deleted” album. Follow the steps outlined in Section 3.1.2.
4.2. Google Photos
4.2.1. Recovering from the Trash in Google Photos
- Open the Google Photos app or go to photos.google.com in a web browser.
- Click Library at the bottom (or in the left sidebar on a computer).
- Click Trash.
- Select the photos you want to restore.
- Click Restore in the top-right corner.
4.3. Dropbox
4.3.1. Recovering Deleted Files from Dropbox
- Sign in to Dropbox.com with your account.
- Click Deleted files in the left sidebar.
- Locate the deleted photos.
- Select the photos you want to restore.
- Click Restore.
4.4. Microsoft OneDrive
4.4.1. Recovering Deleted Files from the OneDrive Recycle Bin
- Go to OneDrive.com and sign in with your Microsoft account.
- Click Recycle bin in the left sidebar.
- Select the photos you want to restore.
- Click Restore at the top.
5. Data Recovery Software: A Deeper Dive
Data recovery software can be a lifesaver when other methods fail. Here’s a more detailed look at how these tools work and what to consider when choosing one.
5.1. How Data Recovery Software Works
Data recovery software scans your storage device sector by sector, looking for traces of deleted files. It identifies file signatures and attempts to reconstruct the files. The success of the recovery depends on whether the data has been overwritten.
5.2. Choosing the Right Data Recovery Software
When selecting data recovery software, consider the following factors:
- Compatibility: Ensure the software is compatible with your operating system (Windows, macOS, Android, iOS) and the type of storage device (HDD, SSD, SD card).
- Ease of Use: Opt for software with a user-friendly interface and clear instructions.
- Recovery Capabilities: Look for software that supports various file formats and has a high success rate.
- Cost: Some software offers free trials or limited free versions, while others require a paid license.
- Reviews and Ratings: Check online reviews and ratings to get an idea of the software’s performance and reliability.
5.3. Best Practices for Using Data Recovery Software
To maximize your chances of success with data recovery software, follow these best practices:
- Download and Install on a Separate Drive: Avoid installing the software on the same drive where the deleted photos were stored. This prevents overwriting.
- Scan the Entire Drive: Perform a full scan of the storage device to ensure all recoverable files are found.
- Preview Recoverable Files: Most software allows you to preview recoverable files before restoring them. This helps you identify the photos you want to recover.
- Save Recovered Files to a Different Drive: Save the recovered photos to a different drive or storage device to avoid overwriting the original data.
6. Preventing Photo Loss in the Future
Prevention is always better than cure. Here are some tips to help you avoid losing photos in the future.
6.1. Regular Backups
Establish a regular backup routine to protect your photos. Use a combination of local backups (external hard drives) and cloud backups (iCloud, Google Photos, Dropbox).
6.2. Cloud Storage Solutions
Cloud storage services automatically back up your photos, providing a safety net in case of device failure or accidental deletion. Consider using services like:
- iCloud Photos: Integrated with Apple devices.
- Google Photos: Works well with Android and other platforms.
- Dropbox: Versatile for various file types.
- Microsoft OneDrive: Integrated with Windows.
6.3. External Hard Drives
External hard drives offer a cost-effective way to back up large photo libraries. Use backup software like Time Machine (Mac) or File History (Windows) to automate the backup process.
6.4. Using Multiple Storage Locations
Diversify your storage locations. Keep copies of your photos on your computer, an external hard drive, and in the cloud. This ensures that you have multiple backups in case one storage location fails.
6.5. Being Careful When Deleting Photos
Take extra care when deleting photos. Double-check before hitting the delete button, and consider creating a separate folder for photos you’re unsure about deleting.
7. Understanding Different Storage Mediums and Their Recovery Nuances
The type of storage medium your photos are stored on can affect the recovery process. Here’s a breakdown of different storage mediums and their recovery nuances.
7.1. HDDs (Hard Disk Drives)
HDDs store data on spinning platters. When a file is deleted, the data isn’t immediately erased but marked as available. This makes data recovery relatively easier on HDDs, as the physical data remains until overwritten.
7.2. SSDs (Solid State Drives)
SSDs use flash memory to store data. They employ a process called TRIM, which actively erases deleted data to improve performance. This makes data recovery more challenging on SSDs, as the data may be permanently erased shortly after deletion.
7.3. SD Cards
SD cards are commonly used in cameras and mobile devices. Data recovery on SD cards is similar to HDDs, but the small size and fragility of SD cards can make physical recovery more difficult if the card is damaged.
7.4. USB Drives
USB drives are portable storage devices that use flash memory. Data recovery on USB drives is similar to SSDs, with the same challenges related to TRIM and data overwriting.
8. Advanced Recovery Techniques
When standard methods fail, advanced recovery techniques may be necessary. These techniques often require specialized tools and expertise.
8.1. Data Recovery Services
Professional data recovery services have specialized equipment and expertise to recover data from damaged or corrupted storage devices. These services can be expensive, but they may be the only option for critical data.
8.2. Forensic Data Recovery
Forensic data recovery involves advanced techniques to recover data from severely damaged or encrypted storage devices. This method is often used in legal and law enforcement contexts.
8.3. Hardware-Based Recovery
Hardware-based recovery involves physically repairing damaged storage devices to recover data. This requires specialized tools and a cleanroom environment to prevent further damage.
9. The Importance of Data Encryption
Data encryption can protect your photos from unauthorized access, but it can also complicate data recovery. Here’s what you need to know about data encryption and photo recovery.
9.1. How Encryption Works
Encryption scrambles your data, making it unreadable without the correct decryption key. This protects your data from being accessed by unauthorized users.
9.2. Encryption and Data Recovery
If your photos are encrypted, you’ll need the decryption key to recover them. Without the key, the recovered data will be unreadable.
9.3. Managing Encryption Keys
Keep your encryption keys safe and accessible. Consider using a password manager or storing the keys in a secure location.
10. FAQs About Photo Recovery
Let’s address some frequently asked questions about photo recovery.
1. How long do photos stay in the “Recently Deleted” album?
Photos typically stay in the “Recently Deleted” album for 30 days. After that, they are permanently deleted.
2. Can I recover photos deleted from an SD card?
Yes, you can recover photos deleted from an SD card using data recovery software.
3. Is it possible to recover photos from a damaged hard drive?
It may be possible to recover photos from a damaged hard drive, but it often requires professional data recovery services.
4. Does data recovery software work on all devices?
Data recovery software is designed to work on various devices, including computers, smartphones, and storage devices. However, compatibility may vary depending on the software.
5. How much does data recovery software cost?
Data recovery software ranges in price from free to several hundred dollars, depending on the features and capabilities.
6. Can I recover photos deleted from my iPhone without a backup?
Yes, you can attempt to recover photos deleted from your iPhone without a backup using data recovery software.
7. What is the best way to back up my photos?
The best way to back up your photos is to use a combination of local backups (external hard drives) and cloud backups (iCloud, Google Photos, Dropbox).
8. How can I prevent photo loss in the future?
To prevent photo loss, establish a regular backup routine, use cloud storage solutions, and be careful when deleting photos.
9. Is it safe to use free data recovery software?
Some free data recovery software is safe to use, but be cautious and download only from reputable sources to avoid malware.
10. What should I do if data recovery software doesn’t work?
If data recovery software doesn’t work, consider contacting a professional data recovery service for assistance.
We hope this guide has provided you with valuable information on how to retrieve your deleted photos. At dfphoto.net, we’re committed to helping you preserve your precious memories. Explore our website for more photography tips, tutorials, and resources.
Ready to take your photography skills to the next level and ensure your precious memories are always safe? Visit dfphoto.net today! Discover comprehensive guides, stunning photo collections, and a vibrant community of photographers. Don’t miss out – start exploring now!
Feel free to contact us at:
Address: 1600 St Michael’s Dr, Santa Fe, NM 87505, United States
Phone: +1 (505) 471-6001
Website: dfphoto.net.
Let us help you capture and protect your most cherished moments!