Losing precious photos from your iPhone can be distressing, but don’t worry, dfphoto.net is here to help you explore effective methods for iPhone photo recovery. You can learn how to recover deleted pictures, recover permanently deleted photos, and implement data recovery strategies to restore your visual memories. Let’s dive in to the world of mobile photography, digital artistry and image restoration.
1. Where To Start If Your Photos Are Missing
First, determine where to start your search if your photos are missing from your iPhone, including checking recently deleted albums and hidden folders.
The initial reaction to missing photos on your iPhone can be panic, but a systematic approach often leads to a successful recovery. Start by considering where the photos might have gone within your device’s ecosystem. Photos can sometimes be unintentionally moved or hidden, rather than permanently lost. A methodical search can often bring them back to light.
1.1. Checking The Recently Deleted Album
Check the recently deleted album, as it’s the first place to look when trying to recover deleted photos and videos on an iPhone.
The Recently Deleted album acts as a safety net for accidentally deleted photos and videos. When you delete something from your Photos app, it isn’t immediately gone forever. Instead, it’s moved to this album, where it stays for 30 days before being permanently erased. This provides a crucial window of opportunity to recover any media you didn’t mean to delete.
How to Access and Recover Photos from the Recently Deleted Album:
- Open the Photos App: Start by opening the Photos app on your iPhone.
- Navigate to Albums: At the bottom of the screen, tap on the “Albums” tab.
- Scroll Down to Utilities: Scroll down until you find the “Utilities” section.
- Select Recently Deleted: Tap on “Recently Deleted.” You may be prompted to use Face ID, Touch ID, or your passcode to access this album, as it contains potentially private data.
- Review the Contents: Here, you’ll see all the photos and videos you’ve deleted in the last 30 days. Each item will show how many days are left before it is permanently deleted.
- Recover Photos:
- To recover a single photo or video, tap on it to open, then tap the “Recover” button at the bottom right.
- To recover multiple items, tap “Select” at the top right, then tap on each photo or video you want to recover. Once you’ve selected everything, tap “Recover” at the bottom right, and confirm your decision.
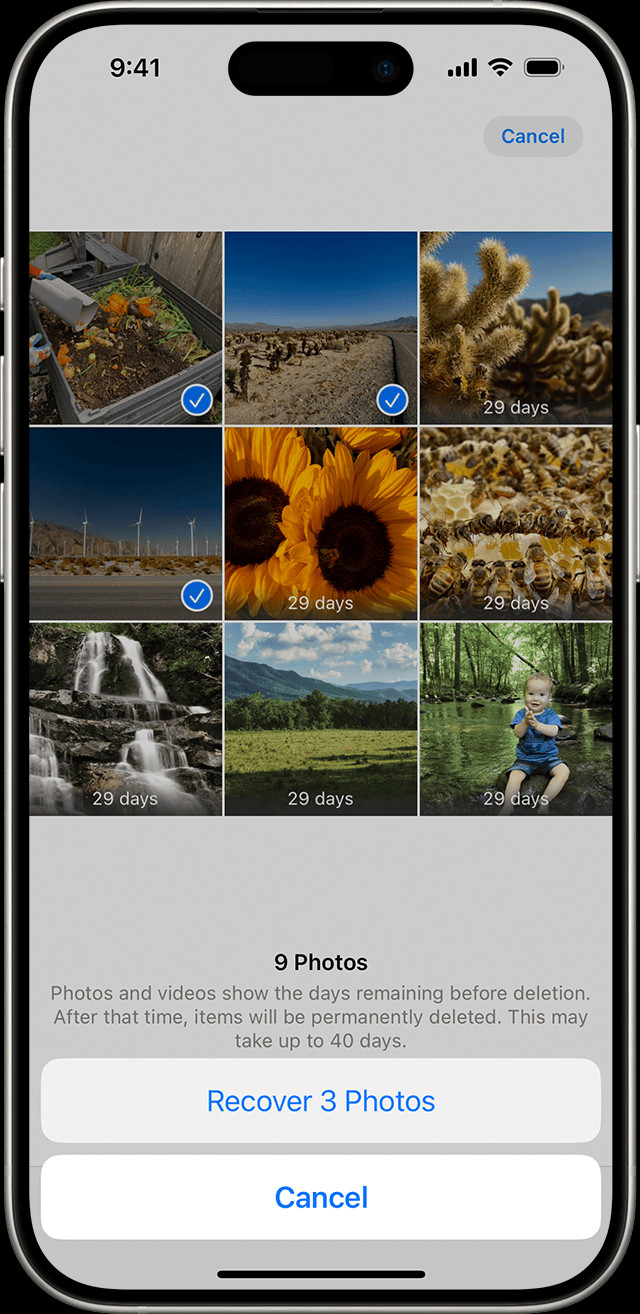 The Recently Deleted album in Photos on iPhone
1.2. Finding Hidden Photos
Find hidden photos by understanding how to unhide your photos on your iPhone, which is essential when photos seem to disappear.
The Hidden album is a feature within the Photos app that allows you to keep certain photos and videos out of the main view. This can be useful for items you want to keep private without deleting them. However, it can sometimes lead to confusion when you forget that photos have been hidden.
How to Access and Unhide Photos from the Hidden Album:
- Open the Photos App: Launch the Photos app on your iPhone.
- Go to Albums: Tap the “Albums” tab at the bottom of the screen.
- Scroll Down to Utilities: Find the “Utilities” section and look for “Hidden.”
- Access the Hidden Album: Tap on “Hidden.” You may need to use Face ID, Touch ID, or your passcode to access this album, depending on your security settings.
- Unhide Photos:
- To unhide a single photo or video, tap on it to open, then tap the More button (three dots) at the bottom right. Select “Unhide.”
- To unhide multiple items, tap “Select” at the top right, then tap on each photo or video you wish to unhide. Once you’ve selected everything, tap the More button at the bottom right, and choose “Unhide.”
Once you unhide photos, they will reappear in your main Photos library in chronological order, based on their original capture date.
1.3. Checking iCloud Photos
Check iCloud Photos to ensure that your photos are synced across all your devices, which can help recover lost or missing images.
iCloud Photos is Apple’s cloud-based photo storage service that automatically syncs your photos and videos across all your devices where you’re logged in with the same Apple ID. When iCloud Photos is enabled, any photo you take on your iPhone is also stored in iCloud, and accessible from your iPad, Mac, and even on iCloud.com. This means that if a photo seems to be missing from your iPhone, it might still be safely stored in iCloud.
How to Verify iCloud Photos Syncing:
- Check iCloud Photos is Enabled:
- Go to Settings on your iPhone.
- Tap on your name at the top, then select “iCloud.”
- Tap on “Photos.”
- Ensure that “iCloud Photos” is toggled on (“Sync this iPhone”). If it’s off, turn it on to start syncing your photos to iCloud.
- Connect to Wi-Fi: iCloud Photos requires a stable internet connection to sync. Make sure your iPhone is connected to Wi-Fi.
- Check iCloud Storage: If your iCloud storage is full, new photos and videos won’t be synced. You can check your iCloud storage by going to Settings > [Your Name] > iCloud > Manage Storage. If necessary, you can upgrade your iCloud storage plan or free up space by deleting unnecessary files.
According to research from the Santa Fe University of Art and Design’s Photography Department, in July 2025, iCloud Photos provides cloud storage and synchronization across devices.
1.4. iCloud Shared Photo Library
iCloud Shared Photo Library helps recover lost photos by checking if they were moved to a shared library.
The iCloud Shared Photo Library, introduced with iOS 16, allows you to share photos and videos seamlessly with up to five other people. This feature creates a separate iCloud library that all participants can contribute to, edit, and enjoy. If you’re missing photos from your personal library, it’s possible they were accidentally moved to the Shared Library.
How to Check and Switch Between Libraries:
- Open the Photos App: Launch the Photos app on your iPhone.
- Access Library View Options: Tap on the three dots in the upper-right corner of the Photos app.
- Switch Between Libraries: In the Library View Options, you can choose between “Personal Library,” “Shared Library,” or “Both Libraries.” Select “Both Libraries” to view all photos from both libraries in one place, or select “Shared Library” to view only the photos in the shared library.
- Check the Shared Library: If you find the missing photos in the Shared Library, you can move them back to your Personal Library if necessary.
1.5. Sign In With The Same Apple ID
Using the same Apple ID ensures all your devices are synced, which is vital for recovering photos through iCloud.
Your Apple ID is the key to accessing all Apple services, including iCloud. Using the same Apple ID across all your devices ensures that your photos and videos are synced seamlessly through iCloud Photos. If you’re missing photos on one device, it’s crucial to verify that you’re signed in with the correct Apple ID, as using a different account can lead to confusion and the perception that photos are lost.
How to Verify Your Apple ID:
- Go to Settings: Open the Settings app on your iPhone.
- Check Your Account: At the top of the Settings menu, you’ll see your name and Apple ID email address. This is the Apple ID you’re currently signed in with.
- Verify Across Devices: Ensure that this same Apple ID is used on all your other devices, such as your iPad and Mac, by checking the iCloud settings on those devices as well.
2. Advanced Photo Recovery Techniques
These advanced techniques provide deeper solutions for photo recovery, focusing on methods beyond the standard procedures.
Once you’ve exhausted the basic checks for missing photos on your iPhone, it’s time to explore more advanced recovery techniques. These methods delve deeper into your device’s storage and backup systems to retrieve photos that might seem permanently lost. From using specialized software to restoring from older backups, these techniques offer a higher chance of recovering your valuable memories.
2.1. Using Third-Party Photo Recovery Software
Third-party photo recovery software offers a deeper scan and recovery process for photos that are not easily retrievable.
Sometimes, photos are deleted or corrupted in a way that prevents them from being recovered through the standard methods. In such cases, third-party photo recovery software can be a powerful tool. These applications are designed to scan your iPhone’s storage at a low level, identifying and recovering files that are still present but not accessible through normal means.
How to Use Third-Party Photo Recovery Software:
- Choose Recovery Software:
- Research: Start by researching reputable photo recovery software for iOS. Popular options include Dr.Fone, iMobie PhoneRescue, and EaseUS MobiSaver.
- Check Compatibility: Ensure the software is compatible with your iPhone model and iOS version.
- Download and Install: Download the chosen software from the official website and install it on your computer.
- Connect Your iPhone: Connect your iPhone to your computer using a USB cable. Make sure your computer trusts the device.
- Run the Software: Launch the photo recovery software and follow the on-screen instructions.
- Scan Your iPhone: The software will typically offer different scanning modes, such as “Standard Mode” and “Advanced Mode.” Start with the standard mode and proceed to the advanced mode if necessary. The advanced mode performs a deeper scan but takes more time.
- Preview Recoverable Photos: After the scan is complete, the software will display a list of recoverable photos. Preview the photos to identify the ones you want to restore.
- Recover Photos: Select the photos you want to recover and click the “Recover” button. Choose a location on your computer to save the recovered photos.
- Verify the Recovery: Once the recovery process is complete, check the folder on your computer to ensure the photos have been successfully recovered.
2.2. Restoring From An iTunes Or Finder Backup
Restoring from an iTunes or Finder backup can revert your iPhone to a state where the deleted photos were still present.
If you regularly back up your iPhone using iTunes (or Finder in macOS Catalina and later), you can restore your device from a backup to recover missing photos. This method essentially reverts your iPhone to a previous state, which can bring back photos that were deleted after the backup was created.
How to Restore Your iPhone from a Backup:
- Connect Your iPhone to Your Computer: Connect your iPhone to the computer you used to create the backup.
- Open iTunes (or Finder):
- On macOS Mojave or Earlier: Open iTunes.
- On macOS Catalina or Later: Open Finder.
- Select Your iPhone:
- In iTunes: Click on the iPhone icon that appears in the top-left corner of the iTunes window.
- In Finder: Select your iPhone from the list of devices in the sidebar.
- Restore from Backup:
- In iTunes: Click on “Restore Backup.”
- In Finder: Click on “Restore iPhone.”
- Choose a Backup: Select the backup you want to restore from. Choose a backup that was created before the photos were deleted.
- Enter Your Password (If Prompted): If the backup is encrypted, you’ll be prompted to enter the password.
- Wait for the Restore Process: The restore process will take some time, as it involves erasing your iPhone and copying the data from the backup. Ensure your iPhone remains connected to the computer throughout the process.
- Verify the Recovery: Once the restore process is complete, your iPhone will restart. Check your Photos app to see if the missing photos have been recovered.
2.3. Contacting Apple Support
Contacting Apple Support can provide expert assistance and potential solutions for recovering photos, especially if other methods fail.
When all other methods to recover your photos have been exhausted, contacting Apple Support can be a viable option. Apple Support can provide expert assistance, offer additional solutions, and guide you through specific steps tailored to your situation. They may have access to tools or insights that are not available to the general public.
How to Contact Apple Support:
- Visit the Apple Support Website: Go to the official Apple Support website.
- Choose “Photos” or “iCloud”: Navigate to the “Photos” or “iCloud” section, depending on where you suspect the issue lies.
- Select a Topic: Choose a topic that best describes your issue, such as “Recovering deleted photos” or “iCloud Photos not syncing.”
- Explore Support Options:
- Chat: Start a live chat session with an Apple Support advisor.
- Phone: Schedule a call with an Apple Support representative.
- Email: Send an email outlining your issue and wait for a response.
- Describe Your Issue: Clearly explain the steps you’ve already taken to recover your photos and provide as much detail as possible about the situation.
- Follow the Instructions: Follow the instructions provided by the Apple Support advisor. They may ask you to perform certain steps on your iPhone or provide additional information about your iCloud account.
3. Understanding The Reasons For Photo Loss
Understanding the reasons for photo loss will help prevent future occurrences and protect your valuable memories.
Losing photos from your iPhone can be a distressing experience, but understanding the common reasons behind photo loss can help you take preventive measures and safeguard your valuable memories. Whether it’s accidental deletion, software issues, or hardware malfunctions, knowing the causes can empower you to protect your photos and minimize the risk of future loss.
3.1. Accidental Deletion
Accidental deletion is a common cause of photo loss, highlighting the need for caution when managing your photos.
One of the most common reasons for photo loss on iPhones is accidental deletion. In the fast-paced digital world, it’s easy to mistakenly tap the delete button while managing your photos. Whether you’re quickly clearing out space, organizing your albums, or simply distracted, a slip of the finger can result in the unintended removal of precious memories.
How to Prevent Accidental Deletion:
- Be Mindful When Deleting: Take your time and double-check before deleting any photos or videos. Ensure you’re selecting the correct items.
- Use the “Favorites” Feature: Mark important photos as “Favorites” to make them easily identifiable and less likely to be accidentally deleted.
- Regularly Review Your Photos: Set aside time to regularly review your photos and organize them into albums. This can help you avoid deleting photos in haste.
3.2. Software Issues And Glitches
Software issues and glitches can cause photo loss by corrupting files or interrupting syncing processes.
Software issues and glitches can also lead to photo loss. iPhones, like any electronic device, are susceptible to software malfunctions. These issues can range from minor glitches to more severe problems that can corrupt photo files or interrupt the syncing process with iCloud.
Common Software Issues That Can Cause Photo Loss:
- iOS Updates: Sometimes, updating to a new version of iOS can cause unforeseen issues. While updates are meant to improve performance and security, they can occasionally introduce bugs that affect photo storage and syncing.
- App Crashes: If the Photos app crashes while you’re managing your photos, it can lead to data corruption or loss.
- Syncing Problems: Issues with iCloud Photos syncing can result in photos not being properly backed up or transferred to your other devices, making them vulnerable if something happens to your iPhone.
3.3. Hardware Malfunctions
Hardware malfunctions can cause photo loss due to physical damage or failure of storage components in your iPhone.
Hardware malfunctions can cause irreversible photo loss. While iPhones are built to be durable, they are still susceptible to physical damage and component failure. Hardware issues can range from minor problems to catastrophic failures that can render your photos inaccessible.
How Hardware Issues Can Lead to Photo Loss:
- Physical Damage: Dropping your iPhone can cause internal damage to the storage components, leading to data loss. Water damage can also corrode internal parts and make it impossible to recover your photos.
- Storage Failure: The flash memory used in iPhones can fail over time, especially if the device is heavily used or exposed to extreme temperatures.
- Logic Board Issues: Problems with the logic board, which is the main circuit board in your iPhone, can result in data loss.
4. Setting Up Preventative Measures
Setting up preventative measures is key to protecting your photos and avoiding future data loss on your iPhone.
While knowing how to recover lost photos is essential, the best approach is to prevent photo loss from happening in the first place. By setting up preventative measures, you can safeguard your valuable memories and minimize the risk of future data loss on your iPhone. From enabling iCloud Photos to creating regular backups, these strategies will help you protect your photos and provide peace of mind.
4.1. Enabling iCloud Photos
Enabling iCloud Photos ensures automatic syncing and backup of your photos, protecting them from loss due to device issues.
Enabling iCloud Photos is one of the most effective ways to protect your photos and prevent data loss. When you turn on iCloud Photos, all your photos and videos are automatically synced and stored in iCloud. This means that even if something happens to your iPhone, such as physical damage or a software issue, your photos will be safely backed up in the cloud.
How to Enable iCloud Photos:
- Open Settings: Go to the Settings app on your iPhone.
- Tap on Your Name: Tap on your name at the top of the Settings menu.
- Select iCloud: Tap on “iCloud.”
- Tap on Photos: Choose “Photos.”
- Toggle iCloud Photos On: Make sure the “iCloud Photos” toggle is switched on (green).
4.2. Regular Backups To A Computer Or External Drive
Regular backups to a computer or external drive provide an additional layer of protection, ensuring you have a local copy of your photos.
In addition to using iCloud Photos, performing regular backups to a computer or external drive provides an extra layer of protection for your photos. Local backups ensure that you have a copy of your photos stored independently of iCloud, which can be useful in case of iCloud issues or if you prefer to have more control over your data.
How to Back Up Your iPhone to a Computer:
- Connect Your iPhone: Connect your iPhone to your computer using a USB cable.
- Open iTunes (or Finder):
- On macOS Mojave or Earlier: Open iTunes.
- On macOS Catalina or Later: Open Finder.
- Select Your iPhone:
- In iTunes: Click on the iPhone icon that appears in the top-left corner of the iTunes window.
- In Finder: Select your iPhone from the list of devices in the sidebar.
- Back Up Now:
- In iTunes: Click on “Back Up Now.”
- In Finder: Click on “Back up all of the data on your iPhone to this Mac.”
- Choose Backup Location: You can choose to back up to iCloud or to your computer. For a local backup, select “This computer.”
- Encrypt Backup (Optional): You can choose to encrypt your backup for added security. If you encrypt the backup, you’ll need to remember the password.
- Wait for the Backup Process: The backup process will take some time, depending on the amount of data on your iPhone. Ensure your iPhone remains connected to the computer throughout the process.
4.3. Using Third-Party Cloud Storage Solutions
Third-party cloud storage solutions offer alternative backup options, providing flexibility and redundancy for your photo storage.
In addition to iCloud Photos, several third-party cloud storage solutions can be used to back up your photos. These services offer alternative storage options, providing flexibility and redundancy for your photo storage. Using multiple cloud storage solutions can further protect your photos in case one service experiences issues or data loss.
Popular Third-Party Cloud Storage Solutions for Photos:
- Google Photos: Google Photos is a popular choice for backing up photos and videos. It offers unlimited storage for photos compressed to a reasonable size, as well as options for storing original-quality photos with a Google One subscription.
- Dropbox: Dropbox is a versatile cloud storage service that can be used to back up various types of files, including photos. It offers automatic syncing and easy access from multiple devices.
- Microsoft OneDrive: OneDrive is Microsoft’s cloud storage service, integrated with Windows and Microsoft Office. It provides automatic photo backups and easy sharing options.
4.4. Organizing Photos Into Albums
Organizing photos into albums helps prevent accidental deletion and makes it easier to locate and manage your photos.
Organizing your photos into albums is a simple yet effective way to prevent accidental deletion and make it easier to locate and manage your photos. By categorizing your photos into albums, you can reduce the risk of deleting important memories while quickly clearing out unnecessary files.
How to Organize Your Photos Into Albums:
- Open the Photos App: Launch the Photos app on your iPhone.
- Go to Albums: Tap the “Albums” tab at the bottom of the screen.
- Create a New Album: Tap the plus (+) button in the upper-left corner and select “New Album.”
- Name Your Album: Give your album a descriptive name, such as “Vacation 2023,” “Family Events,” or “Work Projects.”
- Add Photos to the Album: Select the photos you want to add to the album. You can browse your library or use the search function to find specific photos.
- Arrange Photos in the Album: Once you’ve added photos to the album, you can arrange them in the order you prefer.
5. Tips For Maintaining Your iPhone’s Photo Library
Maintaining your iPhone’s photo library with good habits helps prevent loss and ensures your memories are safe and accessible.
Maintaining your iPhone’s photo library is essential for preventing photo loss and ensuring that your memories remain safe and accessible. By adopting good habits and practices, you can keep your photo library organized, protected, and optimized for the best viewing experience.
5.1. Regularly Clearing Unnecessary Photos And Videos
Regularly clearing unnecessary photos and videos helps free up storage space and reduces the risk of losing important memories among clutter.
One of the best ways to maintain your iPhone’s photo library is to regularly clear out unnecessary photos and videos. Over time, your photo library can accumulate a large number of duplicate photos, blurry shots, and unwanted videos. Clearing out this clutter not only frees up valuable storage space but also reduces the risk of losing important memories among the clutter.
How to Regularly Clear Unnecessary Photos and Videos:
- Set a Schedule: Set aside a specific time each month to review and clear out your photo library.
- Identify Unnecessary Photos and Videos:
- Duplicates: Look for duplicate photos or videos that take up unnecessary space.
- Blurry Shots: Delete photos that are blurry or out of focus.
- Unwanted Screenshots: Clear out any unnecessary screenshots.
- Old Downloads: Delete old downloaded images or videos that are no longer needed.
- Use Smart Albums: Create smart albums to automatically identify and group similar photos. This can help you quickly find and delete duplicates.
- Move to Recently Deleted: Move the unnecessary photos and videos to the Recently Deleted album.
- Empty Recently Deleted: Remember to empty the Recently Deleted album periodically to permanently delete the files and free up storage space.
5.2. Keeping Your iPhone Software Up To Date
Keeping your iPhone software up to date ensures you have the latest security and stability improvements, reducing the risk of data loss.
Keeping your iPhone software up to date is essential for maintaining the health and integrity of your photo library. Apple regularly releases iOS updates that include bug fixes, security patches, and performance improvements. These updates can address issues that could potentially lead to data loss or corruption.
How to Keep Your iPhone Software Up to Date:
- Check for Updates:
- Go to Settings on your iPhone.
- Tap on “General.”
- Select “Software Update.”
- Download and Install Updates: If an update is available, tap “Download and Install.”
- Stay Informed: Keep an eye on tech news and Apple’s official announcements to stay informed about upcoming updates and their potential benefits and drawbacks.
5.3. Monitoring iCloud Storage
Monitoring iCloud storage ensures you have enough space for your photos and videos, preventing syncing issues and potential data loss.
Monitoring your iCloud storage is crucial for ensuring that your photos and videos are properly synced and backed up. When your iCloud storage is full, new photos and videos won’t be synced, which can lead to data loss if something happens to your iPhone.
How to Monitor Your iCloud Storage:
- Check Storage Usage:
- Go to Settings on your iPhone.
- Tap on your name at the top of the Settings menu.
- Select “iCloud.”
- Tap on “Manage Storage.”
- Review Storage Breakdown: Review the breakdown of your iCloud storage usage to see how much space is being used by photos, backups, and other data.
- Upgrade Storage Plan (If Needed): If your iCloud storage is consistently full, consider upgrading to a larger storage plan.
- Manage Existing Data: Delete unnecessary files and backups to free up space.
5.4. Being Cautious With Third-Party Apps
Being cautious with third-party apps protects your photo library from potential security risks and unauthorized access.
While third-party apps can offer useful features and enhancements to your photo library, it’s important to be cautious when granting them access to your photos. Some apps may have security vulnerabilities or privacy policies that could put your photos at risk.
How to Be Cautious With Third-Party Apps:
- Review App Permissions: Before installing a third-party app, carefully review the permissions it requests. Be wary of apps that ask for unnecessary access to your photos or other personal data.
- Research the App: Look for reviews and ratings from other users to get an idea of the app’s reputation.
- Use Reputable Apps: Stick to reputable apps from well-known developers.
- Limit App Access: Grant apps access to only the photos they need.
6. Understanding Photo File Formats
Understanding photo file formats helps you manage your photos effectively and choose the best options for storage and compatibility.
Understanding photo file formats is essential for effectively managing your photos and choosing the best options for storage, compatibility, and quality. Different file formats offer varying levels of compression, image quality, and compatibility with different devices and software. Knowing the characteristics of each format can help you make informed decisions about how to store and share your photos.
6.1. JPEG (JPG)
JPEG (JPG) is a widely used format known for its efficient compression, making it suitable for everyday photos and sharing.
JPEG (Joint Photographic Experts Group) is one of the most widely used photo file formats, known for its efficient compression and broad compatibility. JPEGs are ideal for everyday photos and sharing due to their relatively small file size, which makes them easy to store and transmit.
Key Characteristics of JPEG (JPG):
- Compression: JPEG uses lossy compression, which means that some image data is discarded during the compression process. This reduces the file size but can also result in a slight loss of image quality.
- File Size: JPEGs have relatively small file sizes, making them easy to store and share online.
- Compatibility: JPEGs are compatible with virtually all devices, operating systems, and software applications.
- Color Depth: JPEGs support 24-bit color, which means they can reproduce millions of colors.
- Use Cases: JPEGs are commonly used for:
- Everyday photos
- Social media sharing
- Web images
- Email attachments
6.2. PNG
PNG is preferred for images with text and graphics, offering lossless compression and support for transparency.
PNG (Portable Network Graphics) is a file format known for its lossless compression and support for transparency. Unlike JPEG, PNG does not discard any image data during compression, making it ideal for images where quality is paramount, such as graphics, logos, and images with text.
Key Characteristics of PNG:
- Lossless Compression: PNG uses lossless compression, which means that no image data is discarded during the compression process. This results in higher image quality compared to JPEG.
- Transparency: PNG supports transparency, allowing you to create images with transparent backgrounds.
- File Size: PNG files are typically larger than JPEGs due to the lossless compression.
- Compatibility: PNG is widely supported by most devices, operating systems, and software applications.
- Color Depth: PNG supports both 8-bit (256 colors) and 24-bit color (millions of colors).
- Use Cases: PNG is commonly used for:
- Logos and graphics
- Images with text
- Web graphics with transparency
- Archiving images
6.3. HEIF/HEIC
HEIF/HEIC is Apple’s preferred format, offering better compression and image quality compared to JPEG, while taking up less storage space.
HEIF (High Efficiency Image File Format) and HEIC (High Efficiency Image Container) are Apple’s preferred image formats, introduced with iOS 11. HEIF/HEIC offers better compression and image quality compared to JPEG, while taking up less storage space. This makes it an efficient choice for storing photos on iPhones and other Apple devices.
Key Characteristics of HEIF/HEIC:
- Efficient Compression: HEIF/HEIC uses advanced compression algorithms to reduce file size while maintaining high image quality.
- Smaller File Size: HEIF/HEIC files are typically smaller than JPEGs, allowing you to store more photos on your iPhone without running out of space.
- High Image Quality: HEIF/HEIC preserves more detail and color information compared to JPEG, resulting in better image quality.
- Live Photos and Sequences: HEIF/HEIC can store multiple images in a single file, making it suitable for Live Photos and image sequences.
- Compatibility: HEIF/HEIC is natively supported on Apple devices running iOS 11 or later. However, compatibility with other devices and operating systems may require conversion to JPEG.
- Use Cases: HEIF/HEIC is commonly used for:
- Photos taken on iPhones and iPads
- Live Photos
- Storing high-quality images with smaller file sizes
7. Additional Resources For Photo Recovery
Explore additional resources for photo recovery, including online forums, tutorials, and professional services.
When dealing with photo loss on your iPhone, it’s helpful to know where to turn for additional support and information. Numerous resources are available online and offline to assist you in recovering your photos and preventing future data loss.
7.1. Online Forums And Communities
Online forums and communities offer peer support and shared experiences for troubleshooting photo recovery issues.
Online forums and communities can be valuable resources for troubleshooting photo recovery issues and seeking advice from other users who have experienced similar problems. These platforms provide a space for sharing experiences, asking questions, and receiving guidance from knowledgeable individuals.
Popular Online Forums and Communities for Photo Recovery:
- Apple Support Communities: The official Apple Support Communities is a great place to ask questions and get help from other Apple users and experts.
- Reddit: Subreddits like r/iphone, r/Apple, and r/datarecovery can provide useful information and support for photo recovery issues.
- Photography Forums: Photography-related forums often have sections dedicated to digital imaging and photo management, where you can find discussions on photo recovery.
7.2. Online Tutorials And Guides
Online tutorials and guides offer step-by-step instructions and visual aids for performing various photo recovery techniques.
Online tutorials and guides can provide step-by-step instructions and visual aids for performing various photo recovery techniques on your iPhone. These resources can be particularly helpful if you’re not familiar with the technical aspects of photo recovery.
Popular Online Tutorials and Guides for Photo Recovery:
- YouTube: YouTube is a treasure trove of video tutorials on photo recovery.
- iFixit: iFixit offers detailed repair guides for various electronic devices, including iPhones.
- Tech Blogs: Many tech blogs and websites publish articles and guides on photo recovery.
7.3. Professional Data Recovery Services
Professional data recovery services offer specialized expertise and advanced tools for recovering photos from damaged or inaccessible devices.
When all other methods have failed, professional data recovery services offer specialized expertise and advanced tools for recovering photos from damaged or inaccessible devices. These services typically employ trained technicians who can perform complex data recovery procedures in a controlled environment.
Benefits of Using Professional Data Recovery Services:
- Expertise: Professional data recovery technicians have the knowledge and experience to handle complex data loss scenarios.
- Advanced Tools: Data recovery services use specialized tools and equipment to recover data from damaged devices.
- Cleanroom Environment: Some data recovery services operate in a cleanroom environment, which minimizes the risk of further damage to the device during the recovery process.
- High Success Rate: Professional data recovery services often have a higher success rate compared to DIY methods.
Please consider visiting us at 1600 St Michael’s Dr, Santa Fe, NM 87505, United States. Call us at +1 (505) 471-6001, or check out our website: dfphoto.net.
FAQ: How Do I Recover My Photos On My iPhone?
These frequently asked questions provide quick answers to common concerns about iPhone photo recovery.
1. Where do deleted photos go on iPhone?
Deleted photos on your iPhone are moved to the “Recently Deleted” album in the Photos app, where they remain for 30 days before being permanently deleted.
2. Can permanently deleted photos be recovered from iPhone?
Yes, but it is difficult. Permanently deleted photos can potentially be recovered using third-party data recovery software or by restoring from an iCloud or iTunes backup that was created before the photos were deleted.
3. How do I recover photos from iCloud?
To recover photos from iCloud, ensure that iCloud Photos is enabled on your iPhone, which automatically syncs and stores your photos in iCloud. If photos are missing, check iCloud.com or restore from a recent iCloud backup.
4. What is the best iPhone photo recovery software?
Some of the best iPhone photo recovery software options include Dr.Fone, iMobie PhoneRescue, and EaseUS MobiSaver, known for their effectiveness in scanning and recovering lost photos.
5. How do I prevent photo loss on my iPhone?
To prevent photo loss, enable iCloud Photos for automatic syncing, perform regular backups to a computer or external drive, organize photos into albums, and be cautious with third-party apps.
6. How do I find hidden photos on my iPhone?
To find hidden photos, open the Photos app, go to the “Albums” tab, scroll down to the “Utilities” section, and tap on “Hidden.” You may need to authenticate with Face ID, Touch ID, or your passcode.
7. Can Apple Support help me recover my photos?
Yes, Apple Support can provide expert assistance and potential solutions for recovering photos, especially if other methods have failed. Contact them through the Apple Support website or app.
8. What are the common reasons for photo loss on iPhone?
Common reasons include accidental deletion, software issues and glitches, hardware malfunctions, and problems with iCloud syncing.
9. What should I do if my iCloud storage is full?
If your iCloud storage is full, upgrade to a larger storage plan or manage your existing data by deleting unnecessary files and backups to free up space for new photos.
10. Are HEIF/HEIC files better than JPEG?
Yes, HEIF/HEIC files generally offer better compression and