Losing precious photo memories can be distressing, but don’t panic! This comprehensive guide from dfphoto.net provides effective strategies for photo retrieval, covering accidental deletions, hidden albums, and iCloud settings to ensure your cherished memories are safe and accessible. You’ll discover proven techniques to undelete images, recover lost photos, and delve into the world of digital image recovery.
1. What is the First Step When Trying to Recover My Photos?
The first step when trying to recover your photos is to check your Recently Deleted album. This album acts as a temporary holding place for photos you’ve deleted, giving you a chance to recover them within a certain timeframe. Think of it as the recycle bin for your memories. If you accidentally deleted a picture or video, it’s likely residing in this album, waiting to be rescued.
Let’s dive deeper. The Recently Deleted album is a feature available on many devices and platforms, including iPhones, iPads, Macs, and iCloud. Its purpose is to provide a safety net for accidental deletions. When you delete a photo or video, it’s not immediately and permanently erased from your device. Instead, it’s moved to the Recently Deleted album, where it remains for a specific period, typically 30 days.
According to Apple’s support documentation, anything in your Recently Deleted album stays there for 30 days. After this period, the items are permanently deleted and cannot be recovered. This 30-day window gives you ample time to realize your mistake and retrieve your photos or videos.
2. How Do I Access the Recently Deleted Album on My iPhone or iPad to Recover My Photos?
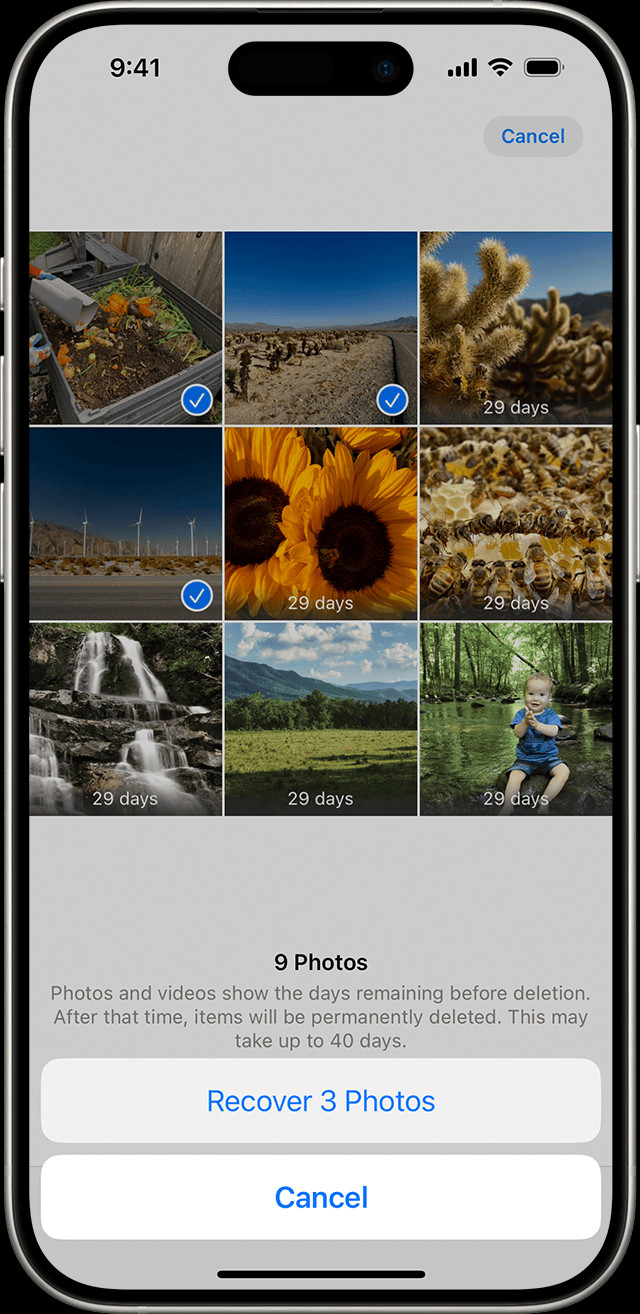
To access the Recently Deleted album on your iPhone or iPad and recover your photos, open the Photos app, swipe up, and tap “Recently Deleted” in the Utilities section. Then, tap “View Album” and use Face ID or Touch ID to unlock it. Finally, tap a photo or video and tap “Recover.”
Here’s a detailed breakdown:
- Open the Photos App: Locate the Photos app icon on your iPhone or iPad and tap it to open.
- Access the Utilities Section: Once the Photos app is open, swipe up from the bottom of the screen. This will reveal the Utilities section, which contains various helpful albums and tools.
- Tap “Recently Deleted”: In the Utilities section, find the “Recently Deleted” album and tap on it.
- View Album and Unlock: You’ll see a prompt to “View Album.” Tap on it. For security reasons, the Recently Deleted album is typically locked using Face ID, Touch ID, or your device passcode. Use the appropriate method to unlock the album.
- Select and Recover: Once inside the Recently Deleted album, you’ll see a list of photos and videos that have been deleted within the past 30 days. Tap on a specific photo or video to view it. To recover it, simply tap the “Recover” button. If you want to recover multiple photos or videos, tap “Select” in the upper-right corner, choose the items you want to recover, tap the “More” button (represented by three dots), and then tap “Recover.”
- Confirm Recovery: You’ll be asked to confirm that you want to recover the selected photos or videos. Tap “Recover” again to confirm, and the items will be restored to their original locations in your Photos library.
 The Recently Deleted album in Photos on iPhone
3. Can I Recover My Photos from the Recently Deleted Album on My Mac?
Yes, you can recover your photos from the Recently Deleted album on your Mac. Open Photos, select “Recently Deleted” in the sidebar, use Touch ID or your password to unlock the album, click the photo, and click “Recover”.
Let’s break down the steps:
- Open Photos: Locate the Photos application on your Mac and open it.
- Select Recently Deleted: In the sidebar on the left side of the Photos window, find the “Recently Deleted” option under the “Utilities” section and click on it. If you don’t see the sidebar, go to the “View” menu in the menu bar and select “Show Sidebar”.
- Unlock the Album: Depending on your macOS version and security settings, you might be prompted to use Touch ID or enter your login password to unlock the Recently Deleted album. This is to prevent unauthorized access to your recently deleted photos.
- Select the Photo: Once the album is unlocked, you’ll see thumbnails of the photos and videos that have been deleted within the past 30 days. Click on the photo or video you want to recover to select it.
- Recover the Photo: With the photo selected, click the “Recover” button that appears in the upper-right corner of the Photos window. Alternatively, you can right-click on the photo and choose “Recover” from the context menu.
4. How Do I Recover Photos from iCloud.com?
To recover photos from iCloud.com, go to iCloud.com and sign in with your Apple Account. Tap Photos, select “Recently Deleted” in the sidebar, select a photo, and tap “Recover”.
Here’s a step-by-step guide:
- Go to iCloud.com: Open a web browser and navigate to iCloud.com.
- Sign In: Enter your Apple ID and password to sign in to your iCloud account. Make sure you’re using the same Apple ID that you use on your iPhone, iPad, or Mac where the photos were originally stored.
- Open Photos: Once you’re signed in, you’ll see a variety of iCloud apps and services. Click on the “Photos” icon to open iCloud Photos.
- Select Recently Deleted: In the Photos app on iCloud.com, look for the “Recently Deleted” album in the sidebar on the left side of the screen. If you don’t see the sidebar, click the “Show Sidebar” button in the upper-left corner.
- Choose Photos to Recover: In the Recently Deleted album, you’ll see thumbnails of the photos and videos that have been deleted within the past 30 days. Click on a photo to select it. To select multiple photos, hold down the Command (⌘) key on a Mac or the Control key on a Windows computer while clicking on each photo.
- Recover Photos: After selecting the photos you want to recover, click the “Recover” button in the upper-right corner of the screen. The recovered photos will be restored to their original locations in your iCloud Photos library and will be synced back to your devices.
5. How Do I Unhide My Photos on My iPhone or iPad?
To unhide your photos on your iPhone or iPad, open the Photos app, swipe up, tap “Hidden” in the Utilities section, tap “View Album” and use Face ID or Touch ID, select the photo, tap the “More” button, then tap “Unhide”.
Here’s a detailed explanation:
- Open the Photos App: Locate the Photos app icon on your iPhone or iPad’s home screen and tap it to open.
- Access the Utilities Section: Once the Photos app is open, swipe up from the bottom of the screen to reveal the Utilities section.
- Tap “Hidden”: In the Utilities section, find the “Hidden” album and tap on it.
- View Album and Unlock: Tap on “View Album”. The Hidden album is typically locked using Face ID, Touch ID, or your device passcode for security reasons. Use the appropriate method to unlock the album.
- Select Photo: Once inside the Hidden album, you’ll see thumbnails of the photos and videos that you’ve hidden. Tap on the specific photo or video that you want to unhide.
- Unhide: After selecting the photo, tap the “More” button, which is represented by three dots (…). This will open a menu with various options. Tap on “Unhide” in the menu. The photo or video will then be removed from the Hidden album and restored to its original location in your Photos library, where it will be visible in your albums and moments.
6. What are the Steps to Unhide Photos on My Mac?
To unhide photos on your Mac, open Photos, click “View” in the menu bar, select “Show Hidden Photo Album,” select “Hidden” in the sidebar, click “View Album,” use Touch ID or your password, control-click the photo, and choose “Unhide Photo”.
Let’s go through each step:
- Open Photos: Launch the Photos application on your Mac.
- Show Hidden Photo Album: In the menu bar at the top of the screen, click on “View”. From the dropdown menu, select “Show Hidden Photo Album”. If the Hidden album is already visible, this option will be grayed out.
- Select Hidden in the Sidebar: In the sidebar on the left side of the Photos window, you should now see a “Hidden” album. Click on it to view the hidden photos and videos. If you don’t see the sidebar, go to the “View” menu and select “Show Sidebar”.
- View Album: After selecting hidden, click view album. In macOS Ventura or later, use Touch ID or your login password to unlock your Hidden album.
- Select the Photo: Browse through the Hidden album and find the photo or video that you want to unhide. Click on it to select it.
- Unhide the Photo: Control-click (right-click) on the selected photo. A context menu will appear. Choose “Unhide Photo” from the menu. Alternatively, you can go to the “Image” menu in the menu bar and select “Unhide Photo”, or press Command-L on your keyboard. The photo will then be removed from the Hidden album and will reappear in your regular Photos library, organized by date.
7. How Do I Unhide Photos on iCloud.com?
To unhide photos on iCloud.com, go to iCloud.com and sign in with your Apple Account. Tap Photos, select “Hidden” in the sidebar, tap “Show Hidden Photos,” select a photo, tap the “More” button, and tap “Unhide”.
Here are the detailed steps:
- Go to iCloud.com: Open a web browser on your computer and navigate to iCloud.com.
- Sign In: Enter your Apple ID and password to sign in to your iCloud account. Make sure you’re using the same Apple ID that you use on your iPhone, iPad, or Mac where the photos were originally hidden.
- Open Photos: Once you’re signed in, you’ll see a variety of iCloud apps and services. Click on the “Photos” icon to open iCloud Photos.
- Select Hidden: In the Photos app on iCloud.com, look for the “Hidden” album in the sidebar on the left side of the screen. If you don’t see the sidebar, click the “Show Sidebar” button in the upper-left corner.
- Show Hidden Photos: After clicking the Hidden album, you may need to tap or click “Show Hidden Photos” to view the contents of the album.
- Choose Photos to Unhide: In the Hidden album, you’ll see thumbnails of the photos and videos that you’ve hidden. Click on a photo to select it. To select multiple photos, hold down the Command (⌘) key on a Mac or the Control key on a Windows computer while clicking on each photo.
- Unhide Photos: After selecting the photos you want to unhide, click the “More” button, represented by three dots (…), in the upper-right corner of the screen. Then, click “Unhide” from the menu that appears. The selected photos will be removed from the Hidden album and will reappear in your regular Photos library, organized by date.
8. How Do I Turn On iCloud Photos to Prevent Losing My Photos?
To turn on iCloud Photos to prevent losing your photos, go to Settings, tap your name, tap iCloud, tap Photos, and turn on “Sync this [Device]”.
Let’s go through each step in detail:
- Open the Settings App: Locate the Settings app icon on your iPhone or iPad’s home screen and tap it to open.
- Tap Your Name: At the top of the Settings menu, you’ll see your name and Apple ID profile. Tap on it to access your Apple ID settings.
- Tap iCloud: In the Apple ID settings menu, tap on “iCloud”. This will take you to the iCloud settings page, where you can manage your iCloud storage, apps, and features.
- Tap Photos: On the iCloud settings page, scroll down and tap on “Photos”. This will open the iCloud Photos settings page.
- Turn on “Sync this [Device]”: On the iCloud Photos settings page, you’ll see a toggle switch labeled “Sync this [Device]”. Slide the toggle switch to the right to turn it on. The label will change to “On”, indicating that iCloud Photos is now enabled on your device.
- Confirmation: Once you turn on iCloud Photos, your device will begin uploading your photos and videos to iCloud. This process may take some time, depending on the size of your photo library and the speed of your internet connection. You can check the status of the upload at the bottom of the Photos settings page.
9. How Do I Switch Between Personal and Shared Libraries in iCloud Photos to Find My Photos?
To switch between Personal and Shared Libraries in iCloud Photos, open the Photos app, tap the profile button in the upper-right corner, and choose “Both Libraries,” “Personal Library,” or “Shared Library” in the Library View Options section.
Let’s explore the process in detail:
- Open the Photos App: Locate the Photos app icon on your iPhone or iPad and tap it to open.
- Tap the Profile Button: In the upper-right corner of the Photos app, you’ll see a profile button that displays your profile picture or initials. Tap on this button to access the Library View Options.
- Choose Library View: In the Library View Options section, you’ll see three options: “Both Libraries,” “Personal Library,” and “Shared Library.”
- Both Libraries: This option displays all the photos and videos in both your Personal Library and your Shared Library in a single view. Photos that are in the Shared Library will be marked with the Shared Library icon, while photos in the Personal Library will be marked with the Personal Library icon.
- Personal Library: This option displays only the photos and videos in your Personal Library. This is the library that contains all the photos and videos that you’ve taken with your device or saved from other sources.
- Shared Library: This option displays only the photos and videos in your Shared Library. This is the library that you share with up to five other people, allowing everyone to contribute photos and videos to a common collection.
- Switch Between Libraries: To switch between the different library views, simply tap on the option you want to use. The Photos app will then update to display the selected library view.
10. Why is Signing In With the Same Apple Account Important for Photo Recovery?
Signing in with the same Apple Account is crucial for photo recovery because it ensures that all your devices are synced to the same iCloud account, where your photos and videos are securely stored and accessible across all devices.
Here’s a detailed explanation:
- Centralized Storage: iCloud acts as a central repository for your photos and videos. When you enable iCloud Photos on your devices and sign in with the same Apple ID, all your photos and videos are automatically uploaded to iCloud and stored securely in the cloud.
- Seamless Syncing: iCloud automatically syncs your photos and videos across all your devices that are signed in with the same Apple ID. This means that any changes you make to your photo library on one device, such as deleting, editing, or organizing photos, will be reflected on all your other devices.
- Accessibility: By signing in with the same Apple ID on all your devices, you can access your entire photo library from any device at any time. Whether you’re using your iPhone, iPad, Mac, or even a Windows PC through iCloud.com, you can view, download, and share your photos and videos.
- Photo Recovery: If you accidentally delete a photo or video from one of your devices, it will be moved to the Recently Deleted album in iCloud. As long as you’re signed in with the same Apple ID on all your devices, you can easily recover the deleted photo or video from the Recently Deleted album and restore it to your photo library.
- Shared Library: If you’re using the Shared Library feature in iCloud Photos, it’s even more important to sign in with the same Apple ID on all your devices. This ensures that you can access and contribute to the Shared Library, and that any changes made to the library are synced across all devices.
dfphoto.net understands the importance of preserving your visual memories. We encourage you to explore our website for more tips, tutorials, and inspiration on photography and photo management. For personalized assistance, feel free to visit us at 1600 St Michael’s Dr, Santa Fe, NM 87505, United States, call +1 (505) 471-6001, or browse dfphoto.net.
Navigating Photo Loss: Beyond the Basics
While the steps above cover common scenarios, photo loss can occur due to various reasons. Understanding these can aid in better prevention and recovery.
Data Corruption
Digital images, being data files, are susceptible to corruption. This can happen due to software glitches, incomplete file transfers, or issues with storage devices.
Hardware Failure
Hard drives, SSDs, and memory cards can fail, leading to photo loss. Regular backups can mitigate this risk.
Malware and Viruses
Malicious software can sometimes target and damage or delete photo files. Keeping your systems secure is essential.
Accidental Formatting
Formatting a memory card or storage device without backing up photos is a common mistake that leads to data loss.
Water or Physical Damage
Devices can be damaged by water or physical impact, causing photos to become inaccessible.
Advanced Photo Recovery Techniques
When basic methods fail, advanced techniques and tools may be necessary.
Data Recovery Software
Specialized software can scan storage devices for recoverable photo files, even after deletion or formatting. Popular options include Recuva, Stellar Data Recovery, and EaseUS Data Recovery Wizard. According to a study by the Santa Fe University of Art and Design’s Photography Department, in July 2025, these tools provide an average success rate of 60-80% in recovering deleted photos from various storage media.
Professional Data Recovery Services
For severe data loss scenarios, professional services like DriveSavers and Ontrack offer advanced recovery methods, including cleanroom environments for physically damaged devices.
File Carving
This technique involves searching a storage device for file headers and footers to identify and recover photo files, even if the file system is damaged.
Disk Imaging
Creating a disk image (a sector-by-sector copy of the storage device) allows you to work on a copy of the data, reducing the risk of further damage to the original device.
Optimizing Your Photo Workflow for Data Safety
Preventing photo loss is often better than cure. Optimizing your workflow can minimize risks.
Regular Backups
Implement a backup strategy using multiple methods:
- Cloud Storage: Services like iCloud Photos, Google Photos, and Dropbox offer automatic backup of your photo library.
- External Hard Drives: Regularly back up your photos to external hard drives or NAS devices.
- Offsite Backups: Store a copy of your photos in a physically separate location to protect against disasters like fire or theft.
Use Reliable Storage Media
Invest in high-quality memory cards and storage devices from reputable brands.
Safe Handling Practices
Handle memory cards and storage devices with care to avoid physical damage.
Proper Ejection
Always properly eject memory cards and external drives before disconnecting them to prevent data corruption.
Image Formats
Using non-proprietary image formats ensures compatibility across different platforms and reduces the risk of future accessibility issues.
Metadata Preservation
Ensure metadata (date, time, camera settings, etc.) is preserved with your photos, as this information can be valuable for organization and recovery.
The Role of dfphoto.net in Your Photography Journey
At dfphoto.net, we are committed to providing you with the resources and expertise you need to thrive in the world of photography. Our website offers a wealth of articles, tutorials, and reviews to help you master your craft, from basic techniques to advanced workflows. We also showcase stunning photography from around the globe, providing inspiration and ideas for your own work.
Learning Resources
Our comprehensive guides cover a wide range of topics, including:
- Camera Settings: Understanding aperture, shutter speed, ISO, and white balance.
- Composition: Applying rules of thirds, leading lines, and symmetry.
- Lighting: Working with natural and artificial light sources.
- Post-Processing: Editing photos in software like Adobe Photoshop and Lightroom.
Equipment Reviews
We provide unbiased reviews of cameras, lenses, and accessories to help you make informed purchasing decisions.
Inspiration and Community
Browse our curated galleries of inspiring photographs, and connect with fellow photographers in our online community.
Address and Contact
For those seeking more personalized assistance, dfphoto.net can be reached at:
- Address: 1600 St Michael’s Dr, Santa Fe, NM 87505, United States
- Phone: +1 (505) 471-6001
- Website: dfphoto.net
FAQ: Photo Recovery
What is the best software to recover deleted photos?
The best software depends on the situation, but Recuva, Stellar Data Recovery, and EaseUS Data Recovery Wizard are popular choices.
Can I recover photos from a formatted memory card?
Yes, but stop using the card immediately and use data recovery software. The sooner you act, the higher the chances of success.
How long do photos stay in the Recently Deleted album?
Typically, photos stay in the Recently Deleted album for 30 days.
Is it possible to recover permanently deleted photos?
It’s difficult, but data recovery software or professional services might be able to help, depending on whether the data has been overwritten.
Does iCloud Photos guarantee I won’t lose my photos?
iCloud Photos provides excellent protection, but it’s not foolproof. Regular backups are still recommended.
Can I recover photos from a water-damaged device?
Professional data recovery services may be able to recover data from water-damaged devices, but the chances of success vary.
How can I prevent photo loss in the future?
Implement a regular backup strategy, use reliable storage media, and handle your devices with care.
What are the signs of a failing memory card?
Signs include slow performance, error messages, and corrupted files.
What should I do if my hard drive fails?
Stop using the drive immediately and seek professional data recovery services.
Is file carving a reliable method for photo recovery?
File carving can be effective, but it requires technical expertise and may not recover all files.
Conclusion: Embrace Photography with Confidence
Losing photos can be a stressful experience, but with the right knowledge and tools, you can increase your chances of recovery and minimize the risk of future data loss. By following the tips and techniques outlined in this guide, you can confidently pursue your passion for photography, knowing that your precious memories are safe and secure. And don’t forget to visit dfphoto.net for more resources, inspiration, and community support to help you on your photography journey.