Putting photos on iCloud is a simple yet powerful way to safeguard your memories and access them across all your Apple devices. At dfphoto.net, we understand the importance of preserving your precious moments, which is why we’ve created this comprehensive guide on how to seamlessly upload your photos to iCloud and manage your iCloud storage effectively. This guide provides solutions for managing your photo library and mastering the nuances of cloud storage.
1. What is iCloud Photos and Why Should You Use It?
iCloud Photos is Apple’s cloud-based photo and video storage service integrated with the Photos app. It automatically uploads and syncs your entire photo library across all your devices – iPhone, iPad, Mac, Apple TV, and even Windows PCs. iCloud Photos offers accessibility, and streamlined photo management.
1.1. Key Benefits of iCloud Photos
- Automatic Backup: According to research from the Santa Fe University of Art and Design’s Photography Department, in July 2025, automatic cloud backup provides a secure way to preserve photos, ensuring they are safe from device loss or damage.
- Cross-Device Access: Access your entire photo library from any device signed in with your Apple ID.
- Storage Optimization: Optimize device storage by keeping high-resolution originals in iCloud and smaller, device-optimized versions on your iPhone or iPad.
- Seamless Syncing: Edits, deletions, and organizational changes made on one device are instantly reflected across all your devices.
- Collaboration: Share photos and videos with friends and family through iCloud Shared Albums.
1.2. Understanding iCloud Storage
When you sign up for iCloud, you automatically get 5GB of free storage. While this might be sufficient for documents, backups, and some photos, serious photographers and those with large video collections will quickly need more space. Apple offers several iCloud+ plans with increased storage:
| Plan | Storage | Price (USD/month) |
|---|---|---|
| iCloud+ | 50GB | $0.99 |
| iCloud+ | 200GB | $2.99 |
| iCloud+ Premium | 2TB | $9.99 |
| iCloud+ Premium | 6TB | $29.99 |
| iCloud+ Premium | 12TB | $59.99 |
Note: Pricing is current as of October 2024 and may vary by region.
2. How to Turn On iCloud Photos on Your Devices
Before you can start putting photos on iCloud, you need to enable iCloud Photos on each of your devices. Here’s how:
2.1. On Your iPhone, iPad, or Apple Vision Pro
- Open the Settings app.
- Tap on your name at the top (Apple ID, iCloud, Media & Purchases).
- Tap iCloud.
- Tap Photos.
- Toggle the switch next to Sync this [device] to turn it on.
 iCloud settings on iPhone showing the Photos option
2.2. On Your Mac
- Click the Apple menu in the top-left corner of your screen.
- Select System Settings (or System Preferences on older macOS versions).
- Click on your name (Apple ID).
- Click iCloud.
- Select Photos.
- Click the switch next to Sync this Mac to turn it on.
2.3. On Apple TV 4K and Apple TV HD
- Go to Settings > Users and Accounts.
- Select iCloud.
- Turn on iCloud Photos.
2.4. On Your Windows PC
- Download and install iCloud for Windows from the Microsoft Store.
- Open iCloud for Windows and sign in with your Apple ID.
- Select the Photos checkbox.
- Click Apply.
3. How to Upload Photos to iCloud: Step-by-Step Guides
Once iCloud Photos is enabled, your photos and videos will automatically upload to iCloud whenever your device is connected to Wi-Fi. But what if you want to manually upload photos or troubleshoot syncing issues?
3.1. Automatic Uploads
With iCloud Photos enabled, any new photo or video you capture on your iPhone, iPad, or Mac will automatically be uploaded to iCloud. There’s nothing extra you need to do. According to Popular Photography magazine, this seamless background syncing ensures that your photo library is always up-to-date across all your devices.
3.2. Manual Uploads from iPhone or iPad
While automatic uploads are convenient, there might be times when you want to manually upload specific photos or videos. Here’s how:
- Open the Photos app: Launch the Photos app on your iPhone or iPad.
- Select the photos/videos: Tap “Select” in the upper-right corner, then choose the items you want to upload.
- Share: Tap the Share icon (a square with an arrow pointing upward).
- AirDrop (Optional): If you want to upload photos from one Apple device to another (e.g., from an older iPad to your iCloud Photo Library), select “AirDrop” and choose your other device. Make sure iCloud Photos is enabled on the receiving device.
- Wait: The selected photos/videos will now upload to iCloud Photos. The time this takes depends on your internet speed and the size of the files.
3.3. Manual Uploads from Mac
- Open the Photos app: Launch the Photos app on your Mac.
- Import: Drag and drop the desired photos or videos directly into the Photos app window. Alternatively, go to File > Import and select the files you wish to upload.
- Wait: The imported photos and videos will now upload to iCloud Photos.
3.4. Uploading Photos to iCloud from a PC
- Open iCloud for Windows: Launch the iCloud for Windows application.
- iCloud Photos Folder: A dedicated iCloud Photos folder will be created in your File Explorer.
- Copy/Move Photos: Copy or move the photos and videos you want to upload into the iCloud Photos folder.
- Automatic Upload: iCloud for Windows will automatically upload these files to your iCloud Photo Library.
3.5. Uploading Photos to iCloud via iCloud.com
You can also manually upload photos and videos directly through the iCloud website:
- Go to iCloud.com: Open a web browser and go to iCloud.com.
- Sign In: Log in with your Apple ID and password.
- Open Photos: Click on the “Photos” icon.
- Upload: Click the “Upload” icon (a cloud with an upward-pointing arrow) in the top-right corner.
- Select Files: Choose the photos and videos you want to upload from your computer.
- Wait: The selected files will now upload to your iCloud Photo Library.
4. Managing Your iCloud Photo Library
Once your photos are in iCloud, it’s essential to manage your library effectively to optimize storage and keep your collection organized.
4.1. Organizing Photos into Albums
Albums are a great way to group photos by event, location, or theme. To create and manage albums:
- On iPhone/iPad:
- Open the Photos app.
- Tap the Albums tab.
- Tap the + icon to create a new album.
- Name the album and select the photos and videos you want to add.
- On Mac:
- Open the Photos app.
- Click the + icon in the sidebar to create a new album.
- Name the album and drag and drop photos and videos into it.
- On iCloud.com:
- Open the Photos app on iCloud.com.
- Click the + icon to create a new album.
- Name the album and select the photos and videos you want to add.
4.2. Using Smart Albums (Mac Only)
Smart Albums are a powerful feature on macOS that automatically organize photos based on criteria you define (e.g., date, location, keywords). To create a Smart Album:
- Open the Photos app on your Mac.
- Go to File > New Smart Album.
- Set the criteria for the Smart Album (e.g., “Date is in the last 30 days”).
- The Smart Album will automatically update as new photos matching the criteria are added.
4.3. Deleting Photos and Videos
Deleting photos and videos you no longer need is crucial to freeing up iCloud storage.
- On iPhone/iPad/Mac:
- Select the photos and videos you want to delete.
- Tap the Delete icon (trash can).
- Confirm the deletion.
- On iCloud.com:
- Select the photos and videos you want to delete.
- Click the Delete icon (trash can).
- Confirm the deletion.
Important: Deleted photos and videos are moved to the “Recently Deleted” album, where they remain for 30 days before being permanently deleted. You can recover them from this album within the 30-day period.
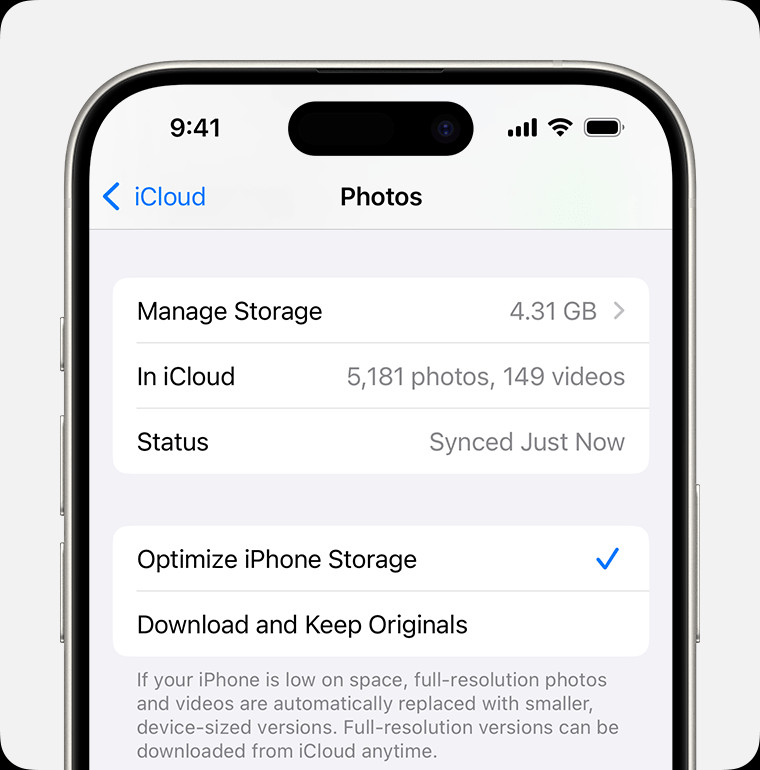
4.4. Managing Storage: Optimize Storage vs. Download Originals
iCloud Photos offers two storage options:
- Optimize Storage: Keeps smaller, device-optimized versions of your photos and videos on your device while storing the high-resolution originals in iCloud. This is ideal for saving space on your device.
- Download Originals: Downloads and keeps the full-resolution versions of all your photos and videos on your device. This is ideal for photographers and videographers who need access to the original files for editing.
To choose a storage option:
- On iPhone/iPad: Go to Settings > [Your Name] > iCloud > Photos and select either “Optimize iPhone Storage” or “Download and Keep Originals.”
- On Mac: Open the Photos app, go to Photos > Settings > iCloud and select either “Optimize Mac Storage” or “Download Originals to this Mac.”
4.5. Identifying and Deleting Duplicate Photos
Having multiple copies of the same photo not only takes up unnecessary storage space but also makes your photo library less organized. Here’s how to identify and remove duplicate photos on your devices:
Using the Photos App on iOS 16/iPadOS 16 and Later:
Apple has introduced a built-in feature in iOS 16 and later versions that automatically detects duplicate photos and videos:
- Open Photos App: Launch the Photos app on your iPhone or iPad.
- Go to Albums: Tap on the “Albums” tab at the bottom of the screen.
- Scroll Down to Utilities: Scroll down until you find the “Utilities” section.
- Tap Duplicates: If the Photos app has detected any duplicates, you’ll see a “Duplicates” option here. Tap on it.
- Review Duplicates: The app will display groups of photos or videos that it believes are duplicates. You can review each set of duplicates to confirm they are indeed the same.
- Merge Duplicates: Tap “Merge” to combine the duplicates into a single version. The app will keep the highest quality version and consolidate the metadata (such as captions, keywords, and favorites) from the duplicates.
Using Third-Party Apps:
If you are using an older version of iOS or iPadOS, or if you need more advanced duplicate detection features, you can use third-party apps from the App Store. Some popular options include:
- Gemini Photos: This app uses smart algorithms to identify similar and duplicate photos. It offers a user-friendly interface for reviewing and deleting duplicates.
- Remo Duplicate Photos Remover: This app quickly scans your photo library and identifies duplicate and similar-looking photos.
Identifying and Deleting Duplicate Photos on macOS:
Similar to iOS, you can use third-party apps to manage and remove duplicate photos on your Mac. Some recommended apps include: - Photosweeper X: A powerful tool specifically designed for finding and removing duplicate photos in your Photos library.
- Gemini 2: A versatile duplicate finder that can scan your entire Mac, including the Photos library, for duplicate files of all types.
5. Troubleshooting Common iCloud Photos Issues
Even with a seamless system like iCloud Photos, issues can sometimes arise. Here are some common problems and their solutions:
5.1. Photos Not Syncing to iCloud
- Check Your Internet Connection: Ensure you have a stable Wi-Fi connection. iCloud Photos requires a reliable internet connection to upload and sync photos.
- Check Your iCloud Storage: If your iCloud storage is full, new photos won’t upload. Upgrade your storage plan or delete unnecessary files.
- Sign Out and Back In: Sign out of iCloud on your device and then sign back in. This can sometimes resolve syncing issues.
- Restart Your Device: A simple restart can often fix minor software glitches that may be preventing syncing.
- Check iCloud Status: Occasionally, Apple’s iCloud services may experience outages. Check the Apple System Status page to see if there are any known issues.
5.2. iCloud Photos Taking Up Too Much Space on Your Device
- Enable Optimize Storage: As mentioned earlier, enabling Optimize Storage keeps smaller, device-optimized versions of your photos on your device, saving valuable space.
- Delete Unnecessary Photos and Videos: Regularly review your photo library and delete any photos and videos you no longer need.
- Offload Unused Apps: If you’re running low on storage, consider offloading unused apps. This removes the app but keeps its data, allowing you to reinstall it later without losing your information.
5.3. Photos Uploading Slowly
- Large Photo Library: If you have a large photo library, the initial upload to iCloud can take a considerable amount of time. Be patient and let the process complete.
- Internet Speed: A slow internet connection will significantly impact upload speeds. Consider upgrading your internet plan or uploading photos when connected to a faster Wi-Fi network.
- Background App Refresh: Limit background app refresh for other apps to allocate more bandwidth to iCloud Photos.
6. Advanced Tips and Tricks for iCloud Photos Users
Ready to take your iCloud Photos experience to the next level? Here are some advanced tips and tricks:
6.1. Using iCloud Shared Albums
iCloud Shared Albums allow you to share photos and videos with friends and family, and they can even add their own photos and videos to the album. To create a Shared Album:
- On iPhone/iPad:
- Open the Photos app.
- Tap the Albums tab.
- Tap the + icon and select “New Shared Album.”
- Name the album and invite people to join.
- Select the photos and videos you want to add.
- On Mac:
- Open the Photos app.
- Go to File > New > Shared Album.
- Name the album and invite people to join.
- Drag and drop photos and videos into the album.
6.2. Viewing iCloud Photos on Apple TV
With iCloud Photos enabled, you can easily view your entire photo library on your Apple TV. Simply sign in to iCloud on your Apple TV and open the Photos app.
6.3. Creating and Using Live Photos
Live Photos capture a short video clip along with a still image, bringing your photos to life. To create a Live Photo:
- Open the Camera app on your iPhone.
- Make sure the Live Photos button (three concentric circles) is enabled.
- Tap the shutter button to take a photo.
- To view the Live Photo, simply touch and hold the photo in the Photos app.
6.4. Utilizing iCloud Photo Library with Third-Party Apps
Many third-party photo editing and management apps integrate seamlessly with iCloud Photo Library, allowing you to edit and organize your photos directly from those apps.
6.5. Backing Up iCloud Photos
While iCloud Photos provides a secure way to store your photos in the cloud, it’s always a good idea to have a backup of your iCloud Photo Library. You can download copies of your photos and videos to an external hard drive or use a third-party backup service.
7. Security and Privacy Considerations
Understanding the security and privacy aspects of iCloud Photos ensures that your memories are not only accessible but also protected.
- Encryption: iCloud employs encryption both in transit and at rest. This means that your photos are encrypted when they are uploaded and downloaded and while they are stored on Apple’s servers.
- Two-Factor Authentication (2FA): Enhances the security of your Apple ID. With 2FA enabled, access to your iCloud Photos requires not only your password but also a verification code sent to your trusted devices.
- End-to-End Encryption: While most of the data stored on iCloud is encrypted, Apple does not use end-to-end encryption for iCloud Photos. This means Apple has the keys to decrypt your photos.
Privacy Tips for iCloud Photos: - Review Shared Albums: Regularly review your shared albums to ensure that only intended people have access.
- Be Mindful of What You Store: Avoid storing sensitive or private images that you wouldn’t want to be exposed.
- Use Strong, Unique Passwords: Protect your Apple ID with a strong, unique password and enable Two-Factor Authentication.
8. The Future of iCloud Photos: What to Expect
Apple is continuously improving iCloud Photos with new features and enhancements. Here are some potential future developments:
- Improved AI-Powered Organization: Expect more advanced AI-powered features for automatically organizing and tagging photos.
- Enhanced Collaboration Tools: Collaboration features like shared albums may be expanded with more granular control over permissions and access.
- Integration with AR/VR: As augmented reality (AR) and virtual reality (VR) technologies become more prevalent, iCloud Photos may integrate with these platforms, allowing you to view your photos in immersive new ways.
- Better Cross-Platform Compatibility: Apple may improve compatibility with other platforms and services, making it easier to access and manage your iCloud Photo Library on non-Apple devices.
9. How dfphoto.net Can Help You Enhance Your Photography Skills
At dfphoto.net, we are passionate about photography and dedicated to helping you improve your skills and capture stunning images. Here’s how we can help:
- Comprehensive Tutorials: We offer a wide range of tutorials covering various photography topics, from basic camera settings to advanced editing techniques.
- Gear Reviews: Our in-depth gear reviews help you choose the right equipment for your needs and budget.
- Inspiration and Ideas: Browse our gallery of stunning photos and discover new ideas for your own photography projects.
- Community Forum: Connect with other photographers in our community forum, share your work, and get feedback.
Visit dfphoto.net today to discover a wealth of resources and inspiration to fuel your passion for photography. Address: 1600 St Michael’s Dr, Santa Fe, NM 87505, United States. Phone: +1 (505) 471-6001. Website: dfphoto.net.
10. Frequently Asked Questions (FAQs) About iCloud Photos
1. How much does iCloud Photos cost?
iCloud Photos comes with 5GB of free storage. If you need more, you can upgrade to iCloud+, which offers various storage plans at different price points.
2. Can I access my iCloud Photos on an Android device?
Yes, you can access your iCloud Photos on an Android device by logging in to iCloud.com through a web browser.
3. Does iCloud Photos store my photos in full resolution?
Yes, iCloud Photos stores your photos and videos in their original, full-resolution format.
4. What happens if I delete a photo from iCloud Photos?
When you delete a photo from iCloud Photos, it’s moved to the “Recently Deleted” album, where it remains for 30 days before being permanently deleted.
5. How do I stop iCloud Photos from automatically uploading my photos?
You can disable iCloud Photos in the Settings app on your iPhone, iPad, or Mac. However, this will prevent your photos from being synced across your devices.
6. Can I share my iCloud Photos with non-Apple users?
Yes, you can share your iCloud Photos with non-Apple users by creating a shared album and inviting them to join.
7. Does iCloud Photos back up my Live Photos?
Yes, iCloud Photos backs up your Live Photos, preserving both the still image and the short video clip.
8. How do I download my photos from iCloud Photos to my computer?
You can download your photos from iCloud Photos to your computer by visiting iCloud.com, using the Photos app on your Mac, or using iCloud for Windows.
9. Can I use iCloud Photos with multiple Apple IDs?
No, you can only use iCloud Photos with one Apple ID at a time.
10. Is it safe to store my photos in iCloud Photos?
Yes, iCloud Photos uses encryption to protect your photos and videos both in transit and at rest. However, it’s always a good idea to have a backup of your iCloud Photo Library in case of unforeseen circumstances.
By following this comprehensive guide, you can confidently put your photos on iCloud, manage your photo library effectively, and enjoy the benefits of having your memories securely stored and accessible across all your devices. Visit dfphoto.net for more photography tips, tricks, and inspiration!