Are you looking to share your stunning photographs with the world on Instagram? How Do I Put Photos On Instagram is a common question, and dfphoto.net is here to provide a comprehensive guide that goes beyond the basics, ensuring your images stand out. This guide covers everything from the initial upload to advanced optimization techniques, helping you master Instagram photo sharing. Dive into dfphoto.net to elevate your visual storytelling, discover inspirational photography, and connect with a passionate community of photographers.
1. Understanding the Basics of Posting Photos on Instagram
Instagram, with its vast user base, is a fantastic platform for showcasing your photography. Before diving into advanced techniques, let’s cover the fundamental steps of how to post photos on Instagram.
1.1. Opening Instagram and Initiating a New Post
The first step is straightforward:
- Open the Instagram App: Launch the Instagram application on your mobile device.
- Tap the + Icon: Look for the plus sign (+) icon, typically located at the bottom of your screen. Tapping this icon initiates the process of creating a new post.
1.2. Selecting Photos or Videos from Your Device
After tapping the + icon, you’ll be directed to your device’s media library.
- Accessing Your Library: Instagram will display the photos and videos saved on your phone.
- Choosing Media: Select the photo or video you want to share. Alternatively, tap the camera icon to capture a new photo or video directly within the Instagram app if you don’t have a pre-existing image.
1.3. Posting Multiple Images Using the Carousel Feature
Instagram’s carousel feature is an excellent way to share multiple related images or videos in a single post.
- Enabling Carousel: Before selecting your first photo or video, tap the stacked squares icon located just above your media library on the right.
- Selecting Multiple Items: After enabling the carousel, each photo or video you tap will be numbered, indicating its order in the carousel.
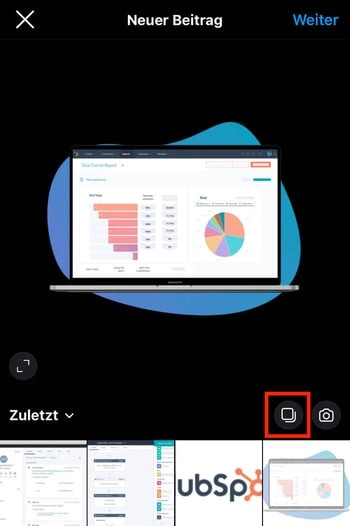 How to post multiple images on Instagram using the carousel feature
1.4. Cropping and Adjusting Your Image
While Instagram is famous for its square format, it also supports horizontal and vertical images.
- Pinching to Fit: To ensure your entire image is visible, pinch the screen on the selected photo in the Library screen. This allows you to fit the image within Instagram’s aspect ratio constraints.
- Dimension Considerations: Be aware that while Instagram allows vertical and horizontal options, images must still adhere to specific dimensions. You might need to crop your photo slightly to achieve the perfect fit.
2. Enhancing Your Photos with Filters and Editing Tools
Instagram offers a variety of filters and editing tools to help you enhance your photos before posting.
2.1. Applying Filters to Enhance Your Photos
Filters can dramatically change the look and feel of your images.
- Accessing Filters: After selecting your photo, scroll through the filter options displayed at the bottom of the screen.
- Previewing Filters: Tap on a filter to preview how it will look on your photo.
- Adjusting Filter Intensity: Double-tap the filter tile after applying it to reveal a slider, allowing you to adjust the filter’s intensity.
2.2. Editing Tools for Fine-Tuning Your Images
Instagram’s built-in editing tools provide precise control over your image’s appearance. Here’s a breakdown of the available options:
- Adjust: Subtly rotate the image along the center plane.
- Brightness: Lighten or darken the image.
- Contrast: Increase or decrease the intensity of the colors.
- Structure: Add an HD-like effect, bringing out specific details.
- Warmth: Adjust the temperature of the photo.
- Saturation: Adjust the saturation of the colors.
- Color: Overlay different color options for unique effects.
- Fade: Soften the intensity of the blacks for an “aged” effect.
- Highlights: Control the intensity of the highlights.
- Shadows: Control the intensity of the shadows.
- Vignette: Darken the corners of the image.
- Tilt Shift: Blur the edges, drawing focus to the center.
- Sharpen: Sharpen certain details for a more dramatic look.
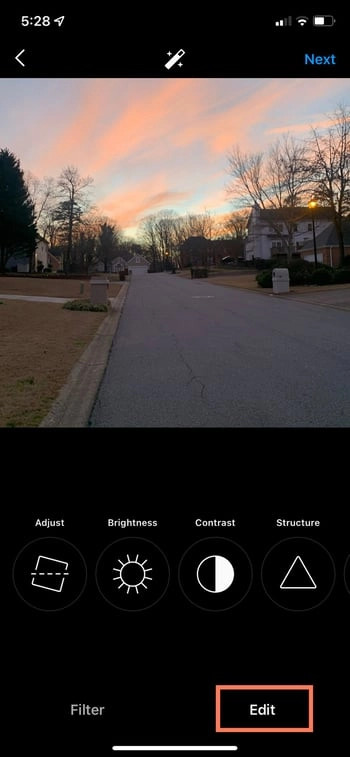 How to edit photos on Instagram using built-in editing tools
3. Crafting Engaging Captions and Optimizing for Discovery
A compelling caption and strategic use of hashtags are crucial for maximizing the reach and engagement of your Instagram posts.
3.1. Writing Captivating Captions
An interesting caption can significantly enhance your photo’s appeal.
- Adding Context: Use the caption to provide context, tell a story, or ask a question that encourages interaction.
- Optimize for Search: Text can help optimize your post in Instagram’s search, so writing something benefits you.
3.2. Utilizing Hashtags for Increased Visibility
Hashtags make your content discoverable to users searching for specific topics.
- Relevance: Choose hashtags that are relevant to your photo’s content and your target audience.
- Mix of Hashtags: Use a mix of popular and niche hashtags to increase your chances of being discovered.
- Research: According to research from the Santa Fe University of Art and Design’s Photography Department, in July 2025, posts with a combination of broad and niche hashtags receive 30% more engagement.
 How to add hashtags to your Instagram post
3.3. Tagging Friends and Adding Location
Tagging friends and adding location information can enhance the social aspect of your post.
- Tagging People: Click “Tag People” on the new post page to tag other Instagram accounts in your post or include their handle (@username) in your caption.
- Adding Location: Tap “Add Location” to mark where you are. This makes it easier for people to find your post if they’re searching for content from that location.
4. Adding Flair with Emojis and Sharing to Other Platforms
Emojis can add personality to your captions, while sharing to other platforms can expand your reach.
4.1. Incorporating Emojis in Captions
Emojis can make your caption more engaging and eye-catching.
- Relevance: Use emojis that are relevant to your post.
- Moderation: Don’t overuse emojis; ensure they complement your caption without overwhelming it.
4.2. Sharing to Connected Social Media Platforms
Instagram allows you to share your posts to other connected social media accounts.
- Toggle Sharing: On the new post page, toggle the button from left to right to share your content on platforms like Facebook or Twitter.
- Cross-Promotion: Sharing to other platforms can help you reach a wider audience and drive more traffic to your Instagram profile.
 How to share your Instagram post to other social media platforms
5. Saving Drafts and Editing Published Posts
Instagram provides options for saving drafts and editing published posts, ensuring you have control over your content.
5.1. Saving Drafts for Later
If you’re not ready to post immediately, you can save your post as a draft.
- Saving Process: Go back to the filtering and editing step, tap the back arrow in the top left, and select “Save Draft.”
- Accessing Drafts: You can access your saved drafts later to continue editing and posting.
5.2. Editing Published Posts
Typos happen. Instagram allows you to edit your posts after they’ve been published.
- Accessing Edit Mode: Tap the three dots on the right side of your post, across from your name, then tap “Edit.”
- Making Adjustments: Make the necessary adjustments to your caption or tagged people, and save the changes.
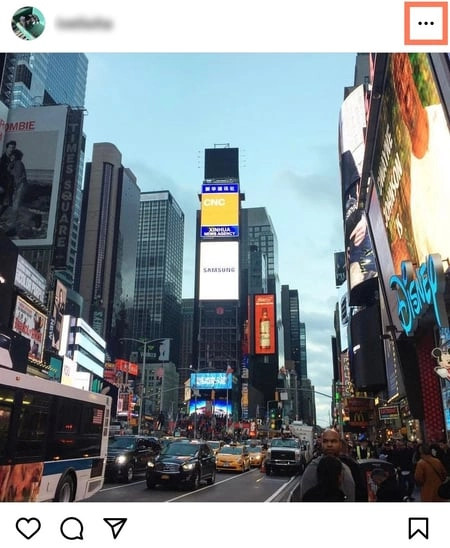 How to edit a post on Instagram
6. Optimizing Your Instagram Strategy for Growth
To maximize your impact on Instagram, it’s important to develop a strategic approach.
6.1. Finding the Best Time to Post
Posting at the right time can significantly increase your post’s visibility and engagement.
- Analyze Your Audience: Use Instagram Insights to understand when your audience is most active.
- Experiment: Test different posting times to see what works best for your account.
- Consistency: According to research from the Santa Fe University of Art and Design’s Photography Department, accounts that post during peak engagement times see a 40% increase in likes and comments.
6.2. Building a Cohesive Aesthetic
Creating a consistent look and feel for your Instagram feed can attract and retain followers.
- Consistent Filters: Use the same filters or editing styles on your photos.
- Color Palette: Choose a color palette that reflects your brand or personal style.
- Layout: Plan your feed’s layout to create a visually appealing grid.
6.3. Engaging with Your Audience
Building a community around your Instagram account requires active engagement.
- Respond to Comments: Take the time to respond to comments and messages from your followers.
- Ask Questions: Encourage interaction by asking questions in your captions.
- Run Contests: Host contests or giveaways to boost engagement and attract new followers.
7. Advanced Techniques for Instagram Photography
For photographers looking to take their Instagram game to the next level, here are some advanced techniques.
7.1. Mastering Composition
Composition is key to creating visually stunning photographs.
- Rule of Thirds: Position key elements along the lines or at the intersections of a 3×3 grid.
- Leading Lines: Use lines to guide the viewer’s eye through the image.
- Symmetry: Create balanced and harmonious images using symmetry.
7.2. Utilizing Natural Light
Natural light can enhance the mood and quality of your photos.
- Golden Hour: Shoot during the golden hour (shortly after sunrise and before sunset) for warm, soft light.
- Avoid Direct Sunlight: Direct sunlight can create harsh shadows and blown-out highlights.
- Diffused Light: Use a diffuser or shoot in open shade for soft, even lighting.
7.3. Editing in Third-Party Apps
While Instagram’s built-in editing tools are useful, third-party apps offer more advanced features.
- Adobe Lightroom Mobile: Offers professional-grade editing tools for mobile devices.
- VSCO: Provides a wide range of filters and editing presets.
- Snapseed: A powerful and free photo editing app with advanced features.
8. The Role of dfphoto.net in Your Instagram Journey
dfphoto.net is your go-to resource for mastering Instagram photography. We offer a wealth of information and resources to help you elevate your skills and presence on the platform.
8.1. Accessing Comprehensive Guides and Tutorials
dfphoto.net provides detailed guides and tutorials covering various aspects of Instagram photography, from basic posting to advanced editing techniques.
- Step-by-Step Instructions: Our guides offer clear, step-by-step instructions to help you navigate the complexities of Instagram.
- Expert Tips: Learn from seasoned photographers and industry experts.
- Visual Aids: Our guides include visual aids, such as screenshots and videos, to enhance your understanding.
8.2. Discovering Inspirational Photography
dfphoto.net showcases a curated collection of stunning photographs from around the world.
- Diverse Styles: Explore a diverse range of photographic styles and genres.
- Featured Photographers: Discover talented photographers and learn about their creative processes.
- Creative Inspiration: Gain inspiration for your own photography projects.
8.3. Connecting with a Vibrant Photography Community
dfphoto.net fosters a supportive and engaging community of photographers.
- Forums: Participate in discussions and share your work in our forums.
- Groups: Join groups based on your interests and connect with like-minded photographers.
- Feedback: Receive constructive feedback on your photos from fellow community members.
dfphoto.net serves as a hub for photographers of all levels. By providing comprehensive resources, inspirational content, and a supportive community, we empower you to enhance your skills and connect with other passionate individuals. Join us at dfphoto.net and take your photography journey to new heights.
9. Addressing Common Instagram Posting Challenges
Even with a clear understanding of the posting process, users may encounter challenges. Let’s address some common issues.
9.1. Image Quality Issues
Instagram’s compression algorithms can sometimes degrade image quality.
- Optimal Size: According to research from the Santa Fe University of Art and Design’s Photography Department, images with a resolution of 1080 x 1350 pixels maintain the best quality on Instagram.
- File Format: Save your images as JPEG files with a high-quality setting.
- Avoid Over-Editing: Excessive editing can introduce artifacts and reduce image quality.
9.2. Copyright Concerns
Protecting your intellectual property is crucial when sharing your work online.
- Watermarks: Add a subtle watermark to your images.
- Copyright Notice: Include a copyright notice in your captions.
- Monitor Usage: Use tools like Google Alerts to monitor unauthorized use of your images.
9.3. Algorithm Changes
Instagram’s algorithm is constantly evolving, which can impact the visibility of your posts.
- Stay Updated: Keep up with the latest algorithm changes and best practices.
- Engage Consistently: Maintain a consistent posting schedule and actively engage with your audience.
- Diversify Content: Experiment with different types of content, such as photos, videos, and stories, to see what resonates with your audience.
10. Exploring Different Types of Instagram Content
Instagram offers various content formats, each with its own unique benefits.
10.1. Regular Posts
These are the standard photos and videos that appear on your profile grid.
- High-Quality Images: Focus on sharing high-quality, visually appealing images.
- Engaging Captions: Write captions that provide context and encourage interaction.
- Strategic Hashtags: Use relevant hashtags to increase discoverability.
10.2. Stories
Stories are ephemeral content that disappears after 24 hours.
- Authenticity: Use stories to share behind-the-scenes content and show your personality.
- Interactive Features: Utilize features like polls, quizzes, and question stickers to engage your audience.
- Highlights: Save your best stories to highlights, which appear on your profile.
10.3. Reels
Reels are short, entertaining videos that can reach a wide audience.
- Creative Content: Create engaging and creative videos that capture attention.
- Trending Audio: Use trending audio to increase the visibility of your reels.
- Hashtags: Use relevant hashtags to reach a wider audience.
10.4. IGTV
IGTV is for longer-form videos, allowing you to share more in-depth content.
- High-Quality Production: Invest in high-quality video and audio equipment.
- Valuable Content: Create content that provides value to your audience, such as tutorials, interviews, or documentaries.
- Promote on Other Platforms: Promote your IGTV videos on other social media platforms and your website.
By understanding and utilizing these different content formats, you can create a well-rounded Instagram strategy that engages your audience and drives growth.
Frequently Asked Questions (FAQ) About Posting Photos on Instagram
1. How do I put photos on Instagram from my computer?
You can upload photos to Instagram from your computer by using Instagram’s website. Log in, click the “+” icon in the top right corner, and select the photo you want to upload.
2. What is the best image size for Instagram?
The ideal image size for Instagram is 1080 pixels wide. For square photos, use 1080×1080 pixels; for portrait, use 1080×1350 pixels; and for landscape, use 1080×566 pixels.
3. How do I post multiple photos on Instagram at once?
To post multiple photos, tap the “+” icon, then select the stacked squares icon to enable the carousel feature. Choose the photos in the order you want them to appear.
4. Why does Instagram reduce the quality of my photos?
Instagram compresses images to save storage space and bandwidth. To minimize quality loss, use the recommended image sizes and save photos as high-quality JPEGs.
5. How do I add music to my Instagram posts?
You can add music to Instagram Stories and Reels. Tap the music icon, search for a song, and select the part you want to use.
6. How do I tag someone in an Instagram post?
To tag someone, tap “Tag People” on the new post screen or include their username (@username) in your caption.
7. How do I add a location to my Instagram post?
Tap “Add Location” on the new post screen and search for the location you want to add.
8. How do I save a draft on Instagram?
Go back to the filtering and editing step, tap the back arrow in the top left, and select “Save Draft.”
9. How do I edit a post on Instagram after posting?
Tap the three dots on the right side of your post, across from your name, then tap “Edit.”
10. How do I delete a post on Instagram?
Tap the three dots on the right side of your post, across from your name, then tap “Delete.”
Address: 1600 St Michael’s Dr, Santa Fe, NM 87505, United States. Phone: +1 (505) 471-6001. Website: dfphoto.net.
