Do you want to protect your cherished photos from loss or damage? Putting your photos in the cloud is a great solution, and dfphoto.net is here to guide you through the process. Cloud storage provides a safe and accessible backup, ensuring your memories are always within reach. This article delves into the best methods for uploading your photos to the cloud, offering practical advice for both beginners and seasoned photographers. You’ll discover tips for organizing your images, choosing the right cloud service, and optimizing your workflow. Let’s dive in and discover the seamless world of cloud-based photo management!
1. Understanding the Benefits of Cloud Storage for Photos
Why should you entrust your precious photos to the cloud? Cloud storage offers a multitude of advantages that can greatly enhance your photo management workflow and give you peace of mind.
- Data Security: Cloud storage provides a secure backup of your photos, protecting them from potential data loss due to hardware failure, theft, or natural disasters. Services like Google Photos, iCloud Photos, and Dropbox employ robust security measures to safeguard your data.
- Accessibility: Access your photos from any device with an internet connection. Whether you’re on your computer, tablet, or smartphone, your photos are always at your fingertips, making it easy to share and enjoy them.
- Organization: Cloud services offer tools to organize your photos with albums, tags, and facial recognition, making it simple to find specific images quickly. This eliminates the hassle of sifting through endless files on your computer.
- Collaboration: Share photos and albums with friends, family, or clients, enabling seamless collaboration on projects. This is especially useful for photographers working with teams or delivering images to clients.
- Storage Space: Free up valuable storage space on your devices by moving your photo library to the cloud. This is particularly beneficial for photographers who work with large RAW files or high-resolution videos.
- Automatic Backup: Many cloud services offer automatic backup features, ensuring that your new photos are instantly and securely stored in the cloud without any manual effort.
- Editing and Sharing: Some cloud platforms include basic photo editing tools and direct sharing options to social media, streamlining your workflow from capture to publishing.
Storing photos in the cloud is a smart move for anyone who values their images and wants to ensure they’re protected and easily accessible.
2. Choosing the Right Cloud Storage Service for Your Photos
Selecting the right cloud storage service is a critical decision that depends on your specific needs, budget, and workflow. Here’s a breakdown of popular options to help you make an informed choice:
2.1. iCloud Photos: Seamless Integration for Apple Users
For those deeply embedded in the Apple ecosystem, iCloud Photos offers unparalleled integration with iPhones, iPads, and Macs.
| Feature | Description |
|---|---|
| Integration | Seamlessly syncs photos across all Apple devices. |
| Storage | Starts with 5GB free; upgrade to iCloud+ for more storage. |
| Optimize Storage | Option to optimize device storage by keeping smaller versions of photos on your device and full-resolution versions in the cloud. |
| Sharing | Easy sharing with iCloud Photo Sharing and Shared Albums. |
| Editing | Basic editing tools available within the Photos app. |
| Privacy & Security | Photos are encrypted both in transit and at rest. |
According to Apple, iCloud Photos automatically keeps every photo and video you take in iCloud, so you can access your library from any device, anytime you want — just open the Photos app.
2.2. Google Photos: Versatile and AI-Powered
Google Photos is renowned for its AI-powered features and cross-platform compatibility, making it a favorite among Android and Google users.
| Feature | Description |
|---|---|
| Integration | Works seamlessly with Android and Google services; accessible on any device via web browser. |
| Storage | 15GB of free storage shared across Google Drive, Gmail, and Google Photos; upgrade to Google One for more storage. |
| AI Features | Advanced facial recognition, automatic album creation, and smart search capabilities. |
| Editing | Robust editing tools, including filters, adjustments, and AI-powered enhancements. |
| Sharing | Easy sharing via links, shared albums, and direct integration with social media. |
| Privacy & Security | Google Photos uses encryption to protect your data; privacy settings allow you to control who can see your photos. |
2.3. Dropbox: Flexible Storage for Professionals
Dropbox is a versatile cloud storage solution favored by professionals for its file-sharing capabilities and integration with various apps.
| Feature | Description |
|---|---|
| Integration | Integrates with a wide range of third-party apps, enhancing workflow flexibility. |
| Storage | Starts with 2GB free; Dropbox Plus and Professional plans offer more storage and features. |
| File Sharing | Robust file-sharing options with granular permissions control. |
| Version History | Keeps track of file versions, allowing you to revert to previous versions if needed. |
| Security | Dropbox uses encryption to protect your files; two-factor authentication adds an extra layer of security. |
| Collaboration | Excellent for team collaboration, with features like shared folders and file requests. |
2.4. Amazon Photos: Prime Perks for Photo Storage
Amazon Photos offers unlimited full-resolution photo storage for Amazon Prime members, making it an attractive option for those already subscribed.
| Feature | Description |
|---|---|
| Integration | Seamlessly integrates with Amazon devices and services. |
| Storage | Unlimited full-resolution photo storage for Amazon Prime members; 5GB of video storage. |
| Organization | Tools for organizing photos with albums, tags, and facial recognition. |
| Sharing | Easy sharing with family and friends via shared albums and links. |
| Printing | Option to order prints and photo gifts directly from Amazon Photos. |
| Privacy & Security | Amazon Photos uses encryption to protect your data; you can control who has access to your photos through sharing settings. |
2.5. Microsoft OneDrive: Integrated with Windows and Office
OneDrive is deeply integrated with Windows and Microsoft Office, making it a convenient option for users of these products.
| Feature | Description |
|---|---|
| Integration | Seamlessly integrates with Windows and Microsoft Office apps. |
| Storage | Starts with 5GB free; upgrade to Microsoft 365 for 1TB of storage and access to Office apps. |
| Collaboration | Real-time collaboration on Office documents; easy sharing via links and shared folders. |
| Version History | Keeps track of file versions, allowing you to revert to previous versions if needed. |
| Security | OneDrive uses encryption to protect your files; two-factor authentication adds an extra layer of security. |
| Cross-Platform | Available on Windows, macOS, Android, and iOS, ensuring accessibility across devices. |
2.6. SmugMug: Tailored for Photographers
SmugMug is designed specifically for photographers, offering features like customizable portfolios, client galleries, and print sales.
| Feature | Description |
|---|---|
| Portfolio | Customizable portfolio websites to showcase your work. |
| Client Galleries | Professional client galleries with password protection and watermarking options. |
| Print Sales | Integrated print sales platform with various print options and pricing controls. |
| Storage | Unlimited photo storage with all SmugMug plans. |
| Customization | Extensive customization options to tailor your website to your brand. |
| Privacy & Security | SmugMug uses encryption to protect your photos; you can control who has access to your galleries and images. |
2.7. Flickr: Community and Exposure
Flickr is a popular platform for photographers to share their work, discover new talent, and engage with a vibrant community.
| Feature | Description |
|---|---|
| Community | Active community of photographers; opportunity to get feedback and exposure. |
| Storage | Limited free storage; upgrade to Flickr Pro for unlimited storage and advanced features. |
| Organization | Tools for organizing photos with albums, tags, and groups. |
| Licensing | Options to license your photos for commercial use. |
| Discovery | Increased visibility for your work through Flickr’s search and explore features. |
| Privacy & Security | Flickr allows you to control the privacy settings of your photos; you can choose to make them public, private, or visible only to specific groups. |
Choosing the best cloud storage for your photos involves considering your specific needs, budget, and preferences. Each service offers unique features, so it’s worth exploring a few options to find the perfect fit for your photography workflow.
3. Step-by-Step Guide: How to Upload Your Photos to the Cloud
Now that you’ve selected a cloud storage service, let’s walk through the steps to upload your photos and keep them safe in the cloud.
3.1. Setting Up Your Account
- Choose a Service: Select a cloud storage provider like iCloud Photos, Google Photos, Dropbox, Amazon Photos, OneDrive, SmugMug, or Flickr.
- Create an Account: Visit the provider’s website and sign up for an account. Follow the prompts to enter your personal information and create a secure password.
- Install the App: Download and install the desktop or mobile app for your chosen service, if available. This will make it easier to manage your photos and sync them automatically.
3.2. Configuring Your Settings
- Choose Upload Settings: Most cloud services offer various upload settings. Decide whether you want to upload photos manually or automatically. Automatic uploads ensure that your new photos are instantly backed up.
- Select Upload Quality: Some services, like Google Photos, offer options to upload photos in original quality or a compressed, “high quality” version. Choose the option that best balances storage space and image quality.
- Organize Your Photos: Create albums or folders within your cloud storage account to organize your photos logically. This will make it easier to find specific images later.
- Enable Sync: Turn on sync settings to ensure that your photos are automatically synced between your devices and the cloud. This keeps your photo library up-to-date across all your devices.
3.3. Uploading Your Photos
- Manual Upload:
- Open the cloud storage app or website.
- Click the “Upload” button.
- Select the photos or folders you want to upload from your computer or device.
- Wait for the upload to complete. The time it takes will depend on your internet speed and the size of your photos.
- Automatic Upload:
- Ensure that automatic upload is enabled in your cloud storage settings.
- Connect your device to Wi-Fi.
- New photos will automatically be uploaded to the cloud in the background.
- Drag and Drop:
- Open the cloud storage app or website.
- Locate the folder where you want to store your photos.
- Drag and drop the photos or folders from your computer into the cloud storage window.
3.4. Verifying Your Uploads
- Check Progress: Most cloud storage apps show the progress of your uploads. Make sure all photos have been successfully uploaded.
- Browse Your Library: Once the upload is complete, browse your cloud photo library to verify that all your photos are there and organized correctly.
- Test on Multiple Devices: Access your cloud photo library from another device to ensure that your photos are syncing properly and can be viewed from different devices.
3.5. Best Practices for Uploading
- Use a Stable Internet Connection: A fast and stable internet connection will ensure that your photos upload quickly and without errors.
- Batch Uploads: Upload photos in batches to minimize interruptions and streamline the process.
- Prioritize Important Photos: If you have limited bandwidth, prioritize uploading your most important photos first.
- Monitor Storage: Keep an eye on your cloud storage usage to ensure that you don’t exceed your storage limit.
- Regular Backups: Even with cloud storage, it’s a good idea to maintain a local backup of your photos for added security.
By following these steps, you can successfully upload your photos to the cloud and enjoy the benefits of secure, accessible, and organized photo storage.
4. Optimizing Your Photos for Cloud Storage
To make the most of your cloud storage and ensure a seamless experience, it’s essential to optimize your photos before uploading them. Here are some tips to help you optimize your photos for cloud storage:
4.1. File Format Considerations
- JPEG: JPEG is a widely supported format that offers a good balance between file size and image quality. It’s ideal for everyday photos and images that don’t require extensive editing.
- PNG: PNG is a lossless format that preserves image quality, making it suitable for graphics, logos, and images with text. However, PNG files tend to be larger than JPEGs.
- RAW: RAW files contain unprocessed data captured by your camera’s sensor. They offer the highest image quality and flexibility for editing but result in significantly larger file sizes. Consider converting RAW files to JPEG after editing to save storage space.
- HEIF/HEIC: HEIF (High Efficiency Image File Format) is a modern format that offers better compression than JPEG while maintaining similar image quality. It’s supported by Apple devices and some Android devices.
4.2. Resizing Images
Resizing your images can significantly reduce their file size without noticeably affecting their appearance, especially when viewing them on smaller screens.
- Determine Display Size: Consider the typical display size on which you’ll be viewing your photos. Resizing images to match this size can save storage space without sacrificing visual quality.
- Use Image Editing Software: Use image editing software like Adobe Photoshop, Lightroom, or GIMP to resize your images. These tools offer precise control over image dimensions and quality.
- Maintain Aspect Ratio: When resizing images, maintain their original aspect ratio to avoid distortion.
- Batch Resizing: Use batch processing features in image editing software to resize multiple images at once, saving time and effort.
4.3. Compression Techniques
Compression reduces the file size of your images by removing redundant data. There are two types of compression:
- Lossy Compression: Lossy compression, like JPEG, permanently removes some image data to reduce file size. This can result in a slight loss of image quality, but it’s often imperceptible to the human eye.
- Lossless Compression: Lossless compression, like PNG, reduces file size without removing any image data. This preserves image quality but typically results in larger file sizes than lossy compression.
4.4. Metadata Management
Metadata is information embedded in your photo files, such as date, time, camera settings, and location. Managing metadata can help you organize your photos and make them easier to find.
- Add Keywords and Tags: Add descriptive keywords and tags to your photos to make them searchable.
- Edit Captions and Descriptions: Write informative captions and descriptions for your photos to provide context and details.
- Geotagging: Add location data to your photos to map them and create location-based albums.
- Remove Sensitive Information: Be mindful of privacy and remove any sensitive information from your photos before sharing them online.
4.5. Efficient File Naming
Use a consistent and descriptive file naming convention to organize your photos logically.
- Date-Based Naming: Include the date in your file names (e.g., YYYYMMDD_Event_Description.jpg).
- Descriptive Naming: Use descriptive names that reflect the content of the photo (e.g., Sunset_at_Santa_Monica_Beach.jpg).
- Sequential Numbering: Add sequential numbers to your file names to maintain chronological order (e.g., Image_001.jpg, Image_002.jpg).
4.6. Regular Clean-Up
Periodically review your photo library and delete any unnecessary or duplicate files to free up storage space.
- Identify Duplicate Photos: Use software to identify and remove duplicate photos.
- Delete Unnecessary Photos: Delete blurry, poorly composed, or irrelevant photos.
- Archive Old Photos: Archive old photos that you don’t need to access frequently to a separate storage location.
By implementing these optimization techniques, you can efficiently manage your photo library in the cloud, save storage space, and ensure a smooth browsing experience.
5. Managing and Organizing Your Photos in the Cloud
Once your photos are safely stored in the cloud, it’s essential to organize and manage them effectively. A well-organized photo library not only makes it easier to find specific images but also enhances your overall photography workflow.
5.1. Creating Albums and Folders
- Logical Structure: Create a logical folder and album structure that reflects your photography style and workflow.
- Event-Based Albums: Organize photos by events, such as weddings, birthdays, vacations, or photoshoots.
- Theme-Based Albums: Group photos by theme, such as landscapes, portraits, wildlife, or street photography.
- Location-Based Albums: Create albums based on geographical locations, such as cities, countries, or specific landmarks.
- Year-Based Folders: Organize photos into year-based folders to maintain a chronological structure.
5.2. Tagging and Keywording
- Descriptive Tags: Add descriptive tags to your photos to make them searchable. Use keywords that accurately reflect the content of the photo, such as “sunset,” “beach,” “portrait,” or “landscape.”
- People Tags: Tag people in your photos to easily find images featuring specific individuals.
- Location Tags: Add location tags to your photos to map them and create location-based albums.
- Keyword Hierarchy: Create a keyword hierarchy to organize your tags and make them easier to manage.
5.3. Using Facial Recognition
- Enable Facial Recognition: Many cloud storage services, like Google Photos and iCloud Photos, offer facial recognition features that automatically identify and tag people in your photos.
- Verify and Correct Tags: Review the automatically generated tags and correct any errors to ensure accuracy.
- Merge Duplicate Profiles: If the facial recognition system creates duplicate profiles for the same person, merge them into a single profile.
5.4. Adding Captions and Descriptions
- Provide Context: Write informative captions and descriptions for your photos to provide context and details.
- Include Storytelling: Use captions to tell the story behind the photo and share your thoughts and feelings.
- Add Technical Information: Include technical information, such as camera settings, lens, and exposure details.
5.5. Implementing a Rating System
- Star Ratings: Use a star rating system to rank your photos based on their quality and importance.
- Color Labels: Use color labels to categorize your photos and mark them for specific purposes, such as editing, sharing, or printing.
5.6. Regularly Reviewing and Culling
- Delete Unnecessary Photos: Periodically review your photo library and delete any blurry, poorly composed, or irrelevant photos.
- Identify Duplicate Photos: Use software to identify and remove duplicate photos.
- Archive Old Photos: Archive old photos that you don’t need to access frequently to a separate storage location.
5.7. Utilizing Smart Albums and Filters
- Smart Albums: Create smart albums that automatically populate with photos based on specific criteria, such as keywords, tags, or ratings.
- Filters: Use filters to quickly find photos based on specific criteria, such as date, location, or file type.
5.8. Backup and Redundancy
- Multiple Cloud Services: Consider using multiple cloud storage services to create redundancy and ensure that your photos are always protected.
- Local Backup: Maintain a local backup of your photos on an external hard drive or NAS device for added security.
By implementing these management and organization techniques, you can maintain a clean, efficient, and easily searchable photo library in the cloud, enhancing your photography workflow and ensuring that your memories are always within reach.
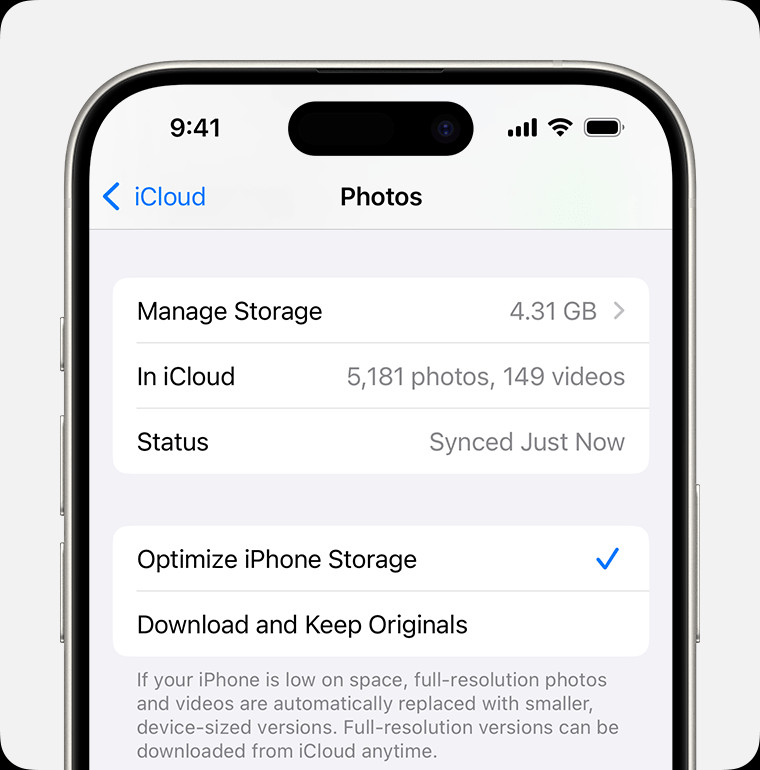 iCloud offers a seamless integration for Apple users, ensuring their photos are synced across all devices with robust privacy and security
6. Sharing Your Photos from the Cloud
One of the greatest benefits of storing your photos in the cloud is the ability to easily share them with friends, family, and clients. Whether you want to share a single image or an entire album, cloud storage services offer a variety of convenient sharing options.
6.1. Sharing Individual Photos
- Generate a Shareable Link: Most cloud storage services allow you to generate a shareable link for individual photos. This link can be sent via email, text message, or social media.
- Control Access Permissions: When generating a shareable link, you can often control access permissions. For example, you can set the link to be view-only, or you can allow recipients to download the photo.
- Set Expiration Dates: Some services allow you to set expiration dates for shareable links, ensuring that the photo is only accessible for a limited time.
6.2. Sharing Albums and Folders
- Create Shared Albums: Many cloud storage services allow you to create shared albums that multiple people can view and contribute to.
- Invite Collaborators: Invite friends, family, or clients to collaborate on shared albums. Collaborators can upload their own photos, add comments, and organize the album.
- Control Album Permissions: Control album permissions to determine who can view, comment, and contribute to the album.
6.3. Sharing Directly to Social Media
- Direct Integration: Some cloud storage services offer direct integration with social media platforms like Facebook, Instagram, and Twitter.
- One-Click Sharing: Share photos directly to social media with a single click, streamlining your workflow.
- Customize Sharing Options: Customize sharing options to control the size, quality, and privacy settings of your social media posts.
6.4. Sharing via Email
- Attach Photos to Emails: Attach photos directly to emails and send them to friends, family, or clients.
- Compress Photos: Compress photos before attaching them to emails to reduce file size and ensure faster delivery.
- Use Cloud Links: Instead of attaching photos directly to emails, include cloud links to allow recipients to view and download the photos from the cloud.
6.5. Creating Client Galleries
- Professional Presentation: Create professional client galleries to showcase your work and deliver photos to clients.
- Password Protection: Password-protect client galleries to ensure that only authorized individuals can access the photos.
- Watermarking: Add watermarks to your photos to protect your copyright and prevent unauthorized use.
- Print Sales: Integrate print sales options into your client galleries to allow clients to purchase prints and other products directly from the gallery.
6.6. Sharing with Specific Groups
- Create Groups: Create groups of friends, family, or clients to easily share photos with specific individuals.
- Group Permissions: Set group permissions to control who can view, comment, and contribute to shared photos and albums.
6.7. Using QR Codes
- Generate QR Codes: Generate QR codes for individual photos or albums and share them with others.
- Scan and View: Recipients can scan the QR code with their smartphone or tablet to instantly view the photo or album.
By utilizing these sharing options, you can easily share your photos from the cloud with anyone, anywhere, making it simple to connect with loved ones, collaborate with colleagues, and showcase your work to the world.
7. Ensuring the Security and Privacy of Your Photos in the Cloud
When entrusting your photos to the cloud, security and privacy are paramount concerns. You want to be sure that your images are protected from unauthorized access, data breaches, and privacy violations. Here are some essential steps you can take to ensure the security and privacy of your photos in the cloud:
7.1. Choose a Reputable Provider
- Research Security Practices: Research the security practices of different cloud storage providers before making a decision.
- Read Reviews: Read reviews and testimonials from other users to get an idea of the provider’s reputation for security and privacy.
- Check for Certifications: Look for providers that have industry-standard security certifications, such as ISO 27001 or SOC 2.
7.2. Use Strong Passwords
- Create Complex Passwords: Create strong, complex passwords that are difficult to guess. Use a combination of uppercase and lowercase letters, numbers, and symbols.
- Avoid Reusing Passwords: Avoid reusing the same password for multiple accounts.
- Use a Password Manager: Use a password manager to securely store and manage your passwords.
7.3. Enable Two-Factor Authentication
- Add an Extra Layer of Security: Enable two-factor authentication (2FA) to add an extra layer of security to your account.
- Use an Authentication App: Use an authentication app, such as Google Authenticator or Authy, to generate verification codes.
- SMS Verification: If an authentication app is not available, use SMS verification to receive verification codes via text message.
7.4. Encrypt Your Photos
- End-to-End Encryption: Choose a cloud storage provider that offers end-to-end encryption, ensuring that your photos are encrypted on your device before they are uploaded to the cloud and decrypted only on the recipient’s device.
- Third-Party Encryption Tools: Use third-party encryption tools, such as VeraCrypt or Cryptomator, to encrypt your photos before uploading them to the cloud.
7.5. Control Sharing Permissions
- Limit Access: Limit access to your photos by only sharing them with specific individuals or groups.
- Set Expiration Dates: Set expiration dates for shared links to ensure that your photos are only accessible for a limited time.
- Disable Downloading: Disable downloading of shared photos to prevent recipients from making unauthorized copies.
7.6. Review Privacy Settings
- Understand Privacy Options: Review the privacy settings of your cloud storage provider and understand how your photos are being used.
- Opt-Out of Data Collection: Opt-out of data collection and targeted advertising if you are concerned about your privacy.
- Limit Facial Recognition: Limit the use of facial recognition features to protect the privacy of individuals in your photos.
7.7. Monitor Account Activity
- Regularly Check Logs: Regularly check your account activity logs for any suspicious activity, such as unauthorized logins or file access.
- Set Up Alerts: Set up alerts to be notified of any unusual activity on your account.
7.8. Keep Software Up-to-Date
- Install Updates: Keep your operating system, web browser, and cloud storage apps up-to-date with the latest security patches.
- Enable Automatic Updates: Enable automatic updates to ensure that you are always protected against the latest threats.
By following these security and privacy measures, you can significantly reduce the risk of unauthorized access, data breaches, and privacy violations, ensuring that your photos in the cloud remain safe and secure.
8. Troubleshooting Common Cloud Storage Issues
Even with the best cloud storage services, you may occasionally encounter technical issues. Here are some common problems and how to troubleshoot them:
8.1. Slow Upload and Download Speeds
- Check Internet Connection: Ensure you have a stable and fast internet connection. Run a speed test to verify your upload and download speeds.
- Close Unnecessary Applications: Close any unnecessary applications that may be consuming bandwidth.
- Use a Wired Connection: If possible, use a wired Ethernet connection instead of Wi-Fi for faster and more reliable speeds.
- Upload During Off-Peak Hours: Upload and download large files during off-peak hours when network traffic is lower.
- Adjust Upload Settings: Some cloud storage services allow you to adjust upload settings to limit bandwidth usage.
8.2. Syncing Problems
- Check Sync Status: Verify that your cloud storage app is running and that syncing is enabled.
- Restart the App: Restart the cloud storage app to refresh the connection and resolve any temporary glitches.
- Check for Updates: Ensure you are using the latest version of the cloud storage app.
- Verify Account Details: Double-check that you are logged in with the correct account details.
- Clear Cache: Clear the cache of the cloud storage app to remove any corrupted files that may be causing syncing issues.
8.3. Storage Limits
- Check Storage Usage: Monitor your cloud storage usage to ensure you haven’t exceeded your storage limit.
- Delete Unnecessary Files: Delete unnecessary files and photos to free up storage space.
- Upgrade Your Plan: If you need more storage, upgrade to a higher storage plan.
- Compress Files: Compress large files to reduce their size and save storage space.
- Archive Old Files: Archive old files that you don’t need to access frequently to a separate storage location.
8.4. File Corruption
- Check for Errors: Check for error messages during upload or download, which may indicate file corruption.
- Re-Upload Files: Re-upload any corrupted files to ensure they are properly stored in the cloud.
- Check Local Copies: Check the local copies of your files to ensure they are not corrupted.
- Use Antivirus Software: Scan your computer for viruses or malware that may be causing file corruption.
8.5. Account Access Issues
- Verify Account Details: Double-check that you are entering the correct username and password.
- Reset Your Password: If you have forgotten your password, reset it using the password reset feature.
- Check for Account Restrictions: Check for any account restrictions or suspensions that may be preventing you from accessing your account.
- Contact Support: Contact customer support for assistance with account access issues.
8.6. Mobile App Problems
- Restart the App: Restart the mobile app to resolve any temporary glitches.
- Check for Updates: Ensure you are using the latest version of the mobile app.
- Clear Cache: Clear the cache of the mobile app to remove any corrupted files.
- Reinstall the App: Reinstall the mobile app to resolve any persistent issues.
- Check Permissions: Verify that the mobile app has the necessary permissions to access your photos and storage.
8.7. Compatibility Issues
- Check File Formats: Ensure that the file formats you are using are compatible with the cloud storage service.
- Update Software: Update your operating system, web browser, and cloud storage apps to the latest versions to ensure compatibility.
- Use Standard Formats: Use standard file formats like JPEG, PNG, and MP4 for maximum compatibility.
By following these troubleshooting tips, you can resolve common cloud storage issues and ensure that your photos are safely stored and easily accessible.
9. The Future of Photo Storage: Trends and Innovations
The world of photo storage is constantly evolving, with new technologies and trends emerging all the time. Here’s a glimpse into the future of photo storage:
9.1. AI-Powered Organization
- Smart Tagging: AI-powered algorithms will automatically tag and categorize your photos based on content, location, and people.
- Intelligent Albums: AI will create intelligent albums that automatically group photos based on events, themes, or memories.
- Smart Search: AI will enable you to search for photos using natural language queries, such as “photos of my dog at the beach.”
9.2. Enhanced Security and Privacy
- Blockchain Technology: Blockchain technology will be used to create decentralized photo storage solutions that are more secure and resistant to hacking.
- Zero-Knowledge Encryption: Zero-knowledge encryption will ensure that only you can access your photos, even the cloud storage provider won’t be able to see them.
- Biometric Authentication: Biometric authentication, such as facial recognition and fingerprint scanning, will be used to secure access to your photos.
9.3. Immersive Experiences
- 3D and VR Photos: 3D and VR photos will become more common, allowing you to experience your memories in a more immersive way.
- Interactive Albums: Interactive albums will allow you to add music, narration, and other multimedia elements to your photos, creating a more engaging experience.
- Holographic Storage: Holographic storage will enable you to store vast amounts of data, including photos, in a small space.
9.4. Seamless Integration
- Cross-Platform Compatibility: Cloud storage services will become more cross-platform compatible, allowing you to access your photos from any device, regardless of operating system.
- Integration with Smart Devices: Cloud storage will be seamlessly integrated with smart devices, such as smart TVs, smart frames, and smart speakers.
- Augmented Reality: Augmented reality (AR) will allow you to overlay your photos onto the real world, creating new and exciting experiences.
9.5. Sustainable Storage
- Green Data Centers: Cloud storage providers will invest in green data centers that use renewable energy sources and energy-efficient technologies.
- Data Compression: Advanced data compression techniques will reduce the amount of storage space required for photos, minimizing the environmental impact of cloud storage.
- Data Tiering: Data tiering will allow you to store your photos on different types of storage media based on their frequency of access, reducing energy consumption.
9.6. Personalized Experiences
- Customized Interfaces: Cloud storage services will offer customized interfaces that allow you to personalize the way you view and organize your photos.
- Adaptive Recommendations: AI-powered algorithms will provide personalized recommendations for photo editing, sharing, and printing.
- Contextual Awareness: Cloud storage will become more contextually aware, understanding your location, activity, and preferences to provide more relevant and personalized experiences.
As technology continues to advance, the future of photo storage is sure to be filled with exciting new possibilities. By staying informed about the latest trends and innovations, you can ensure that your photos are stored safely, securely, and in a way that enhances your overall photography experience.
10. Frequently Asked Questions (FAQs) About Cloud Photo Storage
Here are some frequently asked questions about storing your photos in the cloud:
1. What is cloud photo storage?
Cloud photo storage is a service that allows you to store your photos online, on remote servers, rather than on your computer or mobile device.
2. Why should I put my photos in the cloud?
Cloud storage offers several benefits, including data security, accessibility from any device, easy sharing, and freeing up space on your devices.
**3. Which cloud storage service