Instagram, boasting over a billion active users, stands as a powerhouse for individuals and businesses aiming to amplify their online presence. Whether you’re looking to connect with friends, build a brand, or reach a new audience, mastering Instagram is crucial. If you’re new to the platform or seeking to refine your posting process, this guide will walk you through each step of how to post a photo to Instagram effectively.
Posting photos on Instagram is straightforward, but understanding each feature ensures your content resonates and performs well. Let’s dive into the essential steps to get your photos onto Instagram and seen by your audience.
Posting Photos to Instagram: Your Quick Guide
Here’s a quick overview of the steps we’ll cover in detail:
- Tap the + icon: Start a new post.
- Select your photo or video: Choose from your phone’s library or capture a new one.
- Create a carousel (optional): Post multiple images in one go.
- Crop and adjust: Ensure your image fits perfectly.
- Apply filters: Enhance your photo’s aesthetic.
- Edit for perfection: Fine-tune brightness, contrast, and more.
- Write a compelling caption: Engage your audience with words.
- Optimize with hashtags: Increase discoverability.
- Tag relevant accounts: Connect with friends and collaborators.
- Add location: Let people know where the photo was taken.
- Use emojis: Add personality to your caption.
- Share across platforms: Expand your reach.
- Edit after posting: Correct any mistakes.
Consistent and effective posting is key to growing your Instagram presence. Let’s break down each step to ensure you know exactly how to post photos on Instagram like a pro.
.png)
Step 1: Initiate a New Post by Tapping the Plus (+) Icon
Look for the prominent plus sign (+) icon, usually located at the top center or top right of your Instagram screen. This is your gateway to creating new content. Tapping this icon will initiate the process of posting a photo or video.
Step 2: Choose a Photo or Video from Your Library, or Capture a New One
 Instagram media selection screen
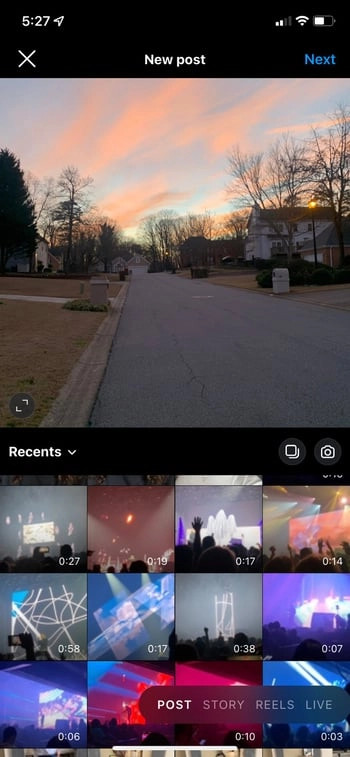
Upon tapping the plus icon, Instagram will access your phone’s photo and video library. You can scroll through your recent media or navigate to specific albums to select the photo or video you wish to post.
Alternatively, directly below the library preview, you’ll find options to capture a new photo or video in real-time using Instagram’s in-app camera. This is useful for spontaneous moments you want to share instantly.
Once you’ve selected your media, tap ‘Next’ in the top right corner to proceed to the editing stage.
Step 3: Utilize the Carousel Feature to Post Multiple Images
 Instagram multiple image selection screen
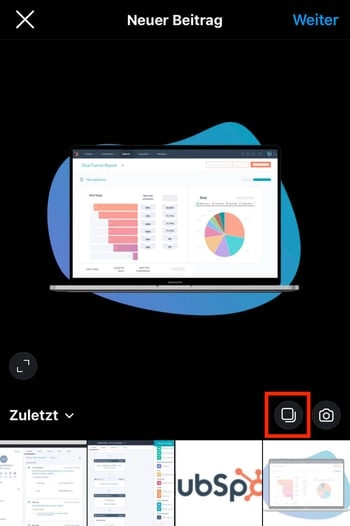
Instagram’s carousel feature is perfect for sharing a series of photos or videos in a single post. To use it, before selecting your first image, tap the ‘Select multiple’ icon (it looks like stacked squares) located above your photo library.
After tapping this, you can select up to 10 photos and videos to include in your carousel. The order in which you tap them determines their sequence in the post. Your followers can then swipe left to view all the content in your carousel.
Step 4: Crop Your Image to Perfection
While Instagram now supports various aspect ratios, understanding cropping is still important to ensure your photo looks its best. After selecting your image, you’ll see options to adjust its framing.
You can pinch to zoom in or out to focus on a specific part of your image. By default, Instagram might crop your image to a square, but you can tap the expand icon at the bottom left of the image to switch between square, portrait, and landscape orientations.
Remember, while flexibility exists, Instagram still has optimal dimensions for displaying images. A slight crop might be necessary to fit these dimensions perfectly and ensure your photo displays as intended.
Step 5: Select a Filter to Enhance Your Photo’s Mood
Instagram filters are a quick way to alter the look and feel of your photos. Swipe left across the filter options displayed at the bottom of your screen to preview different filters on your image.
Once you find a filter you like, tap on it to apply it. If you want a subtler effect, tap the filter name again. This will often allow you to adjust the filter’s intensity using a slider, letting you fine-tune the effect to your preference.
Step 6: Edit Your Photo for the Ideal Look
 Instagram editing options screen
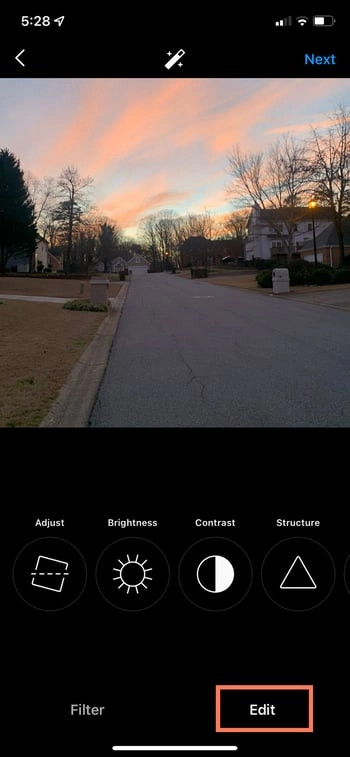
For more precise adjustments, tap ‘Edit’ at the bottom right of the screen. Instagram offers a suite of editing tools to refine your image:
- Adjust: Straighten or rotate your photo.
- Brightness: Lighten or darken the overall image.
- Contrast: Adjust the difference between light and dark areas.
- Structure: Enhance details and textures.
- Warmth: Modify the color temperature (cooler or warmer tones).
- Saturation: Increase or decrease color intensity.
- Color: Add color tints to highlights or shadows.
- Fade: Give your photo a vintage, faded look.
- Highlights & Shadows: Adjust the brightness of the brightest and darkest areas separately.
- Vignette: Darken the edges of the photo to draw focus to the center.
- Tilt Shift: Blur parts of the image to create depth of field effects.
- Sharpen: Increase image sharpness and clarity.
Experiment with these tools to achieve the perfect look for your photo before posting.
.png)
Step 7: Craft a Captivating Caption
A well-written Instagram caption can significantly boost engagement. Tap the ‘Write a caption’ field to add text to your post. Use this space to tell a story, ask a question, or simply provide context for your photo.
Captions are also searchable, so including relevant keywords can improve your post’s visibility in Instagram search results. Keep your audience in mind and write captions that are engaging, informative, or entertaining.
Step 8: Boost Discoverability with Hashtags
 Instagram hashtag example in caption
Hashtags are crucial for increasing the reach of your Instagram posts. They categorize your content and make it discoverable to users searching for specific topics.
In your caption, incorporate relevant hashtags. Research popular and niche hashtags related to your photo’s content. Tools are available online to help you find trending and relevant hashtags. A mix of broad and specific hashtags can optimize your post for wider and targeted audiences.
Step 9: Tag People Who Are In or Relevant to Your Post
If your photo includes friends, collaborators, or anyone relevant, tagging them is a great way to connect and increase visibility. Tap ‘Tag people’ on the ‘New Post’ screen. You can then tap directly on people in the photo to tag their profiles.
Alternatively, you can mention accounts directly in your caption by using the ‘@’ symbol followed by their username. Tagging notifies the tagged accounts and can expose your post to their followers as well.
Step 10: Add Your Location to Contextualize Your Post
Adding a location to your Instagram post provides context and can help people discover your content based on geographic location. On the ‘New Post’ screen, tap ‘Add Location’. You can search for a specific place or choose from nearby locations suggested by Instagram.
Posts with locations can appear in location-based searches and stories, increasing the chances of local users finding your content.
Step 11: Inject Personality with Emojis
Emojis can add a playful and expressive touch to your captions. Use emojis to complement your text, convey emotions, or highlight key points. Instagram offers a wide range of emojis accessible through your device’s keyboard.
While emojis can enhance engagement, use them judiciously. Overusing emojis can make your caption look cluttered or less professional, depending on your brand and audience.
Step 12: Share Your Post to Other Social Media Platforms
 Instagram sharing options to other platforms
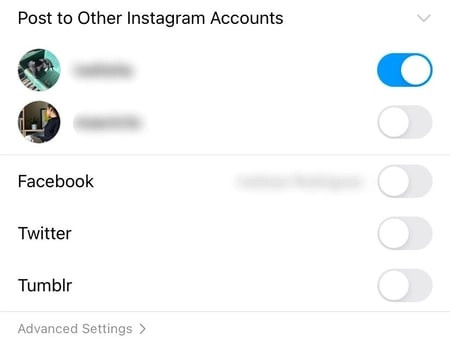
To maximize your content’s reach, Instagram allows you to simultaneously share your post to connected social media platforms like Facebook, Twitter, and others. On the ‘New Post’ screen, you’ll see toggles for linked accounts. Simply toggle these to ‘on’ to share your Instagram post on those platforms as well.
Step 13: Edit Your Post After It’s Live
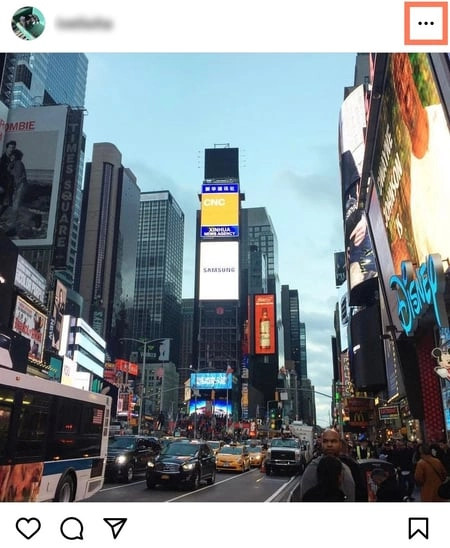 Instagram post options menu with 'Edit' highlighted
Even after posting, you have the flexibility to make edits. If you notice a typo or want to change your caption, tap the three dots ‘…’ located at the top right of your post. In the menu that appears, select ‘Edit’.
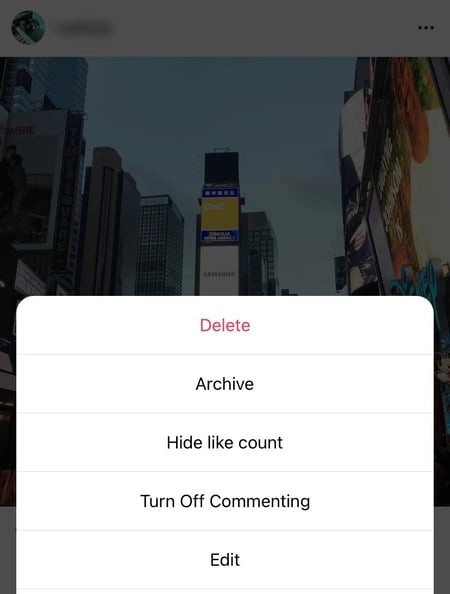 Instagram edit option in post settings
This allows you to modify your caption, tags, location, and more. Editing ensures your post remains accurate and engaging even after it’s been published.
Instagram Drafts: Save and Continue Later
If you’re not ready to post immediately, Instagram allows you to save your post as a draft. Before sharing, simply go back one step from the final share screen using the back arrow and select ‘Save Draft’. You can access and continue editing your drafts later from your profile page.
Start Posting and Grow Your Instagram Presence
Now that you’re equipped with the knowledge of how to post a photo to Instagram, you can start creating and sharing content effectively. Consistent posting, combined with engaging content and strategic use of Instagram features, will help you build your audience and achieve your goals on this dynamic platform.
Editor’s note: This post was originally published in November 2019 and has been updated for comprehensiveness and SEO.