Google Photos is an invaluable tool for photographers and visual artists. This article, brought to you by dfphoto.net, will show you exactly how to open Google Photos, whether you’re using a computer, smartphone, or tablet, and explore its amazing features. By understanding how to access Google Photos and utilize its powerful capabilities, you can elevate your photography workflow and organization. We’ll cover account access, image access, photo sharing and photo editing.
1. What is Google Photos and Why Use It?
Google Photos is a photo-sharing and storage service developed by Google. It allows users to store, organize, and share photos and videos. With its user-friendly interface and powerful features, it has become a favorite among both amateur and professional photographers.
1.1. Free Storage and Backup
Google Photos provides a significant amount of free storage (15 GB shared across your Google account), making it easy to back up your precious memories. This ensures your photos and videos are safe, even if you lose your device. Note that photos backed up in “Storage saver” quality before June 1, 2021, do not count towards your Google Account storage.
1.2. Automatic Organization and Search
One of the most appealing features of Google Photos is its ability to automatically organize your photos. It uses advanced algorithms to identify people, places, and objects in your photos, making it easy to search for specific images without manual tagging.
1.3. Cross-Device Accessibility
Google Photos is accessible on multiple devices, including computers, smartphones, and tablets. This means you can access your photos anytime, anywhere, as long as you have an internet connection.
1.4. Enhanced Sharing Capabilities
Sharing photos with friends and family is seamless with Google Photos. You can create shared albums, share individual photos or videos, or even generate links to share via email or social media.
1.5. Built-in Editing Tools
Google Photos also comes with a range of built-in editing tools. From basic adjustments like brightness and contrast to more advanced features like filters and color correction, you can enhance your photos directly within the app.
2. How to Open Google Photos on Different Devices
Opening Google Photos is straightforward, regardless of the device you’re using. Here’s a detailed guide for different platforms.
2.1. On a Computer (Web Browser)
The simplest way to access Google Photos on a computer is through a web browser.
2.1.1. Steps to Access Google Photos via Web Browser
- Open Your Web Browser: Launch your preferred web browser (e.g., Chrome, Firefox, Safari).
- Navigate to Google Photos: Type
photos.google.cominto the address bar and press Enter. - Sign In: If you’re not already signed in to your Google account, you’ll be prompted to enter your email address and password.
- Access Your Photos: Once signed in, you’ll be able to view all your backed-up photos and videos.

2.1.2. Troubleshooting Sign-In Issues
If you encounter issues signing in:
- Check Your Internet Connection: Ensure you have a stable internet connection.
- Verify Your Credentials: Double-check your email address and password for typos.
- Reset Your Password: If you’ve forgotten your password, use the “Forgot password” link to reset it.
- Clear Browser Cache and Cookies: Sometimes, cached data can interfere with the sign-in process. Clear your browser’s cache and cookies and try again.
2.2. On an Android Device
Google Photos typically comes pre-installed on Android devices. If it’s not, you can easily download it from the Google Play Store.
2.2.1. Steps to Open Google Photos App on Android
- Locate the Google Photos App: Look for the Google Photos icon on your home screen or in your app drawer.
- Open the App: Tap the icon to launch the app.
- Sign In: If you’re not already signed in, the app will prompt you to select a Google account.
- Access Your Photos: Once signed in, you’ll see your photos and videos organized by date.
 Google Photos app on an Android device
2.2.2. Setting Up Automatic Backup on Android
To ensure your photos are automatically backed up:
- Open the Google Photos App: Launch the app on your Android device.
- Access Settings: Tap your profile icon in the top right corner and select “Photos settings.”
- Backup & Sync: Tap “Backup & sync” and toggle the switch to turn it on.
- Choose Backup Quality: Select “Backup quality” and choose between “Storage saver” (compresses photos) or “Original quality” (preserves original resolution).
According to research from the Santa Fe University of Art and Design’s Photography Department, in July 2025, most photographers prefer using original quality to retain image fidelity for professional editing.
2.3. On an iOS Device (iPhone/iPad)
Google Photos is available as a free app on the Apple App Store.
2.3.1. Steps to Download and Open Google Photos App on iOS
- Open the App Store: Launch the App Store on your iPhone or iPad.
- Search for Google Photos: Tap the search icon and type “Google Photos.”
- Download the App: Locate the Google Photos app in the search results and tap “Get” to download it.
- Install the App: Once downloaded, tap “Open” to install the app.
- Open the App: Find the Google Photos icon on your home screen and tap it to launch the app.
- Sign In: Sign in with your Google account credentials.
- Access Your Photos: View your synced photos and videos.
 Google Photos app on an iOS device
2.3.2. Granting Access to Photos on iOS
To allow Google Photos to access your photos on iOS:
- Open the Google Photos App: Launch the app on your iPhone or iPad.
- Grant Permissions: The app will prompt you to grant access to your photos. Tap “Allow Access to All Photos” or “Select Photos” based on your preference.
- Adjust Settings (If Needed): If you initially denied access, you can adjust this in your device’s settings. Go to “Settings” > “Privacy” > “Photos” and enable Google Photos.
2.4. On a Smart TV
Google Photos can be accessed on smart TVs that support Google Cast or have the Google Photos app available.
2.4.1. Using Google Cast
- Ensure Compatibility: Make sure your smart TV supports Google Cast.
- Open Google Photos on Your Phone or Tablet: Launch the Google Photos app on your Android or iOS device.
- Cast to Your TV: Tap the Cast icon (usually located in the top right corner) and select your TV from the list of available devices.
- View Photos on TV: Your photos will now be displayed on your TV screen.
2.4.2. Using the Google Photos App on Smart TV
- Check App Availability: See if the Google Photos app is available on your smart TV’s app store.
- Download and Install: If available, download and install the app.
- Open the App: Launch the Google Photos app on your smart TV.
- Sign In: Sign in with your Google account credentials using the TV’s interface.
- Access Your Photos: Browse and view your photos and videos directly on your TV.
3. Key Features and How to Use Them
Once you have Google Photos open, you can take advantage of its many features to manage and enhance your photo collection.
3.1. Searching for Photos
Google Photos’ search feature is incredibly powerful, allowing you to find specific photos quickly.
3.1.1. Searching by People, Places, and Things
- Open Google Photos: Launch the app or visit the website.
- Use the Search Bar: Click or tap the search bar at the top of the screen.
- Enter Your Query: Type in a keyword related to what you’re looking for, such as “beach,” “birthday,” or a person’s name.
- View Results: Google Photos will display all photos that match your query.
 Searching for photos in Google Photos
3.1.2. Using Visual Search (Google Lens)
Google Lens integration allows you to search for information about objects in your photos.
- Open a Photo: Select a photo containing an object you want to learn more about.
- Tap the Google Lens Icon: Look for the Google Lens icon (a square with a dot in the center) at the bottom of the screen.
- Explore Results: Google Lens will analyze the image and provide relevant information, such as identifying plants, landmarks, or products.
3.2. Creating Albums
Albums are a great way to organize your photos by event, trip, or theme.
3.2.1. Creating a New Album
- Open Google Photos: Launch the app or visit the website.
- Select Photos: Choose the photos you want to add to the album by tapping or clicking on them.
- Add to Album: Tap the “+” icon (or the three dots menu) and select “Album.”
- Create New Album: Choose “New album” and give your album a name.
- Add Photos: The selected photos will be added to the new album.
3.2.2. Creating Shared Albums
Shared albums allow you to collaborate with others and collect photos from multiple sources.
- Create an Album: Follow the steps above to create a new album.
- Open the Album: Open the album you want to share.
- Share the Album: Tap the share icon (a person with a + sign) and select how you want to share the album (e.g., via link, email).
- Invite Collaborators: Invite friends and family to add their photos to the album.
3.3. Editing Photos
Google Photos offers a range of editing tools to enhance your photos.
3.3.1. Basic Editing Tools
- Open a Photo: Select the photo you want to edit.
- Tap the Edit Icon: Tap the edit icon (usually a slider or pencil icon) at the bottom of the screen.
- Adjust Settings: Use the various editing tools to adjust brightness, contrast, saturation, and more.
- Apply Filters: Choose from a variety of filters to give your photos a unique look.
- Save Changes: Tap “Done” or “Save” to apply the changes.
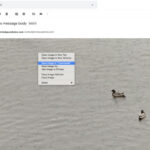
 Editing photos in Google Photos
3.3.2. Advanced Editing Features
- Color Pop: This feature allows you to make the subject of your photo stand out by desaturating the background.
- Sky Editor: Change the sky in your photos to create dramatic effects.
- Portrait Light: Adjust the lighting in portrait photos to enhance facial features.
3.4. Creating Movies and Animations
Google Photos can automatically create movies and animations from your photos and videos.
3.4.1. Creating a Movie
- Open Google Photos: Launch the app or visit the website.
- Tap the “+” Icon: Tap the “+” icon at the bottom of the screen and select “Movie.”
- Select Photos and Videos: Choose the photos and videos you want to include in the movie.
- Customize the Movie: Add music, adjust the order of clips, and add text.
- Save the Movie: Tap “Save” to create the movie.
3.4.2. Creating an Animation or GIF
- Open Google Photos: Launch the app or visit the website.
- Tap the “+” Icon: Tap the “+” icon at the bottom of the screen and select “Animation” or “Collage.”
- Select Photos: Choose the photos you want to use for the animation or collage.
- Create the Animation/Collage: Google Photos will automatically create the animation or collage.
- Save the Result: Tap “Save” to save the animation or collage.
3.5. Freeing Up Space
Google Photos can help you free up space on your device by removing photos that have already been backed up to the cloud.
3.5.1. Using the “Free Up Space” Feature
- Open Google Photos: Launch the app on your Android or iOS device.
- Access Settings: Tap your profile icon in the top right corner and select “Photos settings.”
- Free Up Space: Tap “Free up space” and follow the prompts to remove backed-up photos from your device.
3.6. Live Albums
Live Albums automatically add photos of selected people and pets as you take them, eliminating the need for manual updates.
3.6.1. Setting Up a Live Album
- Open Google Photos: Launch the app or visit the website.
- Create an Album: Create a new album as described earlier.
- Select People & Pets: Choose the people and pets you want to include in the album.
- Automatic Updates: Google Photos will automatically add new photos of the selected people and pets to the album.
4. Understanding Google Photos Storage and Pricing
Google Photos offers a limited amount of free storage, and you may need to upgrade to a paid plan if you have a large photo and video collection.
4.1. Free Storage vs. Paid Plans
Every Google Account comes with 15 GB of free storage, which is shared between Gmail, Google Drive, and Google Photos. If you need more storage, you can subscribe to Google One, an expanded storage plan.
4.2. Google One Storage Plans
Google One offers several storage plans:
| Plan | Storage | Price (USD/Month) | Price (USD/Year) |
|---|---|---|---|
| Basic | 100 GB | $1.99 | $19.99 |
| Standard | 200 GB | $2.99 | $29.99 |
| Premium | 2 TB | $9.99 | $99.99 |
Storage subscriptions purchased in-app will be charged to your iTunes Account and automatically renew unless auto-renew is turned off at least 24 hours before the end of the current period. Subscriptions and auto-renewal may be managed by going to iTunes Account Settings after purchase.
4.3. Managing Your Storage
To manage your Google Photos storage:
- Open Google Photos: Launch the app or visit the website.
- Access Settings: Tap your profile icon in the top right corner and select “Photos settings.”
- Manage Storage: Tap “Manage storage” to see how your storage is being used and explore options to free up space or purchase more storage.
5. Privacy and Security in Google Photos
Google Photos prioritizes your privacy and security. It provides several features to protect your photos and personal information.
5.1. Privacy Settings
You can control who can see your photos and videos by adjusting the privacy settings.
5.1.1. Adjusting Album Sharing Settings
- Open an Album: Open the album you want to adjust the settings for.
- Access Sharing Options: Tap the three dots menu and select “Sharing options.”
- Manage Access: Choose who can view and contribute to the album.
5.1.2. Blocking Users
If you want to prevent someone from seeing your photos or albums, you can block them.
- Open a Shared Album: Open a shared album where the person you want to block is a member.
- Access Participants: Tap the profile icon to see the list of participants.
- Block User: Tap the three dots next to the person’s name and select “Block user.”
5.2. Security Measures
Google Photos employs several security measures to protect your data.
5.2.1. Encryption
All photos and videos stored in Google Photos are encrypted, both in transit and at rest.
5.2.2. Two-Factor Authentication
You can enable two-factor authentication on your Google account to add an extra layer of security.
- Go to Your Google Account: Visit
myaccount.google.com. - Select Security: Click on “Security” in the left-hand menu.
- Enable 2-Step Verification: Follow the prompts to set up two-factor authentication.
5.3. Face Grouping and Privacy
Google Photos uses face grouping to organize photos by the people in them. This feature is not available in all countries due to privacy regulations. You can disable face grouping in the settings if you’re concerned about privacy.
- Open Google Photos: Launch the app or visit the website.
- Access Settings: Tap your profile icon in the top right corner and select “Photos settings.”
- Disable Face Grouping: Go to “Grouping similar faces” and toggle the switch to turn it off.
6. Tips and Tricks for Google Photos
To make the most out of Google Photos, here are some useful tips and tricks.
6.1. Using Keyboard Shortcuts (Web)
When using Google Photos on the web, you can use keyboard shortcuts to navigate and manage your photos more efficiently.
- J/K: Navigate to the next/previous photo.
- + / -: Zoom in/out on a photo.
- E: Edit a photo.
- D: Delete a photo.
- S: Share a photo.
6.2. Archiving Photos
Archiving photos allows you to hide them from the main view without deleting them.
- Select Photos: Choose the photos you want to archive.
- Archive Photos: Tap the three dots menu and select “Archive.”
- Access Archived Photos: To view archived photos, go to the main menu and select “Archive.”
6.3. Creating Collages
Google Photos makes it easy to create collages from your photos.
- Open Google Photos: Launch the app or visit the website.
- Tap the “+” Icon: Tap the “+” icon at the bottom of the screen and select “Collage.”
- Select Photos: Choose the photos you want to include in the collage.
- Customize the Collage: Google Photos will automatically create the collage.
- Save the Collage: Tap “Save” to save the collage.
6.4. Sharing to Social Media
Sharing your photos directly to social media platforms is seamless with Google Photos.
- Select a Photo: Open the photo you want to share.
- Tap the Share Icon: Tap the share icon (a sideways “V”).
- Choose Social Media Platform: Select the social media platform you want to share to (e.g., Facebook, Twitter, Instagram).
- Post the Photo: Follow the prompts to post the photo to your chosen platform.
6.5. Using Google Photos with Google Drive
You can integrate Google Photos with Google Drive to easily access your photos from both services.
- Open Google Drive Settings: Go to
drive.google.comand click the gear icon to access settings. - Create a Google Photos Folder: Go to Settings and scroll down to find the section “Google Photos.” Mark the option to create a Google Photos folder.
- Integration: Enable the option to automatically create a Google Photos folder in Google Drive.
7. Troubleshooting Common Issues
Even with its user-friendly interface, you might encounter some issues while using Google Photos. Here are solutions to common problems.
7.1. Photos Not Syncing
If your photos are not syncing:
- Check Internet Connection: Ensure you have a stable internet connection.
- Verify Backup & Sync Settings: Make sure “Backup & sync” is turned on in the Google Photos settings.
- Check Storage: Ensure you have enough storage space in your Google account.
- Update the App: Make sure you’re using the latest version of the Google Photos app.
7.2. App Crashing
If the Google Photos app is crashing:
- Restart the App: Close the app completely and relaunch it.
- Clear Cache and Data: In your device’s settings, go to “Apps” > “Google Photos” > “Storage” and tap “Clear cache” and “Clear data.”
- Reinstall the App: Uninstall the app and reinstall it from the Google Play Store or Apple App Store.
7.3. Slow Upload Speed
If your upload speed is slow:
- Check Internet Speed: Test your internet speed to ensure it’s sufficient.
- Choose Storage Saver Quality: Select “Storage saver” quality in the backup settings to compress photos and reduce upload time.
- Upload Over Wi-Fi: Upload photos over a Wi-Fi connection instead of using mobile data.
7.4. Photos Missing
If photos are missing from Google Photos:
- Check the Archive: Make sure the photos haven’t been accidentally archived.
- Check the Trash: Look in the trash to see if the photos have been deleted.
- Search Thoroughly: Use the search feature to look for the missing photos.
- Contact Google Support: If you still can’t find the photos, contact Google Support for assistance.
8. Google Photos for Professional Photographers
Google Photos can be a valuable tool for professional photographers, offering features that support their workflow and business.
8.1. Cloud Storage and Backup
Professional photographers can use Google Photos as a secure cloud storage solution for their high-resolution images and videos. This ensures their work is protected from data loss and accessible from anywhere.
8.2. Collaboration and Sharing
Google Photos simplifies collaboration with clients and colleagues. Photographers can create shared albums to share proofs, receive feedback, and deliver final images.
8.3. Portfolio Showcase
While Google Photos isn’t a dedicated portfolio platform, it can be used to create a simple online portfolio to showcase your work to potential clients.
8.4. Integration with Editing Software
Google Photos integrates with various photo editing software, allowing photographers to seamlessly transfer images between platforms.
8.5. Metadata Preservation
When uploading photos to Google Photos, metadata such as camera settings, location data, and copyright information is preserved, which is essential for professional photographers.
9. Alternatives to Google Photos
While Google Photos is a popular choice, several alternatives offer similar features and benefits.
9.1. Adobe Lightroom
Adobe Lightroom is a professional photo editing and management software that also offers cloud storage and syncing capabilities.
9.2. Apple Photos
Apple Photos is a built-in photo management app on iOS and macOS devices, offering seamless integration with the Apple ecosystem.
9.3. Amazon Photos
Amazon Photos provides unlimited photo storage for Amazon Prime members, along with basic editing and sharing features.
9.4. Dropbox
Dropbox is a versatile cloud storage service that can be used to store and share photos and videos, along with other types of files.
9.5. Flickr
Flickr is a photo-sharing platform that caters to photographers, offering a large community, advanced organization tools, and generous free storage.
10. Staying Updated with Google Photos
To stay updated with the latest features and updates from Google Photos, follow these tips.
10.1. Follow Google Photos on Social Media
Follow Google Photos on Twitter at @googlephotos for the latest updates, tips, and announcements.
10.2. Read Google Photos Blog
Check the official Google Photos blog for in-depth articles, tutorials, and feature spotlights.
10.3. Subscribe to Newsletters
Subscribe to photography and technology newsletters to receive news and updates about Google Photos and other relevant topics.
10.4. Join Online Communities
Join online photography communities and forums to discuss Google Photos, share tips, and stay informed about new developments.
In conclusion, accessing Google Photos is simple across various devices, and its rich features make it an excellent tool for managing, editing, and sharing your visual memories.
Ready to take your photography skills to the next level? Visit dfphoto.net for a wealth of tutorials, stunning photo galleries, and a vibrant community of photographers. Enhance your skills, find inspiration, and connect with fellow photography enthusiasts today! Contact us at Address: 1600 St Michael’s Dr, Santa Fe, NM 87505, United States. Phone: +1 (505) 471-6001 or visit our website: dfphoto.net.
FAQ Section
1. How do I open Google Photos on my computer?
Open Google Photos on your computer by navigating to photos.google.com in your web browser and signing in with your Google account. Once signed in, you can access and manage all your backed-up photos and videos seamlessly.
2. How do I open Google Photos on my Android device?
Open Google Photos on your Android device by locating the Google Photos app icon on your home screen or in your app drawer and tapping it to launch. If you’re not already signed in, select your Google account to access your photos.
3. How do I open Google Photos on my iPhone or iPad?
Open Google Photos on your iPhone or iPad by downloading the Google Photos app from the App Store. Once installed, launch the app and sign in with your Google account to access your synced photos and videos.
4. How do I upload photos to Google Photos?
Upload photos to Google Photos by opening the app on your computer or mobile device. Click or tap the “Upload” button, select the photos or videos you want to upload, and they will be backed up to your Google account.
5. How do I search for specific photos in Google Photos?
Search for specific photos in Google Photos by using the search bar at the top of the screen. Type in keywords related to what you’re looking for, such as “beach,” “birthday,” or a person’s name, and Google Photos will display all matching photos.
6. How do I create an album in Google Photos?
Create an album in Google Photos by selecting the photos you want to add to the album, tapping the “+” icon, and selecting “Album.” Choose “New album,” give your album a name, and the selected photos will be added.
7. How do I share photos from Google Photos?
Share photos from Google Photos by opening the photo you want to share, tapping the share icon (a sideways “V”), and selecting how you want to share the photo, such as via link, email, or social media.
8. How do I edit photos in Google Photos?
Edit photos in Google Photos by opening the photo you want to edit and tapping the edit icon (usually a slider or pencil icon) at the bottom of the screen. Use the various editing tools to adjust settings like brightness, contrast, and saturation.
9. How do I free up space using Google Photos?
Free up space using Google Photos by opening the app on your Android or iOS device, accessing settings, and tapping “Free up space.” This will remove backed-up photos from your device, freeing up storage.
10. How do I manage my Google Photos storage?
Manage your Google Photos storage by opening the app or visiting the website, accessing settings, and tapping “Manage storage.” This will show how your storage is being used and provide options to free up space or purchase more storage.