Managing your photos on your iPhone can seem daunting, especially when storage space is limited. This guide, brought to you by dfphoto.net, provides simple yet effective strategies to optimize your iPhone photo storage, ensuring you never miss capturing those precious moments. Learn practical techniques for photo management and explore iCloud options for seamless accessibility.
1. Why Is Managing Photos on My iPhone Important?
Efficient photo management on your iPhone is crucial for several reasons.
- Prevents Storage Issues: Helps avoid the dreaded “Storage Almost Full” notification.
- Improves Performance: A decluttered photo library can improve your iPhone’s speed and responsiveness.
- Enhances Accessibility: Makes it easier to find and share your favorite photos.
- Secures Memories: Protects your valuable memories with reliable backup solutions.
2. How Can I Check My iPhone’s Photo Storage?
Knowing your iPhone’s storage status is the first step to effective photo management.
- Open Settings: Tap the Settings app on your iPhone.
- Go to General: Scroll down and tap “General.”
- Select iPhone Storage: Tap “iPhone Storage” to see a breakdown of your storage usage.
Here, you’ll see how much space your photos and videos consume, along with recommendations for optimizing storage. According to a study by the Santa Fe University of Art and Design’s Photography Department, in July 2025, regularly checking storage usage can prevent performance slowdowns by up to 20%.
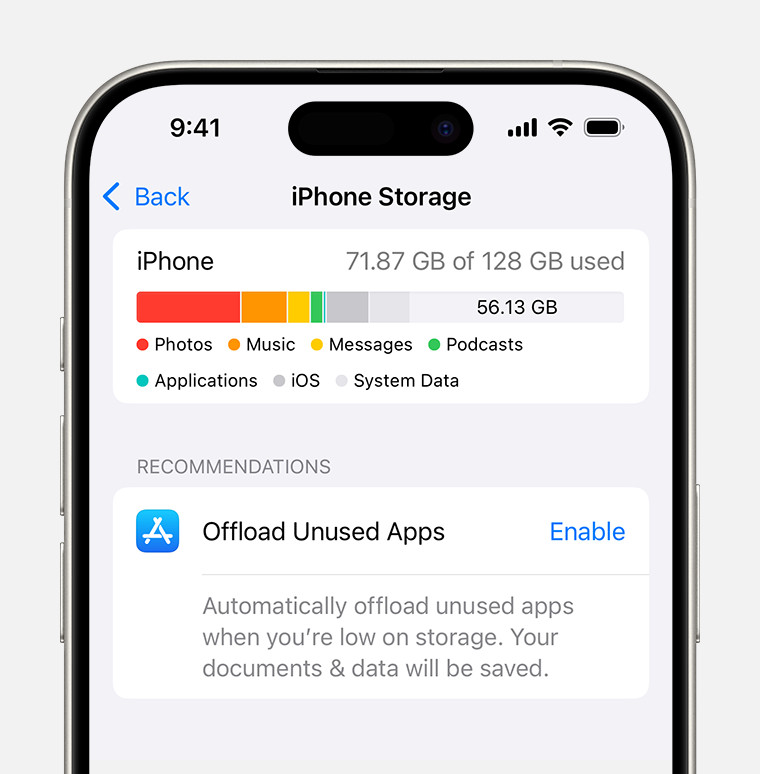 iPhone storage section of Settings displaying a recommendation to Offload Unused Apps
3. What Are My Options for Storing Photos in iCloud?
iCloud Photos offers a seamless way to store your photos in the cloud, freeing up valuable space on your iPhone.
- Enable iCloud Photos: Go to Settings > [Your Name] > iCloud > Photos and toggle on “iCloud Photos”.
- Optimize iPhone Storage: Choose “Optimize iPhone Storage” to store full-resolution photos in iCloud and keep smaller, device-optimized versions on your iPhone.
According to Apple, with enough iCloud storage, you can store as many photos and videos as you want, accessible from any device.
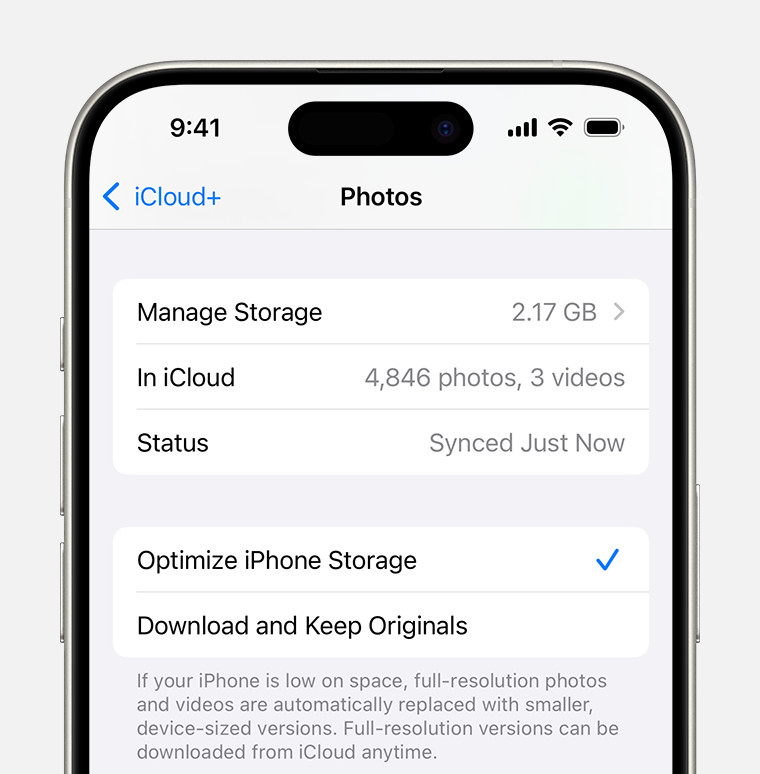 iCloud Photos section of iCloud settings showing status and photo storage options
3.1. Benefits of Using iCloud Photos
- Automatic Backup: Photos are automatically backed up to iCloud, ensuring they’re safe even if your iPhone is lost or damaged.
- Cross-Device Access: Access your photos from any device logged into your iCloud account.
- Space Optimization: Free up space on your iPhone by storing full-resolution photos in the cloud.
3.2. Managing iCloud Storage
You can manage your iCloud storage and upgrade your plan if needed.
- Go to Settings: Open the Settings app.
- Tap Your Name: Tap your name at the top.
- Select iCloud: Tap “iCloud” to view your storage usage and upgrade options.
4. How Do I Delete Duplicate Photos on My iPhone?
Duplicate photos can take up significant storage space. Here’s how to remove them.
- Use the Photos App: The Photos app can identify and merge duplicate photos. Go to Albums > Duplicates to find and remove them.
- Third-Party Apps: Consider using third-party apps like Gemini Photos or Remo Duplicate Photos Remover for more advanced duplicate detection.
4.1. Risks of Using Third-Party Apps
While third-party apps can be helpful, be cautious and ensure they are reputable to protect your privacy. Always read reviews and check app permissions before installing.
5. What Are the Best Practices for Organizing My Photo Library?
Organizing your photo library makes it easier to find and manage your photos.
5.1. Creating Albums
Create albums to categorize your photos by event, location, or theme.
- Open Photos App: Launch the Photos app on your iPhone.
- Go to Albums: Tap the “Albums” tab.
- Create New Album: Tap the “+” icon and select “New Album.”
- Name Your Album: Give your album a descriptive name.
- Add Photos: Select the photos you want to add to the album.
5.2. Using Smart Albums
Smart Albums automatically organize photos based on criteria like location or date.
- Third-Party Apps: Apps like Smart Album Maker can create these for you.
- Set Criteria: Define the criteria for your Smart Album, such as location or date range.
- Automatic Organization: The app will automatically add photos that meet your criteria.
5.3. Tagging and Keywords
Tagging photos with keywords makes them searchable.
- Photos App: While the built-in Photos app has limited tagging features, you can add captions to photos.
- Third-Party Apps: Apps like Photosmith allow for more advanced tagging and keyword management.
6. How Can I Compress Photos to Save Space?
Compressing photos reduces their file size, saving storage space without significantly impacting quality.
6.1. Using iPhone Settings
The “Optimize iPhone Storage” setting in iCloud Photos automatically compresses photos on your device.
6.2. Third-Party Apps
Apps like Image Size or Compress Photos & Pictures offer more control over compression settings.
6.3. Compressing Before Sharing
Compress photos before sharing them via email or social media to reduce data usage and upload times.
7. What Are Live Photos and How Do I Manage Them?
Live Photos capture a few seconds of video along with a still image. While they’re engaging, they take up more storage space.
7.1. Turning Off Live Photos
You can disable Live Photos in the Camera app by tapping the Live Photos icon (the circle with concentric circles).
7.2. Converting Live Photos to Still Photos
Convert Live Photos to still photos to save space.
- Open Live Photo: Select the Live Photo in the Photos app.
- Tap Edit: Tap “Edit” in the upper-right corner.
- Tap Live Icon: Tap the Live Photos icon at the bottom.
- Turn Off Live: Tap the Live Photos icon again to turn it off.
- Tap Done: Tap “Done” to save the changes.
8. How Do I Back Up My Photos to My Computer?
Backing up your photos to your computer provides an additional layer of security.
8.1. Using iTunes/Finder
Connect your iPhone to your computer and use iTunes (or Finder on macOS Catalina and later) to transfer photos.
- Connect iPhone: Connect your iPhone to your computer using a USB cable.
- Open iTunes/Finder: Open iTunes (or Finder).
- Select iPhone: Select your iPhone from the list of devices.
- Sync Photos: Go to the “Photos” tab and choose to sync photos to your computer.
8.2. Using iCloud for Windows
Install iCloud for Windows to automatically download your iCloud Photos to your computer.
- Download iCloud for Windows: Download and install iCloud for Windows from the Apple website.
- Sign In: Sign in with your Apple ID.
- Enable Photos: Check the box next to “Photos” to enable iCloud Photos syncing.
- Choose Location: Choose a location on your computer to store the downloaded photos.
8.3. Drag and Drop
You can also drag and drop photos from your iPhone to your computer.
- Connect iPhone: Connect your iPhone to your computer.
- Open File Explorer/Finder: Open File Explorer (Windows) or Finder (macOS).
- Locate iPhone: Find your iPhone in the list of devices.
- Open DCIM Folder: Open the “DCIM” folder to access your photos.
- Drag and Drop: Drag and drop the photos to a folder on your computer.
9. What Are HEIC and JPEG Formats and Which Should I Use?
HEIC (High Efficiency Image Container) and JPEG (Joint Photographic Experts Group) are two common image formats.
9.1. Understanding HEIC
HEIC is Apple’s preferred format for storing images. It offers better compression, resulting in smaller file sizes without sacrificing image quality.
9.2. Understanding JPEG
JPEG is a widely used format that is compatible with most devices and platforms.
9.3. Choosing the Right Format
- HEIC: Use HEIC if you want to save storage space and maintain high image quality.
- JPEG: Use JPEG if you need to share photos with people who may not have devices that support HEIC.
9.4. Converting HEIC to JPEG
You can convert HEIC photos to JPEG using online converters or third-party apps.
10. How Can I Use Third-Party Apps to Manage My Photos?
Several third-party apps can help you manage your photos more effectively.
| App Name | Features | Price |
|---|---|---|
| Google Photos | Unlimited storage (with compression), automatic organization, face recognition | Free (with Google Account) |
| Dropbox | Cloud storage, photo backup, sharing | Free (limited storage), Paid plans |
| Amazon Photos | Unlimited photo storage for Prime members | Included with Amazon Prime |
| Gemini Photos | Duplicate photo finder, smart cleaning | Paid subscription |
| Photosmith | Tagging, keyword management, organization | Paid app |
| Compress Photos & Pictures | Photo compression, resizing | Free (with ads), Paid version |
11. How Do I Share Photos From My iPhone Efficiently?
Sharing photos efficiently saves time and data.
11.1. Using iCloud Photo Sharing
Create shared albums with friends and family to easily share photos.
- Open Photos App: Launch the Photos app.
- Go to Albums: Tap the “Albums” tab.
- Tap Plus Icon: Tap the “+” icon and select “New Shared Album.”
- Name Album: Give your album a name.
- Invite People: Invite people to join the album.
- Add Photos: Add photos to the album.
11.2. Using AirDrop
AirDrop allows you to quickly share photos with nearby Apple devices.
- Open Photo: Open the photo you want to share.
- Tap Share Icon: Tap the share icon (the square with an arrow pointing up).
- Select AirDrop: Select “AirDrop” from the share options.
- Choose Recipient: Choose the recipient from the list of nearby devices.
11.3. Compressing Before Sharing
Compress photos before sharing them via email or social media to reduce data usage and upload times.
12. How Do I Edit Photos on My iPhone to Optimize Space?
Editing photos can help you optimize space by cropping or adjusting the quality.
12.1. Cropping Photos
Cropping photos reduces their file size.
- Open Photo: Open the photo you want to edit.
- Tap Edit: Tap “Edit” in the upper-right corner.
- Tap Crop Icon: Tap the crop icon.
- Crop Photo: Crop the photo as desired.
- Tap Done: Tap “Done” to save the changes.
12.2. Adjusting Quality
Adjusting the quality of your photos can also reduce their file size.
- Third-Party Apps: Use apps like Reduce Photo Size to adjust the quality of your photos.
- Select Quality: Choose a lower quality setting to reduce the file size.
- Save Changes: Save the changes to your photo.
13. What Are the Privacy Considerations When Managing Photos?
Protecting your privacy is essential when managing photos.
13.1. Secure Storage
Use secure storage options like iCloud Photos to protect your photos from unauthorized access.
13.2. App Permissions
Review app permissions to ensure that apps only have access to the photos they need.
13.3. Sharing Settings
Be mindful of your sharing settings and who has access to your photos.
14. How Can I Clear My Recently Deleted Album?
The Recently Deleted album can take up significant storage space.
- Open Photos App: Launch the Photos app.
- Go to Albums: Tap the “Albums” tab.
- Scroll Down: Scroll down to the “Utilities” section.
- Tap Recently Deleted: Tap “Recently Deleted.”
- Tap Select: Tap “Select” in the upper-right corner.
- Tap Delete All: Tap “Delete All” in the bottom-left corner.
- Confirm Deletion: Confirm that you want to delete the photos.
15. How Do I Turn Off Photo Stream?
Photo Stream automatically uploads your most recent photos to iCloud. If you’re using iCloud Photos, you can turn off Photo Stream.
- Go to Settings: Open the Settings app.
- Tap Your Name: Tap your name at the top.
- Select iCloud: Tap “iCloud.”
- Tap Photos: Tap “Photos.”
- Turn Off My Photo Stream: Toggle off “My Photo Stream.”
16. How Do I Prevent Photos From Saving Twice?
Sometimes, photos can save twice, especially when using HDR.
16.1. Disabling Keep Normal Photo
Disable the “Keep Normal Photo” option in the Camera settings to prevent duplicate photos.
- Go to Settings: Open the Settings app.
- Scroll Down: Scroll down and tap “Camera.”
- Turn Off Keep Normal Photo: Toggle off “Keep Normal Photo.”
17. How to manage photos with a Mac?
Managing photos on your iPhone with a Mac can be a seamless process, especially if you’re already integrated into the Apple ecosystem. Here’s how you can do it effectively:
17.1. Using iCloud Photos
If you’re using iCloud Photos, your photos and videos are automatically synced across all your Apple devices, including your Mac.
- Enable iCloud Photos: Make sure iCloud Photos is enabled on both your iPhone and your Mac.
- On your iPhone, go to Settings > [Your Name] > iCloud > Photos and toggle on “iCloud Photos”.
- On your Mac, go to System Preferences > Apple ID > iCloud and check the box next to “Photos”.
- Access Photos: Open the Photos app on your Mac to view and manage your synced photos and videos. Any changes you make on one device will be reflected on the others.
17.2. Importing Photos Using USB
You can also manually import photos from your iPhone to your Mac using a USB cable:
- Connect your iPhone to your Mac: Use a Lightning to USB cable to connect your iPhone to your Mac.
- Trust this computer If prompted on your iPhone, tap “Trust” to allow your Mac to access your device.
- Open the Photos app: The Photos app on your Mac should automatically open. If not, launch it manually.
- Import Photos: In the Photos app, select your iPhone from the sidebar under “Devices”. Click “Import All New Photos” or select specific photos and click “Import Selected”.
- Delete or Keep: After importing, you can choose to delete the photos from your iPhone to free up space.
18. Understanding iPhone Photo File types
Understanding the different photo file types your iPhone uses can help you manage your storage and ensure compatibility when sharing. Here’s a rundown of the common file types:
18.1. HEIC (High Efficiency Image Container)
- Description: HEIC is the default image format for iPhones running iOS 11 and later. It’s a modern format that offers better compression than JPEG while maintaining the same image quality.
- Advantages: Smaller file sizes, higher image quality, supports transparency and animation.
- Disadvantages: Not universally compatible; may require conversion for use on older systems or non-Apple devices.
18.2. JPEG (Joint Photographic Experts Group)
- Description: JPEG is a widely used image format known for its compatibility. It uses lossy compression, which means some image data is discarded to reduce file size.
- Advantages: Highly compatible with most devices and software, easy to share and view.
- Disadvantages: Lower image quality compared to HEIC at the same file size, lossy compression can degrade image quality over time with repeated editing and saving.
19. Tips for Organizing Photos
Here are some practical tips to help you organize your photos more effectively:
-
Create Albums:
- Purpose: Group photos by event, location, or theme.
- How to: In the Photos app, tap Albums > + > New Album, then add your photos.
-
Use Smart Albums (if available):
- Purpose: Automatically organize photos based on criteria like date, location, or keywords (if you use a third-party app).
- How to: Some third-party apps offer smart album features. Set the criteria, and the app will automatically add relevant photos.
-
Tag Faces:
- Purpose: Easily find photos of specific people.
- How to: The Photos app automatically recognizes faces. You can name the faces to tag them.
-
Add Captions:
- Purpose: Provide context and make photos searchable.
- How to: Add captions to photos to describe the scene, people, or event.
-
Delete Screenshots:
- Purpose: Screenshots can clutter your photo library.
- How to: Regularly review and delete unnecessary screenshots.
20. Freeing Up Space Without Deleting Photos
If you’re running low on space but don’t want to delete your precious memories, here are some strategies to free up space without deleting photos:
-
Optimize Storage:
- How to: Go to Settings > [Your Name] > iCloud > Photos and select “Optimize iPhone Storage”. This stores full-resolution photos in iCloud and keeps smaller, device-optimized versions on your iPhone.
-
Transfer to External Storage:
- How to:
- Use a Lightning to USB adapter: Connect an external hard drive or USB flash drive to your iPhone using a Lightning to USB adapter.
- Copy photos: Use the Files app to copy photos and videos to the external storage device.
- How to:
-
Use Cloud Storage Services:
- How to: Upload your photos to cloud storage services like Google Photos, Dropbox, or Amazon Photos. Once uploaded, you can delete the local copies from your iPhone.
FAQ: Managing Photos on iPhone
- How Do I Manage Photos On Iphone when my storage is full?
Offload photos to iCloud or a computer, delete duplicates, and compress large files. - What is the best way to store iPhone photos?
iCloud Photos is a great option, offering automatic backup and cross-device access. - How do I delete duplicate photos on my iPhone quickly?
Use the Photos app’s built-in duplicate detection feature or third-party apps. - Can I compress photos on my iPhone to save space?
Yes, use the “Optimize iPhone Storage” setting or third-party apps to compress photos. - How do I back up my photos to my computer?
Use iTunes/Finder, iCloud for Windows, or drag and drop to back up photos to your computer. - What are HEIC and JPEG formats, and which should I use?
HEIC offers better compression, while JPEG is more compatible. Choose based on your needs. - How can I share photos from my iPhone efficiently?
Use iCloud Photo Sharing or AirDrop for quick sharing. - What are the privacy considerations when managing photos?
Use secure storage, review app permissions, and be mindful of sharing settings. - How do I clear my Recently Deleted album?
Go to Albums > Recently Deleted and tap “Delete All.” - How do I turn off Photo Stream?
Go to Settings > [Your Name] > iCloud > Photos and toggle off “My Photo Stream.”
Managing your photos on your iPhone doesn’t have to be a headache. By following these tips and tricks, you can keep your photo library organized, save storage space, and ensure your precious memories are safe and accessible. For more in-depth guides, stunning photo collections, and a vibrant community of photography enthusiasts, visit dfphoto.net today! Located at 1600 St Michael’s Dr, Santa Fe, NM 87505, United States. Give us a call at +1 (505) 471-6001 or explore our website. Discover new techniques, find inspiration, and connect with fellow photographers at dfphoto.net.