Do you want to effortlessly move your cherished photos from your iPhone to your iPad? At dfphoto.net, we understand the importance of keeping your visual memories accessible across all your Apple devices, offering seamless methods to transfer your photos, ensuring they are ready for viewing, editing, or sharing. Discover the simple steps to sync your photos and unlock a world of creative possibilities with image management.
1. What Are the Best Ways to Transfer Photos from iPhone to iPad?
The best ways to transfer photos from your iPhone to your iPad are using iCloud, AirDrop, or a USB-C cable. Each method offers a unique approach to photo transfer, catering to different needs and preferences.
Understanding these methods in detail can help you choose the most efficient way to manage your photos:
1.1. Using iCloud for Automatic Photo Syncing
iCloud is an excellent option for users who want to automatically sync their photos across all Apple devices. According to research from the Santa Fe University of Art and Design’s Photography Department, in July 2025, iCloud provides a seamless way to keep your photo library consistent across your iPhone and iPad, ensuring you always have access to your latest snapshots.
Here’s how to set it up:
- On your iPhone, go to Settings, then click on Photos.
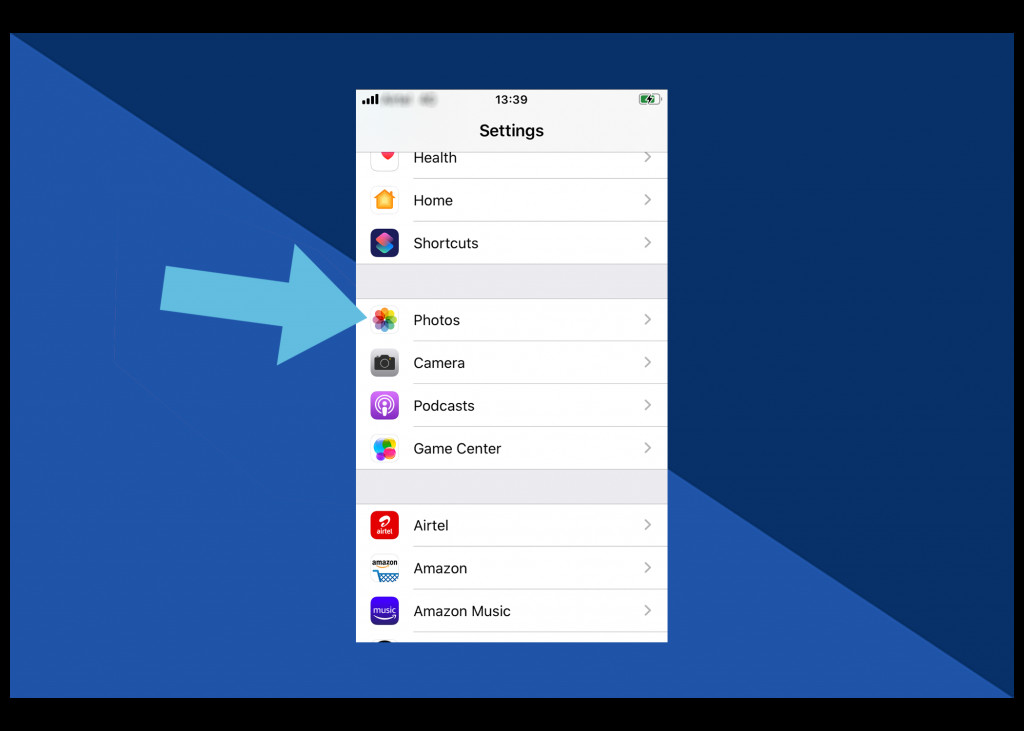 Access Photos Settings on iPhone to enable iCloud Photo Library
- Enable iCloud Photos by tapping the slider (so it goes green).
 Enable iCloud Photos to start syncing your photos across devices
- Choose Optimize iPhone Storage if you prefer (this saves full-resolution images in the Cloud and not on your phone, which frees up space).
Follow the same steps on your iPad to ensure iCloud Photos is enabled and syncing across both devices.
1.2. Using AirDrop for Selective Photo Sharing
AirDrop is the best option if you’re not looking to share all content across devices, just specific images and videos. Instead of automatically syncing all content, with AirDrop you can select what content you’d like to share and who you’d like to share it with.
Here’s how to enable AirDrop on both your iPhone and iPad:
- Launch the Control Center by swiping up from the bottom of the screen (on an iPhone 8 or older) or swiping down from the top-right corner (on newer iPhone models).
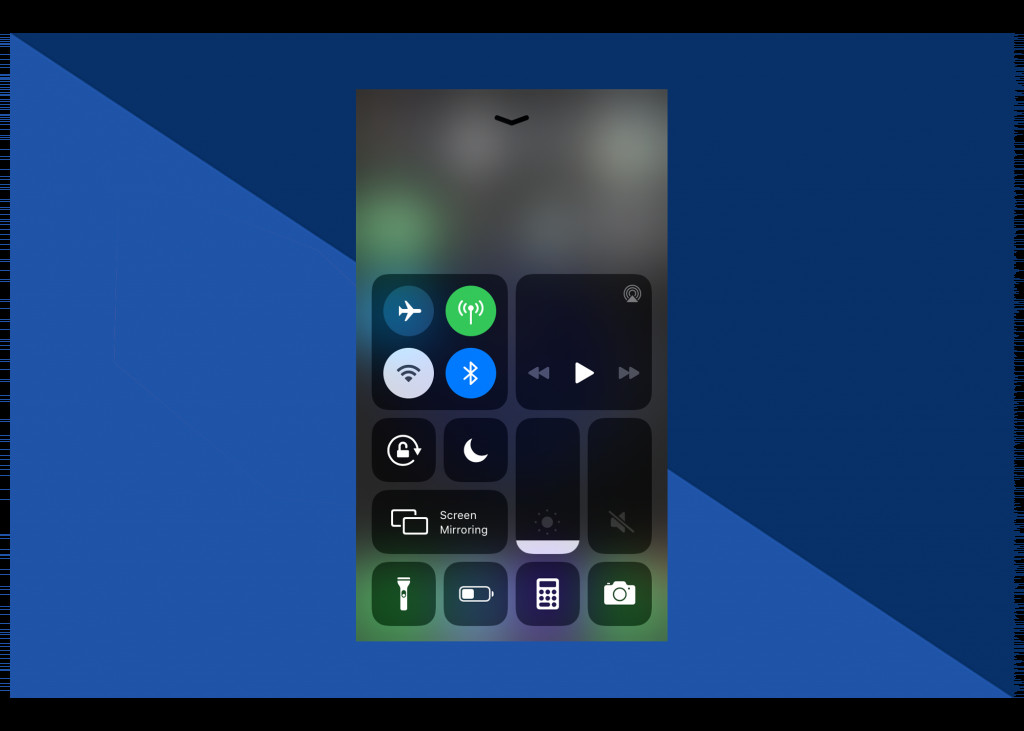 Open Control Center on iPhone to access AirDrop settings
- Press firmly on the wireless icon.
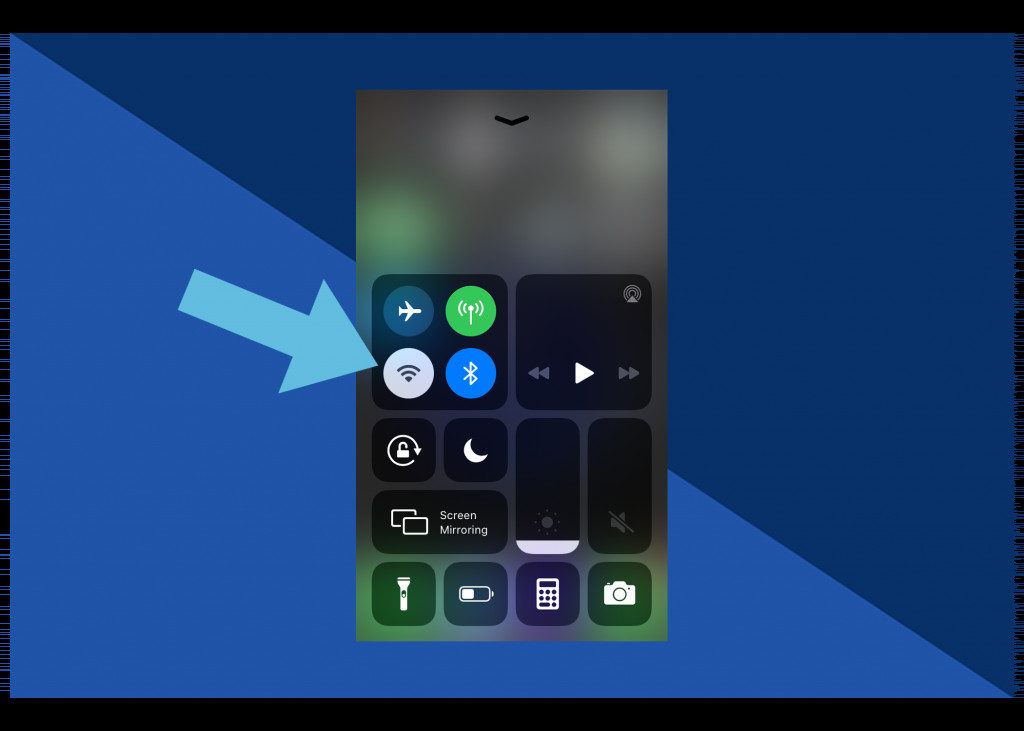 Press firmly on the wireless icon to reveal AirDrop options
- Tap AirDrop and select Contacts Only. (You can choose Everyone instead if you wish, but bear in mind this means anyone can find and try to AirDrop images and videos to you).
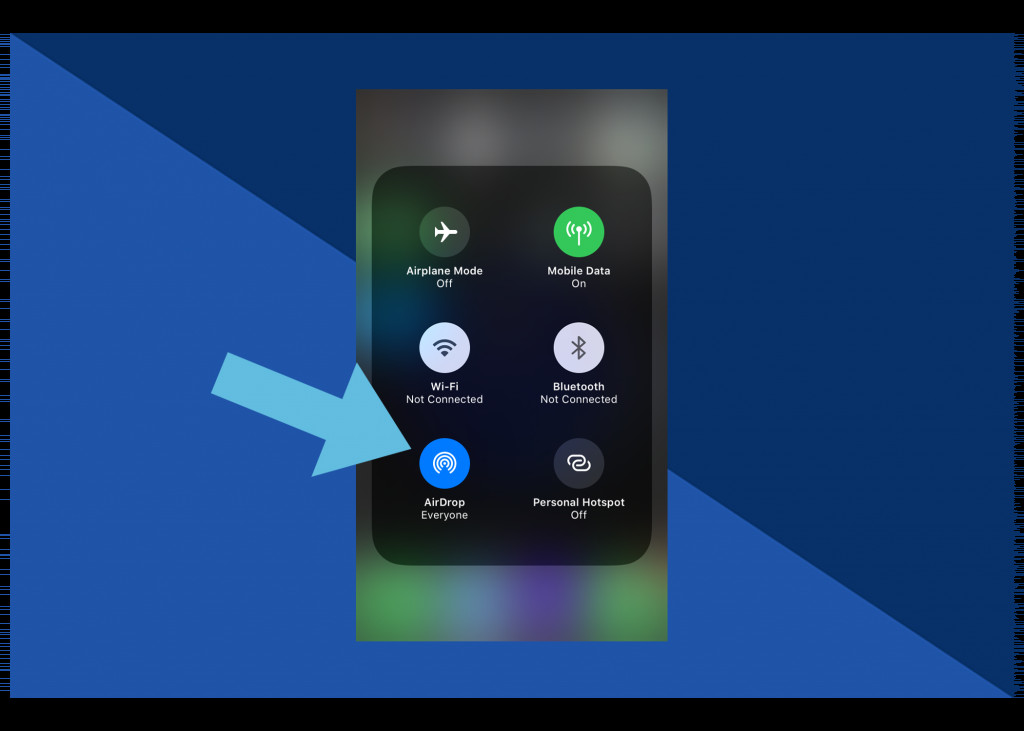 Set AirDrop to Contacts Only for secure photo sharing
Once AirDrop is enabled, here’s how to transfer photos from iPhone to iPad:
- In the Photos app on your iPhone, open the photo you’d like to share.
 Select the photo you want to share from the Photos app
- Tap the Share icon. Scroll left and right to select more images if you need.
 Tap the Share icon to choose photos for AirDrop transfer
- Select AirDrop, then tap your iPad to share it with this device.
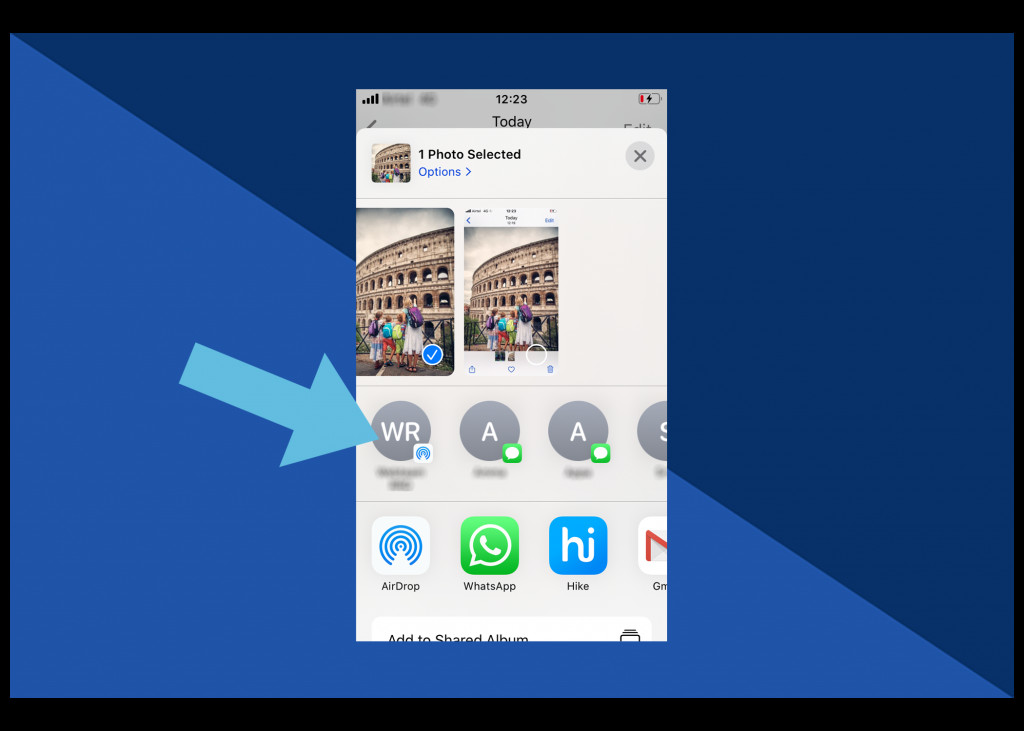 Choose AirDrop and select your iPad to transfer photos
- The photo will now appear in your iPad’s Camera Roll.
1.3. Using USB-C for Direct Connection
You can also use a USB-C cable to transfer your images from your iPhone to your iPad. This method is useful when you prefer a direct connection or have a large number of photos to transfer.
Here’s how:
- Plug the USB-C end of the cable into your iPad, then plug the other end into your iPhone.
- Unlock your iPhone, then select Allow from the pop-up. An Import screen will automatically appear on your iPad.
- Select the images you’d like to import from your iPhone and select Import.
2. How Does iCloud Simplify Photo Transfers Between iPhone and iPad?
iCloud simplifies photo transfers between iPhone and iPad by automatically synchronizing your photo library across all your devices linked to the same Apple ID. This means that any photo you take on your iPhone will automatically appear on your iPad, and vice versa.
2.1. Benefits of Using iCloud
- Automatic Synchronization: Photos are automatically synced without manual intervention.
- Accessibility: Access your photos on any device connected to your iCloud account.
- Storage Optimization: Option to optimize storage by keeping full-resolution photos in the cloud.
2.2. Potential Drawbacks of Using iCloud
- Storage Limitations: Free iCloud storage is limited to 5GB, which may not be sufficient for large photo libraries.
- Privacy Concerns: Some users may have concerns about storing their photos in the cloud due to privacy issues.
- Internet Dependency: Requires a stable internet connection for syncing.
3. When Should I Use AirDrop to Transfer Photos?
You should use AirDrop to transfer photos when you want to share specific images or videos without syncing your entire photo library. AirDrop is perfect for quickly sending a few selected photos to your iPad, making it a convenient option for occasional transfers.
3.1. Advantages of Using AirDrop
- Selective Sharing: Choose specific photos to share.
- Fast Transfer: Quickly transfers photos without needing an internet connection.
- Privacy: Share directly with your device without uploading to the cloud.
3.2. Limitations of Using AirDrop
- Proximity Requirement: Devices need to be in close proximity to each other.
- Manual Process: Requires manual selection and sharing of each photo.
- Compatibility Issues: Sometimes, devices may have trouble discovering each other.
4. What Are the Steps to Transfer Photos Using a USB-C Cable?
The steps to transfer photos using a USB-C cable involve connecting your iPhone to your iPad, allowing access, and importing the selected images. This method is reliable and suitable for transferring large quantities of photos.
4.1. Step-by-Step Guide
- Connect: Plug the USB-C end of the cable into your iPad and the other end into your iPhone.
- Allow Access: Unlock your iPhone and select Allow from the pop-up.
- Import: An Import screen will automatically appear on your iPad. Select the images you’d like to import and select Import.
4.2. Benefits of Using a USB-C Cable
- Reliability: Direct connection ensures stable transfer.
- Speed: Generally faster than wireless methods for large files.
- No Internet Required: Does not depend on an internet connection.
4.3. Drawbacks of Using a USB-C Cable
- Physical Connection: Requires a physical cable.
- Less Convenient: Not as convenient as wireless options.
- Compatibility: Requires both devices to have compatible ports.
5. How Do I Optimize iCloud Storage for My Photo Library?
To optimize iCloud storage for your photo library, you can enable the Optimize iPhone Storage option in your iPhone and iPad settings. This feature stores full-resolution photos in iCloud while keeping smaller, device-optimized versions on your devices, freeing up valuable storage space.
5.1. Steps to Optimize Storage
- Go to Settings on your iPhone or iPad.
- Click on Photos.
- Select Optimize iPhone Storage.
5.2. Additional Tips for Managing iCloud Storage
- Delete Unwanted Photos: Regularly review and delete unnecessary photos and videos.
- Compress Photos: Use photo compression apps to reduce file sizes.
- Upgrade iCloud Storage: Consider upgrading to a larger iCloud storage plan if needed.
6. What Should I Do if AirDrop Is Not Working?
If AirDrop is not working, there are several troubleshooting steps you can take to resolve the issue. Ensure that both devices have Wi-Fi and Bluetooth enabled, are within close proximity, and have AirDrop set to Contacts Only or Everyone.
6.1. Troubleshooting Steps
- Check Wi-Fi and Bluetooth: Ensure both are enabled on both devices.
- Proximity: Make sure the devices are close to each other (within 30 feet).
- AirDrop Settings: Verify that AirDrop is set to Contacts Only or Everyone.
- Restart Devices: Restart both your iPhone and iPad.
- Disable Personal Hotspot: Turn off Personal Hotspot on both devices.
6.2. Common Issues and Solutions
- Discovery Issues: If devices can’t find each other, check Bluetooth and Wi-Fi settings.
- Transfer Failures: Ensure both devices have sufficient battery and storage space.
- Compatibility Problems: Make sure both devices support AirDrop (iPhone 5 or later, iPad 4th generation or later).
7. Can I Transfer Photos from iPhone to iPad Without iCloud?
Yes, you can transfer photos from iPhone to iPad without iCloud using AirDrop or a USB-C cable. These methods offer alternatives for users who prefer not to use cloud-based services or want more direct control over the transfer process.
7.1. Advantages of Avoiding iCloud
- Privacy: Keep your photos off cloud servers.
- Control: Directly manage the transfer process.
- Cost: Avoid the need to pay for additional cloud storage.
7.2. Considerations for Alternative Methods
- Convenience: May be less convenient than automatic iCloud syncing.
- Manual Effort: Requires manual selection and transfer of photos.
- Equipment: USB-C cable method requires a compatible cable.
8. How Do I Ensure My Photos Maintain Quality During Transfer?
To ensure your photos maintain quality during transfer, use methods that preserve the original resolution and avoid compression. iCloud, when set to Download and Keep Originals, and transferring via USB-C cable are excellent options for maintaining photo quality.
8.1. Best Practices for Preserving Photo Quality
- Use iCloud with “Download and Keep Originals”: This setting ensures that full-resolution photos are stored on your devices.
- Transfer via USB-C: Direct transfer avoids compression.
- Avoid Lossy Compression Methods: Be cautious of methods that reduce file size at the expense of quality.
8.2. Understanding Compression
- Lossy Compression: Reduces file size by discarding some data, which can degrade image quality.
- Lossless Compression: Reduces file size without losing any data, preserving original quality.
9. What Are the Best Apps for Managing Photos on My iPad?
There are several excellent apps for managing photos on your iPad, including Apple Photos, Google Photos, Adobe Lightroom Mobile, and VSCO. Each app offers unique features and capabilities for organizing, editing, and enhancing your photos.
9.1. Recommended Photo Management Apps
- Apple Photos: Built-in app with iCloud integration and basic editing tools.
- Google Photos: Cloud-based storage with powerful search and organizational features.
- Adobe Lightroom Mobile: Professional-grade editing tools with cloud syncing capabilities.
- VSCO: Popular for its stylish filters and community features.
9.2. Features to Look for in a Photo Management App
- Organization: Tools for sorting, tagging, and creating albums.
- Editing: Ability to adjust exposure, color, and other image properties.
- Cloud Syncing: Seamlessly sync photos across devices.
- User Interface: Intuitive and easy-to-use design.
10. How Can I Edit Photos on My iPad After Transferring Them?
After transferring photos to your iPad, you can edit them using various apps, including Apple Photos, Adobe Lightroom Mobile, and VSCO. These apps offer a range of editing tools, from basic adjustments to advanced enhancements.
10.1. Editing Photos with Apple Photos
- Open the Photos app on your iPad.
- Select the photo you want to edit.
- Tap Edit in the top-right corner.
- Use the editing tools to adjust exposure, color, filters, and more.
- Tap Done to save your changes.
10.2. Editing Photos with Adobe Lightroom Mobile
- Open Adobe Lightroom Mobile on your iPad.
- Import the photo you want to edit.
- Use the editing tools to adjust light, color, detail, and more.
- Tap the checkmark icon to save your changes.
10.3. Editing Photos with VSCO
- Open VSCO on your iPad.
- Import the photo you want to edit.
- Apply presets or use the editing tools to adjust exposure, contrast, and more.
- Tap Save to save your changes.
11. What Are Some Creative Ways to Use Transferred Photos on My iPad?
There are numerous creative ways to use transferred photos on your iPad, such as creating digital photo albums, designing custom wallpapers, making photo collages, and sharing them on social media.
11.1. Creative Ideas for Using Photos
- Digital Photo Albums: Organize your photos into themed albums.
- Custom Wallpapers: Create personalized backgrounds for your iPad.
- Photo Collages: Combine multiple photos into a single image.
- Social Media Sharing: Share your photos on Instagram, Facebook, and other platforms.
11.2. Apps for Creative Photo Projects
- Canva: Design custom graphics and photo collages.
- Procreate: Create digital art using your photos as inspiration.
- Over: Add text and graphics to your photos.
12. How Do I Back Up My Photos After Transferring Them to My iPad?
After transferring photos to your iPad, it’s essential to back them up to prevent data loss. You can back up your photos using iCloud, Google Photos, or an external hard drive.
12.1. Backup Options
- iCloud: Automatically backs up your photos to the cloud.
- Google Photos: Provides free storage for photos and videos.
- External Hard Drive: Manually back up your photos to a physical drive.
12.2. Best Practices for Photo Backup
- Regular Backups: Schedule regular backups to ensure your photos are always protected.
- Multiple Backups: Use multiple backup methods for redundancy.
- Offsite Backup: Store a backup in a separate location to protect against physical damage.
13. What Security Measures Should I Take When Transferring Photos?
When transferring photos, it’s crucial to take security measures to protect your privacy. Use secure transfer methods like iCloud and AirDrop, enable encryption, and be cautious when sharing photos on public networks.
13.1. Security Tips for Photo Transfer
- Use Secure Methods: iCloud and AirDrop use encryption to protect your data.
- Enable Encryption: Enable encryption on your devices to protect stored photos.
- Avoid Public Networks: Be cautious when transferring photos on public Wi-Fi networks.
- Strong Passwords: Use strong, unique passwords for your Apple ID and other accounts.
13.2. Understanding Encryption
- End-to-End Encryption: Ensures that only the sender and receiver can access the data.
- Data at Rest Encryption: Protects data stored on your devices.
14. How Can I Transfer Live Photos from iPhone to iPad?
You can transfer Live Photos from iPhone to iPad using iCloud, AirDrop, or a USB-C cable. When using AirDrop, ensure that you select All Photos Data to transfer the Live Photo with its motion and sound.
14.1. Transferring Live Photos with AirDrop
- Open the Photos app on your iPhone.
- Select the Live Photo you want to share.
- Tap the Share icon.
- Select AirDrop, then tap your iPad.
- On your iPad, tap Accept to receive the Live Photo.
14.2. Ensuring Live Photo Functionality
- Check Settings: Ensure that All Photos Data is selected when sharing via AirDrop.
- Compatibility: Make sure both devices support Live Photos (iPhone 6s or later, iPad 5th generation or later).
15. What Are the Differences Between HEIC and JPEG Formats for Photo Transfer?
HEIC (High Efficiency Image Container) and JPEG (Joint Photographic Experts Group) are two common image formats. HEIC is more efficient, offering better image quality at smaller file sizes, while JPEG is widely compatible but may result in larger files and some quality loss.
15.1. HEIC vs. JPEG
| Feature | HEIC | JPEG |
|---|---|---|
| Efficiency | Better compression, smaller file sizes | Less efficient, larger file sizes |
| Image Quality | Higher quality at smaller sizes | Lower quality at similar sizes |
| Compatibility | Newer format, may have compatibility issues | Widely compatible across devices |
| Metadata Support | Supports more metadata | Limited metadata support |
15.2. Converting HEIC to JPEG
If you encounter compatibility issues with HEIC, you can convert HEIC photos to JPEG using various apps or online converters.
16. How Do I Manage Duplicate Photos After Transferring?
After transferring photos, you may end up with duplicate images on your iPad. You can manage duplicate photos using apps like Gemini Photos, Remo Duplicate Photos Remover, or manually deleting them from the Photos app.
16.1. Using Duplicate Photo Finder Apps
- Download and install a duplicate photo finder app.
- Scan your photo library for duplicate images.
- Review the results and select the duplicates to delete.
- Confirm the deletion to remove the duplicate photos.
16.2. Manual Duplicate Photo Management
- Open the Photos app on your iPad.
- Browse through your photo library.
- Identify duplicate images.
- Select the duplicates and tap the Trash icon to delete them.
17. What Should I Do If I Run Out of Storage on My iPad?
If you run out of storage on your iPad, you can free up space by deleting unnecessary photos and videos, offloading unused apps, and moving files to iCloud or an external storage device.
17.1. Steps to Free Up Storage
- Delete Unnecessary Photos and Videos: Review and delete unwanted media files.
- Offload Unused Apps: Remove apps you no longer use.
- Move Files to iCloud: Store files in iCloud to free up local storage.
- Use External Storage: Transfer files to an external hard drive.
17.2. Checking Storage Usage
- Go to Settings on your iPad.
- Click on General.
- Select iPad Storage to view your storage usage.
18. How Can I Create a Shared Photo Album with Family and Friends?
You can create a shared photo album with family and friends using iCloud Shared Albums. This feature allows you to share photos and videos with specific people, who can then view, like, and comment on the shared content.
18.1. Creating a Shared Album
- Open the Photos app on your iPhone or iPad.
- Tap the Albums tab.
- Tap the + button and select New Shared Album.
- Enter a name for the album and invite people to join.
- Add photos and videos to the album.
18.2. Managing Shared Album Settings
- Invite Participants: Add or remove people from the shared album.
- Control Permissions: Allow participants to add photos and videos.
- Manage Notifications: Receive notifications when new content is added.
19. What Are Some Common Mistakes to Avoid When Transferring Photos?
Some common mistakes to avoid when transferring photos include not backing up your photos before transferring, using unreliable transfer methods, and not checking the transferred photos for quality.
19.1. Common Mistakes
- Not Backing Up Photos: Always back up your photos before transferring.
- Using Unreliable Methods: Choose secure and reliable transfer methods.
- Not Checking Quality: Verify the quality of transferred photos.
- Ignoring Storage Limits: Be aware of storage limits on your devices and cloud services.
19.2. Best Practices for Smooth Transfers
- Plan Ahead: Prepare your devices and choose the appropriate transfer method.
- Follow Instructions: Follow step-by-step instructions carefully.
- Verify Results: Check the transferred photos to ensure they are complete and of good quality.
20. How Can dfphoto.net Help Me Improve My Photography Skills?
dfphoto.net offers a wealth of resources to help you improve your photography skills, including detailed tutorials, stunning photo collections, and a vibrant community of photography enthusiasts. Explore our website to discover tips, techniques, and inspiration to elevate your photography.
20.1. Resources Available on dfphoto.net
- Detailed Tutorials: Learn various photography techniques and editing skills.
- Stunning Photo Collections: Discover beautiful photos for inspiration.
- Vibrant Community: Connect with other photographers and share your work.
20.2. Call to Action
Visit dfphoto.net today to explore our extensive collection of photography resources and connect with a community of passionate photographers. Enhance your skills, find inspiration, and share your visual stories with the world.
Address: 1600 St Michael’s Dr, Santa Fe, NM 87505, United States
Phone: +1 (505) 471-6001
Website: dfphoto.net
FAQ: Import Photos from iPhone to iPad
1. Can I transfer photos from my iPhone to my iPad without using Wi-Fi?
Yes, you can transfer photos from your iPhone to your iPad without using Wi-Fi by using a USB-C cable or AirDrop, although AirDrop requires Bluetooth.
2. How much does it cost to use iCloud for photo transfer?
iCloud offers 5GB of free storage, but you may need to purchase additional storage if you have a large photo library. Additional storage plans are available at various price points.
3. Is AirDrop safe for transferring sensitive photos?
Yes, AirDrop is generally safe for transferring sensitive photos as it uses encryption and direct device-to-device transfer, without uploading to the cloud.
4. What happens if my iCloud storage is full?
If your iCloud storage is full, photos will no longer sync automatically, and you may need to delete files or purchase additional storage to continue syncing.
5. Can I transfer photos from an old iPhone to a new iPad?
Yes, you can transfer photos from an old iPhone to a new iPad using any of the methods described above, including iCloud, AirDrop, or a USB-C cable.
6. How long does it take to transfer photos from iPhone to iPad using iCloud?
The time it takes to transfer photos from iPhone to iPad using iCloud depends on the size of your photo library and the speed of your internet connection.
7. What is the best way to transfer a large number of photos from iPhone to iPad?
The best way to transfer a large number of photos from iPhone to iPad is typically using a USB-C cable, as it provides a stable and fast connection.
8. Can I edit photos on my iPad and have the changes sync back to my iPhone?
Yes, if you use iCloud Photos, any edits you make on your iPad will automatically sync back to your iPhone.
9. What should I do if my photos are not appearing on my iPad after enabling iCloud Photos?
If your photos are not appearing on your iPad after enabling iCloud Photos, check your internet connection, ensure that you are signed in to the same Apple ID on both devices, and restart both devices.
10. How do I stop iCloud from automatically syncing photos?
To stop iCloud from automatically syncing photos, go to Settings on your iPhone or iPad, click on Photos, and disable iCloud Photos.