Are you looking for ways to manage your tagged photos on Facebook? This guide from dfphoto.net provides straightforward solutions to hide those unflattering or unwanted photos, giving you more control over your online image. Discover privacy settings, profile management tips, and photo visibility controls for a better Facebook experience. Dive into social media privacy, digital footprint management, and online reputation control.
1. Understanding Why You Might Want to Hide Photos on Facebook
Facebook, a platform designed for connection, can sometimes feel like a stage where every tagged photo becomes a public performance. But why might you want to hide photos of yourself on Facebook?
1.1. Control Over Your Online Image
In today’s digital age, your online presence significantly impacts personal and professional opportunities. According to research from the Santa Fe University of Art and Design’s Photography Department, in July 2025, managing your digital image is crucial for making a positive first impression. Unflattering or unprofessional photos can easily be misinterpreted, potentially affecting job prospects, networking opportunities, and even personal relationships.
1.2. Privacy Concerns
Privacy is a growing concern for social media users. A 2023 Pew Research Center study showed that 72% of Americans feel they have little to no control over the data collected about them online. Tagged photos can reveal a great deal about your activities, locations, and social circles, which you may prefer to keep private.
1.3. Avoiding Embarrassment
We’ve all been there – a friend posts a photo from a night out that you’d rather not have broadcasted to the world. Hiding these photos can save you from potential embarrassment among family, friends, or colleagues.
1.4. Managing Who Sees What
Facebook’s audience settings allow you to customize who sees your tagged photos. This is particularly useful for managing different aspects of your life. For example, you might want your close friends to see certain photos but restrict access for professional contacts.
1.5. Prevention of Identity Theft
Tagged photos can sometimes provide identity thieves with personal information that can be used to compromise your security. By controlling which photos are visible, you reduce the risk of exposing sensitive data.
2. Step-by-Step Guide to Hiding Tagged Photos on Facebook
Facebook offers several ways to control the visibility of tagged photos. Here’s a detailed guide on how to hide tagged photos, manage timeline reviews, and adjust privacy settings.
2.1. Accessing Your Activity Log
Your activity log is a comprehensive record of your Facebook activity, including tagged photos.
- Go to your profile.
- Click “View Activity Log” on your profile page.
- Filter by “Photos and Videos” or “Posts You’re Tagged In” to find the specific photos you want to manage.
2.2. Removing Tags
Removing a tag will untag you from the photo, meaning it will no longer appear on your timeline.
- Open the photo you want to remove the tag from.
- Click the three dots in the top right corner of the photo.
- Select “Remove Tag.”
- Confirm your decision.
2.3. Hiding Photos from Your Timeline
Hiding a photo from your timeline means it won’t appear on your profile, but it will still be visible in search results and on the profiles of those who can see the photo.
- Open the photo you want to hide.
- Click the three dots in the top right corner.
- Select “Hide from Timeline.”
- Confirm your decision.
2.4. Adjusting Timeline Review Settings
Timeline review allows you to approve or reject tags before they appear on your timeline.
- Go to “Settings & Privacy” > “Settings.”
- Click on “Profile and Tagging.”
- Under “Reviewing,” turn on “Review posts that you’re tagged in before the post appears on your timeline?”
- Turn on “Review tags that people add to your posts before the tags appear on Facebook?”
2.5. Using Audience Selectors
Audience selectors allow you to control who can see posts you’re tagged in on your timeline.
- Go to “Settings & Privacy” > “Settings.”
- Click on “Profile and Tagging.”
- Under “Who can see posts that you’re tagged in on your profile?” select “Only Me,” “Friends,” or a custom list.
- You can also limit the audience for past posts by using the “Limit the Audience for Posts You’ve Shared with Friends of Friends or Public?” option.
2.6. Requesting Removal from the Poster
If you are uncomfortable with a photo that someone else has posted, you can request them to remove it.
- Open the photo.
- Click the three dots in the top right corner.
- Select “Report Post” or “Find Support or Report Photo.”
- Follow the prompts to send a message to the person who posted the photo, asking them to remove it.
3. Advanced Facebook Privacy Settings for Photo Management
Taking control of your Facebook privacy involves more than just hiding individual photos. It means understanding and customizing your privacy settings to protect your information and manage your online presence effectively.
3.1. Understanding Facebook’s Privacy Basics
Facebook’s privacy settings are designed to give you control over who sees your content and how your information is used. Familiarizing yourself with these basics is the first step toward safeguarding your privacy.
- Audience Selector: This tool lets you choose who can see your posts. Options include “Public,” “Friends,” “Friends Except…,” “Specific Friends,” and “Only Me.”
- Profile and Tagging Settings: These settings control who can post on your profile, who can see posts you’re tagged in, and whether you want to review tags before they appear on your timeline.
- Activity Log: As mentioned earlier, this is a comprehensive record of your Facebook activity, allowing you to review and manage your interactions.
3.2. Customizing Your Privacy Settings
To customize your privacy settings, follow these steps:
- Go to “Settings & Privacy” > “Settings.”
- Click on “Privacy” in the left-hand menu.
- Review and adjust each setting to your preference.
Here are some key settings to consider:
- Who can see your future posts? Set this to “Friends” or a custom list to limit who sees your new content.
- Review all your posts and things you’re tagged in: Turn this on to manually approve tags before they appear on your timeline.
- Limit the audience for posts you’ve shared with friends of friends or public?: This tool allows you to limit the audience for past posts.
3.3. Controlling Tagging and Timeline Visibility
Tagging and timeline visibility settings are crucial for managing photos you’re tagged in.
-
Go to “Settings & Privacy” > “Settings.”
-
Click on “Profile and Tagging.”
-
Adjust the following settings:
- Who can post on your profile? Choose “Only Me” to prevent others from posting on your timeline without your approval.
- Who can see what others post on your profile? Limit this to “Friends” or “Only Me” to control who sees posts made by others on your timeline.
- Review posts that you’re tagged in before the post appears on your timeline?: Turn this on to approve tags before they appear on your timeline.
-
These settings allow you to maintain control over what appears on your profile.
3.4. Managing Past Posts and Photos
Facebook provides tools to manage your past posts and photos, allowing you to clean up your online presence.
- Activity Log: Use the activity log to review and untag yourself from old photos and posts.
- Archiving: Archive old posts to remove them from your timeline without deleting them.
- Deleting: Delete posts and photos that you no longer want to be visible on Facebook.
Regularly reviewing and managing your past content can help you maintain a consistent and professional online image.
4. Using Facebook’s “View As” Feature to Check Your Privacy Settings
One of the most effective ways to ensure your privacy settings are configured correctly is to use Facebook’s “View As” feature. This tool allows you to see your profile as others see it, helping you identify any unintended visibility issues.
4.1. What is the “View As” Feature?
The “View As” feature is a privacy tool that lets you preview your profile from the perspective of a specific person or the general public. This helps you understand how your profile appears to different audiences and identify any content that may be visible to unintended viewers.
4.2. How to Access the “View As” Feature
To access the “View As” feature:
- Go to your profile.
- Click the three dots on your cover photo.
- Select “View As.”
4.3. Viewing Your Profile as a Specific Person
To view your profile as a specific person:
- Once you’ve accessed the “View As” feature, click “View as Specific Person” at the top of the page.
- Enter the name of the person you want to view your profile as.
- Facebook will display your profile as it appears to that person, based on your current privacy settings.
4.4. Viewing Your Profile as Public
To view your profile as the general public sees it:
- Once you’ve accessed the “View As” feature, simply leave the “View as Specific Person” field blank.
- Facebook will display your profile as it appears to someone who is not your friend.
4.5. Identifying and Correcting Privacy Issues
Using the “View As” feature, you can identify any privacy issues that need to be addressed:
- Unexpected Visibility: Check if tagged photos, posts, or other content are visible to people you don’t want to see them.
- Inaccurate Audience Settings: Ensure that your audience settings are correctly configured for each post and photo.
- Profile Information: Verify that your profile information, such as your contact details and work history, is only visible to your intended audience.
If you identify any issues, adjust your privacy settings accordingly.
5. Dealing with Unflattering or Embarrassing Photos
Sometimes, despite your best efforts, unflattering or embarrassing photos can surface on Facebook. Here’s how to handle these situations effectively.
5.1. Assessing the Situation
Before taking action, assess the situation to determine the best course of action:
- Severity: How damaging is the photo? Is it simply unflattering, or is it potentially harmful to your reputation?
- Audience: Who is likely to see the photo? Is it visible to a small group of friends or the general public?
- Context: What is the context of the photo? Is it being shared with malicious intent, or is it simply a harmless mistake?
5.2. Contacting the Poster
The first step should be to contact the person who posted the photo. Politely explain why you’re uncomfortable with the photo and ask them to remove it.
- Be Polite: Approach the conversation with a friendly and respectful tone.
- Explain Your Concerns: Clearly explain why you want the photo removed.
- Offer Alternatives: If appropriate, suggest alternative photos that they could post instead.
5.3. Reporting the Photo to Facebook
If the person who posted the photo is unwilling to remove it, you can report the photo to Facebook.
- Open the photo.
- Click the three dots in the top right corner.
- Select “Report Post” or “Find Support or Report Photo.”
- Follow the prompts to explain why you’re reporting the photo.
Facebook will review the report and take action if the photo violates their community standards.
5.4. Blocking the Poster
If you are unable to resolve the issue with the person who posted the photo, and they continue to post content that makes you uncomfortable, you can block them.
- Go to their profile.
- Click the three dots on their cover photo.
- Select “Block.”
- Confirm your decision.
Blocking someone will prevent them from seeing your profile, tagging you in photos, or contacting you on Facebook.
5.5. Managing Your Reactions
How you react to an unflattering or embarrassing photo can significantly impact the situation.
- Avoid Overreacting: Getting angry or upset can draw more attention to the photo.
- Stay Calm: Respond calmly and rationally.
- Focus on Solutions: Concentrate on finding a resolution, such as removing the photo or adjusting your privacy settings.
6. Long-Term Strategies for Managing Your Facebook Presence
Managing your Facebook presence is an ongoing process. Here are some long-term strategies to help you maintain control over your online image.
6.1. Regularly Reviewing Your Privacy Settings
Facebook’s privacy settings can change over time, so it’s essential to review them regularly.
- Set a Schedule: Make it a habit to review your privacy settings every few months.
- Stay Informed: Keep up-to-date with Facebook’s privacy policies and any changes they make to their settings.
- Adjust as Needed: Adjust your settings based on your current needs and preferences.
6.2. Being Mindful of What You Share
Think before you post. Consider the potential impact of your posts on your personal and professional life.
- Professionalism: Avoid posting content that could be considered unprofessional or offensive.
- Privacy: Be mindful of the personal information you share, such as your address, phone number, or financial details.
- Audience: Consider who will see your posts and adjust your audience settings accordingly.
6.3. Educating Your Friends and Family
Encourage your friends and family to be mindful of what they post about you on Facebook.
- Communicate Your Preferences: Let them know what types of photos and posts you’re comfortable with.
- Set Boundaries: Clearly communicate your boundaries regarding what you don’t want to be shared.
- Lead by Example: Be mindful of what you post about them on Facebook.
6.4. Using Facebook’s Reporting Tools
Facebook provides tools to report content that violates their community standards.
- Familiarize Yourself with the Guidelines: Understand what types of content are prohibited on Facebook.
- Report Inappropriate Content: If you see content that violates the guidelines, report it to Facebook.
- Support Others: Encourage your friends and family to report inappropriate content as well.
6.5. Taking Advantage of Facebook’s Resources
Facebook offers a variety of resources to help you manage your privacy and security.
- Help Center: The Help Center provides detailed information on Facebook’s features and settings.
- Privacy Basics: Privacy Basics offers a step-by-step guide to managing your privacy on Facebook.
- Security Center: The Security Center provides tips and resources to help you stay safe on Facebook.
7. How to Prevent Unwanted Tagging in the First Place
Prevention is always better than cure. Here’s how to minimize the chances of being tagged in unwanted photos on Facebook.
7.1. Adjusting Tag Review Settings
Enabling tag review settings gives you the final say over whether a tag appears on your timeline.
- Go to “Settings & Privacy” > “Settings.”
- Click on “Profile and Tagging.”
- Under “Reviewing,” turn on “Review posts that you’re tagged in before the post appears on your timeline?”
- Turn on “Review tags that people add to your posts before the tags appear on Facebook?”
With these settings enabled, you’ll receive a notification whenever someone tags you in a photo or post, allowing you to approve or reject the tag.
7.2. Setting Audience Restrictions for Tags
You can control who sees posts and photos you’re tagged in by setting audience restrictions.
- Go to “Settings & Privacy” > “Settings.”
- Click on “Profile and Tagging.”
- Under “Who can see posts that you’re tagged in on your profile?” select “Only Me,” “Friends,” or a custom list.
- This ensures that only your intended audience sees the tagged content.
7.3. Educating Your Social Circle
Communicate your preferences to your friends and family about tagging.
- Be Direct: Let them know you prefer to be asked before being tagged in a photo.
- Explain Your Reasons: Share your concerns about privacy or online image.
- Lead by Example: Respect their tagging preferences as well.
7.4. Reviewing Tag Suggestions
Facebook often suggests tags based on facial recognition. You can review these suggestions to ensure accuracy and prevent unwanted tags.
- Go to “Settings & Privacy” > “Settings.”
- Click on “Profile and Tagging.”
- Under “Tag Suggestions,” turn off “Suggest tags of me in photos to friends?”
This prevents Facebook from suggesting your name in photos without your consent.
7.5. Using Custom Lists for Tag Visibility
Custom lists allow you to create specific groups of friends who can see certain posts and photos you’re tagged in.
- Create a custom list by going to “Friends” > “Lists” > “Create List.”
- Add the friends you want to include in the list.
- When adjusting the audience for a tagged photo, select the custom list you created.
This allows you to share tagged content with specific groups of friends while restricting access for others.
8. Understanding Facebook’s Facial Recognition Technology
Facebook’s facial recognition technology plays a significant role in tagging and privacy. Understanding how it works can help you better manage your online presence.
8.1. How Facial Recognition Works on Facebook
Facebook uses facial recognition to identify people in photos and videos. When a photo is uploaded, Facebook scans it and compares the faces to those of people in its database. If a match is found, Facebook suggests tagging that person in the photo.
8.2. The Impact on Tagging and Privacy
Facial recognition can impact tagging and privacy in several ways:
- Tag Suggestions: It makes it easier for friends to tag you in photos, even if they don’t know your name.
- Automatic Tagging: In some cases, Facebook may automatically tag you in photos without your consent.
- Privacy Concerns: Some users are concerned about the privacy implications of Facebook collecting and storing facial recognition data.
8.3. Managing Your Facial Recognition Settings
You can manage your facial recognition settings to control how Facebook uses your facial recognition data.
-
Go to “Settings & Privacy” > “Settings.”
-
Click on “Facial Recognition.”
-
Adjust the setting to your preference:
- Do you want Facebook to be able to recognize you in photos and videos?: Select “Yes” or “No” to enable or disable facial recognition.
-
If you disable facial recognition, Facebook will not suggest tags of you in photos, and you will not be automatically tagged in photos.
8.4. Opting Out of Facial Recognition
If you are concerned about the privacy implications of facial recognition, you can opt out altogether.
- Go to “Settings & Privacy” > “Settings.”
- Click on “Facial Recognition.”
- Select “No” for the question “Do you want Facebook to be able to recognize you in photos and videos?”
By opting out, you prevent Facebook from collecting and storing your facial recognition data.
8.5. Reviewing and Removing Tag Suggestions
Even if you have facial recognition enabled, you can still review and remove tag suggestions.
- Check Notifications: Regularly check your notifications for tag suggestions.
- Remove Tags: If you don’t want to be tagged in a photo, remove the tag.
- Report Inaccurate Suggestions: If Facebook is consistently suggesting inaccurate tags, report them to Facebook.
9. Understanding Facebook’s Community Standards
Facebook’s Community Standards outline what is and isn’t allowed on the platform. Understanding these standards is crucial for maintaining a positive online experience.
9.1. What are Facebook’s Community Standards?
Facebook’s Community Standards are a set of rules that govern what is allowed on the platform. They cover a wide range of topics, including:
- Safety: Protecting users from harm and threats.
- Respect: Promoting respectful communication and preventing harassment.
- Authenticity: Ensuring that users are who they say they are and preventing the spread of misinformation.
- Privacy: Protecting users’ personal information and privacy.
9.2. How Community Standards Relate to Photos and Tagging
The Community Standards relate to photos and tagging in several ways:
- Harassment and Bullying: Photos and tags that are intended to harass or bully someone are prohibited.
- Privacy Violations: Photos and tags that violate someone’s privacy, such as revealing their personal information without their consent, are prohibited.
- Inappropriate Content: Photos and tags that contain inappropriate content, such as nudity or violence, are prohibited.
9.3. Reporting Violations of Community Standards
If you see a photo or tag that violates the Community Standards, you can report it to Facebook.
- Open the photo or post.
- Click the three dots in the top right corner.
- Select “Report Post” or “Find Support or Report Photo.”
- Follow the prompts to explain why you’re reporting the content.
Facebook will review the report and take action if the content violates the Community Standards.
9.4. Consequences of Violating Community Standards
Violating the Community Standards can have several consequences:
- Content Removal: Facebook may remove the content that violates the standards.
- Account Suspension: Facebook may suspend the account of the person who posted the violating content.
- Permanent Ban: In severe cases, Facebook may permanently ban the person from the platform.
9.5. Staying Informed About Community Standards
Facebook’s Community Standards are regularly updated, so it’s essential to stay informed about the latest guidelines.
- Review the Guidelines: Regularly review the Community Standards to understand what is and isn’t allowed on Facebook.
- Follow Facebook’s Updates: Stay informed about any changes to the Community Standards by following Facebook’s updates.
- Report Violations: Help maintain a positive online environment by reporting any violations of the Community Standards.
10. Seeking Professional Help for Online Reputation Management
In some cases, managing your online reputation may require professional help. Here’s when and how to seek professional assistance.
10.1. When to Consider Professional Help
Consider seeking professional help for online reputation management if:
- You’re Facing a Crisis: If you’re dealing with a major online reputation crisis, such as a viral scandal or a smear campaign.
- You Lack the Time or Expertise: If you don’t have the time or expertise to effectively manage your online reputation.
- Your Reputation is Damaged: If your online reputation has been significantly damaged, and you’re struggling to repair it.
- You Need Proactive Management: If you want to proactively manage your online reputation to prevent future issues.
10.2. Types of Online Reputation Management Services
Several types of online reputation management services are available:
- Monitoring: Monitoring your online presence to identify any mentions of your name or brand.
- Content Creation: Creating positive content to improve your search engine rankings.
- Social Media Management: Managing your social media accounts to promote a positive image.
- Reputation Repair: Repairing damaged online reputations through various strategies, such as removing negative content and building positive content.
10.3. Finding a Reputable Online Reputation Management Firm
When choosing an online reputation management firm, look for the following:
- Experience: Choose a firm with a proven track record of success.
- Transparency: Ensure that the firm is transparent about its strategies and pricing.
- Ethical Practices: Avoid firms that use unethical tactics, such as posting fake reviews or engaging in defamation.
- References: Ask for references from past clients.
10.4. Working with an Online Reputation Management Firm
When working with an online reputation management firm:
- Set Clear Goals: Clearly define your goals and expectations.
- Communicate Regularly: Maintain open communication with the firm.
- Provide Feedback: Provide feedback on the firm’s strategies and progress.
- Be Patient: Online reputation management can take time, so be patient and realistic.
10.5. Legal Considerations
In some cases, legal action may be necessary to protect your online reputation.
- Defamation: If you’ve been defamed online, you may be able to sue the person who made the defamatory statements.
- Copyright Infringement: If your copyrighted content has been used without your permission, you may be able to take legal action.
- Privacy Violations: If your privacy has been violated online, you may be able to sue the person who violated your privacy.
Consult with an attorney to determine if legal action is appropriate in your situation.
Managing your tagged photos on Facebook is an essential part of maintaining your online presence and protecting your privacy. By following the tips and strategies outlined in this guide, you can take control of your Facebook experience and ensure that your online image reflects who you are. Remember, consistent effort and proactive management are key to long-term success.
For more tips and resources on photography and managing your online presence, visit dfphoto.net. Address: 1600 St Michael’s Dr, Santa Fe, NM 87505, United States. Phone: +1 (505) 471-6001. Website: dfphoto.net.
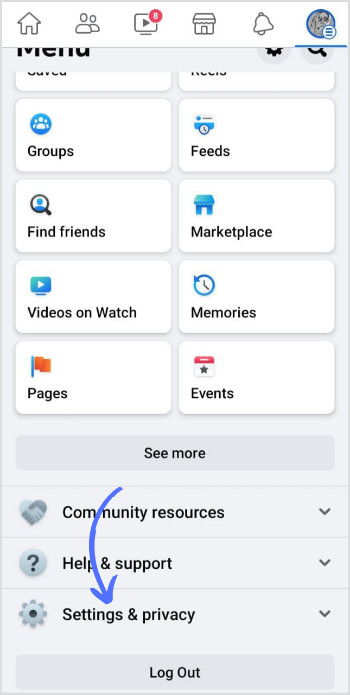
![]() Tap on Hamburger Icon on Facebook
Tap on Hamburger Icon on Facebook
Facebook Navigation: Accessing the Main Menu
This image showcases the Facebook app interface, highlighting the “Hamburger” icon (three horizontal lines) located in the top right corner, which users tap to access the main menu for settings and options.
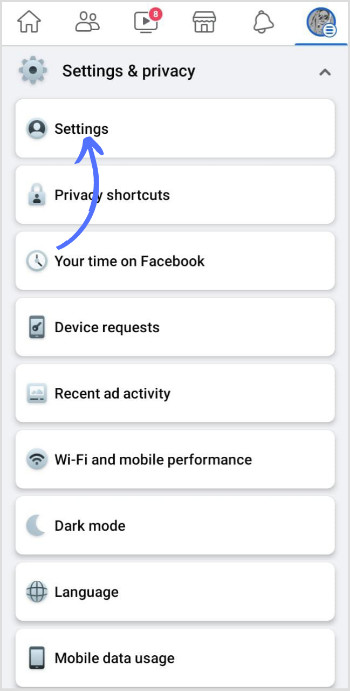
 Tap on Settings & Privacy on Facebook
Facebook’s Privacy Options: Finding the Settings Menu
This image displays the Facebook settings menu, emphasizing the “Settings & Privacy” option within the dropdown menu, enabling users to access their account settings and manage privacy preferences.
 Accessing Settings on Facebook
Facebook Settings Access: Navigating to Account Controls
This image illustrates the Facebook settings page, focusing on the “Settings” option, which users select to delve deeper into their account settings for comprehensive customization and management.
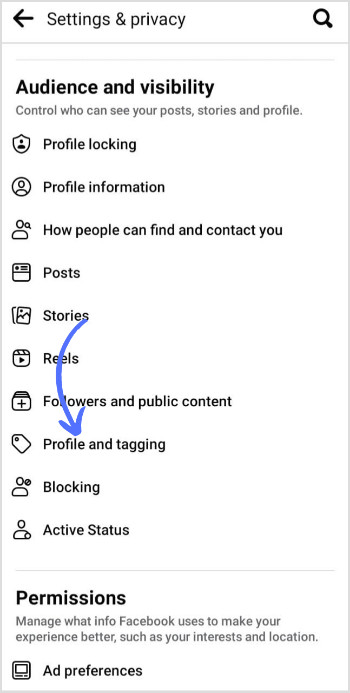 Facebook Profile & Visibility: Adjusting Settings
Facebook Profile Settings: Managing Visibility Options
This image highlights the “Profile and Visibility” section within Facebook settings, allowing users to control who can see their posts, tagged content, and other profile elements, thereby managing their online presence effectively.
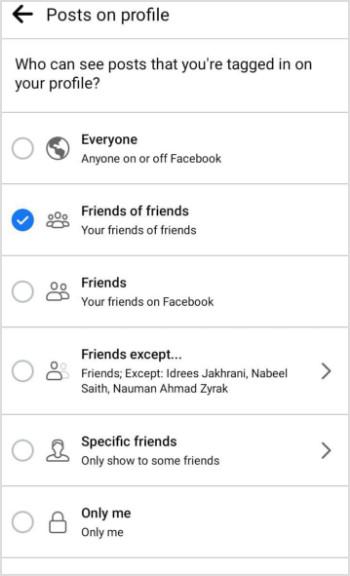 Facebook Privacy Settings: Customizing Photo Visibility
Customizing Facebook Privacy: Changing Visibility Preferences
This image shows the Facebook privacy settings screen, where users can customize who can see their tagged posts and other profile content, giving them control over their online presence and digital footprint.
FAQ: Managing Photo Visibility on Facebook
1. How do I stop people from tagging me in photos on Facebook?
To prevent unwanted tags, enable timeline review in your “Profile and Tagging” settings, which allows you to approve or reject tags before they appear on your timeline, ensuring control over your online image.
2. Can I hide tagged photos from specific people on Facebook?
Yes, use the audience selector in your “Profile and Tagging” settings to customize who can see posts you’re tagged in, choosing options like “Friends,” “Specific Friends,” or “Only Me” for enhanced privacy.
3. What happens when I remove a tag from a photo on Facebook?
Removing a tag untags you from the photo, which means it will no longer appear on your timeline, but the photo may still be visible to others depending on the poster’s privacy settings.
4. How do I hide a photo from my timeline without removing the tag on Facebook?
To hide a photo from your timeline without removing the tag, click the three dots in the top right corner of the photo and select “Hide from Timeline,” which keeps the photo visible elsewhere on Facebook but not on your profile.
5. Is there a way to approve tags before they appear on my Facebook profile?
Yes, by enabling “Review posts that you’re tagged in before the post appears on your timeline?” in your “Profile and Tagging” settings, you can approve or reject tags before they are visible on your profile.
6. How can I see what my Facebook profile looks like to someone else?
Use Facebook’s “View As” feature by going to your profile, clicking the three dots on your cover photo, and selecting “View As,” allowing you to preview your profile from the perspective of a specific person or the public.
7. What should I do if someone posts an embarrassing photo of me on Facebook?
First, contact the poster and politely ask them to remove the photo. If they refuse, report the photo to Facebook for violating community standards, and consider blocking the poster if necessary.
8. How often should I review my Facebook privacy settings?
It’s recommended to review your Facebook privacy settings every few months, as Facebook’s policies and settings can change over time, ensuring you maintain control over your online presence.
9. Can I control who sees my past tagged photos on Facebook?
Yes, use the “Limit the Audience for Posts You’ve Shared with Friends of Friends or Public?” option in your “Privacy” settings to limit the audience for past posts, applying new restrictions to older tagged photos.
10. What are Facebook’s Community Standards, and how do they relate to tagged photos?
Facebook’s Community Standards are guidelines that govern what is allowed on the platform, prohibiting content that is harassing, violates privacy, or is inappropriate, which can be used to report tagged photos that violate these standards.
