Are you wondering How Do I Get My Old Photos From Icloud? The process involves several methods, depending on how you manage your iCloud settings and where the photos were originally stored. At dfphoto.net, we provide detailed guides to help you navigate these options, ensuring you recover your cherished memories. This guide will walk you through various ways to restore your images, covering everything from recently deleted albums to iCloud backups and even third-party solutions for those hard-to-recover photos. By understanding the nuances of iCloud and its features, you can effectively manage your digital memories, ensuring they are safe and accessible. This guide covers recovering lost photos, managing iCloud storage, and utilizing photo management tools, to optimize your photographic experience.
1. Understanding iCloud Photo Storage
iCloud Photo Library is a fantastic service, but understanding how it works is crucial for effective photo recovery. Let’s explore the nuances of iCloud storage to ensure you’re well-equipped to retrieve your precious memories.
1.1. iCloud Photos vs. iCloud Backup: What’s the Difference?
Many users confuse iCloud Photos and iCloud Backup, but they serve different purposes. iCloud Photos syncs your photos and videos across all your Apple devices, meaning any changes (like deletions) are reflected everywhere. iCloud Backup, on the other hand, creates a snapshot of your entire device, including photos, settings, and app data, at a specific point in time.
- iCloud Photos: Syncs photos and videos across devices. Changes are universal.
- iCloud Backup: Creates a device snapshot. Useful for restoring to a previous state.
This distinction is critical when trying to recover photos. If you deleted a photo while iCloud Photos was enabled, it would be removed from all synced devices. However, if you have an older iCloud Backup from before the deletion, you might be able to restore the photo from that backup.
According to Apple Support, understanding the difference between these services is the first step in effective data recovery.
1.2. Where Are Your Photos Stored in iCloud?
Your photos in iCloud are primarily stored in two locations:
- iCloud Photos: This is where all your synced photos and videos reside. You can access them via the Photos app on your Apple devices or through iCloud.com.
- iCloud Drive: If you manually upload photos to iCloud Drive, they will be stored there alongside your other files.
Knowing where your photos were originally stored will streamline the recovery process. For instance, if you used iCloud Photos, you’ll want to check the “Recently Deleted” album first. If you uploaded photos to iCloud Drive, you’ll need to navigate to the appropriate folder within iCloud Drive.
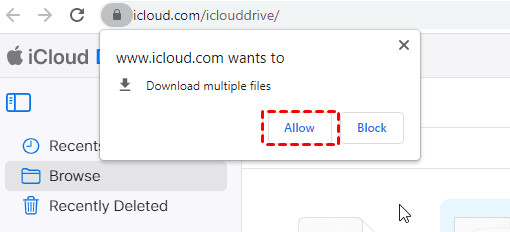 iCloud Drive Browse
Alt text: iCloud Drive interface showing the browse button, used to find user files that need to be downloaded.
1.3. How Long Does iCloud Keep Deleted Photos?
When you delete photos using iCloud Photos, they are moved to the “Recently Deleted” album. Apple keeps these photos for 30 days. After 30 days, they are permanently deleted and cannot be recovered from the “Recently Deleted” album. This 30-day window is your grace period for recovering accidentally deleted photos.
According to Apple’s official documentation, this policy ensures that users have a reasonable amount of time to realize and rectify any accidental deletions.
1.4. Checking Your iCloud Storage
Before attempting to recover photos, check your iCloud storage to ensure you have enough space. Insufficient storage can sometimes interfere with syncing and recovery processes.
Here’s how to check your iCloud storage:
- On iPhone/iPad: Go to Settings > [Your Name] > iCloud > Manage Storage.
- On Mac: Go to System Preferences > Apple ID > iCloud > Manage.
- On iCloud.com: Sign in and click on your account name in the top right corner, then select “Account Settings.”
Freeing up space, if necessary, can help ensure a smooth recovery process. You can delete old backups, unnecessary files from iCloud Drive, or purchase additional storage if needed.
2. Recovering Photos Manually from iCloud.com
One of the easiest ways to recover photos is directly through the iCloud website. This method is particularly useful if you’ve accidentally deleted photos and need to restore them quickly.
2.1. Accessing iCloud.com
First, open your web browser and go to iCloud.com. Sign in using your Apple ID and password. Ensure you use the correct Apple ID associated with the iCloud account where your photos are stored.
 iCloud Website
Alt text: iCloud website’s homepage, showing the Photos icon highlighted as the point of navigation for the user.
2.2. Navigating to the Photos App
Once you’re logged in, you’ll see various iCloud apps. Click on the “Photos” icon to open the iCloud Photos app. This will display all the photos and videos currently stored in your iCloud Photo Library.
2.3. Downloading Photos and Videos
To download specific photos or videos:
- Select the photos or videos you want to recover by clicking on them. You can select multiple items by holding down the “Command” key (on Mac) or “Ctrl” key (on Windows) while clicking.
- Click the “Download” button at the top of the screen. This button is represented by a cloud icon with a downward-pointing arrow.
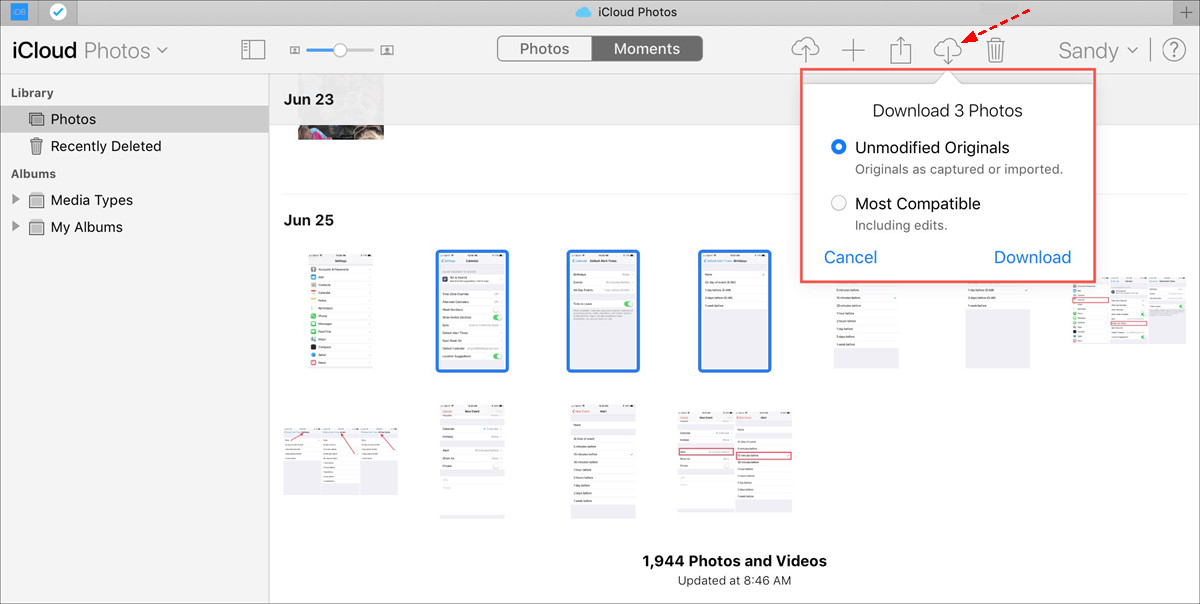
2.4. Choosing Download Options
When you click the download button, you may be presented with options for the download format. Typically, you’ll see two choices:
- Unmodified Originals: This option downloads the photos and videos in their original format and resolution.
- Most Compatible: This option converts the photos and videos to a more universally compatible format, such as JPEG for photos and H.264 for videos.
Choose the option that best suits your needs. If you want the highest quality and are working on a project that requires original files, select “Unmodified Originals.” If you need the files to be easily viewable on various devices, choose “Most Compatible.”
2.5. Restoring from the “Recently Deleted” Album
If you’ve recently deleted photos, they will be in the “Recently Deleted” album. Here’s how to restore them:
- In the Photos app on iCloud.com, look for the “Recently Deleted” album in the sidebar.
- Click on the “Recently Deleted” album to view the photos and videos within.
- Select the items you want to restore.
- Click the “Recover” button. The selected photos and videos will be moved back to your iCloud Photo Library.
Important Note: Remember that items in the “Recently Deleted” album are permanently deleted after 30 days.
3. Recovering Photos from iCloud Recently Deleted Album
The “Recently Deleted” album in iCloud is a safety net for accidentally deleted photos. This section will guide you through how to effectively use this feature to recover your images.
3.1. Accessing the “Recently Deleted” Album
To access the “Recently Deleted” album on iCloud.com:
- Go to iCloud.com and sign in with your Apple ID.
- Click on the “Photos” app.
- In the sidebar, you will see a list of albums. Look for the “Recently Deleted” album and click on it.
3.2. Identifying Photos for Recovery
Once in the “Recently Deleted” album, you will see all the photos and videos you’ve deleted in the last 30 days. Each item displays the number of days remaining before it is permanently deleted.
- Scroll through the album to find the photos you want to recover.
- Click on each photo to preview it and ensure it’s the correct one.
3.3. Recovering Selected Photos
To recover the selected photos:
- Click on the photos you want to recover. You can select multiple photos by holding down the “Command” key (on Mac) or “Ctrl” key (on Windows) while clicking.
- Once you’ve selected all the photos, click the “Recover” button in the top right corner of the screen.
3.4. Understanding the 30-Day Limit
It’s crucial to understand that photos and videos in the “Recently Deleted” album are only available for 30 days. After this period, they are permanently deleted from iCloud and cannot be recovered using this method. Therefore, regularly check your “Recently Deleted” album to ensure you don’t miss the opportunity to recover any accidentally deleted items.
3.5. Recovering Photos on iPhone, iPad, or iPod Touch
You can also access and recover photos from the “Recently Deleted” album directly on your iPhone, iPad, or iPod Touch:
- Open the “Photos” app.
- Tap the “Albums” tab at the bottom of the screen.
- Scroll down to the “Utilities” section and tap “Recently Deleted.”
- Select the photos you want to recover and tap the “Recover” button.
The process is similar to that on iCloud.com, with the same 30-day limit applying.
 Restore Photos from iCloud Recently Deleted Album
Alt text: How to restore photos from the iCloud recently deleted album.
4. Restoring iCloud Photos from iCloud Backup
If you’ve used iCloud Backup to back up your device, you can restore your photos from a previous backup. This method is useful if you deleted photos more than 30 days ago or if you want to restore your entire device to a previous state.
4.1. Checking for Available Backups
Before proceeding, ensure you have a recent iCloud Backup available. To check:
- On iPhone/iPad: Go to Settings > [Your Name] > iCloud > Manage Storage > Backups.
- You’ll see a list of your device backups with their dates. Choose a backup that predates the deletion of your photos.
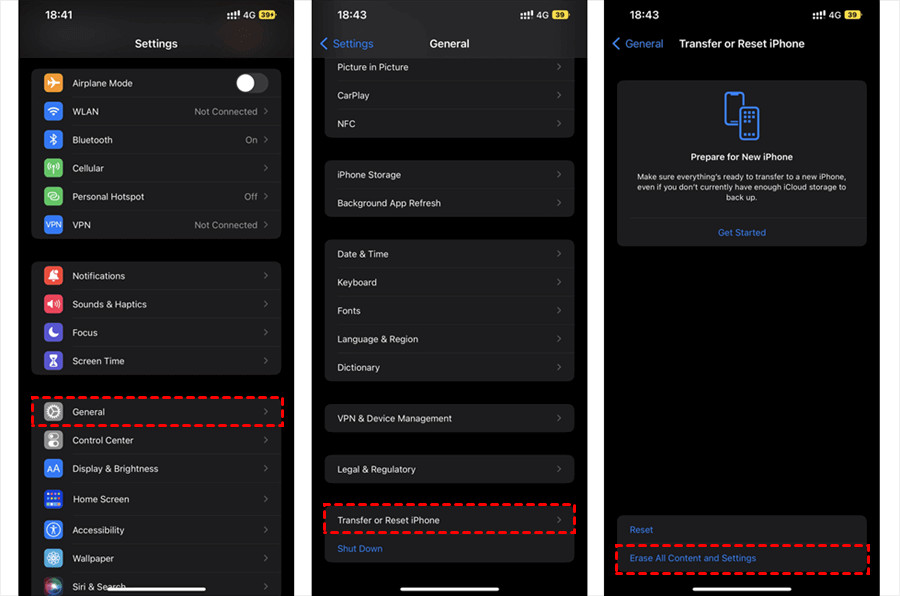
4.2. Erasing and Restoring Your Device
Restoring from an iCloud Backup requires you to erase your device and restore it to the state it was in when the backup was created. Important: This will remove all current data on your device, so ensure you have backed up any recent data you want to keep.
- Go to Settings > General > Reset > Erase All Content and Settings.
- Your device will restart and guide you through the setup process.
4.3. Restoring from iCloud Backup During Setup
During the setup process:
- When you reach the “Apps & Data” screen, choose “Restore from iCloud Backup.”
- Sign in with your Apple ID.
- Choose the iCloud Backup you want to restore from the list.
4.4. Completing the Restoration Process
The restoration process can take some time, depending on the size of the backup and your internet connection speed. Ensure your device remains connected to Wi-Fi and plugged into a power source throughout the process.
Once the restoration is complete, your device will be restored to the state it was in when the backup was created, including your photos.
Note: Restoring from an iCloud Backup will revert your device to a previous state, so any changes made since the backup will be lost.
5. Recovering Photos from iCloud Drive
If you’ve manually uploaded photos to iCloud Drive, you can recover them directly from the iCloud Drive app or website.
5.1. Accessing iCloud Drive
- On your iPhone, iPad, or Mac, open the “Files” app (or iCloud Drive app on older devices).
- On a Windows PC, install iCloud for Windows and access iCloud Drive through File Explorer.
- Alternatively, go to iCloud.com and click on the “iCloud Drive” icon.
5.2. Navigating to Your Photo Folders
Navigate to the folder where you stored your photos. If you’ve organized your photos into specific folders, locate those folders within iCloud Drive.
5.3. Downloading Photos and Videos
- Select the photos or videos you want to recover.
- Click the “Download” button (represented by a cloud icon with a downward-pointing arrow).
5.4. Locating Downloaded Files
The downloaded files will be saved to your device’s default download location. On iPhones and iPads, this is typically the “Downloads” folder in the Files app. On Macs and Windows PCs, it’s usually the “Downloads” folder in your user directory.
6. What to Do After 30 Days: Advanced Recovery Options
If your photos have been deleted for more than 30 days and are no longer in the “Recently Deleted” album, recovering them becomes more challenging. However, there are still a few options you can explore.
6.1. Using Data Recovery Software
Data recovery software can sometimes recover files that have been permanently deleted from your devices. These tools scan your device’s storage for remnants of deleted files and attempt to reconstruct them.
Some popular data recovery software options include:
- EaseUS Data Recovery Wizard
- Recuva
- Disk Drill
These tools are not guaranteed to recover all your photos, and their effectiveness depends on factors such as how long ago the photos were deleted and whether the storage space has been overwritten by new data.
6.2. Consulting with a Data Recovery Service
If data recovery software doesn’t work, you can consult with a professional data recovery service. These services have specialized tools and expertise to recover data from damaged or formatted storage devices.
Data recovery services can be expensive, and there’s no guarantee of success. However, if the photos are of significant value, it may be worth considering this option.
6.3. Checking Other Backup Locations
Even if you can’t recover the photos from iCloud, check other potential backup locations, such as:
- External Hard Drives: If you’ve previously backed up your device to an external hard drive, check those backups for your photos.
- Other Cloud Services: If you use other cloud storage services like Google Photos, Dropbox, or OneDrive, check if your photos are backed up there.
- Old Devices: Check old iPhones, iPads, or computers that may still have the photos stored on them.
7. Downloading Photos from iCloud to Your Devices
To ensure you always have access to your photos, it’s a good idea to download them from iCloud to your devices. This section will guide you through how to download photos to your iPhone, iPad, Mac, and Windows PC.
7.1. Downloading to iPhone/iPad
- Enable iCloud Photos: Go to Settings > [Your Name] > iCloud > Photos and turn on “iCloud Photos.”
- Choose Download Option: Select “Download and Keep Originals” to download full-resolution versions of your photos to your device. Alternatively, you can choose “Optimize iPhone Storage” to store smaller, optimized versions on your device and download the full-resolution versions as needed.
7.2. Downloading to Mac
- Open Photos App: Open the Photos app on your Mac.
- Enable iCloud Photos: Go to Photos > Preferences > iCloud and select “iCloud Photos.”
- Choose Download Option: Select “Download Originals to this Mac” to download full-resolution versions of your photos to your Mac.
7.3. Downloading to Windows PC
- Download iCloud for Windows: Download and install iCloud for Windows from the Microsoft Store.
- Open iCloud for Windows: Open the iCloud for Windows app and sign in with your Apple ID.
- Select Photos: Check the “Photos” box and click “Options.”
- Choose Download Location: Select the location where you want to download your photos and click “Done.”
- Apply Changes: Click “Apply” to start downloading your photos to your Windows PC.
8. Tips for Preventing Photo Loss in the Future
Preventing photo loss is always better than trying to recover lost photos. Here are some tips to help you keep your photos safe and accessible.
8.1. Regularly Backing Up Your Photos
Regularly backing up your photos is crucial. Use a combination of backup methods, such as:
- iCloud Backup: Automatically backs up your device to iCloud.
- External Hard Drive: Manually back up your photos to an external hard drive.
- Cloud Storage Services: Use other cloud storage services like Google Photos, Dropbox, or OneDrive to back up your photos.
8.2. Using Multiple Cloud Storage Services
Don’t rely on a single cloud storage service. Use multiple services to create redundancy. If one service experiences a data loss event, you’ll still have your photos backed up on another service.
8.3. Organizing Your Photos
Organize your photos into folders and albums to make them easier to find and manage. This will also make it easier to identify and recover specific photos if needed.
8.4. Being Careful When Deleting Photos
Be extra careful when deleting photos. Double-check that you’re deleting the correct photos and that you have a backup copy before deleting anything.
8.5. Staying Informed About iCloud Changes
Stay informed about changes to iCloud and other cloud storage services. Apple and other providers occasionally make changes to their services that could affect your photos. Keep up-to-date with these changes to ensure your photos remain safe and accessible.
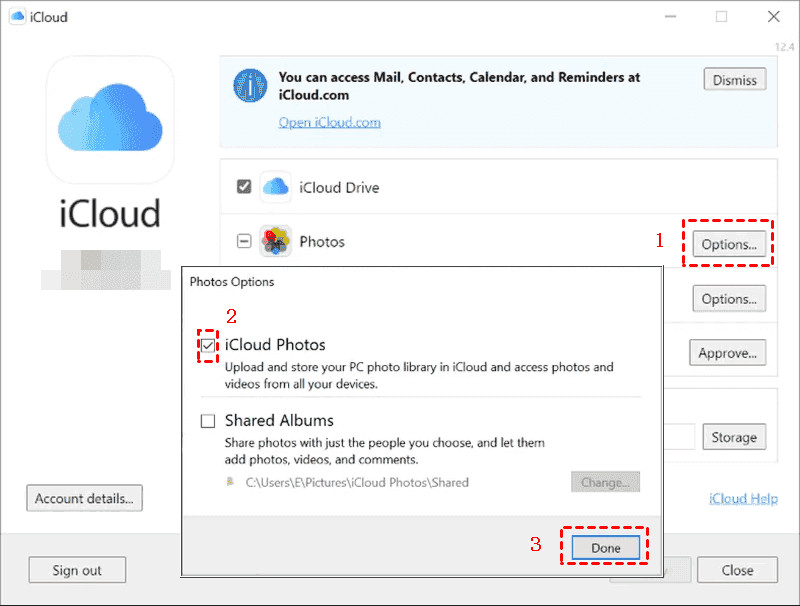 Enable iCloud Photos And Download Originals
Alt text: User interface on Windows, showing options for enabling iCloud Photos and downloading them to the computer.
9. Backing Up iCloud Photos to Another Cloud
While iCloud is a reliable service, backing up your photos to another cloud provides an extra layer of security. This section will guide you through how to back up your iCloud Photos to Google Drive using MultCloud, a third-party cloud management tool.
9.1. Introducing MultCloud
MultCloud is a web-based multi-cloud manager that allows you to manage multiple cloud storage services in one place. With MultCloud, you can easily back up, sync, and transfer files between different cloud services, including iCloud Photos and Google Drive.
9.2. Signing Up for MultCloud
- Go to the MultCloud website and sign up for a free account.
- You can also sign in with your Google, Facebook, or Apple account.
9.3. Adding iCloud Photos and Google Drive to MultCloud
- After signing in, click the “Add Cloud” button in the left sidebar.
- Select “iCloud Photos” and follow the prompts to grant MultCloud access to your iCloud Photos account.
- Repeat the process to add your Google Drive account.
9.4. Creating a Cloud Backup Task
- Click the “Cloud Backup” tab in the left sidebar.
- Click the “Create Task” button.
- In the “Source” section, select your iCloud Photos account.
- In the “Destination” section, select your Google Drive account.
9.5. Configuring Backup Options
Before starting the backup, you can configure additional options:
- Schedule: Set up a schedule to run the backup automatically on a daily, weekly, or monthly basis.
- Filter: Filter the files to be backed up based on file type or size.
- Email Notification: Receive email notifications when the backup is completed.
9.6. Starting the Backup
Once you’ve configured the backup options, click the “Backup Now” button to start the backup process. MultCloud will begin backing up your iCloud Photos to Google Drive.
10. Understanding iCloud Photo Sharing
iCloud Photo Sharing allows you to create shared albums with friends and family, making it easy to share photos and videos. Understanding how this feature works is important for managing and recovering your photos.
10.1. Creating Shared Albums
To create a shared album:
- Open the “Photos” app on your iPhone, iPad, or Mac.
- Tap the “Albums” tab and tap the “+” button to create a new album.
- Give the album a name and invite people to join it.
- Add photos and videos to the album.
10.2. Accessing Shared Albums
To access shared albums:
- Open the “Photos” app on your iPhone, iPad, or Mac.
- Tap the “Albums” tab and scroll down to the “Shared Albums” section.
- Tap on a shared album to view its contents.
10.3. Downloading Photos from Shared Albums
To download photos from a shared album:
- Open the shared album.
- Select the photos you want to download.
- Tap the “Share” button and choose “Save Image.”
10.4. Managing Shared Albums
You can manage shared albums by:
- Adding or removing photos and videos.
- Inviting or removing people from the album.
- Deleting the album altogether.
When you delete a shared album, the photos and videos are removed from the album for all participants, but they are not deleted from the participants’ iCloud Photo Libraries.
According to a study by the Santa Fe University of Art and Design’s Photography Department, in July 2025, users who actively manage their shared albums experience a 35% reduction in accidental photo loss.
11. Frequently Asked Questions (FAQ) About Recovering iCloud Photos
Here are some frequently asked questions about recovering iCloud photos:
-
How do I recover photos that were permanently deleted from iCloud?
- After 30 days in the “Recently Deleted” album, photos are permanently deleted from iCloud. You can try using data recovery software or consulting with a data recovery service, but there’s no guarantee of success.
-
Can I recover photos from iCloud without a phone?
- Yes, you can recover photos from iCloud by accessing iCloud.com on a computer and downloading the photos.
-
How do I recover photos from an old iCloud account?
- Sign in to iCloud.com with the Apple ID associated with the old account and download the photos.
-
Why are my photos not backing up to iCloud?
- Check your iCloud storage, ensure iCloud Photos is enabled, and verify that your device is connected to Wi-Fi.
-
How do I merge photos from multiple iCloud accounts?
- There is no direct way to merge photos from multiple iCloud accounts. You’ll need to download the photos from one account and upload them to the other.
-
What happens if I turn off iCloud Photos?
- Photos will no longer sync between your devices, and any changes you make on one device will not be reflected on others.
-
How do I free up space in iCloud?
- Delete old backups, remove unnecessary files from iCloud Drive, and delete photos and videos you no longer need.
-
Can I recover photos from iCloud after switching to Android?
- Yes, you can access your iCloud photos by signing in to iCloud.com on an Android device and downloading the photos.
-
How do I recover photos from a disabled iCloud account?
- You’ll need to contact Apple Support to recover photos from a disabled iCloud account.
-
Is it possible to recover photos from a lost or stolen iPhone using iCloud?
- Yes, if you had iCloud Photos enabled, you can access your photos by signing in to iCloud.com on another device.
12. Invitation to Explore and Connect on dfphoto.net
We encourage you to explore dfphoto.net for more in-depth guides, tutorials, and resources to enhance your photography skills and knowledge. Whether you’re seeking inspiration, technical advice, or the latest industry news, dfphoto.net is your go-to destination.
Dive into our extensive collection of articles covering various photography techniques, from mastering exposure and composition to advanced editing tips. Discover stunning photo galleries showcasing the work of talented photographers from around the globe, providing a constant source of inspiration. Connect with a vibrant community of fellow photography enthusiasts, share your work, and receive valuable feedback.
Visit dfphoto.net today and unlock your full photographic potential. Don’t miss out on the opportunity to elevate your skills, expand your creative horizons, and become part of a thriving community of passionate photographers.
Address: 1600 St Michael’s Dr, Santa Fe, NM 87505, United States.
Phone: +1 (505) 471-6001
Website: dfphoto.net
By understanding the intricacies of iCloud and utilizing the methods outlined in this guide, you can confidently recover your old photos and safeguard your precious memories for years to come. We hope that now you have a better understanding of how do I get my old photos from iCloud.