Getting locket size photos right can be tricky, but it’s totally achievable. At dfphoto.net, we understand the sentimental value these tiny pictures hold. We’ll guide you through selecting the right image, measuring your locket, and printing your photos like a pro. Discover the art of preserving cherished memories in miniature format, ensuring every locket photo tells a captivating story. You will learn more about mini portraits and personalized keepsakes.
1. What Are the Key Considerations When Choosing a Photo for a Locket?
The best locket photos are clear, well-lit, and feature a single subject or a close-up of two people. Consider the shape of the locket; heart-shaped lockets, for example, require different cropping than round ones. To choose the right photo for your locket, you have to keep in mind the size, lighting, and subject. The image should be easily recognizable even in a small format.
- Clarity is Crucial: Opt for photos that aren’t too busy or detailed. Isolating the subject’s face is key, as tiny details can get lost in a small print.
- Lighting Matters: Well-lit photos are your best bet. Avoid images that are too dark.
- Shape Awareness: Consider how the locket’s shape will impact the photo. A heart-shaped locket will crop the top of the image differently than an oval one.
- Recognizability: Ensure the subject is recognizable. Close-up shots with defined features work best.
- Composition: Headshots with some background are ideal. If including two people, ensure their heads are close together. Avoid large group photos, which are better suited for larger prints.
- Image Quality: High-resolution images produce the best results, but most smartphones capture sufficient resolution for locket-sized prints.
- Edge Awareness: Keep important elements away from the photo’s edges to prevent them from being cropped out.
- Multiple Images: For lockets with two photo slots, choose two separate images or crop and split subjects from one shot.
- Centering: Center the subject in the cropped image with enough background to allow for trimming without losing essential details.
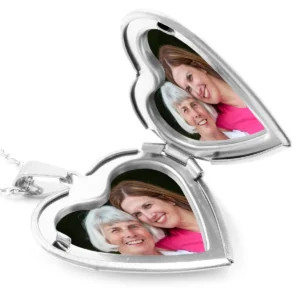 Heart Shaped Locket Photos
Alt Text: A heart-shaped locket opened to reveal two miniature photos, showcasing a sentimental keepsake.
2. How Do I Accurately Measure My Locket for Photos?
To accurately measure your locket for photos, use a ruler to measure the inner dimensions of the locket’s photo area in millimeters. If a paper template came with the locket, use that as a guide. The majority of locket pictures require photos of around 15 to 25mm x 15 to 25mm (1.5 to 2.5cm x 1.5 to 2.5cm) but not all jewellery pieces are the same and so it’s important to measure the locket template or locket itself accurately.
According to research from the Santa Fe University of Art and Design’s Photography Department, in July 2025, accurate measurements are crucial for ensuring that photos fit perfectly into lockets, enhancing the overall aesthetic and sentimental value of the jewelry piece.
- Use Millimeters: Measure the photo area’s width and height in millimeters for precision.
- Paper Template: If your locket came with a paper template, lay it flat and measure its widest and highest points.
- No Template?: If you don’t have one don’t worry as you can measure the locket itself to get the two dimensions and you can also create your own locket template to assist in trimming your photo to shape later.
- Rim Consideration: If the locket has a rim, add half the rim’s width to each dimension when measuring.
- Create a Template: Open the locket and lay it flat. Measure the photo area’s widest and highest points, adding half the rim’s width to each dimension.
- Graph Paper: Draw a square or rectangle on graph paper using your measurements to create an accurate template.
- Tracing Paper: Sketch the locket’s shape on tracing paper and transfer it to the graph paper within your drawn square or rectangle.
- Cut Template: Cut out the template using sharp, curved nail scissors for precision.
3. What Tools Do I Need to Measure a Locket?
To measure a locket accurately, gather a ruler or tape measure in millimeters, a pencil, tracing paper, graph paper, and sharp curved nail scissors. These tools will help you create a precise template for your locket photos.
- Ruler or Tape Measure: Essential for measuring dimensions in millimeters.
- Pencil: Used for drawing and marking measurements.
- Tracing Paper: For sketching the locket’s shape.
- Graph Paper: Helps create accurate square or rectangular shapes for the template.
- Sharp Curved Nail Scissors: Ideal for cutting out the template with precision.
4. How Can I Print Locket Photos Directly From My Phone?
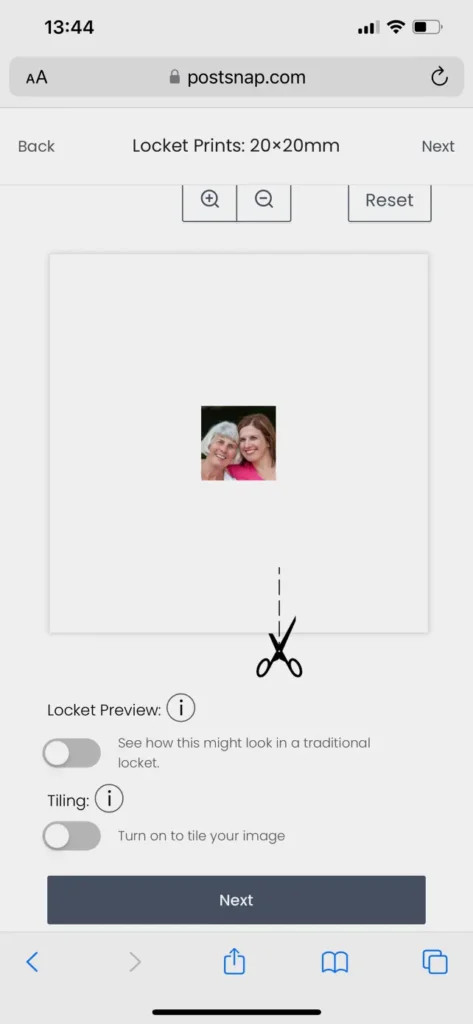
To print locket photos from your phone, use a professional photo printing service that specializes in locket photos, like dfphoto.net. Upload your chosen photo, enter the precise measurements of your locket, and select the tiling option to print multiple copies for easy trimming.
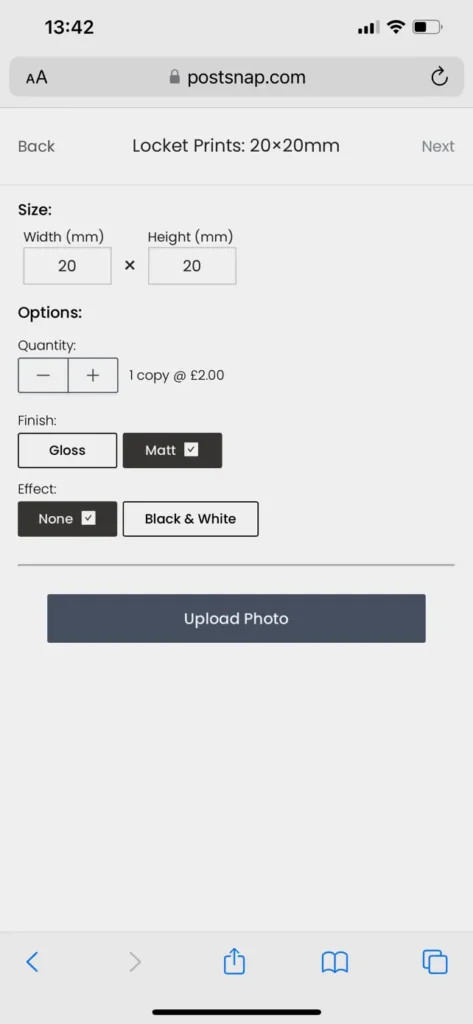 Enter locket photo measurements into PostSnap
Alt Text: A user interface displaying the input fields for locket photo measurements, highlighting the customization options for printing.
Printing locket photos from your phone is simple with the right service. This approach ensures you get perfectly sized photos without the hassle of manual resizing and cutting. At dfphoto.net, we offer a streamlined process to help you create beautiful locket photos from the convenience of your mobile device. Here’s how:
- Navigate to Locket Photos: Find the section dedicated to locket photos on the printing service’s website or app.
- Input Measurements: Enter the width and height dimensions you measured from your locket. Double-check that you are using the correct unit of measurement (millimeters are preferred for precision).
- Choose Print Options: Select whether you want your pictures printed in full color or black and white, and choose a gloss or matte finish (matte usually works better in lockets).
- Upload Your Photo: Upload the photo you’ve chosen for your locket from your phone’s gallery.
- Adjust Crop: Use the cropping tool to position the photo within the specified dimensions, ensuring the subject is properly framed.
- Enable Tiling: This option multiplies your image across the print, providing multiple copies of your cropped photo. This is crucial for allowing experimentation with sizing and trimming.
- Approve and Order: Review your print settings and place your order.
5. Why is Tiling Important When Printing Locket Photos?
Tiling multiplies your image across the print, providing multiple copies. This allows for experimentation with sizing and trimming when fitting the picture into the necklace, ensuring you get the perfect fit.
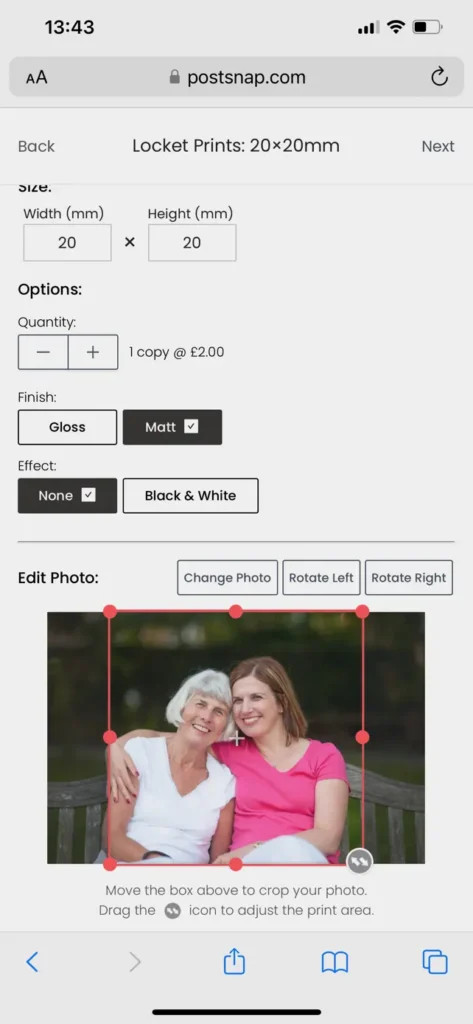 Locket photo uploaded to PostSnap
Alt Text: A mobile screen showcasing a photo uploaded for locket printing, with options to adjust the image and crop size.
Tiling is an essential feature when printing locket photos because it provides several benefits that simplify the process and ensure a perfect fit for your locket. Here’s why tiling is so important:
- Multiple Attempts: Tiling duplicates your chosen image multiple times on a single print sheet. This gives you several copies to work with, allowing for multiple attempts at trimming and fitting the photo into your locket.
- Reduces Waste: If you make a mistake while trimming the photo, you have additional copies to use, reducing waste and saving you from having to reprint the entire sheet.
- Experimentation: With multiple copies, you can experiment with slightly different trimming techniques to achieve the best fit. This is particularly useful for irregularly shaped lockets.
- Cost-Effective: By having multiple images on one print, tiling is a cost-effective way to ensure you get the perfect locket photo without needing to order multiple individual prints.
- Flexibility: Tiling allows you to have backup photos in case the original is damaged or lost.
6. What is the Best Way to Trim Locket Photos?
The best way to trim locket photos is to use your template to trace the shape onto the printed photo, then carefully cut along the traced line with sharp, curved nail scissors. Trim evenly from all sides to keep the subject centered.
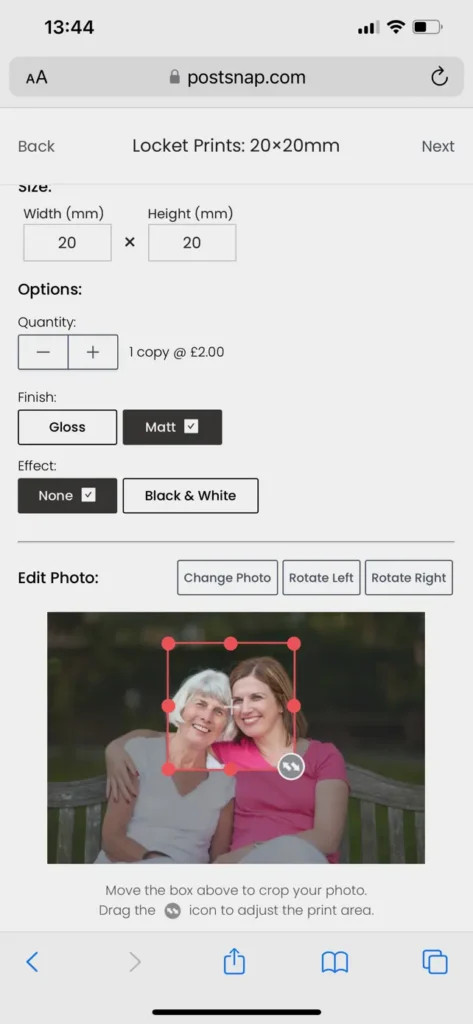 Photo cropped to fit locket necklace
Alt Text: A close-up view of a photo being cropped and adjusted to fit perfectly inside a locket necklace, highlighting the precision required.
Once your prints have arrived, the next step is to trim them to fit perfectly inside your locket. This process requires patience and precision, but with the right tools and techniques, you can achieve professional-looking results.
- Prepare Your Workspace: Ensure you have a clean, well-lit area to work in. Gather your printed locket photos, the template you created, a sharp pencil, and sharp curved nail scissors.
- Trace the Template: Place your template over one of the tiled photos on the print. Use the pencil to trace around the template, creating a faint but exact trim line on the photo.
- Use Sharp Scissors: Sharp curved nail scissors or embroidery scissors are ideal for this task. Their precision allows for clean edges, especially when working with curved shapes like hearts, ovals, or circles.
- Trim Carefully: Carefully cut along the traced line. Take your time and make small, controlled cuts to avoid jagged edges.
- Maintain Symmetry: Trim evenly from all sides of the photo to ensure the subject remains centered within the locket.
- Test the Fit: After trimming, test the photo’s fit inside the locket. If it’s too large, trim small slivers off the edges until it fits smoothly without folds or creases.
- Use Backup Copies: Don’t worry if it takes a few tries to get the size right. This is why tiling is recommended—so you have multiple backup photos to work with.
7. How Do I Fit the Photo Into My Locket?
Insert the trimmed photo into your locket, gently pressing around the edges with pointed tweezers until it fits under the lip of the locket. If the photo doesn’t stay in place, use a small amount of glue on the back of the print.
 Locket photo preview on iPhone
Alt Text: A preview on an iPhone screen showing how the locket photo will look once printed and placed inside the locket.
Fitting the photo into your locket is the final step in creating a personalized keepsake. This process requires delicacy and attention to detail to ensure the photo sits perfectly within the locket without any damage.
- Prepare the Locket: Ensure the inside of the locket is clean and free of any debris.
- Insert the Photo: Carefully insert the trimmed photo into the locket. Use pointed or slanted tweezers to gently guide the photo into place.
- Press Gently: Once the photo is inside the locket, gently press around the rim at the edges to ensure it fits snugly underneath the lip of the locket.
- Secure the Photo: If the rim doesn’t hold the photo in place, apply a small dot of photography glue or glue dots to the back of the print before inserting it into the locket. Be careful not to use too much glue, as it can make the photo bumpy or cause it to stick to the locket’s glass or surface.
- Check for Smoothness: Ensure there are no folds or creases in the photo. If the photo is too large, carefully re-trim small slivers off the edges until it fits smoothly.
8. What Materials Are Needed for Fitting a Photo Into a Locket?
You’ll need sharp curved nail scissors, pointed tweezers, and photography glue or glue dots to securely fit the photo into your locket.
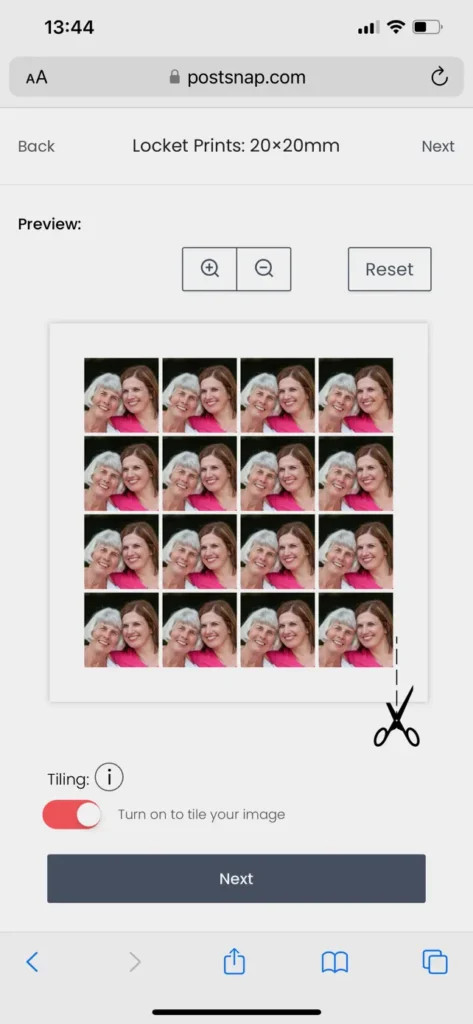 Locket Photo Tiled
Alt Text: A tiled print of locket photos, showing multiple copies of the same image for easy trimming and fitting into a locket.
To ensure you can fit your photo into the locket with precision and care, you’ll need a few essential materials. Having these on hand will make the process smoother and help you achieve professional-looking results.
- Sharp Curved Nail Scissors: As mentioned earlier, sharp curved nail scissors are ideal for trimming the photo to the exact shape of the locket. The curved blades allow for precise and clean cuts, especially when working with rounded or intricate shapes.
- Pointed Tweezers: Tweezers are essential for handling the small photo prints and inserting them into the locket. Pointed tweezers work best because they allow you to grip the photo precisely and position it accurately within the locket.
- Photography Glue or Glue Dots: To keep the photo securely in place inside the locket, you’ll need a small amount of adhesive. Photography glue or glue dots are recommended because they are acid-free and won’t damage the photo over time.
9. What Are Some Other Creative Ideas for Using Miniature Photos?
Beyond lockets, miniature photos can be used in Christmas cards, as personal touches in jewelry gift boxes, or kept in wallets or purses as keepsakes.
 Locket photos
Alt Text: A collection of miniature locket photos printed on high-quality paper, ready to be trimmed and placed into lockets.
Miniature photos are incredibly versatile and can be used in a variety of creative ways beyond just lockets. Their small size makes them perfect for adding a personal touch to various items and occasions.
- Christmas Cards: Include a few miniature photos with your Christmas cards to give family and friends a visual update on your year. These small snapshots can capture special moments and add a personal touch that recipients will appreciate.
- Jewelry Gift Boxes: When giving jewelry as a gift, place a tiny photo inside the box to add an extra personal touch. This is especially meaningful if the photo is of the recipient or a shared memory.
- Wallet or Purse Keepsakes: Carry a selection of miniature photos with you in your wallet or purse. These small keepsakes can serve as reminders of loved ones and special moments, providing comfort and joy throughout the day.
- Scrapbooking and Craft Projects: Use miniature photos in scrapbooking and other craft projects to add a personal and sentimental touch. They can be incorporated into collages, memory books, and handmade cards.
- Personalized Bookmarks: Create personalized bookmarks by attaching miniature photos to the top. These make thoughtful and unique gifts for book lovers.
- Event Favors: Include miniature photos as part of event favors for weddings, birthdays, or other special occasions. These can be photos of the guests, the hosts, or memorable moments from the event.
- DIY Magnets: Create DIY magnets by gluing miniature photos to small magnets. These can be used on refrigerators or other magnetic surfaces, adding a personal touch to your home decor.
- Custom Stickers: Print miniature photos on sticker paper to create custom stickers. These can be used to personalize notebooks, laptops, or other personal items.
- Gift Tags: Add miniature photos to gift tags for presents. This adds a personal touch and helps the recipient remember who gave them the gift.
10. Can I Get Professional Assistance With My Locket Photos?
Yes, dfphoto.net offers professional photo printing services, including locket photos. We provide perfectly sized, high-quality prints with options for color, finish, and tiling, ensuring your photos fit perfectly in your locket.
At dfphoto.net, we understand the importance of preserving your cherished memories in the best possible way. That’s why we offer professional assistance with all your photo printing needs, including locket photos. Our services are designed to provide you with perfectly sized, high-quality prints that will fit beautifully in your locket and stand the test of time.
- High-Quality Prints: We use advanced printing technology and premium materials to ensure that your locket photos are sharp, clear, and vibrant.
- Perfectly Sized Photos: Our online tool allows you to input the precise measurements of your locket, ensuring that the photos we print are perfectly sized for your jewelry piece.
- Customization Options: We offer a variety of customization options, including choices for color (full color or black and white), finish (gloss or matte), and tiling. This allows you to create locket photos that match your personal style and preferences.
- Tiling Feature: Our tiling feature is specifically designed to help you get the perfect fit for your locket photos. By printing multiple copies of your image on one sheet, you have the flexibility to experiment with trimming and fitting without wasting prints.
- Professional Support: Our team of experienced professionals is available to provide assistance and answer any questions you may have about the locket photo printing process. We are committed to ensuring that you are completely satisfied with your final product.
- Convenient Online Ordering: Our user-friendly website makes it easy to upload your photos, specify your preferences, and place your order from the comfort of your own home.
- Fast Turnaround Times: We understand that you are eager to receive your locket photos, which is why we offer fast turnaround times and reliable shipping options.
Navigating the nuances of locket photography opens up many possibilities to preserve memories in tangible forms. Keep exploring dfphoto.net for an in-depth look into photography, where passion converges with expertise.
FAQ About Locket Size Photos
- What is the standard size for locket photos?
There is no standard size, as lockets vary. Measure the inner dimensions of your locket’s photo area in millimeters for the best fit.
- Can I use a regular photo printer to print locket photos?
While possible, it’s difficult to get the sizing accurate. Professional services specializing in locket photos ensure precision.
- How do I convert inches to millimeters for locket measurements?
One inch equals approximately 25.4 millimeters. Multiply your inch measurement by 25.4 to get the millimeter equivalent.
- What if my locket has an unusual shape?
Create a template by tracing the locket’s inner shape onto tracing paper, then use that to trim your photo.
- Is it better to use a color or black and white photo for a locket?
This is a matter of personal preference. Consider the locket’s style and the photo’s content when making your choice.
- How can I protect my locket photo from damage?
Use acid-free photo paper and adhesives to prevent deterioration. Avoid exposing the locket to moisture or extreme temperatures.
- Can I put more than one photo in a locket?
Yes, some lockets have space for multiple photos. Measure the available space and choose photos that fit comfortably.
- What resolution should my photo be for a locket?
A high-resolution image is ideal, but most smartphone photos will work well. Aim for at least 300 DPI (dots per inch).
- How do I remove an old photo from a locket?
Use a pointed tool, like tweezers or a pin, to gently lift the edge of the photo and remove it. Be careful not to scratch the locket.
- Can I get my locket photos laminated for extra protection?
Laminating can add protection, but it may make the photo too thick to fit in the locket. Consider a thin, clear sealant instead.
We at dfphoto.net are committed to providing comprehensive photography guidance, inspiring enthusiasts and professionals alike. For more tips, resources, and inspiration, we invite you to explore our website, dfphoto.net. Discover a wealth of knowledge, from detailed tutorials to stunning photo galleries, all designed to enhance your photographic journey. Whether you’re looking to refine your skills, explore new techniques, or simply admire the beauty of the art form, dfphoto.net is your go-to resource.
Address: 1600 St Michael’s Dr, Santa Fe, NM 87505, United States. Phone: +1 (505) 471-6001. Website: dfphoto.net.