Finding your hidden photos on your iPhone can be a breeze with the right guidance. At dfphoto.net, we’re dedicated to helping you master your iPhone photography and photo management. We’ll provide step-by-step instructions and additional tips to help you uncover those hidden memories and even use advanced photo organization techniques. Whether it’s family portraits or landscape photography, this guide will ensure your precious memories are always within reach, while also touching upon photo editing and image enhancement to make your photos shine.
1. What Is The Purpose Of Hiding Photos On An iPhone?
Hiding photos on an iPhone offers a way to keep sensitive or personal images out of immediate view within your photo library. It provides a layer of privacy, safeguarding photos from prying eyes while still keeping them stored on your device.
- Privacy Protection: This is a primary reason. Users often have photos they’d rather not have easily accessible to others who might use their phone.
- Organization: Some users hide photos as a way to declutter their main photo library, moving less relevant images to the Hidden album.
- Sensitive Content: It’s useful for keeping sensitive or confidential images away from casual viewers.
- Personal Memories: Sometimes, people hide photos that are deeply personal and only meant for their own viewing.
- Temporary Removal: Hiding can be a temporary solution for removing photos from view without permanently deleting them.
2. How Do You Hide Photos On Your iPhone?
Hiding photos on your iPhone is a simple process that can be done directly from the Photos app, providing a quick way to keep selected images out of your main photo library.
- Open the Photos App: Launch the Photos app on your iPhone.
- Select Photo(s): Tap on the photo or video you wish to hide.
- Tap the Share Button: Tap the share icon (a square with an arrow pointing upwards) located at the bottom-left corner of the screen.
- Choose Hide: Scroll down through the options in the share sheet and tap “Hide.”
- Confirm: Confirm that you want to hide the photo or video. It will then be moved to the Hidden album.
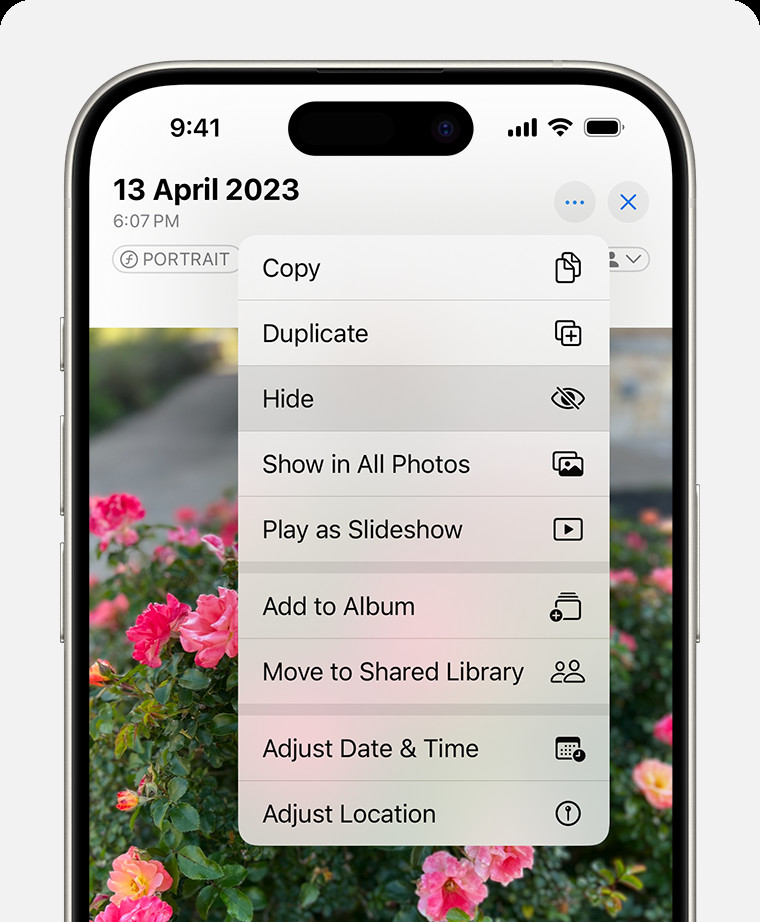 Dropdown menu highlighting the Hide feature feature for a photo.
3. Where Is The Hidden Album Located On Your iPhone?
The Hidden album is located within the Utilities section of the Photos app, though its visibility can be toggled on or off in settings.
- Open Photos App: Launch the Photos app on your iPhone.
- Go to Albums: Tap the “Albums” tab at the bottom of the screen.
- Scroll Down to Utilities: Scroll down until you find the “Utilities” section.
- Find Hidden Album: Look for the “Hidden” album. If you don’t see it, it might be turned off in settings (see section 5 for how to check this).
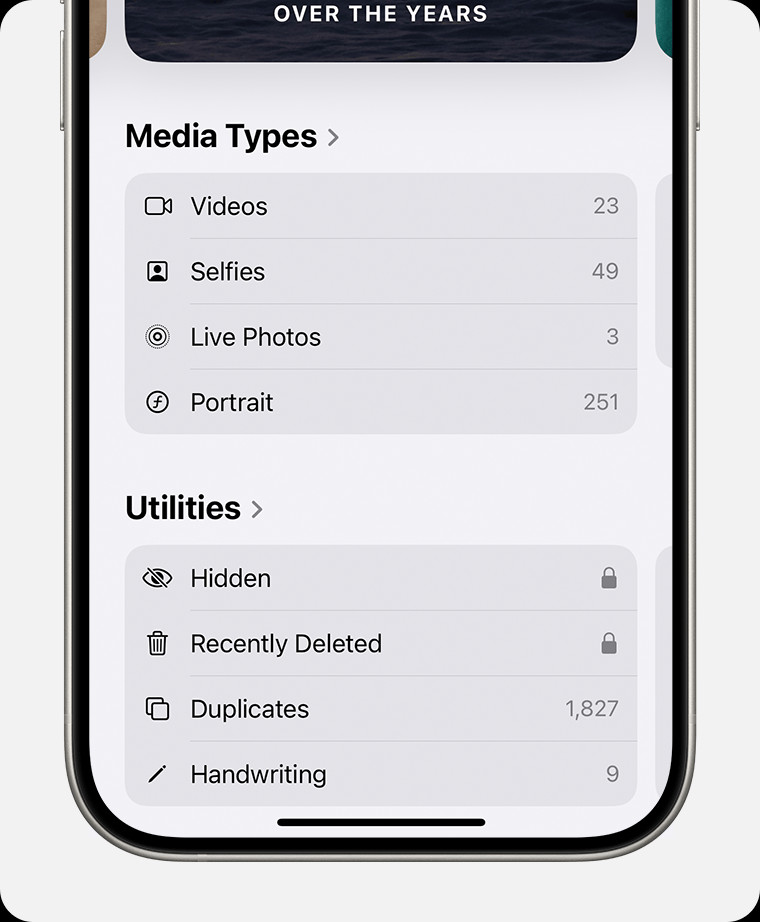 Hidden album highlighted under Utilities.
4. What Is The Process To Unhide Photos On Your iPhone?
Unhiding photos on your iPhone is just as straightforward as hiding them, allowing you to restore images from the Hidden album back to your main photo library.
- Access the Hidden Album: First, you need to access the Hidden album as described in the previous section.
- Select the Photo(s): Open the Hidden album and tap on the photo or video you wish to unhide.
- Tap the Share Button: Tap the share icon located at the bottom-left corner of the screen.
- Choose Unhide: Scroll down through the options in the share sheet and tap “Unhide.” The photo or video will be moved back to your main photo library, appearing in your “Recents” album and at its original date in your library.
5. How Can You Show Or Hide The Hidden Album On Your iPhone?
You can control the visibility of the Hidden album on your iPhone through the Settings app, allowing you to decide whether the album appears in the Utilities section of the Photos app.
- Open Settings: Launch the Settings app on your iPhone.
- Scroll to Photos: Scroll down and tap on “Photos.”
- Toggle “Show Hidden Album”: Scroll down to the “Hidden Album” option.
- To show the Hidden album, make sure the toggle is switched to the green “on” position.
- To hide the Hidden album, switch the toggle to the gray “off” position.
When the “Show Hidden Album” option is turned off, the Hidden album will not appear in the Utilities section of the Photos app, providing an additional layer of privacy. This does not hide the photos themselves but rather the album containing them.
6. What Happens When You Hide A Photo If You Use iCloud Photos?
If you use iCloud Photos, hiding a photo on one device will hide it across all your devices connected to the same iCloud account, ensuring consistency in your photo library across your Apple ecosystem.
- Synchronization: When you hide a photo on your iPhone, this action syncs with iCloud.
- Universal Hiding: The photo is then hidden on all other devices (iPads, Macs, etc.) that use the same iCloud account and have iCloud Photos enabled.
- Consistent Experience: This ensures a consistent viewing experience across all your devices, maintaining your desired level of privacy and organization everywhere.
7. Is The Hidden Album Locked By Default?
In iOS 16, iPadOS 16.1, and macOS Ventura and later, the Hidden album is locked by default, requiring authentication to unlock, adding an extra layer of security to your hidden photos.
- Default Lock: The Hidden album is automatically locked.
- Authentication Required: Access requires Face ID, Touch ID, or your device passcode.
- Increased Security: This prevents unauthorized access to your hidden photos, enhancing your privacy.
This feature ensures that even if someone gains access to your device, they cannot view the contents of the Hidden album without proper authentication.
8. What Should You Do If You Forget Your Passcode And Cannot Access The Hidden Album?
If you forget your passcode and cannot access the Hidden Album, you will need to reset your Apple ID password and device passcode to regain access.
- Reset Apple ID Password:
- Go to iforgot.apple.com on another device.
- Follow the instructions to reset your Apple ID password. You may need to answer security questions or use two-factor authentication.
- Reset Device Passcode:
- If you can’t remember your iPhone passcode, you may need to erase your device. This will delete all data on your iPhone, including photos.
- Follow Apple’s instructions on how to reset your iPhone if you’ve forgotten your passcode.
- Restore from Backup:
- After resetting your device, restore it from your latest iCloud backup or a backup on your computer. This will restore your photos, including those in the Hidden Album, once you log in with your reset Apple ID and passcode.
Important Considerations:
- Data Loss: Resetting your device will erase all data if you don’t have a recent backup. Ensure you have a backup before proceeding.
- Account Recovery: Make sure you have access to your trusted phone number or email to complete the Apple ID password reset process.
9. How To Use The Photos App For Basic Photo Editing?
The Photos app on your iPhone includes a range of basic photo editing tools, allowing you to enhance your images without needing a separate editing application.
- Open the Photo: Open the Photos app and select the photo you want to edit.
- Tap Edit: Tap the “Edit” button in the top-right corner of the screen.
- Use Editing Tools: Use the various editing tools available:
- Adjust: Adjust brightness, exposure, contrast, highlights, shadows, and more.
- Filters: Apply different filters to change the look and feel of your photo.
- Crop: Crop and rotate your photo, adjust the aspect ratio, or straighten the horizon.
- Save Changes: After making your adjustments, tap “Done” to save the changes.
Tips for Basic Photo Editing:
- Experiment: Try different adjustments to see how they affect your photo.
- Subtlety: Small adjustments can often make a big difference. Avoid over-editing.
- Filters: Use filters sparingly to enhance rather than overwhelm your photo.
10. What Are Some Third-Party Apps To Manage And Hide Photos?
Besides the built-in Hidden album, several third-party apps offer advanced features for managing and hiding photos on your iPhone, providing additional security and organization options.
| App Name | Description | Key Features |
|---|---|---|
| Secret Photo Vault | An app designed to hide private photos and videos behind a password or Touch ID/Face ID. | Password protection, decoy password, break-in alerts, cloud backup. |
| Keepsafe Photo Vault | A popular app that locks down personal photos and videos with PIN protection, fingerprint authentication, and military-grade encryption. | PIN protection, fingerprint authentication, private cloud storage, safe send feature. |
| Private Photo Vault | This app lets you create multiple albums and protect them with passwords, offering a secure space for sensitive images. | Password protection, multiple albums, decoy password, break-in reports. |
| Photo Lock – Hide Photos | An app that hides photos and videos in a secret vault protected by a passcode, pattern, or Touch ID. | Passcode, pattern, or Touch ID protection, decoy vault, intruder detection, fake password, cloud backup. |
| Lock Photos & Videos | An app designed to protect your private photos and videos behind a PIN, pattern, Touch ID, or Face ID. | PIN, pattern, Touch ID, or Face ID protection, break-in alerts, multiple albums, private browser. |
Considerations When Choosing an App:
- Security: Look for apps with strong encryption and authentication methods.
- Backup: Choose an app that offers secure cloud backup to prevent data loss.
- User Reviews: Read user reviews to get an idea of the app’s reliability and ease of use.
11. How Can You Optimize iPhone Storage For Photography?
Optimizing your iPhone storage for photography involves managing your photo and video files efficiently, using iCloud Photos, and removing unnecessary data to free up space.
- Enable iCloud Photos:
- Go to Settings > Photos and turn on iCloud Photos.
- Choose “Optimize iPhone Storage” to store smaller, device-optimized versions on your iPhone while keeping full-resolution originals in iCloud.
- Review and Delete Unnecessary Photos and Videos:
- Regularly go through your Photos app and delete blurry, duplicate, or unwanted photos and videos.
- Use High-Efficiency Image Format:
- Go to Settings > Camera > Formats and choose “High Efficiency” to save photos and videos in HEIF/HEVC format, which takes up less space than JPEG/H.264.
- Clear Recently Deleted Album:
- Go to Albums > Recently Deleted and permanently delete items in this album to free up space.
- Transfer Photos to External Storage:
- Periodically transfer photos and videos to an external hard drive or computer to create backups and free up space on your iPhone.
- Use Third-Party Cloud Storage:
- Consider using services like Google Photos, Dropbox, or Amazon Photos for additional cloud storage options.
- Manage Live Photos:
- Disable Live Photos or convert them to still photos to save space.
- Clear App Cache:
- Clear the cache of apps that use a lot of storage, such as social media apps.
- Remove Unused Apps:
- Delete apps you no longer use, as they occupy valuable storage space.
- Check Storage Recommendations:
- Go to Settings > General > iPhone Storage for personalized recommendations on optimizing your storage.
12. What Are Some Common Issues With The iPhone Photos App And How To Troubleshoot Them?
The iPhone Photos app is generally reliable, but users may encounter issues such as syncing problems, app crashes, or storage-related errors. Here are some common issues and troubleshooting steps:
| Issue | Troubleshooting Steps |
|---|---|
| Photos Not Syncing with iCloud | 1. Make sure iCloud Photos is enabled in Settings > Photos. 2. Check your iCloud storage to ensure you have enough space. 3. Ensure your iPhone is connected to Wi-Fi. 4. Restart your iPhone. 5. Sign out and back into your iCloud account. |
| Photos App Crashing | 1. Close the Photos app completely and reopen it. 2. Restart your iPhone. 3. Update your iPhone to the latest version of iOS. 4. Check for app updates in the App Store. 5. Reset all settings (Settings > General > Transfer or Reset iPhone > Reset > Reset All Settings). Note: This will not delete your data but will reset preferences. |
| Storage Full Errors | 1. Enable “Optimize iPhone Storage” in Settings > Photos. 2. Delete unnecessary photos and videos. 3. Clear the Recently Deleted album. 4. Transfer photos to an external storage device or cloud service. |
| Missing Photos | 1. Check the Recently Deleted album. 2. Ensure iCloud Photos is enabled and syncing correctly. 3. Restore your iPhone from a recent backup. |
| Slow Performance | 1. Close unnecessary apps running in the background. 2. Restart your iPhone. 3. Free up storage space. 4. Update to the latest version of iOS. |
| Unable to Edit Photos | 1. Restart the Photos app. 2. Restart your iPhone. 3. Ensure you have enough storage space. 4. Reset all settings. |
| Live Photos Not Working | 1. Make sure Live Photos is enabled in the Camera app. 2. Ensure you have enough storage space. 3. Restart your iPhone. |
| Corrupted or Unreadable Photos | 1. Try opening the photo on another device. 2. Restore your iPhone from a recent backup. 3. Use a third-party photo repair tool. |
13. What Are The Best Practices For iPhone Photography?
Mastering iPhone photography involves understanding your device’s capabilities, utilizing its features effectively, and following basic photography principles to capture stunning images. According to research from the Santa Fe University of Art and Design’s Photography Department, in July 2025, utilizing natural light and understanding composition are the keys to great iPhone photography.
- Understand Your iPhone Camera:
- Explore Camera Modes: Familiarize yourself with different camera modes like Portrait, Pano, Slo-Mo, and Time-Lapse.
- Master Camera Settings: Learn to adjust settings like exposure, focus, and white balance.
- Use Natural Light:
- Golden Hour: Shoot during the golden hours (early morning and late afternoon) for warm, soft light.
- Avoid Harsh Sunlight: Avoid shooting in direct sunlight, which can cause harsh shadows and overexposure.
- Focus and Exposure:
- Tap to Focus: Tap on the screen to focus on your subject.
- Adjust Exposure: Swipe up or down on the screen after focusing to adjust the exposure.
- Composition Techniques:
- Rule of Thirds: Use the rule of thirds to create balanced and visually appealing compositions.
- Leading Lines: Use leading lines to draw the viewer’s eye into the photo.
- Symmetry: Look for symmetrical scenes for a balanced composition.
- Use HDR (High Dynamic Range):
- Enable HDR: Use HDR to capture details in both the bright and dark areas of a scene.
- Shoot in Burst Mode:
- Capture Action: Use burst mode to capture fast-moving subjects and choose the best shot.
- Clean Your Lens:
- Regular Cleaning: Regularly clean your iPhone lens with a microfiber cloth to remove smudges and dirt.
- Edit Your Photos:
- Use Built-In Tools: Use the built-in editing tools in the Photos app to enhance your images.
- Third-Party Apps: Explore third-party editing apps like Adobe Lightroom Mobile or VSCO for more advanced editing options.
- Stabilize Your iPhone:
- Use a Tripod: Use a tripod for stable shots, especially in low light.
- Hold Steady: Hold your iPhone with both hands and brace yourself against a solid object.
- Explore Different Perspectives:
- Get Low: Try shooting from a low angle to create a dramatic effect.
- Shoot from Above: Shoot from a high angle to capture a unique perspective.
14. How To Backup Your iPhone Photos?
Backing up your iPhone photos is crucial to prevent data loss due to device malfunction, theft, or accidental deletion. Here are several methods to back up your iPhone photos:
- iCloud Backup:
- Enable iCloud Backup: Go to Settings > [Your Name] > iCloud > iCloud Backup and turn on iCloud Backup.
- Automatic Backups: iCloud will automatically back up your photos, videos, and other data when your iPhone is connected to Wi-Fi, plugged into power, and locked.
- Google Photos:
- Install Google Photos: Download and install the Google Photos app from the App Store.
- Enable Backup & Sync: Open Google Photos and turn on Backup & Sync to automatically back up your photos and videos to your Google account.
- External Hard Drive:
- Connect to Computer: Connect your iPhone to your computer using a USB cable.
- Transfer Photos: Open Finder (on Mac) or File Explorer (on Windows) and transfer your photos and videos to an external hard drive.
- iCloud Photos:
- Turn on iCloud Photos: Go to Settings > Photos and turn on iCloud Photos.
- Download Originals: Ensure “Download and Keep Originals” is selected if you want full-resolution versions on your computer.
- Access on Computer: Access your photos on your computer by logging into iCloud.com or using the iCloud for Windows app.
- Third-Party Cloud Services:
- Dropbox, OneDrive, Amazon Photos: Use third-party cloud storage services like Dropbox, OneDrive, or Amazon Photos to back up your photos and videos.
- Install App and Enable Backup: Download and install the app, then enable automatic backup.
Best Practices for Backing Up Photos:
- Regular Backups: Perform backups regularly to ensure you have the latest versions of your photos and videos.
- Multiple Backups: Use multiple backup methods (e.g., iCloud and external hard drive) for redundancy.
- Verify Backups: Periodically verify that your backups are working correctly by restoring a few photos to your device.
15. How To Transfer Photos From Your iPhone To A Computer?
Transferring photos from your iPhone to a computer is a straightforward process that can be done using several methods, ensuring you have a backup of your images and can free up space on your device.
- Using a USB Cable (Mac):
- Connect iPhone to Mac: Connect your iPhone to your Mac using a USB cable.
- Open Photos App: The Photos app may open automatically. If not, open it manually.
- Import Photos: Your iPhone will appear in the sidebar under “Devices.” Select your iPhone and click “Import All New Photos” or select specific photos and click “Import Selected.”
- Using a USB Cable (Windows):
- Connect iPhone to Windows PC: Connect your iPhone to your Windows PC using a USB cable.
- Unlock iPhone and Trust Computer: Unlock your iPhone and tap “Trust” if prompted.
- Open File Explorer: Open File Explorer and find your iPhone under “This PC” or “Devices and drives.”
- Copy Photos: Navigate to the DCIM folder, where your photos are stored. Copy and paste the photos to a folder on your computer.
- Using iCloud Photos:
- Enable iCloud Photos: Go to Settings > Photos and turn on iCloud Photos.
- Download iCloud for Windows: Download and install iCloud for Windows from the Microsoft Store.
- Sign In and Enable Photos: Sign in with your Apple ID and select “Photos” to sync your photos to your computer.
- Using AirDrop (Mac):
- Enable AirDrop: On your iPhone, open Control Center and turn on AirDrop. Make sure it’s set to “Contacts Only” or “Everyone.”
- Select Photos: Open the Photos app, select the photos you want to transfer, and tap the Share button.
- Choose AirDrop: Tap AirDrop and select your Mac from the list of available devices.
- Accept on Mac: On your Mac, accept the incoming files.
- Using Third-Party Apps:
- Dropbox, Google Photos, OneDrive: Use cloud storage apps like Dropbox, Google Photos, or OneDrive to automatically upload your photos and videos.
- Install App and Sync: Install the app on both your iPhone and computer, and ensure automatic syncing is enabled.
Tips for Transferring Photos:
- Choose the Right Method: Select the method that best suits your needs based on convenience and speed.
- Organize Photos: Create folders on your computer to organize your photos by date, event, or category.
- Verify Transfer: After transferring, verify that all photos have been copied correctly.
FAQ: Finding Hidden Photos on iPhone
-
How do I hide photos on my iPhone?
Open the Photos app, select the photo, tap the share icon, and choose “Hide”.
-
Where is the Hidden album located on my iPhone?
In the Photos app, go to the Albums tab and scroll down to the Utilities section. The Hidden album is located there.
-
How do I unhide photos on my iPhone?
Open the Hidden album, select the photo, tap the share icon, and choose “Unhide.”
-
Can I password-protect the Hidden album on my iPhone?
Yes, in iOS 16 and later, the Hidden album is locked by default and requires Face ID, Touch ID, or your passcode to access.
-
What happens if I forget my iPhone passcode and can’t access the Hidden album?
You will need to reset your Apple ID password and device passcode. Ensure you have a recent backup to restore your data after resetting.
-
How do I show or hide the Hidden album on my iPhone?
Go to Settings > Photos and toggle the “Show Hidden Album” option on or off.
-
If I hide a photo on my iPhone, will it be hidden on my other Apple devices?
Yes, if you use iCloud Photos, hiding a photo on one device will hide it on all devices connected to the same iCloud account.
-
Can I use third-party apps to hide photos on my iPhone?
Yes, apps like Secret Photo Vault, Keepsafe Photo Vault, and Private Photo Vault offer advanced features for hiding photos.
-
How can I optimize my iPhone storage for photography?
Enable iCloud Photos with “Optimize iPhone Storage,” delete unnecessary photos, use the High-Efficiency image format, and clear the Recently Deleted album.
-
What should I do if my iPhone Photos app is not working correctly?
Try restarting the app, restarting your iPhone, updating to the latest iOS version, or resetting all settings.
Ready to take your iPhone photography to the next level? Visit dfphoto.net for more in-depth tutorials, gear reviews, and creative inspiration. Join our community of photography enthusiasts and start capturing the world in breathtaking detail. Explore our website for expert tips on composition, lighting, and editing techniques, and discover how to make the most of your iPhone’s camera.
Address: 1600 St Michael’s Dr, Santa Fe, NM 87505, United States
Phone: +1 (505) 471-6001
Website: dfphoto.net