Drawing on a photo on your iPhone is a simple yet powerful way to personalize images, add context, or unleash your creativity, and dfphoto.net is here to show you how! With the built-in Markup feature, your iPhone transforms into a pocket-sized digital canvas. This article will dive deep into the world of iPhone photo editing, including drawing tools, markup options, and sharing techniques. Learn how to annotate photos and explore image editing applications for advanced photo enhancements.
1. What Is The Markup Tool On iPhone And Where Can I Find It?
The Markup tool on iPhone is a built-in feature that allows you to draw, write, and add shapes to photos, screenshots, and documents directly on your device. You can find it in several apps, including Photos, Messages, and Mail.
The Markup tool is a convenient and versatile feature for quick edits and annotations. It provides a range of tools for drawing, highlighting, adding text, and even including your signature on documents. Here’s where you can typically find it:
- Photos App: Open a photo, tap “Edit” in the upper right corner, then tap the Markup button (a pen icon). This allows you to draw directly on your photos.
- Messages App: In a conversation, tap the “+” button, select “Photos,” choose a photo, tap on the photo again, and then tap “Markup.”
- Mail App: When composing an email, you can insert a photo or document, tap on the attachment, and then select the Markup icon.
- Screenshots: After taking a screenshot, a thumbnail appears in the lower-left corner. Tapping this thumbnail opens the Markup tool.
1.1. Utilizing the Markup Tool in Photos
The Photos app provides a straightforward way to access the Markup tool for photo editing.
- Open Photos: Launch the Photos app on your iPhone and select the image you want to edit.
- Tap Edit: In the upper-right corner, tap the “Edit” button.
- Access Markup: Look for the Markup icon (a pen inside a circle) and tap it. This will open the Markup toolbar at the bottom of your screen.
- Start Drawing: Select your preferred tool (pen, highlighter, pencil), choose a color, and begin drawing on the photo.
1.2. Utilizing the Markup Tool in Messages
The Messages app allows you to quickly mark up and send photos with annotations.
- Open Messages: Open the Messages app and select or start a conversation.
- Add Photo: Tap the “+” button, then select “Photos” to choose a photo from your library.
- Access Markup: Tap the photo you just added, and then tap the “Markup” option.
- Annotate and Send: Use the Markup tools to draw, add text, or magnify parts of the photo. Tap “Done” and then send your message.
1.3. Utilizing the Markup Tool in Mail
In the Mail app, the Markup tool is useful for annotating attachments, such as documents or images, before sending them.
- Open Mail: Open the Mail app and start composing a new email or reply to an existing one.
- Insert Attachment: Tap inside the body of your email, then tap the gray arrow icon or tap Return to open the format bar. You can also tap inside your email, then tap the cursor and select Insert Photo or Video or Add Attachment.
- Access Markup: Tap the attachment, then tap the gray arrow icon. Tap the Markup button to add your markup.
- Annotate and Send: Use the Markup tools to add your annotations. Tap “Done,” then send your email.
1.4. Accessing Markup on Screenshots
Taking and marking up screenshots is a quick way to share information with annotations.
- Take Screenshot: Press the side button and the volume up button simultaneously (or the home button and the power button on older models).
- Open Markup: Tap the screenshot thumbnail that appears in the lower-left corner of your screen. This opens the Markup tool directly.
- Annotate and Share: Draw, highlight, or add text to the screenshot. Tap “Done” and choose where to save or share it.
According to research from the Santa Fe University of Art and Design’s Photography Department, in July 2025, utilizing the Markup tool can significantly improve communication and collaboration in digital environments.
 Markup tool on iPhone Photos app for adding text to an image
2. What Are The Basic Tools Available In The iPhone Markup Feature?
The iPhone Markup feature provides a set of basic tools, including pen, highlighter, pencil, eraser, lasso, color palette, ruler, text insertion, signature, and shapes. These tools enable users to draw, annotate, and personalize images directly on their devices.
Here’s a detailed look at each of the basic tools available:
2.1. Pen Tool
The pen tool allows you to draw freehand lines with varying thicknesses and opacity.
- Functionality: Use it for writing, sketching, or drawing precise lines on your photo.
- Customization: Tap the pen icon again to adjust the line thickness and opacity. Choose from a variety of colors using the color palette.
- Use Case: Perfect for adding handwritten notes or detailed drawings to your images.
2.2. Highlighter Tool
The highlighter tool adds semi-transparent strokes, making it ideal for emphasizing specific areas of a photo.
- Functionality: Highlights portions of the image without completely obscuring them.
- Customization: Adjust the thickness and opacity by tapping the highlighter icon again. Select a color from the palette to match your needs.
- Use Case: Useful for drawing attention to particular details or adding emphasis to parts of the image.
2.3. Pencil Tool
The pencil tool creates lines with a textured appearance, mimicking a real pencil.
- Functionality: Offers a more natural, textured drawing experience compared to the pen tool.
- Customization: Change the line thickness and opacity for different effects. The color palette allows for a wide range of shades.
- Use Case: Ideal for sketching and creating artistic effects on photos.
2.4. Eraser Tool
The eraser tool removes any unwanted marks or drawings made with the Markup tools.
- Functionality: Erases lines, highlights, and other annotations from the photo.
- Options: You can choose between a pixel eraser (erases small sections) and an object eraser (removes entire strokes with one tap).
- Use Case: Essential for correcting mistakes and refining your annotations.
2.5. Lasso Tool
The lasso tool allows you to select and move specific parts of your drawings or annotations.
- Functionality: Draw a freehand selection around the elements you want to move, copy, or delete.
- Use Case: Useful for repositioning annotations, copying them to other parts of the image, or removing them entirely.
2.6. Color Palette
The color palette provides a range of colors to choose from for your drawings and annotations.
- Functionality: Select any color to use with the pen, highlighter, pencil, and text tools.
- Customization: Tap the color circle to access a wider spectrum of colors, including custom shades.
- Use Case: Enhances the visual appeal of your annotations and helps to differentiate between different elements.
2.7. Ruler Tool
The ruler tool helps you draw straight lines with precision.
- Functionality: Place the ruler on the screen and draw along its edge to create a straight line.
- Customization: Rotate the ruler by using two fingers to adjust the angle.
- Use Case: Perfect for adding precise lines and measurements to your photos.
2.8. Text Insertion Tool
The text insertion tool allows you to add text boxes to your photos.
- Functionality: Insert text boxes with customizable fonts, sizes, and colors.
- Customization: Tap the text box to edit the text, change the font style, adjust the size, and modify the alignment.
- Use Case: Ideal for adding captions, labels, or explanations to your images.
2.9. Signature Tool
The signature tool allows you to add a saved signature to your documents and photos.
- Functionality: Add a digital signature that you’ve previously created and saved.
- Customization: Resize and reposition the signature as needed.
- Use Case: Useful for signing documents directly on your iPhone.
2.10. Shapes Tool
The shapes tool provides a variety of shapes, such as circles, squares, arrows, and speech bubbles, to add to your photos.
- Functionality: Insert shapes to highlight areas, create diagrams, or add visual elements.
- Customization: Resize and rotate the shapes. Use the green dots to adjust specific attributes like the arrow’s curve or the speech bubble’s tail.
- Use Case: Enhances the visual structure of your annotations and helps to convey information effectively.
These basic tools in the iPhone Markup feature are designed to be intuitive and user-friendly, making it easy for anyone to add creative and informative annotations to their photos.
 iPhone Markup tools including pen, highlighter, and eraser
3. How Do I Draw A Straight Line On A Photo Using The iPhone’s Built-In Tools?
To draw a straight line on a photo using the iPhone’s built-in tools, utilize the Ruler tool in Markup. Position the ruler at the desired angle, then draw along the edge to create a perfectly straight line.
The Ruler tool is designed to help you create precise, straight lines. Here’s how to use it effectively:
- Access Markup: Open the photo you want to edit in the Photos app, tap “Edit,” and then tap the Markup button.
- Select the Ruler Tool: In the Markup toolbar, tap the “+” button to reveal additional tools, and then select the Ruler tool.
- Position the Ruler: A transparent ruler will appear on the screen. Use two fingers to rotate the ruler to the desired angle. The angle of rotation will be displayed on the ruler itself, allowing for precise adjustments.
- Draw the Line: Choose your preferred drawing tool (pen, pencil, or highlighter) and select a color. Place your finger along the edge of the ruler and draw a line. The line will follow the ruler’s edge, ensuring it is perfectly straight.
- Adjust and Refine: If you need to adjust the position or angle of the line, simply reposition the ruler and draw again. Use the eraser tool to remove any mistakes.
- Finish Editing: Once you are satisfied with your straight line, tap “Done” to save your changes.
3.1. Tips for Using the Ruler Tool Effectively
- Use Two Fingers for Rotation: Rotating the ruler with two fingers provides more control and precision.
- Monitor the Angle: Pay attention to the angle displayed on the ruler to achieve the exact angle you need.
- Combine with Other Tools: Use the ruler in combination with other Markup tools, such as the highlighter for creating straight, highlighted lines.
- Practice and Experiment: Practice using the ruler tool to become comfortable with its functionality and discover new ways to use it in your photo editing projects.
3.2. Alternative Methods for Drawing Straight Lines
While the Ruler tool is the most direct way to draw straight lines, here are a couple of alternative methods:
- Use a Third-Party App: Many photo editing apps offer more advanced tools for drawing straight lines, including features like snap-to-grid and adjustable line thickness. Apps like Adobe Photoshop Express and Snapseed provide these capabilities.
- Digital Stylus: Using a digital stylus like the Apple Pencil can provide more precision and control when drawing straight lines. While not a built-in feature, the stylus enhances the drawing experience, especially when combined with the Ruler tool or third-party apps.
The Ruler tool in the iPhone’s Markup feature is a simple yet powerful way to add straight lines to your photos. Whether you’re highlighting specific areas, creating diagrams, or adding architectural details, this tool provides the precision you need.
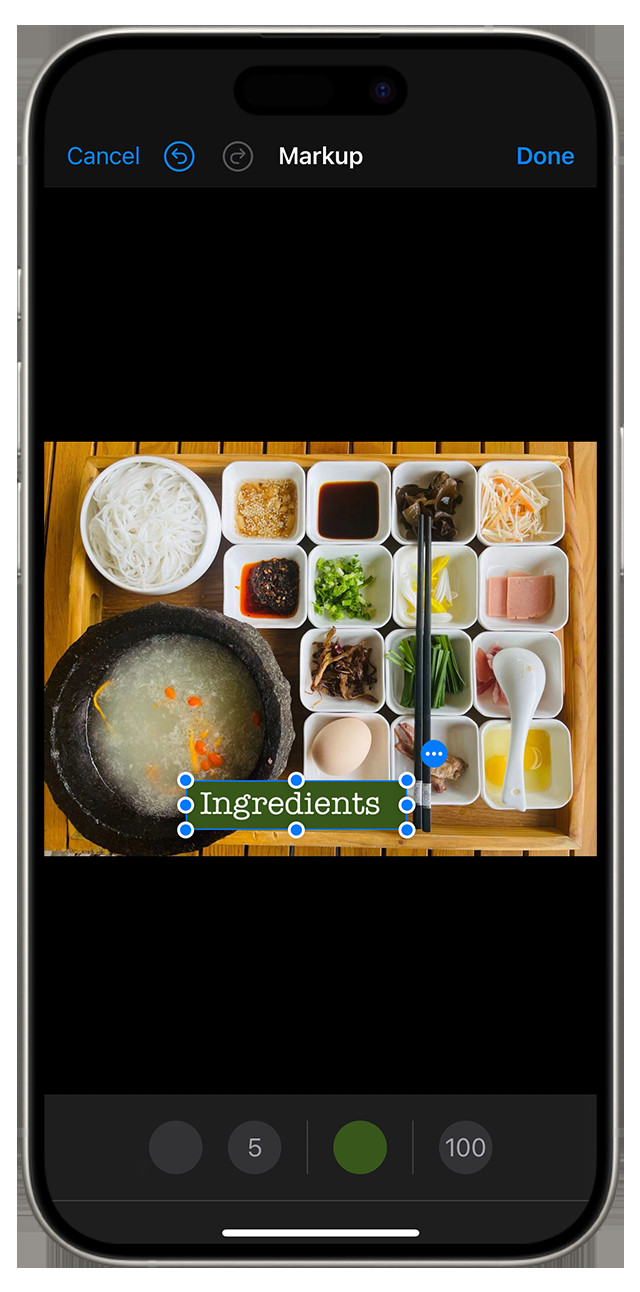
4. Can I Add Text To Photos Using The Markup Tool? How?
Yes, you can add text to photos using the Markup tool. To do this, tap the “+” button in the Markup toolbar, select “Text,” and then type your desired text. You can customize the font, size, color, and alignment of the text.
The Text tool in Markup is a versatile feature that allows you to add captions, labels, and annotations directly onto your photos. Here’s a detailed guide on how to use it effectively:
- Access Markup: Open the photo you want to edit in the Photos app, tap “Edit,” and then tap the Markup button.
- Select the Text Tool: In the Markup toolbar, tap the “+” button to reveal additional tools, and then select the “Text” option. A text box will appear on your photo.
- Enter Your Text: Tap inside the text box to bring up the keyboard and begin typing your desired text.
- Customize the Text:
- Font: Tap the formatting button (usually represented by “Aa”) to access font options. You can choose from a variety of fonts to match the style of your photo.
- Size: Adjust the size of the text to make it more prominent or to fit within a specific area.
- Color: Select a color from the color palette to make your text stand out or blend in with the image.
- Alignment: Change the alignment of the text (left, center, right) to suit your layout.
- Position the Text: Drag the text box to the desired location on the photo. Use the blue dots around the text box to resize it and adjust its shape.
- Refine and Finalize: Review your text and make any necessary adjustments to the font, size, color, and position. Once you are satisfied, tap outside the text box to finalize the changes.
- Save Your Changes: Tap “Done” to save your edited photo.
4.1. Tips for Adding Text Effectively
- Choose the Right Font: Select a font that is easy to read and complements the style of your photo.
- Consider the Color: Use a color that provides enough contrast with the background to ensure the text is visible.
- Adjust the Size: Make sure the text is large enough to be read easily, but not so large that it overwhelms the image.
- Placement Matters: Position the text in a location that is visually appealing and doesn’t obscure important details in the photo.
- Use Sparingly: Add text only when it enhances the photo or provides valuable information. Avoid cluttering the image with too much text.
4.2. Enhancing Text with Shapes
You can combine the Text tool with the Shapes tool to create more visually appealing annotations. For example, you can add a speech bubble around your text to make it stand out, or use a colored box as a background to improve readability.
4.3. Using Third-Party Apps for Advanced Text Options
While the Markup tool provides basic text functionality, third-party apps offer more advanced options, such as:
- More Font Choices: Apps like Phonto and Over provide a wide variety of fonts to choose from.
- Advanced Text Effects: Add shadows, outlines, and other effects to make your text stand out.
- Templates and Presets: Use pre-designed templates to quickly create stylish text overlays.
Adding text to photos using the iPhone’s Markup tool is a great way to personalize your images, add context, and create engaging content. Whether you’re adding captions, labels, or creative annotations, the Text tool is a valuable asset for photo editing on your iPhone.
5. How Can I Erase Markings Made With The Markup Tool On My iPhone?
To erase markings made with the Markup tool on your iPhone, select the Eraser tool from the Markup toolbar. Then, run your finger over the markings you wish to remove.
The Eraser tool in the Markup feature is designed to help you correct mistakes and refine your annotations. Here’s how to use it effectively:
- Access Markup: Open the photo you want to edit in the Photos app, tap “Edit,” and then tap the Markup button.
- Select the Eraser Tool: In the Markup toolbar, tap the Eraser icon.
- Erase Markings: Run your finger over the markings you want to remove. The eraser will delete any lines, highlights, or annotations you touch.
- Undo and Redo: If you accidentally erase something you didn’t mean to, tap the Undo button (the curved arrow pointing to the left) to restore it. If you undo something by mistake, you can tap the Redo button (the curved arrow pointing to the right) to reinstate it.
5.1. Types of Eraser Tools
The Markup tool typically offers two types of erasers:
- Pixel Eraser: This eraser removes small sections of the marking, allowing for precise corrections. It’s ideal for cleaning up small mistakes or refining the edges of your drawings.
- Object Eraser: This eraser removes entire strokes or objects with a single tap. It’s useful for quickly deleting entire lines, shapes, or text boxes.
To switch between the Pixel Eraser and the Object Eraser, tap the Eraser icon again. A menu will appear, allowing you to select your preferred eraser type.
5.2. Tips for Using the Eraser Tool Effectively
- Use the Right Eraser: Choose the appropriate eraser type (Pixel or Object) based on the size and complexity of the marking you want to remove.
- Zoom In: Zooming in on the photo can help you make more precise corrections, especially when using the Pixel Eraser.
- Erase Slowly: Move your finger slowly and deliberately over the markings to ensure you remove only the parts you intend to erase.
- Use Undo/Redo: Don’t hesitate to use the Undo and Redo buttons to correct any mistakes you make while erasing.
5.3. Alternative Methods for Removing Markings
In addition to the Eraser tool, there are a couple of alternative methods for removing markings:
- The Lasso Tool: Use the Lasso tool to select the markings you want to remove, and then tap the Delete button. This method is useful for removing multiple markings at once.
- Revert to Original: If you’ve made a lot of changes and want to start over, you can revert the photo to its original state. In the Photos app, tap “Edit,” then tap “Revert,” and select “Revert to Original.”
The Eraser tool in the iPhone’s Markup feature is an essential tool for correcting mistakes and refining your annotations. Whether you’re cleaning up small errors or removing entire objects, the Eraser tool provides the flexibility and precision you need to perfect your photos.
6. How Do I Change The Color And Thickness Of The Lines I Draw?
To change the color and thickness of the lines you draw using the Markup tool, first select a drawing tool (pen, highlighter, pencil). Then, tap the tool icon again to adjust the thickness and tap the color circle to choose a new color.
Customizing the color and thickness of your lines allows you to create a variety of effects and make your annotations more visually appealing. Here’s a step-by-step guide on how to do it:
- Access Markup: Open the photo you want to edit in the Photos app, tap “Edit,” and then tap the Markup button.
- Select a Drawing Tool: Choose the pen, highlighter, or pencil tool from the Markup toolbar.
- Adjust the Thickness: Tap the selected drawing tool icon again. A slider will appear, allowing you to adjust the thickness of the line. Drag the slider to the left for a thinner line and to the right for a thicker line.
- Change the Color: Tap the color circle in the Markup toolbar. A color palette will appear, allowing you to choose from a range of colors. Tap the color you want to use for your lines.
- Draw with New Settings: Once you have adjusted the thickness and color, begin drawing on your photo. The lines will now appear with the new settings.
- Experiment: Try different combinations of colors and thicknesses to achieve the desired effect. You can also adjust the opacity of the lines by tapping the drawing tool icon again and using the opacity slider.
- Save Your Changes: Tap “Done” to save your edited photo.
6.1. Tips for Customizing Lines Effectively
- Use Different Colors for Emphasis: Use different colors to highlight specific areas or to differentiate between different elements in your photo.
- Vary the Thickness: Vary the thickness of your lines to create visual interest and to draw attention to certain details.
- Consider the Background: Choose colors that contrast well with the background of your photo to ensure your lines are visible.
- Use Opacity for Subtlety: Adjust the opacity of your lines to create subtle highlights or to add depth to your drawings.
- Save Custom Colors: Some apps allow you to save custom colors for future use, making it easier to maintain a consistent style across your photos.
6.2. Using Third-Party Apps for Advanced Line Customization
While the Markup tool provides basic line customization options, third-party apps offer more advanced features, such as:
- More Color Options: Apps like Adobe Photoshop Express and PicsArt provide a wider range of colors to choose from, including custom color palettes.
- Different Brush Styles: Experiment with different brush styles, such as airbrush, watercolor, and calligraphy brushes.
- Pressure Sensitivity: Use a digital stylus like the Apple Pencil to create lines with varying thickness and opacity based on the pressure you apply.
Customizing the color and thickness of your lines is a great way to add visual interest and personality to your photos. Whether you’re creating simple annotations or complex drawings, these adjustments can help you achieve the perfect look.
7. Can I Magnify A Part Of The Photo While Using Markup?
Yes, you can magnify a part of the photo while using Markup by using the Loupe tool. Tap the “+” button in the Markup toolbar and select “Loupe.” Drag the loupe over the area you want to magnify and adjust the size and magnification level using the green and blue dots.
The Loupe tool is designed to help you focus on specific areas of your photo, allowing for more precise annotations and edits. Here’s a detailed guide on how to use it effectively:
- Access Markup: Open the photo you want to edit in the Photos app, tap “Edit,” and then tap the Markup button.
- Select the Loupe Tool: In the Markup toolbar, tap the “+” button to reveal additional tools, and then select the “Loupe” option. A magnifying glass (loupe) will appear on your photo.
- Position the Loupe: Drag the loupe to the area you want to magnify.
- Adjust the Size: Use the blue dot on the edge of the loupe to adjust its size. Dragging the dot outwards will increase the size of the loupe, while dragging it inwards will decrease the size.
- Adjust the Magnification Level: Use the green dot on the loupe to adjust the magnification level. Dragging the green dot away from the center will increase the magnification, while dragging it towards the center will decrease the magnification.
- Annotate with Magnification: Once you have positioned and adjusted the loupe, you can use the other Markup tools to draw, write, or add shapes to the magnified area.
- Remove the Loupe: When you are finished using the loupe, you can tap the “x” button in the corner of the loupe to remove it from the photo.
- Save Your Changes: Tap “Done” to save your edited photo.
7.1. Tips for Using the Loupe Tool Effectively
- Use for Precise Annotations: The Loupe tool is particularly useful for adding detailed annotations to small or intricate areas of your photo.
- Adjust Size and Magnification: Experiment with different sizes and magnification levels to find the optimal settings for your editing needs.
- Combine with Other Tools: Use the loupe in combination with other Markup tools, such as the pen or pencil, to create precise drawings and annotations.
- Move the Loupe as Needed: Drag the loupe around the photo to focus on different areas as you edit.
- Use with Screenshots: The Loupe tool is also useful for magnifying parts of screenshots, making it easier to highlight specific details.
7.2. Alternative Methods for Magnifying Photos
In addition to the Loupe tool, there are a couple of alternative methods for magnifying photos:
- Pinch to Zoom: You can use the pinch-to-zoom gesture to magnify the entire photo while using Markup. This allows you to see the details more clearly, but it doesn’t provide the focused magnification of the Loupe tool.
- Third-Party Apps: Some third-party photo editing apps offer more advanced magnification tools, such as adjustable zoom levels and focus areas.
The Loupe tool in the iPhone’s Markup feature is a valuable asset for making precise annotations and edits to your photos. Whether you’re highlighting small details or creating intricate drawings, this tool provides the magnification you need to achieve the perfect result.
8. Can I Add My Signature To A Photo On My iPhone?
Yes, you can add your signature to a photo on your iPhone using the Markup tool. Tap the “+” button in the Markup toolbar, select “Signature,” and choose from existing signatures or create a new one.
Adding your signature to a photo can be useful for personalizing your images, signing documents, or adding a professional touch to your work. Here’s a detailed guide on how to use the Signature tool effectively:
- Access Markup: Open the photo you want to edit in the Photos app, tap “Edit,” and then tap the Markup button.
- Select the Signature Tool: In the Markup toolbar, tap the “+” button to reveal additional tools, and then select the “Signature” option.
- Choose an Existing Signature or Create a New One:
- If you have existing signatures: A list of your saved signatures will appear. Tap the signature you want to add to the photo.
- If you don’t have any signatures or want to create a new one: Tap “Add or Remove Signature.” A blank signature field will appear. Use your finger or a stylus to draw your signature on the screen.
- Customize Your Signature (if creating a new one):
- Redraw: If you’re not happy with your signature, tap the “Clear” button to clear the field and try again.
- Done: Once you’re satisfied with your signature, tap “Done.”
- Position and Resize the Signature: The signature will appear on your photo. Drag it to the desired location and use the blue dots to resize it.
- Finalize and Save: Tap outside the signature to finalize its placement. Tap “Done” to save your edited photo.
8.1. Tips for Adding Signatures Effectively
- Create a Clear Signature: Use a stylus or your finger to create a signature that is legible and represents your personal style.
- Save Multiple Signatures: You can save multiple signatures for different purposes. For example, you might have one signature for formal documents and another for casual photos.
- Adjust the Size and Position: Make sure the signature is appropriately sized and positioned so that it doesn’t obscure important details in the photo.
- Consider the Background: Choose a signature color that contrasts well with the background to ensure it is visible.
- Use for Branding: If you’re a photographer or artist, adding your signature to your photos can help to brand your work and protect your copyright.
8.2. Using Third-Party Apps for Advanced Signature Options
While the Markup tool provides basic signature functionality, third-party apps offer more advanced options, such as:
- More Signature Styles: Some apps offer different signature styles, such as handwritten fonts and calligraphy effects.
- Secure Signatures: Use apps that offer secure signature options, such as digital certificates and timestamping, to ensure the authenticity of your signatures.
- Integration with Cloud Services: Some apps integrate with cloud services, such as Adobe Sign and DocuSign, allowing you to easily sign and manage documents on your iPhone.
Adding your signature to a photo on your iPhone is a simple yet effective way to personalize your images, sign documents, and add a professional touch to your work. Whether you’re signing contracts, adding your autograph to a photo, or branding your artwork, the Signature tool is a valuable asset for photo editing on your iPhone.
9. How Do I Move A Drawing After I’ve Made It With The Markup Tool?
To move a drawing after you’ve made it with the Markup tool, use the Lasso tool to select the drawing. Then, tap and drag the selected drawing to its new location.
The Lasso tool is designed to help you select and manipulate specific parts of your drawings and annotations. Here’s how to use it effectively to move a drawing:
- Access Markup: Open the photo you want to edit in the Photos app, tap “Edit,” and then tap the Markup button.
- Select the Lasso Tool: In the Markup toolbar, tap the Lasso icon.
- Select the Drawing: Use your finger or a stylus to draw a freehand selection around the drawing you want to move. Make sure the entire drawing is enclosed within the selection.
- Move the Drawing: Once the drawing is selected, tap and hold inside the selected area. Then, drag the drawing to its new location.
- Adjust and Refine: If you need to make further adjustments, such as resizing or rotating the drawing, you can use the blue dots that appear around the selected area.
- Finalize and Save: Tap outside the selected area to finalize the changes. Tap “Done” to save your edited photo.
9.1. Tips for Using the Lasso Tool Effectively
- Be Precise: Draw the selection as closely as possible to the edges of the drawing to avoid selecting unwanted parts of the photo.
- Use Zoom: Zoom in on the photo to make more precise selections, especially when working with small or intricate drawings.
- Select Multiple Elements: You can use the Lasso tool to select multiple drawings or annotations at once. Simply include all the elements you want to move within the selection.
- Combine with Other Tools: Use the Lasso tool in combination with other Markup tools, such as the Eraser, to refine your drawings and annotations.
- Practice and Experiment: Practice using the Lasso tool to become comfortable with its functionality and discover new ways to use it in your photo editing projects.
9.2. Alternative Methods for Moving Drawings
In addition to the Lasso tool, there are a couple of alternative methods for moving drawings:
- Undo and Redraw: If you only need to make a small adjustment, you can undo the drawing and redraw it in the correct location.
- Third-Party Apps: Some third-party photo editing apps offer more advanced tools for moving and manipulating drawings, such as snap-to-grid and alignment guides.
The Lasso tool in the iPhone’s Markup feature is a valuable asset for making precise adjustments to your drawings and annotations. Whether you’re repositioning a single element or rearranging multiple parts of your photo, this tool provides the flexibility and control you need to achieve the perfect result.
10. What Are Some Third-Party Apps That Offer More Advanced Drawing Features Than The Built-In Markup Tool?
Several third-party apps offer more advanced drawing features than the built-in Markup tool, including Adobe Photoshop Sketch, Procreate, Autodesk Sketchbook, PicsArt, and Snapseed. These apps provide a wider range of brushes, tools, and customization options for creating detailed and artistic drawings on your iPhone.
Here’s a closer look at some of these apps and their advanced drawing features:
10.1. Adobe Photoshop Sketch
Adobe Photoshop Sketch is a professional-grade drawing app that offers a wide range of brushes, pencils, and markers for creating detailed and expressive drawings.
- Key Features:
- Variety of Brushes: Access a wide range of brushes, including pencils, pens, markers, and watercolors, each with customizable settings for size, opacity, and pressure sensitivity.
- Adobe Creative Cloud Integration: Seamlessly integrate with other Adobe Creative Cloud apps, such as Photoshop and Illustrator, for advanced editing and sharing options.
- Perspective Grid: Use the perspective grid tool to create drawings with accurate depth and perspective.
- Layers: Work with multiple layers to create complex drawings with ease.
- Use Case: Ideal for artists, designers, and illustrators who want to create professional-quality drawings on their iPhone.
10.2. Procreate
Procreate is a powerful and intuitive drawing app that offers a wide range of tools and features for creating stunning artwork on your iPhone.
- Key Features:
- Advanced Brush Engine: Create custom brushes with unique textures and effects using the advanced brush engine.
- Layer System: Work with multiple layers to create complex drawings with ease.
- High Resolution Canvas: Create drawings with high resolution, up to 16K on supported devices.
- Time-Lapse Recording: Record your drawing process and share it as a time-lapse video.
- Use Case: Ideal for artists, illustrators, and designers who want a comprehensive and versatile drawing app for their iPhone.
10.3. Autodesk Sketchbook
Autodesk Sketchbook is a free drawing app that offers a wide range of tools and features for creating sketches, illustrations, and paintings on your iPhone.
- Key Features:
- Professional-Grade Tools: Access a wide range of professional-grade tools, including pencils, pens, markers, and airbrushes, each with customizable settings.
- Layer Support: Work with multiple layers to create complex drawings with ease.
- Perspective Guides: Use the perspective guides to create drawings with accurate depth and perspective.
- Predictive Stroke: Use the predictive stroke feature to smooth out your lines and create more polished drawings.
- Use Case: Ideal for students, artists, and designers who want a free and powerful drawing app for their iPhone.
10.4. PicsArt
PicsArt is a versatile photo editing app that offers a wide range of drawing tools and features for creating artistic and creative drawings on your iPhone.
- Key Features:
- Drawing Tools: Access a variety of drawing tools, including brushes, pencils, and markers, each with customizable settings.
- Layers: Work with multiple layers to create complex drawings with ease.
- Effects and Filters: Apply a wide range of effects and filters to your drawings to enhance their visual appeal.
- Community Features: Share your drawings with the PicsArt community and get feedback from other artists.
- Use Case: Ideal for casual users and artists who want a fun and easy-to-use drawing app with a wide range of creative options.
10.5. Snapseed
Snapseed is a powerful photo editing app that also offers a range of drawing tools and features for creating artistic and creative drawings on your iPhone.
- Key Features:
- Brush Tool: Use the brush tool to selectively apply edits to specific areas of your photo.
- Healing Tool: Use the healing tool to remove blemishes and imperfections from your drawings.
- Text Tool: Add text to your drawings with customizable fonts, colors, and styles.
- Filters and Effects: Apply a wide range of filters and effects to your drawings to enhance their visual appeal.
- Use Case: Ideal for photographers and artists who want a powerful photo editing app with a range of drawing tools and features.
These third-party apps offer a wide range of advanced drawing features that can help you create stunning artwork on your iPhone.