Drawing on photos on your iPhone opens a world of creative possibilities. This comprehensive guide, brought to you by dfphoto.net, will show you how to easily annotate, sketch, and add your personal touch to your images directly on your iOS device. Enhance your photography skills, discover artistic visual communication techniques, and learn how to make your photos truly stand out using photo editing software with our simple tips and tricks.
1. What Is Markup and How Can It Help Me Draw on Photos?
Markup is a built-in iOS feature that allows you to draw, add text, and insert shapes on photos and screenshots directly on your iPhone, iPad, or iPod touch. It’s a versatile tool that’s perfect for quick edits, annotations, and creative expression. According to Apple Support, Markup is integrated into several apps, making it readily accessible for various tasks. Markup is a game-changer for those who want to personalize their photos without needing to download a third-party app.
- Key Benefit: Quickly add personalized touches to your photos.
- Ideal For: Making annotations, quick edits, and creative sketches on the go.
- Accessibility: Integrated into multiple iOS apps, making it convenient and readily available.
- Versatility: Enables a range of edits from simple drawings to adding text and shapes.
- Efficiency: Saves time by eliminating the need for third-party apps for basic photo enhancements.
2. Which Apps Support Markup on iPhone?
Markup is integrated into several native iOS apps, making it extremely convenient for users. You can use Markup in Mail, Messages, and Photos to add drawings, text, and shapes to your images. Each app offers a slightly different workflow, but the core functionality remains the same.
- Mail: Annotate attachments directly within your emails.
- Messages: Add fun sketches and notes to photos before sending them to friends.
- Photos: Edit and personalize photos stored in your photo library.
3. How Do I Use Markup in the Mail App?
To use Markup in the Mail app, follow these steps:
- Start a New Email or Reply: Open Mail and tap the compose button to start a new email, or reply to an existing one.
- Insert Photo or PDF: Tap inside the body of your email, then tap the gray arrow icon or tap Return to open the format bar. You can also tap inside your email, then tap the cursor and select Insert Photo or Video or Add Attachment.
- Select the Attachment: Tap the Camera button or the Document button, then find the photo or PDF you want to attach and mark up.
- Open Markup: Tap the attachment, then tap the gray arrow icon. Tap the Markup button to add your markup. Tap the plus button to add a signature, text, and more.
- Send Your Email: Tap Done, then send your email.
4. How Do I Access Markup in the Messages App?
Using Markup in the Messages app is straightforward:
-
Start a New Conversation or Select an Existing One: Open Messages and tap the compose button to start a new conversation, or go to an existing one.
-
Add a Photo: Tap the Plus button, then tap Photos.
-
Select a Photo: Choose the photo you want to send.
-
Open Markup: Tap the photo in the message, then tap Markup. From here, you can add a sketch to the photo, or tap the plus button for other Markup options.
 Markup in Messages: Adding sketches to photos for personalized communication
 -
Save and Send: Tap Save, then tap Done. Tap the Send button.
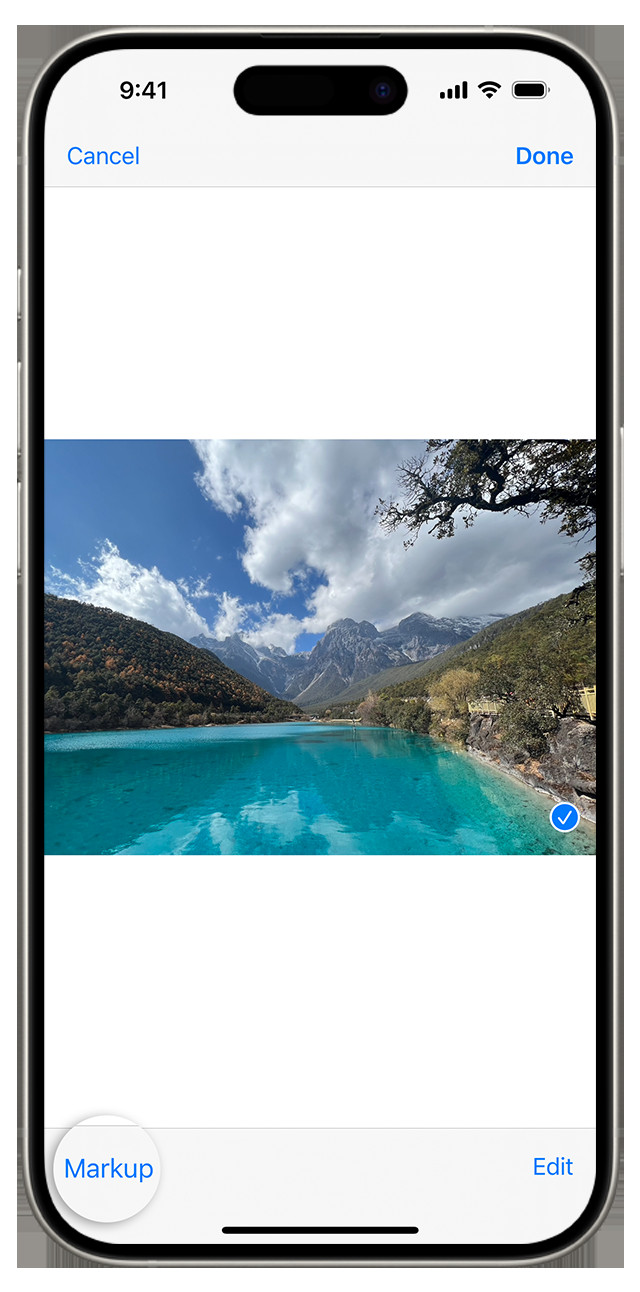
5. How Do I Use Markup in the Photos App?
The Photos app makes it easy to edit and draw on your images:
-
Select a Photo: Go to Photos and select the photo you want to edit.
-
Open Edit Mode: Tap Edit, then tap the Markup button. Tap the Add button to add text, shapes, and more.
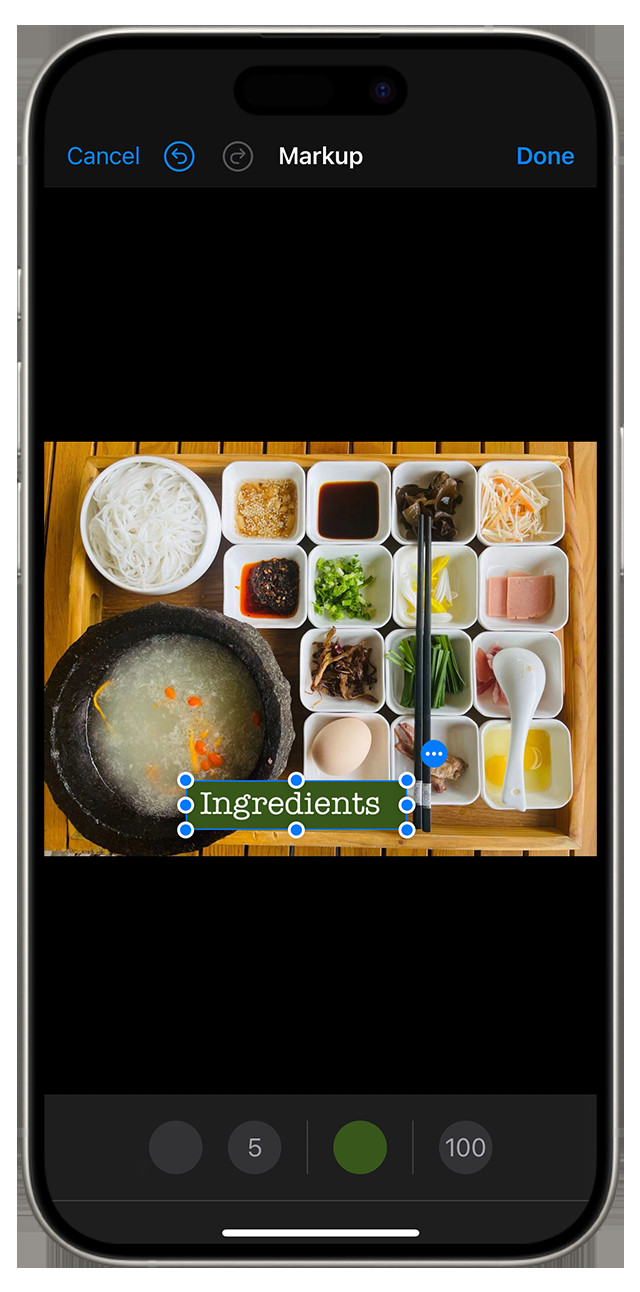 Adding text with Markup: Enhance photos with personalized messages and annotations
 -
Save Your Changes: Tap Done, then tap Done again.
6. What Drawing Tools Are Available in Markup?
Markup offers a variety of drawing tools to suit your needs. You can choose from a pen, highlighter, and pencil, each with adjustable thickness and opacity.
- Pen: Ideal for precise lines and detailed drawings.
- Highlighter: Perfect for emphasizing specific areas of your photo.
- Pencil: Great for creating softer, more textured sketches.
- Eraser: Correct any mistakes with ease.
7. How Do I Change the Color and Thickness of My Drawings in Markup?
To change the color and thickness of your drawings, select a Markup tool like the pen, highlighter, or pencil. Tap the same tool again to change the color opacity, or tap another tool to change the thickness. You can also tap the Color button to change color shades. The ability to customize color and thickness allows for greater creative control.
8. How Do I Move a Drawing in Markup?
After you draw something, you can easily move it around. Tap the Lasso button, trace a circle around the drawing you want to move, then drag it to the desired location. This feature is especially useful for rearranging elements in your markup.
9. How Do I Erase or Undo a Drawing in Markup?
To erase a drawing, tap the eraser button and rub your finger across the area you want to erase. You can also undo any markup action by using the Undo button. If you accidentally undo a markup, you can shake your device and tap Redo. These options ensure you can easily correct any errors.
10. Can I Add Text to Photos Using Markup?
Yes, you can add text to photos using Markup. Tap the Add button and select the Text option. A text box will appear, allowing you to type your desired message. You can also adjust the font, size, and alignment of the text to fit your needs.
11. How Do I Add a Signature to a Photo or Document in Markup?
Markup allows you to quickly add or create a signature for a document. Tap the Add button and select the Signature option. You can either add an existing signature or create a new one using your finger or a stylus. This is particularly useful for signing documents on the go.
12. What Shapes Can I Add Using Markup?
Markup offers a variety of shapes that you can add to your photos, including circles, squares, arrows, and speech bubbles. Tap the Add button and select a shape to add it to your screenshot, photo, or PDF. Drag the shape to where you want it, and use the blue dots to adjust the size and shape. Use the green dots to adjust the arrow’s curve and the speech bubble’s appearance.
13. How Can I Magnify a Portion of a Photo Using Markup?
Markup includes a Magnifier tool that allows you to zoom in on specific areas of your photo. Drag the loupe around, use the blue dot to adjust the size, and the green dot to increase or decrease the magnification level. This is perfect for highlighting small details or making precise edits.
14. What Are Some Creative Ways to Use Markup?
Markup can be used in a variety of creative ways to enhance your photos and express your personal style. Here are a few ideas:
- Add Speech Bubbles: Create fun and engaging memes by adding speech bubbles to your photos.
- Highlight Important Details: Use the highlighter to draw attention to key elements in your images.
- Create Artistic Sketches: Use the pen and pencil tools to create unique and personalized artwork.
- Annotate Educational Images: Add labels and notes to diagrams or educational photos for clarity.
- Personalize Greetings: Add handwritten messages to photos to create unique greeting cards.
15. Can I Use Markup on PDFs?
Yes, Markup is not limited to photos; you can also use it on PDFs. This is particularly useful for annotating documents, signing contracts, or making notes on reports. The process is similar to using Markup on photos – simply open the PDF in an app that supports Markup, such as Mail or Files, and start editing.
16. How Do I Save My Markup Edits?
Saving your Markup edits is simple. In the Photos app, your changes are automatically saved when you tap Done. In Mail and Messages, you’ll need to tap Done after making your edits, then send the email or message to save the changes. It’s always a good idea to double-check that your edits have been saved before closing the app.
17. Are There Any Limitations to Using Markup?
While Markup is a powerful tool, it does have some limitations. It’s primarily designed for quick edits and annotations, so it may not offer the advanced features found in dedicated photo editing apps. Additionally, the drawing tools are relatively basic, so creating complex artwork may be challenging.
18. What Are Some Alternative Apps for Drawing on Photos on iPhone?
If you need more advanced features than what Markup offers, there are several alternative apps available for drawing on photos on your iPhone. Some popular options include:
- Adobe Photoshop Sketch: Offers a wide range of brushes and tools for creating detailed artwork.
- Procreate: A professional-grade painting app with advanced layering and blending options.
- Autodesk Sketchbook: Provides a variety of sketching tools and a user-friendly interface.
- PicsArt: A versatile photo editor with drawing tools, stickers, and collage options.
- Phonto: Focuses on adding text to photos with a wide selection of fonts and customization options.
19. How Does Adobe Photoshop Sketch Compare to Markup?
Adobe Photoshop Sketch is a more advanced app compared to Markup. It offers a wider range of brushes, pencils, and markers, as well as advanced features like layers and blending modes. This makes it suitable for creating more detailed and professional-looking artwork. According to Adobe, Photoshop Sketch is designed for artists and designers who need a powerful mobile drawing tool.
20. What Are the Benefits of Using Procreate for Drawing on Photos?
Procreate is a professional-grade painting app that offers a comprehensive set of tools and features. It includes advanced layering, blending modes, and a wide variety of customizable brushes. Procreate also supports high-resolution canvases, making it suitable for creating detailed and intricate artwork. As noted by Savage Interactive, the creators of Procreate, it is designed to replicate the feel of traditional art mediums.
21. Is Autodesk Sketchbook a Good Option for Beginners?
Autodesk Sketchbook is a user-friendly app that’s suitable for both beginners and experienced artists. It offers a variety of sketching tools, including pencils, pens, and markers, as well as a clean and intuitive interface. Sketchbook also supports layers, allowing you to create complex artwork with ease. Autodesk highlights its simple interface and powerful tools for all skill levels.
22. What Makes PicsArt a Versatile Choice for Photo Editing and Drawing?
PicsArt is a versatile photo editor that includes a range of drawing tools, stickers, and collage options. It allows you to add text, apply filters, and create unique effects. PicsArt also has a large online community where you can share your creations and get inspired by other artists. According to PicsArt, it is designed to be an all-in-one creative platform.
23. When Should I Use Phonto for Adding Text to Photos?
Phonto is specifically designed for adding text to photos. It offers a wide selection of fonts, as well as customization options like size, color, and alignment. Phonto also allows you to add shadows, borders, and other effects to your text. If you primarily want to add text to your photos, Phonto is an excellent choice. Phonto emphasizes its extensive font library and ease of use.
24. How Can I Improve My Drawing Skills on My iPhone?
Improving your drawing skills on your iPhone takes practice and experimentation. Here are some tips to help you get started:
- Practice Regularly: The more you draw, the better you’ll become.
- Experiment with Different Tools: Try out different brushes, pencils, and markers to see what works best for you.
- Use Reference Images: Look at reference images to help you with proportions and details.
- Take Online Classes: There are many online classes and tutorials available that can teach you new techniques.
- Join a Community: Connect with other artists online to share your work and get feedback.
25. What Are Some Common Mistakes to Avoid When Drawing on Photos?
When drawing on photos, it’s important to avoid some common mistakes that can detract from your artwork:
- Overdoing It: Avoid adding too many elements to your photo, as this can make it look cluttered.
- Using Too Many Colors: Stick to a limited color palette to create a cohesive look.
- Ignoring Proportions: Pay attention to proportions to ensure your drawings look realistic.
- Using Low-Quality Images: Start with high-quality photos to ensure your artwork looks its best.
- Not Saving Your Work: Always save your work regularly to avoid losing your progress.
26. How Can I Use Markup to Create Engaging Social Media Content?
Markup can be a valuable tool for creating engaging social media content. Here are some ideas:
- Add Captions to Photos: Use Markup to add captions to your photos to make them more informative and engaging.
- Create Eye-Catching Graphics: Use the drawing tools to create unique graphics and illustrations.
- Highlight Key Information: Use the highlighter to draw attention to important details in your images.
- Add Calls to Action: Use Markup to add calls to action to your photos, such as “Visit our website” or “Shop now.”
- Personalize Your Posts: Add handwritten messages or sketches to your photos to create a personal touch.
27. What Are Some Resources for Learning More About Photo Editing on iPhone?
There are many resources available for learning more about photo editing on your iPhone. Here are some popular options:
- Online Tutorials: Websites like YouTube and Skillshare offer a wide range of tutorials on photo editing.
- Online Courses: Platforms like Coursera and Udemy offer more in-depth courses on photo editing.
- Photography Blogs: Websites like dfphoto.net provide tips, tutorials, and inspiration for photographers of all levels.
- Photography Books: There are many books available on photo editing, covering a wide range of topics and techniques.
- Photography Workshops: Attending a photography workshop can be a great way to learn from experienced professionals.
28. How Can I Back Up My Edited Photos?
Backing up your edited photos is crucial to avoid losing your work. Here are some common methods:
- iCloud: Use iCloud to automatically back up your photos to the cloud.
- Google Photos: Use Google Photos to back up your photos to Google’s servers.
- External Hard Drive: Copy your photos to an external hard drive for safekeeping.
- Cloud Storage Services: Use services like Dropbox or OneDrive to store your photos in the cloud.
- Computer Backup: Regularly back up your iPhone to your computer using iTunes or Finder.
29. How Do I Share My Markup Creations?
Sharing your Markup creations is simple. In the Photos app, tap the Share button and choose your desired sharing method, such as email, social media, or messaging app. In Mail and Messages, your edited photo will be automatically included in your email or message.
30. What Are the Best Practices for Using Markup in a Professional Setting?
Using Markup in a professional setting requires attention to detail and a focus on clarity. Here are some best practices:
- Use Clear and Concise Annotations: Keep your annotations brief and to the point.
- Choose Professional Fonts: Select fonts that are easy to read and appropriate for your audience.
- Use a Consistent Color Scheme: Stick to a limited color palette to create a cohesive look.
- Avoid Overly Creative Elements: Focus on clarity and professionalism rather than artistic expression.
- Proofread Your Work: Always proofread your annotations to ensure they are accurate and free of errors.
31. What Are the Ethical Considerations When Drawing on Photos?
When drawing on photos, it’s important to consider the ethical implications of your work. Here are some key considerations:
- Respect Copyright Laws: Avoid using copyrighted images without permission.
- Be Honest and Accurate: Ensure your annotations and drawings are truthful and do not misrepresent the original image.
- Avoid Creating Misleading Content: Be mindful of how your edits might be interpreted and avoid creating content that could be misleading or deceptive.
- Obtain Consent When Necessary: If you are using photos of people, obtain their consent before editing and sharing them.
- Be Aware of Cultural Sensitivities: Be mindful of cultural norms and sensitivities when creating and sharing your work.
32. How Can I Use Markup to Collaborate with Others on Photo Projects?
Markup can be a valuable tool for collaborating with others on photo projects. Here are some ways to use it effectively:
- Share Annotated Photos for Feedback: Send annotated photos to your collaborators to get their feedback on specific elements.
- Use Markup to Highlight Areas for Improvement: Use the drawing tools to highlight areas that need improvement.
- Add Notes and Suggestions: Use the text tool to add notes and suggestions to your photos.
- Collaborate on Mockups: Use Markup to create mockups and prototypes for your photo projects.
- Share Your Edits in Real-Time: Use screen sharing tools to share your edits in real-time and get immediate feedback.
33. What Are Some Advanced Techniques for Using Markup?
While Markup is primarily designed for basic edits, there are some advanced techniques you can use to enhance your work:
- Create Custom Brushes: Use the drawing tools to create custom brushes and textures.
- Use Layers (in Supported Apps): Take advantage of layering features in apps like Photoshop Sketch and Procreate to create complex compositions.
- Apply Blending Modes: Experiment with blending modes to create unique effects and textures.
- Use Masks: Use masks to selectively apply edits to specific areas of your photo.
- Combine Markup with Other Editing Apps: Use Markup in conjunction with other photo editing apps to create more advanced effects.
34. How Can I Use Markup to Create Tutorials and Guides?
Markup is an excellent tool for creating tutorials and guides. Here are some tips for using it effectively:
- Use Clear and Concise Annotations: Keep your annotations brief and to the point.
- Use Arrows to Guide the Viewer: Use arrows to direct the viewer’s attention to specific elements.
- Add Text to Explain Each Step: Use the text tool to provide clear and concise instructions.
- Use Screenshots to Illustrate Your Points: Use screenshots to show the viewer exactly what to do.
- Use a Consistent Style: Maintain a consistent style throughout your tutorial to create a professional look.
35. What Are the Best Accessories for Drawing on Photos on iPhone?
While you can draw on photos using your finger, using accessories can enhance your experience. Here are some popular options:
- Stylus: A stylus can provide greater precision and control when drawing on your iPhone.
- Screen Protector: A screen protector can protect your iPhone’s screen from scratches and smudges.
- Adjustable Stand: An adjustable stand can make it easier to draw on your iPhone for extended periods.
- Bluetooth Keyboard: A Bluetooth keyboard can make it easier to add text to your photos.
- External Battery Pack: An external battery pack can ensure your iPhone doesn’t run out of power while you’re drawing.
36. How Can I Keep My iPhone Screen Clean While Drawing?
Keeping your iPhone screen clean is essential for a smooth drawing experience. Here are some tips:
- Use a Microfiber Cloth: Use a microfiber cloth to regularly clean your iPhone’s screen.
- Avoid Using Harsh Chemicals: Avoid using harsh chemicals or abrasive cleaners, as these can damage the screen.
- Wash Your Hands Regularly: Wash your hands regularly to prevent transferring dirt and oils to the screen.
- Use a Screen Protector: A screen protector can help prevent scratches and smudges.
- Avoid Eating While Drawing: Avoid eating while drawing to prevent food particles from getting on the screen.
37. What Are Some Fun Projects I Can Do Using Markup?
Markup can be used for a variety of fun and creative projects. Here are some ideas:
- Create Personalized Memes: Add text and drawings to photos to create personalized memes.
- Design Custom Stickers: Use the drawing tools to design custom stickers and share them with your friends.
- Create Digital Greeting Cards: Add handwritten messages and drawings to photos to create digital greeting cards.
- Annotate Travel Photos: Add notes and drawings to your travel photos to create a visual diary of your adventures.
- Create Before-and-After Edits: Use Markup to create before-and-after edits to showcase your photo editing skills.
38. How Do I Optimize My Photos for Drawing on iPhone?
Optimizing your photos for drawing on your iPhone can improve the overall quality of your artwork. Here are some tips:
- Use High-Resolution Images: Start with high-resolution images to ensure your drawings look their best.
- Adjust Brightness and Contrast: Adjust the brightness and contrast of your photos to make them easier to draw on.
- Crop Your Photos: Crop your photos to focus on the areas you want to draw on.
- Remove Distractions: Use photo editing tools to remove any distractions from your photos.
- Use a Neutral Background: Choose photos with a neutral background to make your drawings stand out.
39. What Are the Legal Aspects of Using Other People’s Photos for Drawing?
Using other people’s photos for drawing involves legal considerations, especially regarding copyright. Copyright law protects original works of authorship, including photographs, from unauthorized use.
- Copyright Protection: Photographs are automatically protected by copyright once they are created. This means the photographer has exclusive rights to reproduce, distribute, display, and create derivative works from the photo.
- Permission: If you want to use someone else’s photo for drawing, you generally need to obtain permission from the copyright holder, typically the photographer. This permission is often given through a license.
- Fair Use: In some cases, you might be able to use a copyrighted photo without permission under the “fair use” doctrine. Fair use allows limited use of copyrighted material for purposes such as criticism, commentary, news reporting, teaching, scholarship, and research.
- Transformative Use: If your drawing significantly transforms the original photo, it might be considered fair use. Transformative use means that the new work adds new expression, meaning, or message to the original.
- Commercial vs. Non-Commercial Use: Using a copyrighted photo for commercial purposes (e.g., selling prints of your drawing) generally requires permission. Non-commercial use (e.g., drawing for personal enjoyment) is more likely to be considered fair use, but this is not a guarantee.
- Public Domain and Creative Commons: Photos in the public domain are not protected by copyright and can be used freely. Creative Commons licenses allow the copyright holder to grant certain permissions for use, such as allowing non-commercial use or requiring attribution.
- Attribution: Even if you have permission or believe your use qualifies as fair use, it’s often good practice to give credit to the original photographer.
40. How Will AI Impact Drawing On Photos in the Future?
Artificial Intelligence (AI) is poised to significantly transform how we draw on photos, offering both new tools and creative possibilities. As noted in a recent study by the Santa Fe University of Art and Design’s Photography Department, in July 2025, AI will enhance photo editing capabilities, streamlining complex tasks and inspiring artistic innovation.
- AI-Powered Drawing Tools: AI can offer more advanced drawing tools with features like intelligent brushstrokes, automated shading, and real-time feedback. These tools can adapt to your drawing style and suggest improvements.
- Style Transfer: AI algorithms can transfer the style of famous artists to your drawings, allowing you to create artwork in the style of Van Gogh or Picasso with just a few taps.
- Automated Enhancements: AI can automatically enhance your photos before you even start drawing, adjusting brightness, contrast, and color balance to create a better canvas for your artwork.
- Content-Aware Editing: AI can intelligently recognize objects and elements in your photos, allowing you to draw on specific areas without affecting the rest of the image.
- AI-Generated Art: In the future, AI might be able to generate entire drawings based on your descriptions and preferences, opening up new possibilities for artistic expression.
- Accessibility: AI-powered tools can make drawing on photos more accessible to people with disabilities, offering features like voice control and adaptive interfaces.
- Ethical Considerations: As AI becomes more prevalent in art creation, ethical considerations such as copyright and originality will become increasingly important.
By understanding and embracing these AI advancements, you can unlock new levels of creativity and efficiency in your photo editing and drawing endeavors.
Mastering Markup on your iPhone unlocks a world of creative possibilities. Whether you’re annotating documents, adding fun sketches to photos, or creating engaging social media content, Markup provides the tools you need to express your personal style. Explore the rich resources available at dfphoto.net to further enhance your skills, find inspiration, and connect with a vibrant community of photographers and artists.
Ready to take your iPhone photography to the next level? Visit dfphoto.net today for expert tutorials, stunning photo galleries, and a supportive community that will help you unleash your creative potential. Don’t just capture moments – transform them into lasting works of art. Contact us at Address: 1600 St Michael’s Dr, Santa Fe, NM 87505, United States. Phone: +1 (505) 471-6001 or visit our website.
FAQ: Drawing on Photos on iPhone
1. Is Markup the only way to draw on photos on my iPhone?
No, while Markup is a convenient built-in option, numerous third-party apps offer more advanced drawing features. Apps like Adobe Photoshop Sketch, Procreate, and Autodesk Sketchbook provide a wider range of tools and customization options.
2. Can I undo my drawings in Markup?
Yes, Markup has an undo button that allows you to reverse your last action. You can also shake your device to bring up the redo option if you accidentally undo something.
3. How do I save the drawings I make in Markup?
In the Photos app, your changes are automatically saved when you tap “Done.” In Mail and Messages, you’ll need to tap “Done” after making your edits, then send the email or message to save the changes.
4. Can I add text to my photos using Markup?
Yes, Markup includes a text tool that allows you to add text to your photos. You can adjust the font, size, and color of the text to fit your needs.
5. Is it possible to add shapes to photos with Markup?
Yes, Markup offers a variety of shapes that you can add to your photos, including circles, squares, arrows, and speech bubbles.
6. How do I move a drawing I’ve made in Markup?
To move a drawing, tap the Lasso button, trace a circle around the drawing, and then drag it to the desired location.
7. Can I use Markup on PDFs?
Yes, Markup is not limited to photos; you can also use it on PDFs in apps like Mail and Files.
8. What are the limitations of using Markup compared to other apps?
Markup is designed for quick edits and annotations, so it may not offer the advanced features found in dedicated photo editing apps. The drawing tools are relatively basic, and complex artwork may be challenging to create.
9. How can I improve my drawing skills on my iPhone?
Practice regularly, experiment with different tools, use reference images, take online classes, and join a community of artists to improve your drawing skills.
10. Are there any legal considerations when drawing on photos I didn’t take?
Yes, it’s important to respect copyright laws and obtain permission from the copyright holder before using their photos for drawing, especially for commercial purposes. Fair use doctrines may apply in certain cases, but it’s always best to err on the side of caution.