Are you looking to download all your precious memories from Google Photos to your computer? You’re definitely not alone. Many users, whether they use PCs or Macs, are realizing the importance of having a local backup of their cloud-stored photos and videos. While Google Photos is a fantastic service for cloud storage and easy access across devices, downloading your entire library isn’t always immediately obvious.
Think of Google Photos as your digital photo album in the cloud. It’s convenient, accessible from anywhere, and packed with features. But what if you want to have a physical copy, or simply want to ensure you have a backup stored safely on your own hard drive? Perhaps you’re concerned about internet access when traveling, or just prefer the peace of mind of owning your data outright. Whatever your reason, downloading your Google Photos library is a smart move.
While Google Photos itself doesn’t offer a straightforward “download all” button, thankfully, Google provides a powerful tool called Google Takeout that makes this process possible. This tool is designed to export your data from various Google services, including Google Photos, and allows you to download everything in one go.
This guide will walk you through several methods to download your photos from Google Photos, whether you want to download your entire library, select albums, or just grab a few individual images. We’ll cover using Google Takeout for bulk downloads, as well as the simpler methods for downloading individual photos, multiple selections, and entire albums directly from the Google Photos interface. Let’s dive in and ensure your memories are safely backed up on your computer.
Step-by-Step Guide: Downloading All Google Photos Using Google Takeout
For a complete backup of your Google Photos library, Google Takeout is the most efficient method. It allows you to export all your photos and videos in one go, saving you time and effort. Here’s how to use it:
1. Navigate to Google Takeout
To begin, open your web browser and go to takeout.google.com. Make sure you are logged in to the Google account associated with your Google Photos library.
2. Select Google Photos for Download
Once you’re on the Google Takeout page, you’ll see a list of Google services. By default, all services are selected. To download only your Google Photos, click the “Deselect all” option at the top of the list.
Then, scroll down until you find “Google Photos” and check the box next to it. This indicates that you want to export data specifically from Google Photos.
3. Customize Your Google Photos Export (Optional)
Clicking on the “All photo albums included” button provides further customization. A pop-up window will appear, allowing you to choose specific albums or even years to download, instead of your entire library. This is useful if you only need a portion of your photos.
If you want to download everything, leave the default option selected. If you wish to download specific albums, deselect “All photo albums included” and then select the albums you want to download. Click “OK” to confirm your selection.
4. Configure Export Settings
After selecting Google Photos and choosing your albums (if applicable), scroll down and click the “Next step” button at the bottom of the page.
On the next page, you’ll configure your export settings. Here are the key options:
- Delivery method: Choose how you want to receive your download. The default option is to “Send download link via email,” which will email you a link to download your files once they are ready. You can also choose to add your export directly to cloud storage services like Dropbox, Google Drive, OneDrive, or Box. This is particularly useful if you’re planning to migrate your photos to another cloud platform.
- Frequency: Select “Export once” for a one-time download of your current library. You can also set up “Scheduled exports” to automatically export your data every 2 months for a year, creating periodic backups.
- File type & size: Choose the archive file type for your download. “.zip” is the most common and recommended option. You can also choose “.tgz”. Additionally, you can set the archive size. If your export is larger than the chosen size (e.g., 1GB), it will be split into multiple smaller files, making downloading more manageable.
5. Create Export
Once you’ve configured your desired settings, click the “Create export” button. Google will begin preparing your export. The process time depends on the size of your Google Photos library. It could take anywhere from a few minutes to several hours, or even days for very large libraries.
You’ll see a message indicating that “Google is creating a copy of files from Google Photos.” You can close the Takeout window and Google will continue processing in the background.
6. Download Your Files
Once your export is ready, you will receive an email notification at the Gmail address associated with your Google account. The email will contain a “Download your files” button. Click this button to be redirected back to Google Takeout, where you can download your exported Google Photos as a ZIP file (or multiple ZIP files if your export was split).
Remember that the download link is typically active for about a week, so make sure to download your files within that timeframe.
Downloading Individual Photos from Google Photos
If you only need to download a few specific photos, downloading them individually directly from Google Photos is the quickest method.
1. Open Google Photos
Go to the Google Photos website (photos.google.com) and sign in to your account.
2. Select a Photo
Navigate to and open the photo you want to download by clicking on it.
3. Access Download Option
In the top right corner of the photo viewing screen, you’ll see three vertical dots (the “More options” menu). Click on these dots.
4. Download the Photo
From the dropdown menu, select “Download.” The photo will be downloaded to your computer’s default download location.
Downloading Multiple Photos at Once from Google Photos
For downloading a selection of photos without using Google Takeout, Google Photos allows you to select and download multiple images simultaneously.
1. Open Google Photos and Select Photos
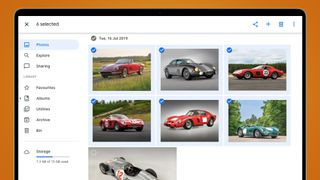 Google Photos Multiple Selection
Go to photos.google.com and navigate to the main Photos library view. To select photos, hover your mouse over the thumbnail of a photo. A checkmark will appear in the top-left corner. Click on the checkmark to select the photo.
Continue clicking checkmarks to select all the photos you want to download. You can also use the Shift key to select a range of photos: click the first photo, hold Shift, and click the last photo in the range to select all photos in between.
2. Download Selected Photos
Once you’ve selected all the photos you want to download, look for the three vertical dots (“More options”) in the top right corner of the Google Photos interface. Click on these dots.
3. Confirm Download
From the dropdown menu, select “Download.” Google Photos will compress your selected photos into a single ZIP file and download it to your computer.
Downloading Albums from Google Photos
If you’ve organized your photos into albums within Google Photos, you can download entire albums directly.
1. Go to the Albums Tab
In Google Photos, click on the “Albums” tab in the left-hand menu. If you don’t see it, click on “Explore” first.
2. View All Albums
Click on “View all albums” to see a complete list of your albums.
3. Select an Album
Click on the album you wish to download to open it.
4. Download Album
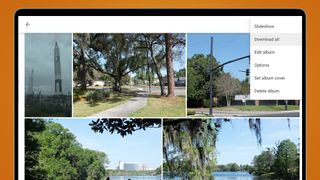 Google Photos Album Download Option
Once the album is open, look for the three vertical dots (“More options”) in the top right corner. Click on these dots and select “Download all” from the menu.
Google Photos will then compress all the photos and videos within that album into a ZIP file and begin the download to your computer. Note that you need to download albums one at a time using this method.
Conclusion
Downloading your photos from Google Photos is crucial for creating backups and ensuring you have offline access to your memories. Whether you choose to download your entire library using Google Takeout, grab individual images, download selections, or save entire albums, Google provides multiple options to suit your needs.
By following these step-by-step guides, you can confidently download your Google Photos to your PC or Mac and keep your precious photos safe and accessible, regardless of your internet connection or cloud service status. Having a local backup offers an extra layer of security and control over your valuable photo collection.