Deleting multiple photos from your iPad can seem daunting, but it’s actually a straightforward process. This guide from dfphoto.net will walk you through efficient methods to clear out unwanted images, manage your photo library, and reclaim valuable storage space. You’ll learn various techniques, from using the Photos app to employing third-party tools, ensuring a seamless experience in photo management.
1. Why Delete Multiple Photos from Your iPad?
There are several reasons why you might need to delete multiple photos from your iPad:
- Freeing up storage space: iPads have limited storage capacity. Photos and videos consume a significant portion of it. Regularly deleting unnecessary photos can help free up space for new content, apps, and system updates.
- Organizing your photo library: Over time, your photo library can become cluttered with duplicates, blurry images, and unwanted screenshots. Deleting these photos can help you organize your library, making it easier to find the photos you want.
- Privacy concerns: You might have photos that you no longer want to keep for privacy reasons. Deleting them ensures that they are not accessible to others.
- Improving iPad performance: A large photo library can slow down your iPad’s performance. Deleting unnecessary photos can help improve its speed and responsiveness.
2. Understanding Your iPad’s Photo Management System
Before diving into the deletion process, it’s essential to understand how your iPad manages photos. Photos are typically stored in one of two locations:
- On your iPad’s internal storage: These are photos you’ve taken with your iPad’s camera, downloaded from the internet, or transferred from other devices.
- In iCloud Photos: If you’re using iCloud Photos, your photos are stored in the cloud and synced across all your Apple devices. Deleting a photo from your iPad will also delete it from iCloud Photos and all your other devices.
It’s crucial to be aware of where your photos are stored before deleting them, especially if you’re using iCloud Photos.
3. Methods for Deleting Multiple Photos from iPad
Here are several methods for deleting multiple photos from your iPad, catering to different preferences and scenarios:
3.1 Using the Photos App (The Built-in Method)
The Photos app offers a direct and simple way to delete multiple photos:
- Open the Photos app: Locate and tap the Photos app icon on your iPad’s home screen.
- Navigate to the album: Select the album containing the photos you want to delete (e.g., Camera Roll, Screenshots, etc.).
- Tap “Select”: In the upper-right corner of the screen, tap the “Select” button.
- Select photos: Tap on each photo you want to delete. A blue checkmark will appear on selected photos. You can also drag your finger across multiple photos to select them quickly.
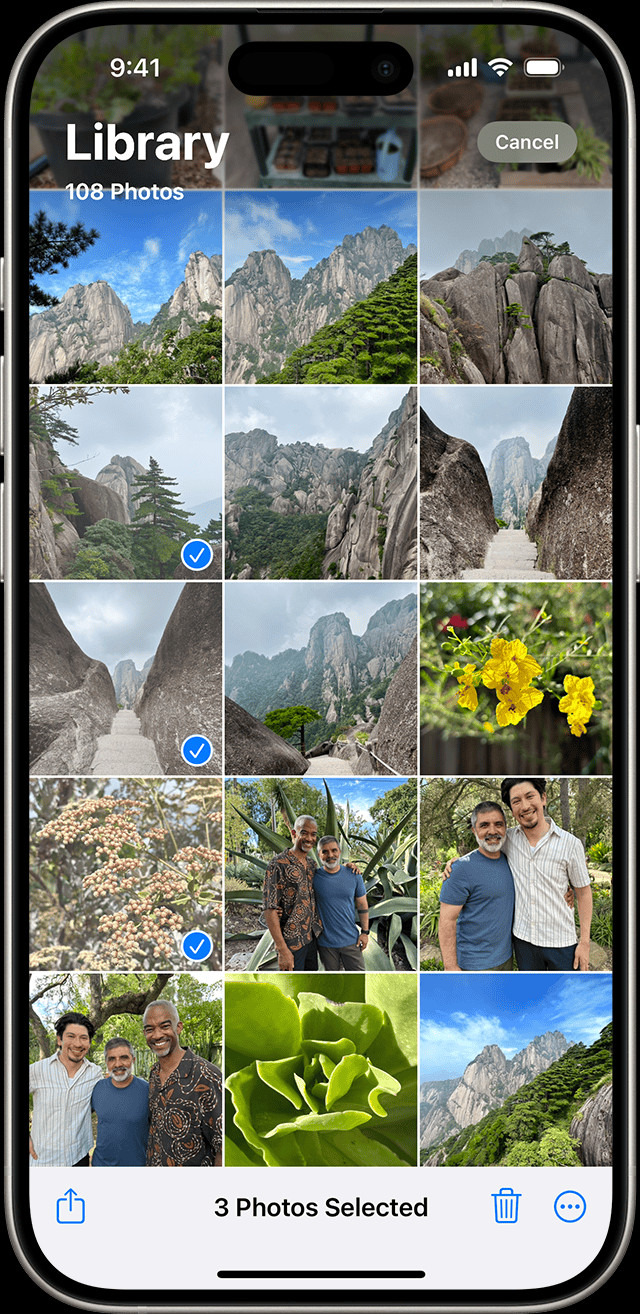 iPhone showing multiple photos selected in the Photos app
- Tap the Trash icon: Once you’ve selected all the photos you want to delete, tap the Trash icon (a small trash can) in the bottom-right corner of the screen.
- Confirm deletion: A confirmation message will appear. Tap “Delete [Number] Photos” to confirm the deletion.
Important Considerations:
- Recently Deleted Album: Deleted photos are moved to the “Recently Deleted” album. They remain there for 30 days, giving you a chance to recover them if you change your mind. After 30 days, they are permanently deleted.
- iCloud Photos: If you’re using iCloud Photos, deleting photos from your iPad will also delete them from iCloud and all your other devices signed in with the same Apple ID.
3.2 Deleting Photos from the “Recently Deleted” Album
To permanently delete photos and free up space immediately, you need to empty the “Recently Deleted” album:
- Open the Photos app:
- Tap “Albums”: At the bottom of the screen, tap the “Albums” tab.
- Scroll down to “Utilities”: Scroll down to the “Utilities” section and tap “Recently Deleted”.
- Unlock with Face ID/Touch ID (if enabled): In iOS 16, iPadOS 16.1, or later, tap View Album, then use Face ID or Touch ID to unlock your Recently Deleted album.
- Tap “Select”: In the upper-right corner, tap “Select”.
- Delete All or Select Individually: You can either tap “Delete All” to permanently delete all photos in the album or select individual photos and tap “Delete”.
- Confirm deletion: A confirmation message will appear. Tap “Delete [Number] Photos” to confirm the permanent deletion.
3.3 Using Third-Party Photo Management Apps
Several third-party photo management apps offer advanced features for deleting and organizing photos, including batch deletion, duplicate detection, and more. Some popular options include:
- Gemini Photos: This app focuses on identifying and deleting duplicate photos and similar-looking images. It uses smart algorithms to analyze your photo library and suggest photos to delete.
- Slidebox: Slidebox offers a unique interface for quickly sorting through your photos. You can swipe left to trash a photo, swipe up to move it to an album, or tap to keep it. It’s a fast and intuitive way to delete multiple photos.
- Flic: Flic is another app that simplifies photo management. It allows you to quickly swipe through your photos and categorize them into different albums or delete them.
How to Use a Third-Party App (Example: Gemini Photos)
- Download and install the app: Download Gemini Photos from the App Store and install it on your iPad.
- Grant access to your photo library: Open the app and grant it permission to access your photo library.
- Scan for duplicates: The app will scan your photo library for duplicate photos and similar-looking images.
- Review and select photos to delete: The app will display the results, allowing you to review the suggested photos and select the ones you want to delete.
- Delete selected photos: Tap the “Delete” button to remove the selected photos from your iPad.
Note: Always review the photos suggested for deletion by third-party apps to ensure you’re not accidentally deleting important images.
3.4 Using a Computer (Mac or PC)
You can also use a computer to delete multiple photos from your iPad, especially if you have a large photo library:
-
Connect your iPad to your computer: Use a USB cable to connect your iPad to your Mac or PC.
-
Trust the computer (if prompted): On your iPad, you might see a prompt asking if you trust the computer. Tap “Trust”.
-
Open Photos (on Mac) or File Explorer (on PC):
- Mac: The Photos app should automatically open. If not, open it manually.
- PC: Open File Explorer and locate your iPad in the list of devices. It will typically appear under “Apple iPhone” or “Apple iPad”.
-
Import or access photos:
- Mac: In the Photos app, select your iPad in the sidebar. You might need to import the photos from your iPad to your Mac first.
- PC: In File Explorer, navigate to the “Internal Storage” folder, then “DCIM” (Digital Camera Images). Your photos will be in folders within the DCIM folder.
-
Select and delete photos: Select the photos you want to delete. You can use Shift-click to select a range of photos or Ctrl-click (or Command-click on Mac) to select individual photos. Press the Delete key on your keyboard or right-click and select “Delete”.
-
Empty the Recycle Bin (on PC): On a PC, the deleted photos will be moved to the Recycle Bin. Empty the Recycle Bin to permanently delete them.
-
Sync with iCloud Photos (if applicable): If you’re using iCloud Photos, the changes will be synced across your devices.
Important Considerations:
- Backups: Before deleting photos from your iPad using a computer, it’s a good idea to create a backup of your photo library.
- iCloud Photos: Be aware that deleting photos from your iPad using a computer will also delete them from iCloud Photos and all your other devices signed in with the same Apple ID.
4. Tips for Efficient Photo Management on Your iPad
Here are some additional tips to help you manage your photo library efficiently and avoid the need to delete large numbers of photos in the future:
- Regularly review your photos: Make it a habit to review your photos regularly and delete any that you no longer need or want.
- Use albums to organize your photos: Create albums to categorize your photos by event, location, or subject. This will make it easier to find and manage your photos.
- Enable iCloud Photos (with caution): iCloud Photos can be a convenient way to sync your photos across devices, but be aware that deleting photos from one device will delete them from all devices.
- Consider using a cloud storage service: If you need more storage space for your photos, consider using a cloud storage service like Google Photos, Dropbox, or Amazon Photos.
- Turn off Burst Mode for unnecessary shots: Burst mode takes multiple photos in quick succession. Review and delete the extras immediately to save space.
- Adjust Camera Settings: Lower the resolution or quality settings for photos and videos if you don’t need the highest quality. This will reduce file sizes.
- Clean up Screenshots: Screenshots can accumulate quickly. Regularly delete the ones you no longer need.
5. Understanding the Impact of Deleting Photos on iCloud
When using iCloud Photos, deleting photos on your iPad has a direct impact on your entire iCloud photo library. Here’s what you need to consider:
- Synchronization: Any photo or video you delete from your iPad will be removed from iCloud and all other devices connected to the same Apple ID. This synchronization happens almost instantly, so be sure before you delete.
- Shared Albums: If you delete a photo from a shared album, it will be removed for everyone who has access to that album. Only the person who added the photo or video to the Shared Album can permanently delete or recover it from the Recently Deleted folder. You have 30 days to get a photo or video back from your Recently Deleted album.
- Storage Management: Deleting photos helps free up storage space in iCloud, which is crucial if you’re nearing your storage limit.
- Recovery Period: Photos deleted from iCloud are moved to the “Recently Deleted” album, where they remain for 30 days. This gives you a window to recover them if needed.
6. Troubleshooting Common Issues
Sometimes, you might encounter issues when trying to delete multiple photos from your iPad. Here are some common problems and their solutions:
- Trash icon is grayed out: This usually means you’re trying to delete photos that were synced from your computer. You need to stop syncing photos from your computer to delete them from your iPad.
- Photos not deleting: This could be due to a syncing issue with iCloud Photos. Try turning iCloud Photos off and on again in Settings > Photos.
- Storage not freeing up: Make sure you empty the “Recently Deleted” album to permanently delete the photos and free up storage space.
- iPad is slow: A large photo library can slow down your iPad. Try deleting unnecessary photos and videos to improve performance.
- Cannot Delete All Photos Simultaneously: Due to iOS/iPadOS limitations, there isn’t a direct ‘Select All’ option in the Recently Deleted album. Use third-party apps or connect to a computer to mass delete.
- Photos Reappear After Deletion: Ensure iCloud Photos is functioning correctly. Sometimes, a temporary glitch can cause photos to reappear. Restarting your device or resetting iCloud settings might help.
7. Practical Scenarios and Solutions
Let’s look at some practical scenarios where you might need to delete multiple photos and how to handle them:
- Scenario 1: Vacation Photos: After a vacation, you might have hundreds of photos. Review them and delete duplicates, blurry shots, and unwanted images. Use the Photos app or a third-party app like Slidebox to quickly sort through them.
- Scenario 2: Screenshots: Screenshots can quickly accumulate and take up storage space. Regularly review your screenshots and delete the ones you no longer need. Create a dedicated album for important screenshots to keep them organized.
- Scenario 3: Duplicate Photos: Use a third-party app like Gemini Photos to identify and delete duplicate photos. This will help you free up storage space and declutter your photo library.
- Scenario 4: Preparing iPad for Sale: Before selling your iPad, make sure to delete all personal photos and videos. Empty the “Recently Deleted” album and consider using a data erasure tool to ensure that the photos are permanently deleted.
- Scenario 5: Managing Kids’ Photos: If you have kids who use your iPad, they might take a lot of photos. Regularly review their photos and delete the ones you don’t want to keep. Consider creating a shared album for family photos.
- Scenario 6: Event Photography: After shooting an event, import the photos to your iPad for initial culling. Delete the obvious misses (out-of-focus, bad exposures) using the Photos app before transferring the keepers to your computer for editing. This reduces the number of files you need to manage.
8. The Role of dfphoto.net in Your Photography Journey
At dfphoto.net, we understand the challenges photographers face, from managing large photo libraries to mastering the latest techniques. Here’s how our website can assist you in your photographic endeavors:
- Comprehensive Guides: We offer detailed tutorials and guides on various photography topics, including photo management, editing, and equipment reviews.
- Inspiration and Ideas: Explore our curated collections of stunning photographs and discover new ideas for your own projects.
- Community Support: Connect with fellow photographers, share your work, and get feedback from our vibrant community.
9. Maintaining Photo Quality While Managing Storage
Efficiently managing photos on your iPad doesn’t mean you have to compromise on quality. Here are some strategies to balance storage and image quality:
- Optimize Storage: In Settings > Photos, enable “Optimize iPad Storage.” This setting automatically replaces full-resolution photos with smaller, device-optimized versions when storage is low. The original, high-resolution photos are stored in iCloud.
- Choose the Right Format: Use HEIF (High Efficiency Image File Format) for photos and HEVC (High Efficiency Video Coding) for videos. These formats offer better compression while maintaining high image quality.
- Edit Before Deleting: Edit your photos before deleting them. This ensures you’re only keeping the best versions. Use built-in editing tools or third-party apps like Adobe Lightroom Mobile.
- External Storage: Consider using external storage devices like portable SSDs to offload photos from your iPad.
- Cloud Services: Utilize cloud storage services like Google Photos or Dropbox to back up your photos. Many offer options to automatically compress photos when uploading.
- Selective HDR: High Dynamic Range (HDR) photos take up more space. Disable HDR for everyday shots where it’s not needed.
- Live Photos Management: Live Photos combine a still image with a short video. Disable the “Live” feature or convert Live Photos to still images to save space.
- Regular Backups: Regularly back up your photos to an external drive or cloud service. This ensures you have a copy of your original, high-resolution photos.
10. FAQ: Deleting Multiple Photos on iPad
Here are some frequently asked questions about deleting multiple photos from your iPad:
- Q1: How do I permanently delete photos from my iPad?
- To permanently delete photos, you need to empty the “Recently Deleted” album in the Photos app.
- Q2: Can I recover deleted photos from my iPad?
- Yes, you can recover deleted photos from the “Recently Deleted” album within 30 days of deletion.
- Q3: How do I delete photos from iCloud Photos?
- Deleting photos from your iPad while using iCloud Photos will also delete them from iCloud and all your other devices signed in with the same Apple ID.
- Q4: How do I stop syncing photos from my computer to my iPad?
- To stop syncing photos from your computer, you need to disable photo syncing in iTunes (on PC) or Finder (on Mac).
- Q5: Why can’t I delete some photos from my iPad?
- This could be because the photos were synced from your computer. You need to stop syncing photos from your computer to delete them from your iPad.
- Q6: What is the “Recently Deleted” album?
- The “Recently Deleted” album is a temporary storage location for deleted photos. Photos remain there for 30 days before being permanently deleted.
- Q7: How do I find duplicate photos on my iPad?
- You can use a third-party app like Gemini Photos to find and delete duplicate photos.
- Q8: How do I free up storage space on my iPad?
- Deleting unnecessary photos and videos is a great way to free up storage space. You can also delete apps you no longer use and clear your browser cache.
- Q9: Will deleting photos from my iPad affect my other Apple devices?
- If you’re using iCloud Photos, deleting photos from your iPad will also delete them from all your other devices signed in with the same Apple ID.
- Q10: How do I back up my photos before deleting them?
- You can back up your photos to iCloud, a computer, or a cloud storage service like Google Photos or Dropbox.
Deleting multiple photos from your iPad is a necessary task to manage storage, organize your library, and protect your privacy. By following the methods and tips outlined in this guide, you can efficiently delete unwanted photos and keep your iPad running smoothly. Visit dfphoto.net for more photography tips, tutorials, and inspiration.
For more insights and resources, feel free to visit us at 1600 St Michael’s Dr, Santa Fe, NM 87505, United States, call us at +1 (505) 471-6001, or explore our website at dfphoto.net.