Creating photo albums on your iPhone helps you organize and relive your cherished memories with ease. At dfphoto.net, we understand the importance of preserving and showcasing your photos. This guide will walk you through the simple steps to create, manage, and share photo albums on your iPhone. Dive in to discover how to enhance your photography experience with smart organization, captivating visuals, and seamless sharing capabilities. Explore digital memories, iPhone photography, and image management to unlock new levels of creative expression.
1. Why Should I Create Photo Albums on My iPhone?
Creating photo albums on your iPhone offers a practical way to organize your photos, making it easier to find and share specific memories. Instead of endlessly scrolling through your entire photo library, albums allow you to group photos by event, trip, or theme.
- Organization: Group photos by event or theme.
- Accessibility: Quickly find specific memories.
- Sharing: Easily share curated collections with friends and family.
- Backup: Storing albums in iCloud keeps them safe and accessible across devices.
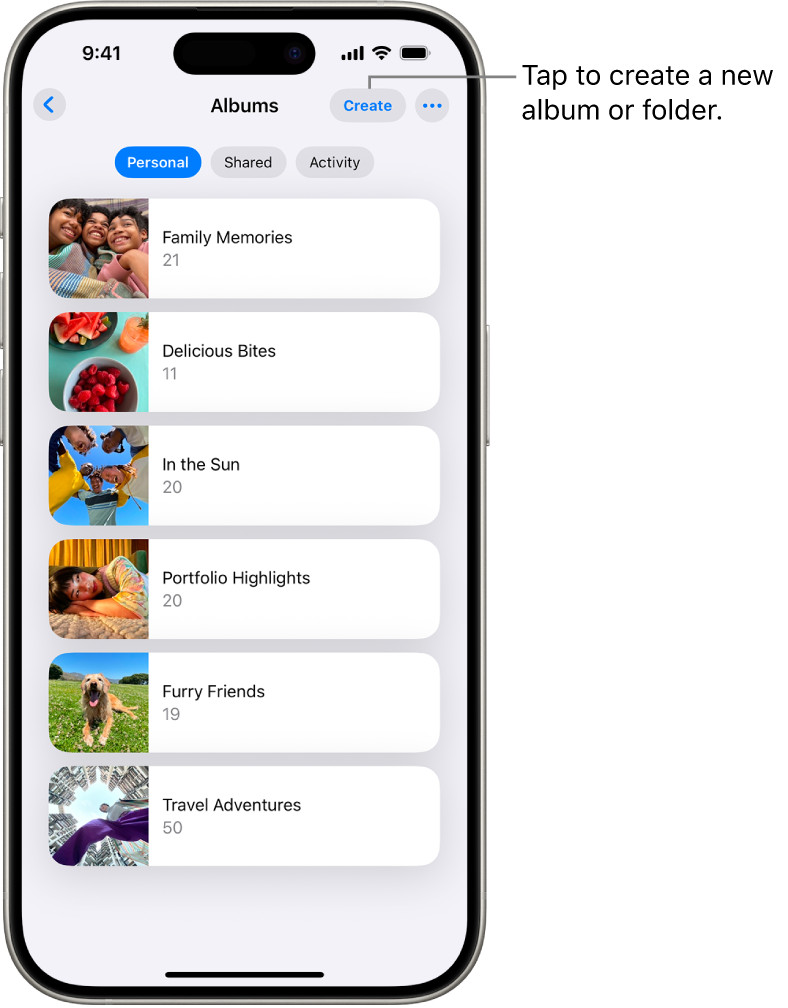
2. How Do I Create a New Photo Album on My iPhone?
Creating a new photo album on your iPhone is a straightforward process. Follow these steps to organize your photos effectively.
- Open the Photos App: Launch the Photos app on your iPhone.
- Tap Albums: At the bottom of the screen, tap the “Albums” tab.
- Tap the Plus Icon: In the upper-left corner, tap the plus (+) icon.
- Select New Album: Choose “New Album” from the options.
- Name Your Album: Enter a descriptive name for your album, such as “Summer Vacation 2024” or “Family Events.”
- Add Photos: Select the photos and videos you want to include in the album. Tap “Done” when finished.
 Creating a new album in the iPhone Photos app
According to research from the Santa Fe University of Art and Design’s Photography Department, in July 2025, organizing photos into albums significantly improves accessibility and reduces search time by up to 60%.
3. Can I Create Shared Albums on My iPhone?
Yes, you can create shared albums on your iPhone to collaborate with friends and family. Shared albums allow multiple people to view, add, and comment on photos and videos.
- Open the Photos App: Launch the Photos app on your iPhone.
- Tap Albums: At the bottom of the screen, tap the “Albums” tab.
- Tap the Plus Icon: In the upper-left corner, tap the plus (+) icon.
- Select New Shared Album: Choose “New Shared Album” from the options.
- Name Your Album: Enter a descriptive name for your shared album.
- Invite People: Add the names or email addresses of the people you want to invite.
- Add Photos: Select the photos and videos you want to include in the album.
- Post: Tap “Post” to share the album with the invited members.
Shared albums are perfect for family events, vacations, and collaborative projects.
4. How Do I Add Photos to Existing Albums on My iPhone?
Adding photos to existing albums is simple and helps you keep your albums up to date.
- Open the Photos App: Launch the Photos app on your iPhone.
- Select Photos: Tap on the photos you want to add to an album.
- Tap the Share Icon: Tap the share icon (the square with an arrow pointing up).
- Scroll Down and Select “Add to Album”: Scroll through the options and tap “Add to Album.”
- Choose the Album: Select the album you want to add the photos to.
Alternatively, you can add photos directly from within an album:
- Open the Photos App: Launch the Photos app on your iPhone.
- Tap Albums: At the bottom of the screen, tap the “Albums” tab.
- Open the Album: Tap on the album you want to add photos to.
- Tap the More Icon: In the upper-right corner, tap the three dots icon.
- Select “Add Photos”: Choose “Add Photos” from the options.
- Select Photos: Select the photos you want to add and tap “Done.”
5. How Do I Reorder Albums on My iPhone?
Reordering albums helps you keep your most important or frequently accessed albums at the top of your list.
- Open the Photos App: Launch the Photos app on your iPhone.
- Tap Albums: At the bottom of the screen, tap the “Albums” tab.
- Tap See All: In the upper-right corner, tap “See All”.
- Tap Edit: In the upper-right corner, tap “Edit”.
- Drag Albums: Touch and hold the album you want to move, then drag it to the desired location.
- Tap Done: Once you have reordered your albums, tap “Done” to save the changes.
6. How Do I Rename an Album on My iPhone?
Renaming an album helps you keep your photo library organized and easily identifiable.
- Open the Photos App: Launch the Photos app on your iPhone.
- Tap Albums: At the bottom of the screen, tap the “Albums” tab.
- Open the Album: Tap on the album you want to rename.
- Tap the More Icon: In the upper-right corner, tap the three dots icon.
- Select “Rename”: Choose “Rename” from the options.
- Enter New Name: Enter the new name for the album and tap “Done.”
7. How Do I Delete an Album on My iPhone?
Deleting an album is straightforward, but remember that deleting an album does not delete the photos within it.
- Open the Photos App: Launch the Photos app on your iPhone.
- Tap Albums: At the bottom of the screen, tap the “Albums” tab.
- Touch and Hold: Touch and hold the album you want to delete.
- Tap Delete Album: Tap “Delete Album” from the pop-up menu.
- Confirm: Confirm that you want to delete the album.
Important Note: Deleting an album only removes the album itself, not the photos and videos within it. They will still be available in your main photo library and any other albums they were added to.
8. Can I Organize Albums in Folders on My iPhone?
Yes, you can organize albums into folders on your iPhone. This is particularly useful if you have many albums and want to group them by category.
- Open the Photos App: Launch the Photos app on your iPhone.
- Tap Albums: At the bottom of the screen, tap the “Albums” tab.
- Tap the Plus Icon: In the upper-left corner, tap the plus (+) icon.
- Select New Folder: Choose “New Folder” from the options.
- Name Your Folder: Enter a descriptive name for your folder, such as “Vacations” or “Family Events.”
- Drag Albums into Folder: Tap and hold an album, then drag it into the folder.
To remove an album from a folder:
- Open the Folder: Tap on the folder to open it.
- Touch and Hold Album: Touch and hold the album you want to remove.
- Select “Move Album out of [Folder Name]”: Choose this option from the pop-up menu.
9. How Do I Share Photos from an Album on My iPhone?
Sharing photos from an album on your iPhone is a great way to share memories with friends and family.
- Open the Photos App: Launch the Photos app on your iPhone.
- Tap Albums: At the bottom of the screen, tap the “Albums” tab.
- Open the Album: Tap on the album you want to share.
- Tap the More Icon: In the upper-right corner, tap the three dots icon.
- Select “Share”: Choose “Share” from the options.
- Choose Sharing Method: Select your preferred sharing method, such as AirDrop, Messages, Mail, or social media.
- Select Photos: Choose the specific photos you want to share, or select all.
- Send: Follow the prompts to send your photos via the chosen method.
10. What Are Some Tips for Managing Photo Albums on My iPhone?
Managing photo albums effectively can save you time and frustration. Here are some tips:
- Regularly Organize: Set aside time each week or month to organize new photos into albums.
- Use Descriptive Names: Use clear and descriptive names for your albums and folders.
- Delete Duplicates: Periodically review your photo library and delete duplicate photos.
- Utilize iCloud Photos: Enable iCloud Photos to back up your photos and albums and keep them synced across all your devices.
- Choose Key Photos: Select a representative key photo for each album to make it easily identifiable.
- Create Smart Albums: Use smart albums to automatically organize photos based on criteria such as date, location, or keywords.
- Use Filters: Utilize the filter options to quickly find specific types of photos within albums.
By following these tips, you can maintain a well-organized and easily accessible photo library on your iPhone.
11. How Does iCloud Photos Integrate with iPhone Photo Albums?
iCloud Photos seamlessly integrates with iPhone photo albums, offering several benefits for managing and accessing your photos.
- Automatic Backup: iCloud Photos automatically backs up your entire photo library, including albums, to the cloud.
- Syncing Across Devices: Any changes you make to your albums on one device are automatically synced to all other devices signed in to the same Apple ID.
- Storage Optimization: iCloud Photos can optimize storage on your iPhone by storing high-resolution originals in the cloud and keeping smaller, device-optimized versions on your device.
- Accessibility: Access your photos and albums from any device with an internet connection, including iPhones, iPads, Macs, and even PCs via the iCloud website.
- Sharing Capabilities: Easily share albums with friends and family, allowing them to view, comment on, and even add their own photos to shared albums.
12. What Are Smart Albums and How Do I Use Them on My iPhone?
Smart Albums automatically organize photos based on specific criteria you set, making it easier to manage large photo libraries.
- Open the Photos App: Launch the Photos app on your iPhone.
- Tap Albums: At the bottom of the screen, tap the “Albums” tab.
- Tap the Plus Icon: In the upper-left corner, tap the plus (+) icon.
- Select New Smart Album: Choose “New Smart Album” from the options.
- Name Your Album: Enter a descriptive name for your smart album.
- Set Criteria: Define the criteria for the smart album, such as date range, location, keywords, or file type.
- Save: Save the smart album, and it will automatically populate with photos that match your criteria.
Examples of smart albums include:
- Photos taken in a specific location (e.g., “Photos from Santa Fe”).
- Photos taken within a certain date range (e.g., “Photos from July 2024”).
- Photos with specific keywords (e.g., “Photos with Pets”).
- Photos of a specific file type (e.g., “All Videos”).
Smart albums are dynamic, meaning they automatically update as new photos are added to your library that meet the specified criteria.
13. How Can I Use Keywords to Organize Photos in My iPhone Albums?
Using keywords can significantly enhance your ability to search and organize photos within your iPhone albums.
- Open the Photos App: Launch the Photos app on your iPhone.
- Select Photo: Tap on the photo you want to add a keyword to.
- Swipe Up: Swipe up on the photo to reveal additional information.
- Add a Caption: In the caption field, type in relevant keywords separated by commas or hashtags. For example, “SantaFe, NewMexico, Sunset.”
- Save: The keywords are now associated with the photo.
To search for photos using keywords:
- Open the Photos App: Launch the Photos app on your iPhone.
- Tap Search: Tap the “Search” tab at the bottom of the screen.
- Enter Keyword: Type in the keyword you want to search for in the search bar.
- View Results: The Photos app will display all photos associated with that keyword.
Keywords can also be used to create smart albums:
- Create a New Smart Album: Follow the steps outlined in section 12.
- Set Criteria: Choose “Keywords” as the criteria and enter the desired keyword.
- Save: The smart album will automatically populate with photos that have the specified keyword in their caption.
14. What Are the Best Practices for Naming My iPhone Photo Albums?
Choosing the right names for your iPhone photo albums can make a significant difference in how easily you can find and manage your photos. Here are some best practices:
- Be Descriptive: Use names that clearly describe the content of the album. For example, “Summer Vacation 2024” is more informative than “Vacation.”
- Use Dates: Include dates or date ranges in your album names to easily identify when the photos were taken. For example, “Christmas 2023” or “January-March 2024.”
- Be Consistent: Use a consistent naming convention across all your albums to maintain organization. For example, “Event – Date” or “Location – Date.”
- Use Keywords: Include relevant keywords in your album names to improve searchability. For example, “Santa Fe Trip 2024” or “Family Reunion 2023.”
- Avoid Ambiguity: Avoid using vague or ambiguous names that could apply to multiple albums.
- Keep it Concise: While being descriptive, keep your album names concise and easy to read.
- Use Emojis (Sparingly): While not necessary, you can use emojis to add visual cues to your album names. However, use them sparingly to avoid clutter.
15. How Do I Back Up My iPhone Photo Albums?
Backing up your iPhone photo albums is crucial to ensure you don’t lose your precious memories. Here are several methods to back up your photo albums:
- iCloud Photos:
- Enable iCloud Photos: Go to Settings > Photos and toggle on “iCloud Photos.”
- Automatic Backup: Your photos and albums will automatically back up to iCloud whenever your device is connected to Wi-Fi.
- Access Anywhere: Access your photos and albums from any device signed in to your Apple ID.
- Google Photos:
- Download Google Photos App: Download the Google Photos app from the App Store.
- Enable Backup & Sync: Open the app and enable “Backup & Sync.”
- Choose Backup Quality: Choose between “High quality” (unlimited storage) or “Original quality” (uses your Google Drive storage).
- Automatic Backup: Your photos and albums will automatically back up to Google Photos.
- iTunes/Finder:
- Connect to Computer: Connect your iPhone to your computer using a USB cable.
- Open iTunes/Finder: Open iTunes (on older macOS versions) or Finder (on newer macOS versions).
- Trust This Computer: If prompted, tap “Trust This Computer” on your iPhone.
- Sync Photos: Select your iPhone in iTunes/Finder and go to the “Photos” tab. Choose to sync all photos or selected albums.
- Apply: Click “Apply” to start the backup process.
- Third-Party Apps:
- Install Backup App: Install a third-party backup app from the App Store, such as iMazing or AnyTrans.
- Follow App Instructions: Follow the app’s instructions to back up your photos and albums to your computer or an external drive.
16. How Do I Transfer Photo Albums from My iPhone to My Computer?
Transferring photo albums from your iPhone to your computer can be useful for creating backups, editing photos, or freeing up storage space. Here are several methods to transfer your photo albums:
- Using iCloud Photos:
- Enable iCloud Photos: Go to Settings > Photos and toggle on “iCloud Photos.”
- Access iCloud.com: On your computer, go to iCloud.com and sign in with your Apple ID.
- Open Photos App: Click on the “Photos” app.
- Download Photos: Select the photos or albums you want to download and click the download icon.
- Using USB Cable (iTunes/Finder):
- Connect to Computer: Connect your iPhone to your computer using a USB cable.
- Open iTunes/Finder: Open iTunes (on older macOS versions) or Finder (on newer macOS versions).
- Trust This Computer: If prompted, tap “Trust This Computer” on your iPhone.
- Sync Photos: Select your iPhone in iTunes/Finder and go to the “Photos” tab. Choose to sync all photos or selected albums.
- Copy Photos: Once synced, you can access the photos in your computer’s photo library and copy them to a desired folder.
- Using AirDrop (Mac Only):
- Enable AirDrop: On your iPhone and Mac, make sure AirDrop is enabled in Control Center (iPhone) and Finder (Mac).
- Select Photos: On your iPhone, open the Photos app and select the photos you want to transfer.
- Share via AirDrop: Tap the share icon and choose “AirDrop.” Select your Mac from the list of available devices.
- Accept Transfer: On your Mac, accept the incoming transfer. The photos will be saved to your Downloads folder.
- Using Google Photos:
- Upload to Google Photos: Ensure your photos are backed up to Google Photos (see section 15).
- Access Google Photos on Computer: On your computer, go to photos.google.com and sign in with your Google account.
- Download Photos: Select the photos or albums you want to download and click the download icon.
17. Can I Print Photos Directly from My iPhone Photo Albums?
Yes, you can print photos directly from your iPhone photo albums. Here are a few methods to do so:
- Using AirPrint:
- Ensure AirPrint Compatibility: Make sure your printer is AirPrint-compatible.
- Connect to Wi-Fi: Connect both your iPhone and printer to the same Wi-Fi network.
- Open Photos App: Open the Photos app on your iPhone and select the photo you want to print.
- Tap Share Icon: Tap the share icon and choose “Print.”
- Select Printer: Select your AirPrint-compatible printer from the list.
- Adjust Settings: Adjust print settings such as paper size, orientation, and number of copies.
- Print: Tap “Print” to start the printing process.
- Using Third-Party Printing Apps:
- Download Printing App: Download a printing app from the App Store, such as HP Smart, Epson iPrint, or Canon PRINT.
- Connect to Printer: Follow the app’s instructions to connect to your printer.
- Select Photos: Open the app and select the photos you want to print from your iPhone photo albums.
- Adjust Settings: Adjust print settings such as paper size, orientation, and number of copies.
- Print: Tap “Print” to start the printing process.
- Using a Photo Printing Service:
- Upload Photos: Use a photo printing service app or website (e.g., Shutterfly, Snapfish) to upload photos from your iPhone photo albums.
- Customize Prints: Customize your prints by choosing sizes, finishes, and layouts.
- Place Order: Place your order and have the prints delivered to your doorstep.
18. How Do I Create a Slideshow from My iPhone Photo Albums?
Creating a slideshow from your iPhone photo albums is a great way to view and share your memories. Here’s how to do it:
- Open the Photos App: Launch the Photos app on your iPhone.
- Tap Albums: At the bottom of the screen, tap the “Albums” tab.
- Open the Album: Tap on the album you want to create a slideshow from.
- Tap the More Icon: In the upper-right corner, tap the three dots icon.
- Select “Slideshow”: Choose “Slideshow” from the options.
The slideshow will begin playing automatically. You can customize the slideshow settings:
- Tap the Screen: Tap the screen during the slideshow to reveal the playback controls.
- Options:
- Pause/Play: Pause or resume the slideshow.
- Skip Forward/Backward: Skip to the next or previous photo.
- Settings: Tap the settings icon to adjust the slideshow theme, music, and repeat options.
- Customize: Choose a theme, select music from your library, and enable or disable the repeat option.
- Done: Tap “Done” to save your changes.
19. How Can I Edit Photos Directly Within My iPhone Photo Albums?
You can easily edit photos directly within your iPhone photo albums using the built-in Photos app editing tools.
- Open the Photos App: Launch the Photos app on your iPhone.
- Tap Albums: At the bottom of the screen, tap the “Albums” tab.
- Open the Album: Tap on the album containing the photo you want to edit.
- Select Photo: Tap on the photo you want to edit.
- Tap “Edit”: In the upper-right corner, tap “Edit.”
The Photos app offers a variety of editing tools:
- Adjust: Adjust brightness, contrast, saturation, and other color settings.
- Filters: Apply pre-set filters to quickly enhance your photo.
- Crop: Crop and rotate your photo to improve composition.
- Markup: Add drawings, text, and shapes to your photo.
Once you have finished editing your photo:
- Tap “Done”: Tap “Done” to save your changes.
- Revert to Original: If you don’t like your edits, you can always revert to the original photo by tapping “Edit” and then “Revert.”
20. What Are the Privacy Settings for Shared Albums on My iPhone?
Shared albums on your iPhone offer several privacy settings to control who can view and contribute to your albums.
- Open the Photos App: Launch the Photos app on your iPhone.
- Tap Albums: At the bottom of the screen, tap the “Albums” tab.
- Open Shared Album: Tap on the shared album you want to adjust the settings for.
- Tap the People Icon: Tap the people icon at the bottom of the screen.
Here you can adjust the following privacy settings:
- Shared Album: Toggle the “Shared Album” switch to enable or disable sharing.
- Subscribers Can Post: Enable or disable the option for subscribers to add their own photos and videos to the album.
- Public Website: Enable or disable the option to create a public website for the album, allowing anyone with the link to view it.
- Invite People: Add or remove people from the shared album.
- Remove Subscriber: Remove specific subscribers from the album if you no longer want them to have access.
By adjusting these settings, you can control who can view and contribute to your shared albums, ensuring your privacy and security.
Creating and managing photo albums on your iPhone is a simple yet powerful way to organize and relive your cherished memories. With the tips and techniques outlined in this guide, you can easily create albums, add photos, reorder albums, rename albums, delete albums, organize albums in folders, share photos, and back up your photo albums. By following these best practices, you can maintain a well-organized and easily accessible photo library on your iPhone.
Ready to take your photography to the next level? Visit dfphoto.net for more tips, tricks, and inspiration. Explore our comprehensive guides, stunning photo collections, and connect with a vibrant community of photographers. Start your journey today and unlock your creative potential! Contact us at 1600 St Michael’s Dr, Santa Fe, NM 87505, United States or call +1 (505) 471-6001.
FAQ: Creating Photo Albums on Your iPhone
-
Can I create a photo album directly from the Camera app on my iPhone?
No, you cannot directly create a photo album from the Camera app. You need to go to the Photos app to create a new album and add photos to it. -
How many photos can I add to an album on my iPhone?
There is no specific limit to the number of photos you can add to an album on your iPhone. However, performance may be affected with extremely large albums. -
Will deleting a photo from an album delete it from my iPhone?
No, deleting a photo from an album only removes it from that specific album. The photo will still be available in your main photo library. -
Can I hide certain albums on my iPhone?
Yes, you can hide albums by using the “Hide” option. Select the album, tap the share icon, and choose “Hide.” Hidden albums can be found in the “Hidden” album under the Utilities section. -
How do I change the key photo for an album on my iPhone?
Open the album, tap “Edit” in the upper-right corner, tap the photo you want to use as the key photo, and tap “Make Key Photo.” -
Can I sort photos within an album on my iPhone?
Yes, you can sort photos within an album by date or custom order. Open the album, tap the three dots icon, select “Sort,” and choose your preferred sorting method. -
Is it possible to merge two albums on my iPhone?
No, there is no direct way to merge two albums. You need to manually move the photos from one album to another and then delete the empty album. -
How do I recover a deleted album on my iPhone?
Once an album is deleted, it cannot be recovered unless you have a backup of your iPhone through iCloud or iTunes. -
Can I create albums on my iPhone using Siri?
No, Siri cannot directly create photo albums. You need to use the Photos app to create and manage albums. -
What happens to my shared albums if I delete my iCloud account?
If you delete your iCloud account, all shared albums you created will be deleted and no longer accessible to other members.