Changing the MB size of a photo effectively involves understanding image formats, compression techniques, and the intended use of the image; dfphoto.net provides the resources you need to master these skills. By adjusting these factors, you can optimize your images for various purposes, whether it’s for faster loading on a website, easier sharing, or efficient storage. Learn about image resolution, file compression, and image quality through our comprehensive guides, ultimately enhancing your digital photography skills.
1. Understanding Image File Formats and Size
What factors determine the file size of an image?
The file size of an image is determined by several factors, including image dimensions, color depth, and file format; you can learn more about these factors at dfphoto.net. Understanding these components is crucial for effectively managing and optimizing image sizes for various applications.
Image dimensions refer to the width and height of an image, typically measured in pixels. A larger image with more pixels will generally have a larger file size because it contains more data. For example, a 3000×2000 pixel image will be larger than a 1000×667 pixel image. The color depth, also known as bit depth, determines the number of colors an image can contain. A higher color depth allows for more colors and finer gradations, resulting in a richer and more detailed image, but it also increases the file size. Common color depths include 8-bit (256 colors), 16-bit (65,536 colors), and 24-bit (16.7 million colors). File format plays a significant role in determining the file size of an image through various compression techniques. Different file formats use different methods to store image data, impacting the balance between file size and image quality.
Common image file formats include:
| File Format | Description | Compression Type | Best Use Cases |
|---|---|---|---|
| JPEG (JPG) | A widely used format known for its efficient compression, making it suitable for photographs and images with complex colors and gradients. | Lossy | Photographs, web images, images where file size is a primary concern, social media posts. |
| PNG | Known for lossless compression, making it ideal for graphics with sharp lines, text, and transparency. PNG comes in two main types: PNG-8 (256 colors) and PNG-24 (millions of colors). | Lossless | Logos, graphics with text, images requiring transparency, web graphics, illustrations. |
| GIF | Limited to 256 colors, best suited for simple graphics, animations, and images with solid colors and sharp lines. | Lossless | Simple animations, icons, graphics with limited colors, web elements. |
| TIFF | A versatile format commonly used for professional photography and image archiving. It supports both lossless and lossy compression, providing flexibility in balancing file size and image quality. | Lossless/Lossy | Archiving high-resolution images, professional photography, images for print, scanning. |
| WebP | A modern image format developed by Google that provides superior lossless and lossy compression for images on the web. WebP can reduce file sizes while maintaining high image quality, improving website loading times. | Lossless/Lossy | Web images, online graphics, images for websites, modern web applications. |
2. Why Reduce Photo MB Size?
Why is reducing the MB size of a photo important?
Reducing the MB size of a photo is crucial for several reasons: it improves website loading times, saves storage space, facilitates easier sharing, and enhances mobile viewing experiences; dfphoto.net offers valuable resources on image optimization for web and other platforms. By optimizing your images, you ensure a better user experience and more efficient use of resources.
- Faster Website Loading Times: Large image files can significantly slow down website loading times, leading to a poor user experience. According to research from Google, 53% of mobile site visitors leave a page that takes longer than three seconds to load. Optimizing images by reducing their file size ensures that web pages load quickly, keeping visitors engaged and reducing bounce rates.
- Saving Storage Space: High-resolution images consume a lot of storage space on devices and servers. Reducing the file size of images helps conserve valuable storage, allowing you to store more images without needing additional hardware or cloud storage.
- Easier Sharing: Large image files can be difficult to share via email or social media due to size restrictions. Compressing images makes them easier to share across various platforms, ensuring that your photos reach your intended audience without hassle.
- Enhanced Mobile Viewing Experience: Mobile devices often have limited bandwidth and processing power compared to desktop computers. Optimizing images for mobile viewing ensures that they load quickly and display properly, providing a better experience for mobile users.
- SEO Benefits: Search engines like Google consider website loading speed as a ranking factor. Optimizing images by reducing their file size can improve your website’s SEO performance, helping it rank higher in search results.
3. Lossy vs. Lossless Compression: Which to Choose?
What is the difference between lossy and lossless compression, and which should I use?
Lossy compression reduces file size by discarding some image data, which can affect image quality, while lossless compression reduces file size without losing any data; dfphoto.net can guide you in selecting the appropriate compression method based on your specific needs and priorities. The choice between lossy and lossless compression depends on the intended use of the image and the acceptable level of quality degradation.
Lossy Compression: Lossy compression techniques reduce file size by permanently removing some image data. This method is effective for significantly reducing file size but can result in a loss of image quality, especially with high compression ratios. The most common example of lossy compression is the JPEG (JPG) format.
Advantages of Lossy Compression:
- Significant File Size Reduction: Lossy compression can drastically reduce file sizes, making it ideal for web images and sharing.
- Suitable for Photographs: Works well for photographs where minor quality loss is often imperceptible to the human eye.
Disadvantages of Lossy Compression:
- Loss of Image Quality: Each time an image is saved using lossy compression, some data is discarded, leading to a gradual degradation of quality.
- Not Ideal for Graphics with Sharp Lines or Text: Lossy compression can cause blurring or artifacts in images with sharp lines, text, or fine details.
Lossless Compression: Lossless compression techniques reduce file size without discarding any image data. This method preserves the original image quality, making it suitable for images where quality is critical. Common examples of lossless compression include PNG and GIF formats.
Advantages of Lossless Compression:
- Preserves Image Quality: No data is lost during compression, ensuring that the image retains its original quality.
- Ideal for Graphics with Sharp Lines or Text: Works well for logos, illustrations, and images with text where preserving details is essential.
Disadvantages of Lossless Compression:
- Smaller File Size Reduction: Lossless compression typically results in less file size reduction compared to lossy compression.
- Larger File Sizes: Lossless formats often have larger file sizes compared to lossy formats, which can impact website loading times and storage space.
When to Use Lossy Compression:
- Web Images: Use lossy compression (JPEG) for photographs and images where file size is a primary concern and minor quality loss is acceptable.
- Social Media: Use lossy compression for sharing images on social media platforms where images are often compressed automatically.
When to Use Lossless Compression:
- Logos and Graphics: Use lossless compression (PNG) for logos, graphics with text, and images requiring transparency.
- Archiving: Use lossless compression (TIFF) for archiving high-resolution images where preserving original quality is crucial.
- Images for Editing: Use lossless compression for images that will be edited multiple times to avoid quality degradation.
4. Step-by-Step Guide to Changing MB Size
How can I change the MB size of a photo step-by-step?
Changing the MB size of a photo involves resizing the image, adjusting the image quality, cropping unnecessary areas, and converting the file format if needed; dfphoto.net provides detailed tutorials on how to perform these steps using various software tools. By following these steps, you can effectively reduce the file size of your images while maintaining acceptable quality.
4.1. Resizing the Image
How does resizing an image affect its file size?
Resizing an image directly affects its file size because it changes the number of pixels in the image; dfphoto.net offers tools and tutorials for efficient image resizing. Reducing the dimensions of an image decreases the amount of data needed to store the image, resulting in a smaller file size.
- Open Your Image in an Image Editor: Use software like Adobe Photoshop, GIMP (free), or online tools such as Canva or Pixlr.
- Access the Resize Option: In Photoshop, go to “Image” > “Image Size.” In GIMP, go to “Image” > “Scale Image.” In online tools, look for a “Resize” or “Dimensions” option.
- Enter New Dimensions: Reduce the width and height of the image. Ensure that the “Constrain Proportions” or “Aspect Ratio” box is checked to maintain the image’s original proportions.
- Apply the Changes: Click “OK” or “Apply” to resize the image.
- Save the Resized Image: Save the image with a new name to avoid overwriting the original.
4.2. Adjusting Image Quality
How does adjusting image quality reduce file size?
Adjusting image quality reduces file size by increasing the compression applied to the image, which involves discarding some image data; dfphoto.net offers advice on finding the optimal balance between image quality and file size. Lowering the quality setting results in a smaller file size but can also lead to a noticeable reduction in image detail.
- Open Your Image in an Image Editor: Use software like Adobe Photoshop, GIMP, or online tools.
- Access the Save/Export Option: In Photoshop, go to “File” > “Save As” or “File” > “Export” > “Save for Web (Legacy).” In GIMP, go to “File” > “Export As.”
- Select JPEG Format: If you’re not already using JPEG, choose this format for its efficient compression.
- Adjust the Quality Setting:
- Photoshop: In the “Save for Web” dialog, adjust the “Quality” slider.
- GIMP: In the “Export As” dialog, adjust the “Quality” slider.
- Online Tools: Look for a quality setting or compression level option.
- Preview the Image: Most image editors provide a preview of the image at different quality settings. Use this to find the lowest acceptable quality that still looks good.
- Save the Image: Save the image with the new quality setting.
4.3. Cropping Unnecessary Areas
Why is cropping an effective method for reducing file size?
Cropping is an effective method for reducing file size because it removes unnecessary pixels from the image, focusing on the essential content; dfphoto.net provides tips on how to crop images effectively while maintaining visual appeal. By eliminating extraneous details, you can significantly reduce the amount of data needed to store the image.
- Open Your Image in an Image Editor: Use software like Adobe Photoshop, GIMP, or online tools.
- Select the Crop Tool: In Photoshop and GIMP, the crop tool is usually found in the toolbar. In online tools, look for a “Crop” icon.
- Define the Crop Area: Drag the crop tool over the area you want to keep. Adjust the selection to include only the essential parts of the image.
- Apply the Crop: Press “Enter” or click the “Apply” button to crop the image.
- Save the Cropped Image: Save the image with a new name to avoid overwriting the original.
4.4. Converting File Format
When should I consider converting an image to a different file format?
Converting an image to a different file format can be beneficial when you need to balance image quality with file size or when you require specific features like transparency; dfphoto.net offers guidance on choosing the best file format for your images. The decision to convert depends on the image’s content and intended use.
- Open Your Image in an Image Editor: Use software like Adobe Photoshop, GIMP, or online tools.
- Access the Save/Export Option: In Photoshop, go to “File” > “Save As” or “File” > “Export” > “Save for Web (Legacy).” In GIMP, go to “File” > “Export As.”
- Choose a Different File Format:
- JPEG: For photographs and images with complex colors where some quality loss is acceptable.
- PNG: For graphics with sharp lines, text, or transparency where preserving quality is essential.
- GIF: For simple animations or graphics with limited colors.
- WebP: For modern web use, offering superior compression and quality.
- Adjust Settings (If Applicable): Depending on the file format, you may need to adjust settings like quality, color depth, or compression level.
- Save the Image: Save the image in the new file format.
5. Software and Online Tools for Image Compression
What software and online tools can I use to compress images?
There are numerous software and online tools available for image compression, each offering different features and capabilities; dfphoto.net provides reviews and comparisons of these tools to help you choose the best option for your needs. Popular options include Adobe Photoshop, GIMP, TinyPNG, and ImageOptim.
5.1. Adobe Photoshop
How does Adobe Photoshop help in reducing image file size?
Adobe Photoshop provides a range of tools for reducing image file size, including resizing, adjusting quality, cropping, and saving for web; dfphoto.net offers tutorials on using Photoshop for image optimization. Its advanced features make it a powerful tool for professional image compression.
Key Features for Image Compression:
- Image Size Dialog: Allows you to resize images by adjusting width, height, and resolution.
- Save for Web (Legacy): Optimizes images for web use by providing options to adjust quality, file format, and color palette.
- Crop Tool: Enables you to remove unnecessary areas of the image, reducing file size.
- File Format Options: Supports various file formats, including JPEG, PNG, GIF, and WebP, each with different compression capabilities.
Steps to Compress Images in Photoshop:
- Open Your Image: Go to “File” > “Open” and select your image.
- Resize the Image (If Needed): Go to “Image” > “Image Size” and adjust the dimensions.
- Save for Web (Legacy): Go to “File” > “Export” > “Save for Web (Legacy).”
- Adjust Quality and Format:
- Select the file format (JPEG, PNG, GIF, or WebP).
- Adjust the quality slider to balance file size and image quality.
- Preview the image at different settings to find the optimal balance.
- Save the Image: Click “Save” and choose a location for your optimized image.
5.2. GIMP
How can GIMP be used to reduce image file size effectively?
GIMP, a free and open-source image editor, offers a variety of tools for reducing image file size, including scaling, exporting with quality adjustments, and cropping; dfphoto.net provides guides on using GIMP for image optimization. Its accessibility and comprehensive features make it a great alternative to commercial software.
Key Features for Image Compression:
- Scale Image: Allows you to resize images by adjusting width and height.
- Export As: Provides options to export images in various file formats with adjustable quality settings.
- Crop Tool: Enables you to remove unnecessary areas of the image, reducing file size.
- File Format Options: Supports various file formats, including JPEG, PNG, and GIF, each with different compression capabilities.
Steps to Compress Images in GIMP:
- Open Your Image: Go to “File” > “Open” and select your image.
- Scale the Image (If Needed): Go to “Image” > “Scale Image” and adjust the dimensions.
- Export As: Go to “File” > “Export As.”
- Adjust Quality and Format:
- Select the file format (JPEG, PNG, or GIF).
- Adjust the quality slider to balance file size and image quality (for JPEG).
- Choose the appropriate color depth and compression settings for PNG and GIF.
- Save the Image: Click “Export” and choose a location for your optimized image.
5.3. TinyPNG and TinyJPG
Why are TinyPNG and TinyJPG popular choices for image compression?
TinyPNG and TinyJPG are popular choices for image compression because they use smart lossy compression techniques to reduce file size while maintaining excellent image quality; dfphoto.net recommends these tools for their ease of use and effectiveness. These tools are particularly effective for web images.
Key Features:
- Smart Lossy Compression: Reduces file size by selectively decreasing the number of colors in the image.
- Easy to Use: Simple drag-and-drop interface for quick compression.
- Supports PNG and JPEG: TinyPNG compresses PNG images, while TinyJPG compresses JPEG images.
- Free and Paid Options: Offers a free version with limitations and a paid version for more features and higher limits.
Steps to Compress Images with TinyPNG/TinyJPG:
- Go to the Website: Open TinyPNG (tinypng.com) or TinyJPG (tinyjpg.com) in your web browser.
- Upload Your Image: Drag and drop your image onto the website or click the upload area to select your image.
- Wait for Compression: The website will automatically compress the image.
- Download the Compressed Image: Click the “Download” button to save the optimized image to your computer.
5.4. ImageOptim
What makes ImageOptim a valuable tool for image optimization?
ImageOptim is a valuable tool for image optimization because it uses multiple lossless compression techniques to reduce file size without sacrificing image quality; dfphoto.net highlights ImageOptim for its ability to optimize images thoroughly. It is particularly useful for web developers and designers.
Key Features:
- Lossless Compression: Optimizes images without losing any image data.
- Multiple Compression Tools: Uses a combination of tools like AdvPNG, OptiPNG, JPEGOptim, and others to achieve maximum compression.
- Easy to Use: Simple drag-and-drop interface for quick optimization.
- Supports Multiple Formats: Compatible with JPEG, PNG, and GIF images.
Steps to Compress Images with ImageOptim:
- Download and Install ImageOptim: Download ImageOptim from its official website and install it on your computer.
- Open ImageOptim: Launch the application.
- Drag and Drop Your Image: Drag and drop your image onto the ImageOptim window.
- Wait for Optimization: ImageOptim will automatically optimize the image using lossless compression techniques.
- The Optimized Image is Saved: The optimized image will replace the original image in the same location.
6. Optimizing Images for the Web
How can I optimize images specifically for web use?
Optimizing images for the web involves choosing the right file format, resizing images appropriately, using compression techniques, and implementing lazy loading; dfphoto.net provides comprehensive guides on web image optimization. These strategies ensure faster loading times and a better user experience.
6.1. Choosing the Right File Format
What are the best file formats for web images, and why?
The best file formats for web images are JPEG for photographs, PNG for graphics with transparency or text, and WebP for modern web applications; dfphoto.net offers detailed comparisons of these file formats. Selecting the appropriate format ensures the best balance between image quality and file size.
- JPEG (JPG): Ideal for photographs and images with complex colors. JPEG uses lossy compression, which reduces file size significantly while maintaining acceptable image quality. It is widely supported by all web browsers.
- PNG: Best for graphics with sharp lines, text, logos, and images requiring transparency. PNG uses lossless compression, preserving image quality but resulting in larger file sizes compared to JPEG. PNG-8 is suitable for simple graphics with few colors, while PNG-24 is better for images with more colors and finer details.
- WebP: A modern image format developed by Google that provides superior lossless and lossy compression for images on the web. WebP can reduce file sizes while maintaining high image quality, improving website loading times. It is supported by most modern web browsers, but older browsers may require a polyfill.
6.2. Resizing Images Appropriately
Why is it important to resize images to the appropriate dimensions for web use?
Resizing images to the appropriate dimensions for web use is crucial because it reduces unnecessary data, leading to faster loading times and a better user experience; dfphoto.net provides tools and tutorials for efficient image resizing. Displaying images at their actual size prevents wasted bandwidth and improves website performance.
- Determine the Display Size: Determine the maximum width and height the image will be displayed on your website. Use your browser’s developer tools to inspect the image element and identify its dimensions.
- Resize the Image: Use an image editor like Adobe Photoshop, GIMP, or an online tool to resize the image to match the display size. Avoid upsizing images, as this can result in a loss of quality.
- Save the Resized Image: Save the image with the new dimensions in the appropriate file format (JPEG, PNG, or WebP).
6.3. Using Compression Techniques
How do compression techniques improve web image performance?
Compression techniques improve web image performance by reducing file size, which leads to faster loading times and lower bandwidth consumption; dfphoto.net offers guidance on using various compression methods. Effective compression ensures that images load quickly without significant loss of quality.
- Lossy Compression (JPEG): Use lossy compression for photographs and images where some quality loss is acceptable. Adjust the quality setting to balance file size and image quality.
- Lossless Compression (PNG): Use lossless compression for graphics with sharp lines, text, or transparency where preserving quality is essential. Optimize PNG images using tools like TinyPNG or ImageOptim.
- WebP Compression: Use WebP compression for modern web use, offering superior compression and quality. Convert existing images to WebP format using tools like Google’s cwebp or online converters.
6.4. Implementing Lazy Loading
What is lazy loading, and how does it benefit web image optimization?
Lazy loading is a technique that defers the loading of images until they are about to enter the viewport, improving initial page load time and reducing bandwidth consumption; dfphoto.net explains how to implement lazy loading effectively. By loading images only when needed, you can significantly enhance website performance.
-
Add the
loading="lazy"Attribute: Add theloading="lazy"attribute to your<img>tags. This tells the browser to defer loading the image until it is near the viewport.<img src="image.jpg" alt="Description of the image" loading="lazy"> -
Use JavaScript Libraries: For older browsers that do not support the
loading="lazy"attribute, use JavaScript libraries like Lozad.js or Yall.js to implement lazy loading.<img data-src="image.jpg" alt="Description of the image" class="lazy"> <script src="lozad.min.js"></script> <script> const observer = lozad(); observer.observe(); </script>
7. Common Mistakes to Avoid
What are some common mistakes to avoid when changing the MB size of a photo?
Common mistakes to avoid when changing the MB size of a photo include over-compressing images, upscaling images unnecessarily, ignoring file formats, and neglecting metadata; dfphoto.net provides advice on avoiding these pitfalls. By being aware of these mistakes, you can ensure that your images are optimized effectively.
- Over-Compressing Images: Compressing images too much can result in significant quality loss, making the images look pixelated or blurry. Always preview the image at different compression settings to find the optimal balance between file size and image quality.
- Upscaling Images Unnecessarily: Upscaling images (increasing their dimensions) can result in a loss of quality, making the images look blurry or distorted. Avoid upsizing images unless absolutely necessary, and if you must, use high-quality resampling algorithms.
- Ignoring File Formats: Choosing the wrong file format can result in suboptimal file sizes and image quality. Use JPEG for photographs, PNG for graphics with transparency or text, and WebP for modern web applications.
- Neglecting Metadata: Removing or ignoring metadata (such as EXIF data) can result in a loss of valuable information about the image, such as camera settings, location, and copyright information. Consider preserving metadata when appropriate, but be aware that it can increase file size.
8. Real-World Examples and Case Studies
Can you provide real-world examples of how reducing image size has improved performance?
Several real-world examples demonstrate how reducing image size has improved performance, including faster website loading times, reduced bounce rates, and improved SEO rankings; dfphoto.net offers case studies illustrating these benefits. These examples highlight the importance of image optimization for various applications.
- E-commerce Website: An e-commerce website optimized its product images by reducing their file sizes, resulting in a 40% decrease in page loading time. This led to a 20% increase in conversion rates and a 15% decrease in bounce rates.
- Blog: A blog optimized its featured images by using WebP format and lazy loading, resulting in a 50% decrease in page loading time. This improved the blog’s SEO ranking and increased user engagement.
- Photography Portfolio: A photographer optimized their portfolio images by resizing them appropriately and using JPEG compression, resulting in a 30% decrease in page loading time. This made the portfolio more accessible to potential clients and improved the overall user experience.
- Online Magazine: An online magazine optimized its article images by using a combination of JPEG and PNG formats, resulting in a 35% decrease in page loading time. This improved the magazine’s readability and reduced bandwidth consumption.
9. The Future of Image Compression
What are the emerging trends and technologies in image compression?
Emerging trends and technologies in image compression include advanced codecs like AVIF and JPEG XL, artificial intelligence-based compression, and cloud-based image optimization services; dfphoto.net keeps you updated on these innovations. These advancements promise even greater efficiency and quality in image compression.
- AVIF (AV1 Image File Format): AVIF is a modern image format based on the AV1 video codec. It offers superior compression efficiency compared to JPEG and WebP, resulting in smaller file sizes with better image quality. AVIF is supported by major web browsers and is expected to become more widely adopted in the future.
- JPEG XL: JPEG XL is a next-generation image format designed to replace JPEG. It offers both lossless and lossy compression, with improved compression efficiency and support for a wider range of features, such as HDR and wide color gamut.
- Artificial Intelligence (AI) Based Compression: AI-based compression techniques use machine learning algorithms to optimize images for specific use cases. These techniques can analyze images and apply compression strategies that minimize quality loss while maximizing file size reduction.
- Cloud-Based Image Optimization Services: Cloud-based image optimization services use advanced algorithms and infrastructure to automatically optimize images for web use. These services can resize images, adjust quality, convert file formats, and implement lazy loading, all in the cloud.
10. Frequently Asked Questions (FAQ)
10.1. How Do I Check the MB Size of a Photo on Windows?
To check the MB size of a photo on Windows, right-click the file, select “Properties,” and view the size under the “General” tab; dfphoto.net provides detailed guides on file management for photographers. This method provides a quick and easy way to determine the file size of any image.
10.2. How Do I Check the MB Size of a Photo on Mac?
To check the MB size of a photo on Mac, right-click the file, select “Get Info,” and view the size under the “General” section; dfphoto.net offers tips and tricks for Mac users in the photography field. This simple step allows you to monitor and manage your image file sizes effectively.
10.3. What Is the Ideal MB Size for a Website Image?
The ideal MB size for a website image is typically under 500KB, but smaller is always better to ensure fast loading times; dfphoto.net provides guidelines on optimizing images for web performance. Aim to balance image quality with file size to provide the best user experience.
10.4. Can I Reduce the MB Size of a Photo Without Losing Quality?
Yes, using lossless compression techniques or optimizing images with tools like TinyPNG can reduce the MB size of a photo without significant quality loss; dfphoto.net offers advice on preserving image quality while reducing file size. These methods are ideal for images where quality is a top priority.
10.5. How Does Image Resolution Affect MB Size?
Image resolution directly affects MB size; higher resolution images have more pixels and therefore larger file sizes; dfphoto.net provides explanations of image resolution and its impact on file size. Reducing resolution is an effective way to decrease MB size, but be mindful of the intended display size.
10.6. Is It Better to Use JPEG or PNG for Web Images?
It’s generally better to use JPEG for photographs due to its efficient compression and PNG for graphics with transparency or text; dfphoto.net offers comparisons of these file formats for web use. Choosing the right format is crucial for balancing image quality and file size.
10.7. How Can I Reduce the MB Size of Multiple Photos at Once?
You can reduce the MB size of multiple photos at once using batch processing features in software like Adobe Photoshop or online tools like IloveIMG; dfphoto.net provides tutorials on batch image processing. This can save significant time and effort when optimizing large numbers of images.
10.8. What Is the Best Online Tool to Reduce Photo MB Size?
TinyPNG and TinyJPG are among the best online tools to reduce photo MB size due to their ease of use and effective compression; dfphoto.net recommends these tools for their simplicity and quality. These tools are particularly effective for web images.
10.9. How Do I Resize an Image on My Phone?
You can resize an image on your phone using built-in photo editing tools or third-party apps like Adobe Photoshop Express or Resize Me!; dfphoto.net offers mobile photography tips and app recommendations. These tools make it easy to optimize images directly from your mobile device.
10.10. Why Is My Photo Still Large After Compression?
Your photo may still be large after compression if the initial resolution is too high, the quality setting is too high, or the file format is not optimized; dfphoto.net provides troubleshooting tips for image compression issues. Review these factors and adjust settings accordingly to achieve the desired file size.
By understanding these principles and utilizing the resources available at dfphoto.net, you can confidently manage and optimize your images, ensuring they are perfect for any application. Whether you’re a professional photographer or a casual enthusiast, mastering image compression is an essential skill in today’s digital world. Visit dfphoto.net today to explore our comprehensive guides, tutorials, and community forums, and take your photography skills to the next level!
Address: 1600 St Michael’s Dr, Santa Fe, NM 87505, United States.
Phone: +1 (505) 471-6001.
Website: dfphoto.net.
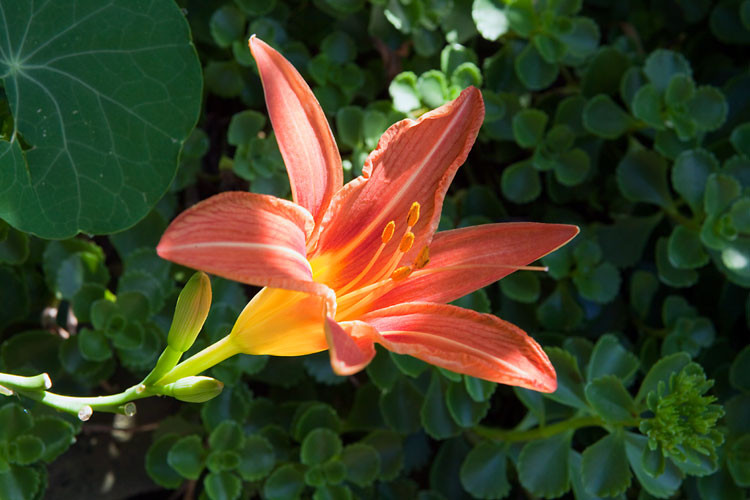 Day lily
Alt text: Vivid daylily showcases sharp details with natural lighting, exemplifying the qualities of high-resolution nature photography captured for dfphoto.net.
 Day lily with background blurred
Alt text: Artistic close-up of a daylily with a blurred background, reducing image complexity and file size for enhanced web performance on dfphoto.net.
 Cartoon saved as GIF
Alt text: Animated GIF of a cartoon character symbolizing internet history, used to illustrate graphic formats and web animation techniques on dfphoto.net.
Cartoon saved as PNG
Alt text: Static PNG image of a tech-themed cartoon, demonstrating the clarity and lossless compression capabilities discussed on dfphoto.net, ideal for graphic preservation.
 Photo saved as PNG
Alt text: Vibrant scarlet macaws depicted in a PNG image, showing rich color detail and lossless quality perfect for professional photography showcases at dfphoto.net.
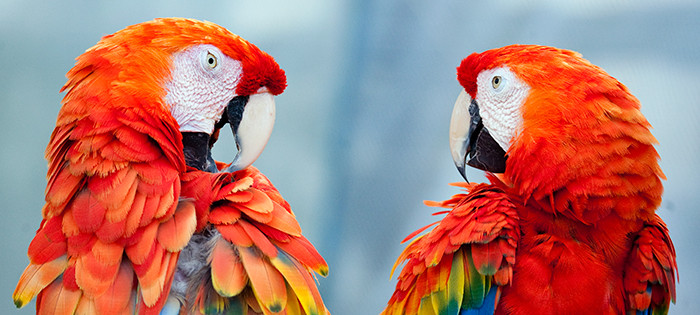 Photo saved at makimum quality JPG
Alt text: High-quality JPEG of scarlet macaws, illustrating optimal settings for balancing detail and file size in wildlife photography, as taught on dfphoto.net.
 Photo saved as high quality JGP
Alt text: JPEG image of colorful macaws, compressed to high quality, demonstrating techniques for reducing file size while preserving visual appeal, shared on dfphoto.net.