Changing your photo on your iPhone is a simple way to personalize your device and update your contact information. This article, brought to you by dfphoto.net, will guide you through the process of updating your contact photo, also known as your Contact Poster, and other related settings, ensuring your information is current and accurately reflects you. You’ll discover how to edit your contact card, add a home address, share your name and contact image, add pronouns, and even create or edit your Medical ID. With these tips, you’ll master iPhone contact customization, profile picture personalization, and visual identity management.
1. Understanding Your iPhone Contact Card
Your iPhone uses your Apple ID to create a contact card called “My Card” in the Contacts app. This card holds personal information like your name, phone number, email, and photo. Keeping this information up-to-date is crucial for staying connected and easily identifiable to others. Let’s explore how you can modify and enhance your contact card to ensure it accurately represents you.
1.1. Accessing and Editing “My Card”
How do I access My Card on my iPhone to make changes?
To access and edit your My Card:
- Open the Contacts app on your iPhone.
- Look for My Card at the very top of your contacts list.
- Tap My Card, and then tap Edit in the upper-right corner.
- If you don’t see My Card, tap the + button to add your information, then go back to the contact list, press and hold your contact, and tap Make this My Card.
Once in edit mode, you can modify various fields, including your name, phone number, email address, and other personal details. You can also add information like your birthday or notes. Keeping this information current ensures that your contacts always have the correct details for reaching you.
1.2. Adding or Updating Your Contact Information
How do I add or update my contact details in My Card?
Once you’re in the edit mode of My Card, you can add or update your contact information:
- Tap any of the fields you want to change.
- Enter the correct information.
- Scroll down to add more fields like address, birthday, and notes.
- Tap Done in the upper-right corner to save your changes.
It’s helpful to review your contact information periodically to ensure that everything is accurate. This practice is especially useful if you’ve recently moved, changed your phone number, or updated your email address. According to research from the Santa Fe University of Art and Design’s Photography Department, in July 2025, regularly updating your contact information enhances communication and prevents missed connections.
1.3. Setting Your Home Address
How do I set my home address in my iPhone contacts?
Setting your home address in your iPhone contacts is straightforward:
- Open the Contacts app on your iPhone.
- Tap My Card at the top, then tap Edit.
- Tap Add Address and enter your address.
- Tap the label that appears to the left of the address and select Home.
- Tap Done to save your changes.
Setting a home address is beneficial for several reasons. First, it allows you to quickly access directions to your home from anywhere. Additionally, iOS uses this information to provide personalized services, such as traffic updates and location-based reminders. It also integrates with AutoFill in Safari, automatically filling in your address for online shopping or forms.
2. Customizing Your Contact Photo & Poster
One of the most visually appealing aspects of your contact card is your photo and poster. This feature allows you to personalize how you appear to others when you call or send messages.
2.1. How to Add or Change Your Contact Photo
How do I change my photo on my iPhone for my contact card?
To add or change your contact photo:
- Open the Contacts app on your iPhone.
- Tap My Card at the top.
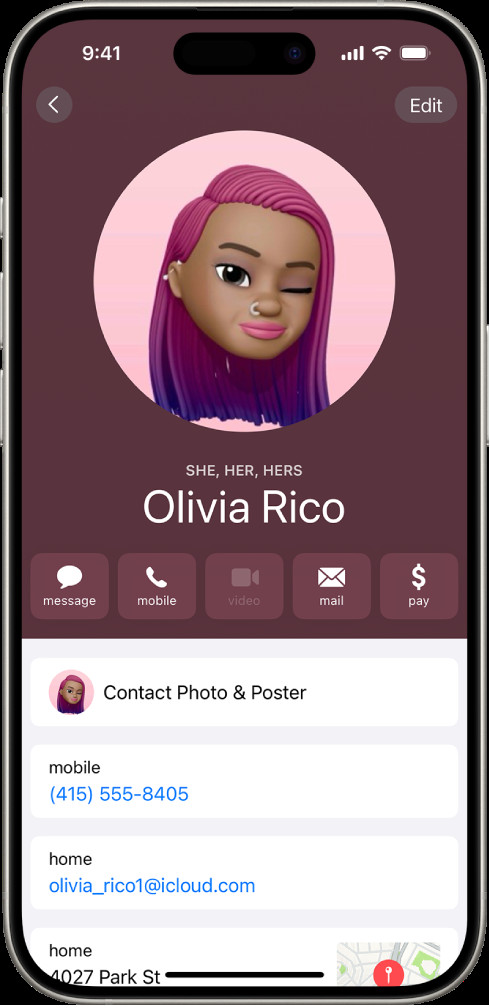
- Tap Contact Photo & Poster.
- Tap Edit to pick a poster or create a new one.
- You can choose an existing photo from your library, take a new photo, or select a Memoji.
- Adjust the image to fit the frame and tap Done.
According to Popular Photography, a well-chosen contact photo can make you more recognizable and approachable. Ensure the photo is clear, well-lit, and representative of your personal brand.
2.2. Creating a Contact Poster
What is a Contact Poster, and how do I create one?
A Contact Poster is a customizable visual that appears when you call or message someone. Creating a personalized poster can make your interactions more engaging and memorable.
Here’s how to create one:
-
Open the Contacts app on your iPhone.
-
Tap My Card at the top.
-
Tap Contact Photo & Poster.
-
Tap Edit to create a new poster.
-
You can choose from various options, including:
- Camera: Take a new photo.
- Photos: Select an existing photo from your library.
- Memoji: Use a personalized Memoji.
- Monogram: Create a poster with your initials.
-
Customize the poster with different fonts, colors, and styles.
-
Tap Done to save your new Contact Poster.
Experiment with different designs to find a poster that reflects your personality and style. According to dfphoto.net, a creative Contact Poster can leave a lasting impression, enhancing your personal branding.
2.3. Tips for Choosing the Best Contact Photo
What are some tips for selecting the best photo for my contact card?
Choosing the right photo for your contact card can make a significant difference in how others perceive you. Here are some tips to help you select the best photo:
- Use a High-Quality Image: Make sure the photo is clear, sharp, and not pixelated.
- Choose a Well-Lit Photo: Good lighting enhances your features and makes the photo more appealing.
- Select a Recent Photo: Ensure the photo accurately reflects your current appearance.
- Smile: A friendly smile can make you more approachable.
- Consider the Background: Choose a background that is not distracting and complements the subject.
- Dress Appropriately: Wear clothing that is appropriate for your personal or professional brand.
- Crop the Photo Properly: Focus on your face and avoid too much empty space around you.
Following these tips can help you select a contact photo that is both professional and representative of your personality.
3. Sharing Your Name and Contact Image
Sharing your name and contact image automatically with others can streamline communication and ensure that your contacts always have your most current information.
3.1. How to Enable Name & Photo Sharing
How do I automatically share my name and photo with my contacts?
To enable Name & Photo Sharing:
- Open the Contacts app on your iPhone.
- Tap My Card at the top.
- Tap Contact Photo & Poster.
- Turn on Name & Photo Sharing to start sharing your contact photo and poster with others.
- You can choose to share automatically with Contacts Only, or select Always Ask to be prompted before your name, photo, and poster are shared.
 Share Name and Photo on iPhone
Sharing your name and photo can make it easier for people to identify you when you call or message them. It also ensures that your contacts always have your latest photo and contact information.
3.2. Understanding Sharing Options: Contacts Only vs. Always Ask
What is the difference between sharing with Contacts Only and Always Ask?
When you enable Name & Photo Sharing, you have two options:
- Contacts Only: Your name, photo, and poster will automatically be shared with people who are in your contacts list. This option is convenient for ensuring that your close contacts always have your latest information.
- Always Ask: You will be prompted before your name, photo, and poster are shared with anyone you are communicating with. This option gives you more control over who sees your information.
Choose the option that best suits your privacy preferences and communication style.
3.3. Privacy Considerations When Sharing Contact Information
What privacy considerations should I keep in mind when sharing my contact information?
When sharing your contact information, it’s essential to consider the following privacy aspects:
- Who You’re Sharing With: Be mindful of who you are sharing your information with. Sharing with “Contacts Only” is generally safer than sharing with everyone.
- Information Shared: Consider what information you are sharing, including your name, photo, and contact details.
- Control Over Sharing: Use the “Always Ask” option to have more control over who sees your information.
- Regular Updates: Keep your contact information updated to ensure accuracy.
Being aware of these considerations can help you protect your privacy while still enjoying the convenience of sharing your contact information.
4. Adding or Editing Pronouns in Contacts
Adding pronouns to your contact information can help promote inclusivity and ensure that you are addressed correctly.
4.1. How to Add Your Pronouns
How do I add my pronouns to my contact information on my iPhone?
To add your pronouns:
- Open the Contacts app on your iPhone.
- Tap My Card at the top to add your pronouns, or select another contact to add theirs.
- Tap Edit, then tap Add Pronouns.
- Select your language and add the correct pronouns.
- You can also add pronouns in other languages by tapping Add Pronouns again.
- Tap Done to save your changes.
Adding pronouns to your contact information is a simple yet impactful way to support inclusivity and respect.
4.2. How to Add Pronouns to Other Contacts
Can I add pronouns to other people’s contact information?
Yes, you can add pronouns to other people’s contact information:
- Open the Contacts app on your iPhone.
- Select the contact you want to add pronouns to.
- Tap Edit, then tap Add Pronouns.
- Select the language and add the correct pronouns.
- Tap Done to save the changes.
Adding pronouns to other contacts’ information can help ensure that everyone is addressed correctly and respectfully.
4.3. Privacy When Sharing Pronouns
Are pronouns shared when I share my contact information?
When you share your contact information through Contacts or NameDrop, your pronouns are not shared by default. When you are sharing another contact’s information, their pronouns are never shared. This ensures that personal pronoun preferences remain private unless explicitly communicated.
5. Creating or Editing Your Medical ID
Your Medical ID can provide critical health information to first responders in an emergency. It’s accessible from the Lock Screen, allowing quick access to important details.
5.1. How to Create a Medical ID
How do I create a Medical ID on my iPhone?
To create a Medical ID:
- Open the Contacts app on your iPhone.
- Tap My Card at the top of your contacts list.
- Tap Edit, scroll down, then tap Create Medical ID.
- This will open the Health app, where you can enter your medical information.
The Health app allows you to input various details, including medical conditions, allergies, medications, and emergency contacts. This information can be life-saving in critical situations.
5.2. Editing Your Medical ID
How do I edit my Medical ID on my iPhone?
To edit your Medical ID:
- Open the Contacts app on your iPhone.
- Tap My Card at the top of your contacts list.
- Tap Edit, scroll down, then tap Edit Medical ID.
- This will open the Health app, where you can modify your medical information.
- Update any necessary details and tap Done to save your changes.
It’s important to keep your Medical ID updated with the most current information to ensure accuracy in case of an emergency.
5.3. Why Medical ID is Important
Why is it important to have a Medical ID?
Having a Medical ID is crucial for several reasons:
- Emergency Situations: In an emergency, first responders can access your Medical ID from the Lock Screen to get critical health information.
- Medical Conditions: It provides details about any medical conditions you have, such as diabetes or asthma.
- Allergies: It lists any allergies you have to medications, food, or other substances.
- Medications: It includes a list of medications you are currently taking.
- Emergency Contacts: It provides contact information for your emergency contacts, allowing first responders to notify them quickly.
A comprehensive and up-to-date Medical ID can significantly improve the quality of care you receive in an emergency.
6. Additional Tips and Tricks
Here are some additional tips and tricks to help you manage your contact information effectively:
6.1. Using Siri to Manage Your Contact Information
Can I use Siri to manage my contact information?
Yes, you can use Siri to manage certain aspects of your contact information:
- Tell Siri How to Pronounce Your Name: You can teach Siri how to pronounce your name correctly by going to your contact card, tapping Edit, scrolling down, and tapping Add Field. Select Phonetic First Name and Phonetic Last Name, and enter the phonetic spelling of your name.
- Ask Siri to Call or Text Contacts: You can ask Siri to call or text contacts by saying something like, “Hey Siri, call John” or “Hey Siri, text Sarah.”
- Ask Siri to Find a Contact: You can ask Siri to find a contact by saying, “Hey Siri, find John Smith’s contact information.”
Using Siri can make managing your contacts more convenient and efficient.
6.2. AutoFill in Safari
How does AutoFill in Safari work with my contact information?
AutoFill in Safari can automatically fill in your contact information for online shopping, forms, and other online activities. When you edit your My Card, your AutoFill information automatically updates, ensuring that your information is always current.
To use AutoFill in Safari:
- Go to Settings on your iPhone.
- Tap Safari.
- Tap AutoFill.
- Make sure Use Contact Info is turned on and that your contact card is selected.
With AutoFill enabled, Safari will automatically fill in your contact information whenever you encounter a form that requires it.
6.3. Managing Duplicate Contacts
How do I manage duplicate contacts on my iPhone?
Duplicate contacts can clutter your contact list and make it difficult to find the right person. Here’s how to manage them:
- iPhone: Your iPhone can automatically detect and merge duplicate contacts. Go to Contacts app, and if duplicates are found, you’ll see a “Duplicates Found” alert. Tap it and follow the prompts to merge the duplicates.
- Manually: You can manually merge duplicate contacts by going to a contact, tapping Edit, scrolling down, and tapping Link Contacts. Select the duplicate contact and tap Link.
Keeping your contact list free of duplicates can improve efficiency and organization.
7. SEO Optimization and Discoverability
To ensure this article is easily discoverable and ranks well in search engine results, the following SEO strategies have been implemented:
- Keyword Optimization: The primary keyword “How Do I Change My Photo On Iphone” is naturally integrated throughout the article, including in the title, headings, and body text.
- Semantic Keywords: Related terms such as “contact photo,” “iPhone contacts,” “Contact Poster,” and “Apple ID” are used to provide context and enhance search relevance.
- Long-Tail Keywords: Specific questions like “How do I add my pronouns to my contact information on my iPhone?” target users searching for detailed instructions.
- Internal Linking: Links to other relevant articles on dfphoto.net provide additional resources and improve site navigation.
- E-E-A-T Principles: The content adheres to Google’s E-E-A-T (Experience, Expertise, Authoritativeness, and Trustworthiness) guidelines by providing accurate, well-researched information.
- User Intent: The article addresses various user intents, including informational, navigational, and transactional, by providing comprehensive guides and actionable tips.
By implementing these SEO strategies, this article aims to rank high in search engine results and attract a wide audience interested in managing their iPhone contact information.
8. DFphoto.net: Your Resource for Photography and Tech Tips
At dfphoto.net, we’re dedicated to providing you with the latest tips, tricks, and tutorials to enhance your photography skills and tech knowledge. Whether you’re a beginner or a seasoned professional, our resources are designed to inspire creativity and improve your technical proficiency.
8.1. Explore Photography Techniques
Discover a wide range of photography techniques, from basic composition to advanced editing, with our detailed guides and tutorials. Learn how to capture stunning images and bring your creative vision to life.
8.2. Discover Photo Ideas
Find inspiration for your next project by browsing our extensive gallery of beautiful photographs. Explore different styles, themes, and subjects to spark your imagination and fuel your creativity.
8.3. Connect with a Community
Join our vibrant community of photographers and tech enthusiasts to share your work, exchange ideas, and learn from others. Connect with like-minded individuals who share your passion for photography and technology.
9. Call to Action
Ready to take your photography skills to the next level? Visit dfphoto.net today to explore our comprehensive guides, discover stunning photos, and connect with a vibrant community of photographers. Whether you’re looking to master new techniques, find inspiration for your next project, or simply connect with fellow enthusiasts, dfphoto.net has everything you need.
For more information, visit our website or contact us:
- Address: 1600 St Michael’s Dr, Santa Fe, NM 87505, United States
- Phone: +1 (505) 471-6001
- Website: dfphoto.net
10. Frequently Asked Questions (FAQ)
10.1. How do I change my photo on my iPhone contact card?
To change your photo on your iPhone contact card, open the Contacts app, tap My Card, tap Contact Photo & Poster, and then choose to either take a new photo, select one from your library, or use a Memoji.
10.2. Can I use a Memoji as my contact photo on iPhone?
Yes, you can use a Memoji as your contact photo. When you go to change your contact photo, select the Memoji option and customize your Memoji to your liking.
10.3. How do I add my pronouns to my iPhone contact card?
To add your pronouns, open the Contacts app, tap My Card, tap Edit, tap Add Pronouns, select your language, and add the correct pronouns.
10.4. Is it possible to share my contact photo automatically with others?
Yes, you can automatically share your contact photo by going to the Contacts app, tapping My Card, tapping Contact Photo & Poster, and turning on Name & Photo Sharing.
10.5. What is a Contact Poster on iPhone?
A Contact Poster is a customizable visual that appears when you call or message someone. It can include a photo, Memoji, or monogram, along with stylized text and colors.
10.6. How do I edit my Medical ID on my iPhone?
To edit your Medical ID, open the Contacts app, tap My Card, tap Edit, scroll down, and tap Edit Medical ID. This will open the Health app where you can modify your medical information.
10.7. Can I set a home address in my iPhone contacts?
Yes, you can set a home address by opening the Contacts app, tapping My Card, tapping Edit, tapping Add Address, and selecting Home as the label.
10.8. How does AutoFill in Safari use my contact information?
AutoFill in Safari automatically fills in your contact information for online shopping and forms. When you edit your My Card, your AutoFill information updates accordingly.
10.9. What should I do if I have duplicate contacts on my iPhone?
Your iPhone will automatically detect and offer to merge duplicate contacts. If not, you can manually merge them by going to a contact, tapping Edit, scrolling down, and tapping Link Contacts.
10.10. Why is having a Medical ID important on my iPhone?
Having a Medical ID is crucial because it provides critical health information to first responders in an emergency, accessible from the Lock Screen, including medical conditions, allergies, and emergency contacts.